Saturday, October 31, 2009

Collecting

With the Kiwi dollar being so strong a couple of weeks ago ( though it now seems to be back on a merry downward spiral) I went shopping in the US for some Ed bits. A protracted search of the internet revealed that a GG1 pantograph was probably about the correct size. At least the Americans work to 1 scale for N (1:160) vs the merry conglomeration from the British (anything from 1-148 to 1-160 depending on the moon phase I think). So with a flutter in my credit card I ordered the spares (both Kato USA and Atlas have very good online shops and you can get almost all the spares for their loco's).
Finally the box turned up, and I tore it open to inspect my purchases.

Mostly plastic with fine metal bits with very nice detail (yah). However they are a bit floppy and will require some sort of spring system to elevate correctly (boo). Comparing to the plan, the side elevation is spot on (yah), but the end elevation is probably about 1-2mm too narrow (boo). Is this going to bother me? Hell no. I now means there is a bit more reason to get the rest of the tops completed.

Stacking it up

Today's aim was to put the trackbase on so that I could think about starting to lay track. I started off by cutting out the 3 bits of ply to a shape which I believe is probably close to being right. These were based on the small model i built previously, plus some basic calculations on what was the minimum width for the station passing loops.

As I also needed eventually to add the rest of the scenery at a slightly different elevation, I decided to raise the trackbed up 25mm (for our continental readers who were raised with a sensible measuring system), or 1" (for those who weren't). This is where this method of baseboard construction is worth the work. I riped up some of the remaining plywood into 25mm strips, and then proceeded to build beams as before, with a bit of a difference. The raising beams were made with the blocks protruding at the bottom, and the tops flush. Each beam was made to fit that particular main cross beam, and then was glued in place.


I now had a slight problem to fix. In the previous posts I had described attaching the end plates outside the main beams. This now gave me the problem that the modules were 2 thicknesses of plywood longer than my sheet that I had cut for the track base. This was easily solved by making the rising end plates 10mm higher than the other risers, to account for the 7mm ply plus 3mm for the roadbed (probably to be 3mm cork tiles). It also gave a positive square end to screw the track base to (assuming that the ends of the plywood sheet were indeed parallel to start with)


I managed to get through risers for 2 and a half modules before the brads ran out, which will necessitate another trip to the hardware store for more brads and also some small screws to attack the ply trackbase to the modules.

Friday, October 30, 2009

Scaling it back

No, I'm not having second thoughts about layout building.

You can only go so far visualizing a layout on paper. Even if you are using one of them new fangled track computer programs, Transferring the plan from 2 to 3D often throws up unforeseen problems. As my plan (while 1:1) is a collection of wiggly blue lines on a large bit of paper, its worse.
So, earlier this week, having built the baseboards, I decided to have a look to see if i could now get in everything that I wanted ('hmmm, we seem to have a fully loaded cart, now I suppose we should look at buying a horse').
Again I borrowed a trick from Barry Norman (I do read other layout books, honest!). He builds a scaled down model of the planned layout to see how it all fits together. This includes buildings, the groundform and backscenes. I'm not quite sure how much he scales his model down, but I've used 1" to 1'.

'No, its not T gauge'

The baseboards and hills are shaped from foamcore board (found in bookstores) with a sharp knife. The buildings are cut out of plasticard. Give everything a coat of paint to see roughly what it will look like. You can also use various scenic coverings to add colour and texture (I have yet to add the trees etc). This will give you a reasonable accurate representation of what the final model will look like. I used this technique on my Cass layout, and the final result was quite similar to the model I had built.

My small model has revealed that I could have problems around the water tank area of the loco depot. However I think I can lose a track on the other side of the oil/coaling stage so I can gain 30-40mm there which should hopefully do it.
the model has also indicated to me that I will need to at least build mock ups of all the buildings and structures, and that I may have to start laying track from the north (loco depot) end, as that seems to be where the entire yard and the exit tracks will hinge on. The south end is easy as its all straight tracks and I can bend things in the area over the road crossing. I think I have enough area for modeling a small part of the town, and the railway settlement.

In real layout news, I have assembled the last module, and added the internal cross braces. This was fun (not really) and involved some very careful thought on just which way was up. I only got a 2/3rds pass mark on this (requiring undoing all the screws and flipping everything over) and to cap it off, the powerdrill ran out of juice with 2 screws to go, which was a real pain, and almost had me breaking out the old hand tools. Fortunately cooler heads (and weak wrists) prevailed and I just waited 10 minutes for a quicky charge before finishing the job.

Its still a bit flexible but adding the track base in will stiffen everything up quite nicely.

Thursday, October 29, 2009

Hey Mr DJ, put a record on...

DB says: Yes, I have a pair of the South Island stalwarts. I'm sure they aren't the only NZ120 DJs in existence, but DJs are rare because of the chassis challenge. These two aren't perfect, but they are OK when viewed from 2 (or maybe 4) feet away.

3021 was the last model I made from the Otaki to Cass era, so it has some decent nose detailing, but I don't like the look of it as much as the other one (but I don't know why - the shade of blue and the overweight Letraset numbers perhaps). 3067 was my second 'proper' NZ120 model, so it's getting on a bit, having put in many exhibition miles over the years, and isn't in great shape these days (not that it was then either) because it's been opened up a few times for repairs.

Huh?

The challenge with using a widebody Kato chassis to represent a skinny 'hood unit', is that my DJs have no 'body shell' as such - the mech innards are too wide as it is let alone having a structural sheet of plastic fattening up the hoods even more. The 'sides' are thus paper-thin plasticard (actually I think 3067's are paper - photocopied plans) glued directly onto the mech and the side sills, roof, cab, hood doors etc are all attached to the core.

I shaved the metal sides of 3021's widebody mech down a bit with a file so it is closer to scale width, and I have parts for one and a half more as yet unmade DJs floating around somewhere that several people have attacked with mills and files over the years. DCCing the two will probably require trashing the 'bodies' but that day must one day come as they sound terrible on the '00' DCC analogue address.Other than the slimming down, and the bogie-mounted sandboxes (six each side) being removed with a sharp knife, there were no other changes made to the Kato chassis. They're not perfect, but they do make me miss the once ubiquitous DJs in their nice TMS blue livery.

Wednesday, October 28, 2009

S'now time like the present

(This post was written a month ago but for a variety of reasons has been left unfinished till now)

Todays mind wanderings lead to another layout idea, and one which I don't think has been explored at all in this country; a Snow scene. This could be because we see ourselves as living in the south Pacific in a loverly warm climate. Evidence outside my window as I speak would suggest otherwise as I can see across to snow capped mountains, and it sure wasn't that warm biking home last night.

The big problem I think comes with actually have to represent something which is soft, fluffy, white, sparky and melty all at once. I think lighting has a large art to play as well. You can't just leave your plaster white and be done with it, as it just looks like unpainted plaster. Woodland scenics do snow as a scenic cover.

Just to destroy my hypothesis, the latest issue of the local rag has a 6 page spread on a snow themed layout, though not NZR, just a New Zealand setting. And for some odd reason (maybe because I've spent a bit of time in snow recently) the snow doesn't ring true. It just looks too fluffy. Real snow tends to sit as a powder (like sprinkling , and where there is just a sprinkling, it tends to leave real fast unless the air temp is close to zero).

Darryl has just sent me this picture of a snow scene he made many moons ago.
It was made with Silicone caulking and the Vintage Reproductions snow as featured in Rand Hood's MR article some 15 years back.


Areas I could see this being applied to would be a layout set on the midland line, the central plateau or central otago. Other lines get snow but its not a common thing.

Tuesday, October 27, 2009

Product Review: Trackgang Type 16 Bogie

Am_Fet writes: With a fleet of plastic fantastics looming on the horizon, thoughts turned to what was going to keep these little beauties from being dragged unceremoniously across the ballast, and the Trackgang Type 16 seemed the best candidate (for reasons that will be explained later)

The initial "un-boxing" (to use an IT phrase) revealed a small plastic bag of bits and a bright, shiny two dollar coin that apparently I was owed by being over generous in my payment. Trackgang goes 1-0 up straight after kickoff!


Laid out on the workbench, the bags contents look like this, to whit 2 bogies made up of 2 sideframes, a stretcher and 2 wheel sets:


Initial reactions regarding the castings was good. Sure, some of the detail on the sideframes was a bit rough, but the flash was almost non-existent (just some mold lines and a wee bit around the pegs) and the stretcher seemed cleverly designed:


Assembly was undertaken with CA Gel, which up to this point I had never tried. The stuff itself is a revelation; it stays where it is put and is quick drying. Even so, I still blew gently on the joints to help them set (CA was first developed as Military Emergency Medical Goop and water is its catalyst....it usually reacts to moisture in the air and skin, which explains why it dont work so flash on hot dry days.)

As for the assembly itself....It took a few goes to work out how to get it to go together. The initial plan of gluing then prising the sideframes apart and inserting the wheelsets came unglued (literally) by the length of the axles on the wheelsets. Somehow I finally got it together by holding a sideframe and stretcher vertically against a block, then inserting the wheels with my other hand and holding them before introducing the top sideframe with my next hand...then proceeding to unscrew the cap off the CA with my fourth hand (if a mad scientist ever gets the hang of genetic modification, I am seriously going to ask for more hands). Somehow it all held and just required a slight tweak to get it all sitting flat. When pushed, it wanders away by itself at around 6.5 out of 10 on the friction-ometer:


When put up beside a bogie from offshore, the difference is startling...it is clearly a bigger, chunkier bogie and when mounted under the IA it just seems to fit together nicely....And this size difference is probably be why I'll be back for more...


So the final roundup: The detail of the castings isnt startling, but I've come to realise that details like this in this scale dont have to be; its all about creating a picture, and I personally dont think it will be worrying me when I have a long freight train of wagons equipped with these bogies wandering past. Assembly is where I hit problems, despite the parts being well designed...maybe I'll get it right the more I do, but it did seem to just be a bit...difficult. I havent put the wheelsets in the second one (I left the glue to cure properly overnight)...maybe soldering will be the answer.

So I'm curiously torn. Russell is to be congratulated for getting Trackgang up and running and making all these goodies available...it sure is easier than scratching my own bogie, and when it is part of a complete wagon it sure is purty. But I'm wondering if I really have the patience to wrestle with every bogie I have to make?

And will someone ever come out of the woodwork to provide an alternative bogie in a different medium? Time will tell....

Monday, October 26, 2009

Putting it together

Further progress on the layout today. The base size of the module is to be 4' by 2'. I'm sure I've pillared this before, but in this case it did actually make sense. However, its not the whole story. There are some areas of the layout where i wanted/needed some extra real estate. I want to model part of the railway settlement, but not really the town (well, past the pub and the old building on the corner). I thus decided to add a 6' extension to the first 2 modules. To do this I decide to have a cunning plan. The first end piece was assembled as a run of the mill end plate.

I decided to have the outer plate run the entire width of the module just to make things look tidy. The other end got a semi complex end piece with a gap for the beam to fit in.

After assembly It looked like this.


The second module of the 3 is the most complex. while the settlement side has to symmetrically curve back in (to match the other module), the loco depot side has to curve out. However on this side I decided that a sweeping reverse curve to the edge would suit more.


And heres what the first 2 modules look like placed together.

I still have to do the internal cross braces and the trackbed, but I need to buy another sheet of plywood for that. Maybe tomorrow if I'm allowed out.

Sunday, October 25, 2009

Diesel Chassis Compendia

DB says: I had a few emails float across the newsdesk last week querying suitable chassis for diesels. Here is my limited knowledge:

Kato SD40-2 and Atlas SD35

DA/DB/DC/DBR - the Atlas (early ones made by Kato) SD7/9s or the newer SD24/26/35s (generally DCC friendly) are a good match and run well. You can chop off the brake shoes that surround the center axle to represent our locos. Technically the idler wheels should be a smaller diameter, but who's going to know... These all run very well. The Lifeline SD7s of about 10 years ago are ok, but they are light and really need their power pickups hardwired between the bogies and the chassis.

DE - I reckon one of these would be a good start: http://www.euro-trains.com/products/Roco/23393.aspx

DF (EE) - Kato makes several Japanese 2-c0-c0-2 electrics that are within spitting. The end bogies are the right design, but a little small. The driven bogies on the Japanese loco have an offset middle axle, but it's not far off. I bought one of these chassis about 15 years ago but have yet to start construction. The one I got came with nicely molded clip-on cowcatchers as well.

DF (GM) - Kato sd40-2s are pretty good - these are all DCC friendly. The design of the chassis and bogies were changed on these about 3 years ago from the earlier models. As discussed in a much older post, you can use the larger SD90 wheelsets in these bogies for a slightly better look. The SD fuel tank is fairly close to the DF's in profile (the SD's slopes more in at the bottom) if you cut the back off to make room for a plasticard battery box.

DG - PA1's made by Con-cor/Lifelike/Kato. I have no experience with the Lifelike models. I think the early Con-cor ones from about 25 years ago were made by Kato. They run well. Kato redesigned these a couple of years ago to make them more DCC friendly, but the metal chassis is now a bit longer than we'd like. The pic below shows the required surgery to fit my old recab.


DH (GE) - Haven't measured one, but I think the new Atlas MP15 http://www.blwnscale.com/Atlas%20MP15DC.htm might work well for a DH as it's a bit shorter than the other GP models.

DI - Nothing springs to mind. My hokey example was made from a GP30 chassis with SD40-2 bogies (one reversed). Yikes

Frankenstein DI with ground down GP30 chassis

DJ - There are a bunch of tri-bogie Japanese electric loco prototypes with small gaps between the bogies (we don't want the long locos with spaced out bogies). We also want twin coil springs on each bogie side, but these are hard to find. I think I used this prototype for mine: http://www.1999.co.jp/eng/image/10031056a/20/1 If I do another DJ, I might get one of these EF64-37s. http://www.newhallstation.com/store/product_info.php/cPath/26_30/products_id/420 The centre bogie has only one spring, but on the plus side there are no bogie-mounted sandboxes to have to hack off. The newer ones may be more DCC friendly than the old ones. The other challenge is that the metal chassis halves are full width so are a bit fat for a DJ hood. You can try filing/milling them down.

DX family- The recent Atlas Dash 8s are very nice and are DCC friendly. They are nice and narrow. Bachman's older models from the early 1990s aren't in the same league, but they're not awful and can be had cheaply off ebay if you can find someone who will ship internationally. I got three from a guy in the UK for about $50USD. Their newer releases from a year or three ago are supposed to be much better, but they're almost as pricey as the Atlas ones. To complete the DX illusion, you can reposition the brake cylinders, add the shock absorbers on all but the center axles, and add the inboard 'tail' to the main bogie casting. The DX has a pretty short fuel tank as well, but it's a similar profile to the Dash 8's, so you can cut down the one that comes with the chassis and fatten it up a bit.

So that's my brain-dump - who has other experiences and suggestions?

Saturday, October 24, 2009

A start

Today your intrepid correspondent has dusted off his long lost (some would say still lost) wood working skills, and made a start on a layout. I had purchased some real wood (no more of this MDF crap, unless I can't use anything else) earlier in the week. To get it home in the back of the car I had it cut into 4' by 2' sections. I also purchased some cheap 19mm by 90mm pine boards.

What follows is a bit of a departure from the normal methods of building layouts. Instead of solid wood frames, I'm building wood beams like a real engineer would. This idea comes from Barry Norman, who's work I have followed in the model press for quite a while, but mostly from the book 'landscape modeling'(which once belonged to the late great Brian Cross), where he describes a (then) new method for building baseboard structures. A weakness of using plain wood form the structure is that over time it can warp unless a fair bit of bracing is involved. Mostly in these cases adding strength means adding weight, to the point where the main structure feels like it has been made from concrete. Barry's answer was to build the baseboard from beams. The sheet of plywood (in this case 7mm thick, and the cheapest I could find) was cut into 90mm strips on a sawbench. Some 90mm pine planks were also cut up to the same dimensions (cut everything on the same setting and at least one dimension will be the same during assembly). Taking a ply strip, glue and nail (with brads) a block of pine at each end, making sure that they are square, and that the end grain of the pine is facing upwards. Then glue (and nail) 2 intermediate blocks to the beam.

The second piece is then nailed and glued to the other side. Why are we bothering? because we now have a 4' long beam that will not warp or bend (due to a few engineering principles that I'm not overly sure about, but which are apparently used in the real world) and is also quite light. I'm going to cut out some holes in the beams to see if they can be made noticeably lighter without sacrificing any strength.

The product of tonight's work, six beams which are enough for 12' of layout.


Next up I'll be doing the cross bracing and working out how to tie it all together. I do wish I had paid more attention in woodworking class.

Friday, October 23, 2009

Friday night module idea

Further to our other ideas for modules, even if we collectively have still to decide on a standard design.

This week I've been looking at possible test track/layouts for 'Der Room'. Among the many ideas that were battered around the 'wibbly wobby woo' was the possibility of modeling the J'ville line in the 1960's to match the set of electrics that I'm in the process of building. in this time period this branch was more than just the commuter line that today's version has found itself degraded to. There was a daily good shunt on the line, and most of the stations had a small goods yard. J'ville itself had a sizable yard (now buried under a shopping mall).

On station that did pique my interest was Raroa. In the 60's there was a freezing works here and stock trains were run up the branch (in season there could be 3 a day).
The plan shows a nice wee station (the passing loop on the back shunt had a capacity of 14 wagons plus a van) on a curve so it can be stuffed into a corner. there is a fenced off area with a cattle stop at each end. sadly there were no refrigerated wagons going out here, I think they all went from down the hill at Kaiwharawhara


I've not seen any pictures of Ed's shunting the line, but I assume that they must have been used some times.
Just the other side of the hill is the suburban sprawl of Khandallah. Even today this location is still undeveloped and looks quite rural.

Thursday, October 22, 2009

Off Topic: Robbie the Ballast Robot

DB reminisces: Every model train nerd worth his salt needs good tools, and in the early 1980s, the Batchelor and Bond Empire Railways Infrastructure Management Division were armed with this fine piece of equipment - Robbie the Robot: diluted PVA ballast glue dispenser to the stars. (And a staple gun, and a pair of pliers. And that was about it actually.)Ev just sent me this picture. Apparently, twenty five years on, Robbie has survived (or been dug up) - complete with dried glue stains that probably contain the DNA of long-extinct prehistoric beasts.

Robbie started as an Avon product (my mother having no defense against the strong-arm sales tactics employed by the Waimate sales branch: OK, OK, I'll buy something, just go away!) and he was modified for model rail service with the artistic application of marker pen. The quirky face, toupee, buttons and wristwatch all bear a striking resemblance to Buzz Lightyear. Or, perhaps, the other way around...?

Is that a copyright infringement lawsuit I see approaching over the horizon?

Wednesday, October 21, 2009

A quicky

I've been moving slowly towards a layout for a while now. As well as the almost mythical Paekakariki layout, I've also been mulling over a model of the J'ville line in the 60's. there was a busy siding to the Meatworks at Raroa which at times had 3 shunts a day from Wellington, and also busy yards in Ngaio and Jonsonville itself. I even started measuring up 'Der Room for a round the walls shelf layout, that may or may not be mobile.

I was stopped by one thing. The baby modules that I have built so far, while serviceable, are made in MDF, which I have now accepted is the worst building material known to man. It's heavy, won't take nails, and absorbs water like a sponge. The sealer of the deal, was laying out my Paekakariki plan last night on the floor (after the lady of the house had gone to bed). By making it in 3 x 1200mm lengths instead of 2 x 1800 ones it might fit in the back of the car, and the module breaks are in area's where there are no points. If the modules are 750mm wide I can get the scenery that I want, and the layout is easier to reach over. I will have to have the central module as a parallelogram, but I can live with that.

To further this project there is now a sheet of plywood sitting in the garage, ready for me to attack on Friday afternoon.

I'm now off to the pub for the evening. Botton's up.

Tuesday, October 20, 2009

New things

Some more prototype pictures tonight. this time its the first? Kiwirail shunter DSG 3114 sent in by Michael Harrison down south. One assumes it was done at Hillside.


I wonder how the driver's cope when the front end goes faster than the back (red is always quicker).
At least with the hood tops being gray, you will only have to mask one side when painting.

Monday, October 19, 2009

Moana 9: Cabbage Trees/Restless Natives

DB says: Every once and a while someone wanders into the hobby's consciousness and in their own quiet way, shake things up a bit for the better - the late Brian Cross and his RTV molding, John Agnew and his Railmaster kits, Lawrence Boul's meticulously detailed styrene models, Peter Ross' search for the perfect long grass and in our humble scale: the late, great John Rappard, who took NZ120 out of crazy-impossible-dreamland to show just how do-able and easy it could be.

Another name that has been cropping up of late is that of Mark Andrews, who is called 'Cabbage' for reasons I can't fathom. You may recognise his real name from recent etching/CAD articles in the NZ Model Railway Rag, his superb 1:64th Dubs A kitset, Evan's IA wagon that he helped turn into reality, or that nice ZH...

All gushing aside, an email arrived from him yesterday containing print-and-assemble flax bushes. Clever enough, but obviously aimed at the larger scales. My finger hovered over the delete button... but today I printed out a few, cut them out (I may need to see an optometrist after that episode) and stuck them together. They came out ok, but not great. I may have another go with the recommended green paper, of which I have none as the idea is better than my execution of it.

Despite my wish to get Moana up and running so I can work on something else, I went a bit crazy Nuw Zulunding it today. In Mark's honour: Cabbage trees. These were made from parts of the Woodland Scenics tree forms that are included in Fine Leaf Foliage packs . These are a bit short really, but they were to hand.

I wonder if anybody, anywhere in the world, has ever used these delightful two-dimensional forms (below) to make award-winning flat trees, such as you would if modeling the hillsides near Murupara that are thickly dotted with Flounder Pines. On the ends of these short trunky bits, which were washed with some thin gray paint, I added a blob of Silflor Buffalo Grass: the new wonder product. Pungas were made from little bits of fern stuck onto twigs with PVA - much easier than you'd think:
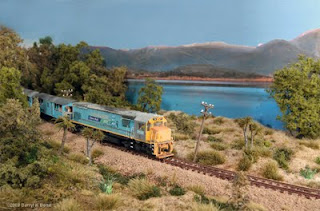
OK, so how does all of the above look when assembled? In the pic below you can see a punga in front of the AG van, a wee cabbage tree in front of the DF fuel tank and another to the right of the power pole, and some flaxes (bluey-green) in the foreground below the loco and another one extreme right. Not completely awful. A few fern fronds are also visible beside the track, but they are hard to see.Just to get even sillier, I remember Don Clements going on about toi tois (or toetoes if you prefer) many, many years ago (a picture of Don in Andrew Gorrie's neat spread in the latest Railfan). This was 1993 or so at the Hutt Valley club, where alternate meetings were spent cycling over the same two topics: modeling stations with 6 inch rusticated weatherboards, and toi tois. Now that I think about it, the toi tois were a side conversation and the rusticated weatherboards were the monthly topic for about three years.

To honour that memory, I used a clump of silflor and some toothbrush bristles dipped in PVA and then fine sawdust. The toi toi and a short cabbage tree are dwarfed by Rhys' cast resin hut. Might need to upscale the foliage... So it's all coming together, but as you can see, the station trackage still isn't in yet. It's about time I got that damn point motor working too.

Sunday, October 18, 2009

Not finished yet.

Its been too long without a guards van post. Some might say not long enough.

This week I've been doing roofs and stuff. After gluing the shot into the van bodies for weight, I glued the pre-shaped balsa roofs in place.


Once the glue had set I then carefully cut down the ends (well, as carefully as it gets) and then gave them a bit of a sanding to complete the shape.


The ventilators on the roof are courtesy of Trackgang. I marked in pencil where i wanted them to be, then attached them with 5 minute araldite. I also added the small circular bits which I assume hide the interior lighting bits, and the power supply lines for them as well ( gas or electricity, I'm not sure which).


So here is where we are up to at the moment. Almost finished apart from some details, the underframe bits and some bogies.

Saturday, October 17, 2009

Fun with Modules: 1

Am_Fet writes: With all the talk of new modular standards over on Nz120.org, my mind has been wandering onto cool things that you could create using the wonderfully loose system. And lets face it: As long as the endboards are present somewhere, you can damn near get away with anything.

One thing that comes through in all of the photos I see of similar Fremo setups is that the setups are mainly for the enjoyment of the operators and the public rarely seem to be invited...or is it just that they cant get photos when the doors are open as the layout is swamped with people? Anyway, crowd control must be a nightmare on some of the sprawling creations the germans seem to cobble together.....

So, everyone turns up on site with their modules strapped to their pannier racks on their Raleigh Twentys and a person takes the lead and starts piecing them together...so what makes a good modular layout in my opinion?

1/ Boring bits. Modules that are straight or curved with just a bit of scenery to go between the action packed modules to increase the run. Not many people will want to take on the onerous task of making these, but it will need to be done.

2/ Intermediate stations. You know the sort, we had thousands at one stage. 2 loops, a goods shed, stockyard, class 5 station building....say no more

3/ Industry. Somewhere that traffic can be sent to and shunted, preferably with enough sidings off the main that wagon jostling can be carried out without holding up the limited express for 30 minutes outside the station home signal.

4/ Decent sized storage yards. Like (1), someone will have to take on the task of building these, but considering each punters backpack will contain at least 2 trainloads of wagons, they are going to have to go somewhere....

5/ Junctions and Branches. Like (3), this would be what Tony Koester once termed a "refuge"...its somewhere to wander slowly through the weeds and not have to worry about timetables and speed limits, do a little bit of work, then head back home and tie up for the night.

So working on that list, I'm going to start throwing some plans out that I think will make good "scenes" on a modular layout, starting with this one:


Waimate (as already featured elsewhere....frequently) was a bit of an interesting station, being a terminus for both the line from Studholme (SIMT) and the Waihao Downs branch. However, I've turned things around slightly and made the third leg of the triangle the "main line" with the corresponding modular endcaps. The station itself acts like a "branch" and will happily keep someone shuffling wagons around the traps for a few hours without tying up the main line. Also, its an interesting shape (or at least the way I drew it in Paint it is).

I hope this will start people thinking "outside the square" (or the rectangle) when it comes to module design....but dont forget the boring bits!

Friday, October 16, 2009

Moana 8: Little Green Tufts of Silflor Everywhere

As a public service to the blog's vast viewership, I ordered some silly-expensive Silflor Prairie Tufts and Buffalo Grass a while back. They come in a fancy packages just like iPods do, although these are marginally cheaper at $21~25 USD. Cough cough.

Inside the package are two 'sleeves' of clear plastic, coated with blobs of sticky stuff, to which fibres of a grasslike appearance have been attached. Hmmm. So to install these grassoids, you 'wear' a sleeve of them around one hand, and in the other, use fine pliers or substantial tweezers, to pull off a clump (some are singles, some are clumps of clumps depending on how their glue landed on the clear stuff - you can break these multiclumps apart if desired), dab them in PVA, and add them to the layout. I like em. A lot.

I used one sleeve of "Late Summer Buffalo Grass" to do the scene shown here (maybe 2x3 feet) and its made a big impression on these eyes. As with most scenery products, you'll want stick to the more muted colours and avoid the bright-radioactive-green spring and summer editions of their products.

A couple of mocked up pictures...
.As an aside on the finer points of photographic technique, the picture of the sleeve and pliers above was taken with my camera hanging around my neck on 2 second self-timer, with a flash on top, pointing up at a 70cm long foamboard reflector held between my teeth. I must detail how more of these exquisitely crafted pictures are taken... :)

Friday night public service anouncment

While looking for something else tonight on our favorite Japanese model railway website, I came across this.


While I can't vouch for the dimensions, it does have spoked wheels. The price appears to be about NZ$130 (at todays 67 yen to the dollar).

No I'm not buying one, as I have just looked at all the 1/2 finished loco projects on my workbench
(and I keep spending money on brewing supplies)