Right, the days are getting shorter and its time to start on those winter modeling projects.
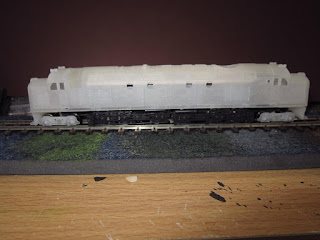
So, today I had a first look at the Shapeways Df top, and did some preliminary work.
The first thing to understand is that these prints should be treated as a Scratch aid, so there are no instructions and the modeler is left to fend for him/her self in the construction process.
So I'm going to blog my build to show how I approach things and possibly why I do things the way I do (or not, who knows).
The main bogie side frames were cut away from the top with a piecing saw. Similarly the front and rear bogies were also cut off. The braces between the sides were also cut/snapped away.
Dropping the top onto the mech revealed that the top sat too low. I then noticed that Peter had quite thoughtfully provided some steps on the inside of the roof. I cut out a piece of 1.5mm thick card 17mm by 85 mm which fitted nicely.
Placing the top on the mech gives an overall height of ~30mm, which is about right height wise.
Next up are the bogies. Again, Peter has thoughtfully included some locating dimples for the axle pinpoints, which take a 15mm axle. This appears to be standard on British wheels (Peco, Parkside Dundas or Farish), so its up to you for your choice. I've gone with (I think) Parkside Dundas solid disk 6.2mm wheels cos I like metal tires. Comparing the old with the new.....
The older bogies pop out of the locating beams, and the new ones will drop in once finished.
With the new bogies temporarily in place here's how things stand.
It has also answered one of my worries that the underframe was not going to look 'full enough' for want of better phrasing. The replacement bogies carry the underframe all the way to the ends, though I'll make some adjustments to the placement to balance things up.
Sunday, February 28, 2016
Subscribe to:
Posts (Atom)


