
On the NZ120 list yesterday, a suggestion that someone overseas could step in and produce items for sale locally.
Honestly, its just not going to happen. There's no money in it. I'm doing casting for myself, making models that I want/need. now if other people are interested in them, then I can probably sell some, but I'm not in a position to go into full scale production (well, maybe not, watch this space).
I'll also have to work out what they are worth. I've looked at the UK market and its hard to tell. UK modelers are an amazing bunch. Buy a perfectly respectable model, then strip it down and hack it into some other variant (different head code boards, drivers arm in the wrong position etc), but mostly sticking with the horrible tension lock coupler ( though I think there's some movement towards kadee's). They will buy etched frets for a model without the correct dimensions ( often for quite substantial sums of money) and then merrily file it down to whats correct ( when the manufacturer should have got it right in the first place)
I think they are all mad. maybe we should be more like them.
Wednesday, December 31, 2008
Monday, December 29, 2008
Masters
Just to prove I have not been sipping Margarita's on the deck for the last few days (that's my wife's job), here's some of the models I've made this last weekend. First up are a collection of l wagons.

Back row L2, L4 and La6 (though there's no real difference between the series from 4 to 10 I think), front row L1 and M1. This should provide enough variation on a goods train, though there are still a couple of odd wagons that I need to make just as one offs ( steel L1, and a steel l4; well approximate sizes anyway).
I've also had a crack at a hutt as normally seen on E wagons.

Now I just have to get pouring the rubber.
(does anyone else have any requests?)
Things one shouldn't do while on holiday
When one gets the chance to sit round, drink beer in the sun and do not much, one's brain tends to wander off into all sorts of weird and wonderful places. At the moment its trying to convince me that this is a good idea for a layout. Maybe its because I have a copy of Noel Cameron's updated 'Rimutaka Railway' in front of me.

Yes, dear readers, I'm just as concerned as you.
Actually, thinking a bit further ( and maybe because I have not had a beer yet today), what are the real problems with this whole set up? Modeling cross creek is not a big problem, its actually a small yard ( having been to see the real thing I was struck by just how small it really was). The loco depot is quite big and until it closed was also the depot for south Wairarapa, so not just H's were stabled there.
There's a good selection of trains through. Every train needs to be re-arranged before it leaves. This can also be considered a drawback.
The layout would have to be a stand alone, as there is no way it could function as part of a modular set up. First off theres the center rail, which would preclude other locos running on it (not much space under your typical N gauge loco these days).
You would need a fiddle yard at one end, and you would probably have to handle the locos and wagons all the time ( sounds easy, but its how things get broke). You could possibly model summit as well, but I have not thought much about the type of operations at that end.
The number of operator required to run something like this, unless you are good at doing DCC consisting on the fly, or are a member of a large family (I suspect if you did carry it off, there would be no shortage of people wanting to operate though)
The main problem is the loco's and their collection of 'jiggly' bits.

While its not the best picture, it shows that a certain Mr Widmark decided back in 1875 to annoy future generations of modelers by hanging something that should be well hidden out for all to see (he was Swedish, maybe that explains it). That Stephenson's valve gear is a bugger. Now I know people have done it (even in 2mm scale of all things) but I think if they ever went to court charged with murder they could use the model in evidence for an insanity plea.
On the plus side, the H is a big loco, so there's no problem fitting an engine in there, and also possibly a sound decoder and a speaker as well (and that would be impressive if you could get the odd syncopated beat that they had, plus a wheelslip noise). They also have the same wheelbase (well the driven wheels) as an atlas GP38, so that's all the gearing done in one foul swoop. The wheels are split frame, approximately the correct diameter, and its possible to knock the steel axles out and replace them with something a bit more solder friendly.
See, I've done a lot of drinking ah thinking about this. The only question I have now, is will I be good at basket weaving at the funny farm.
Saturday, December 27, 2008
A touch of the sun
Its high summer, the temperature outside climbs above 20C and there's not a cloud in the sky. Given my Scottish ancestry (my natural skin colour is pale blue) there's only one place for me, and that's inside. And if I am inside, I may as well be at the modeling bench. In the last 2 days I've made masters for an L1, L2, L4 and an La6. Still progressing are the Xa, and I need to get started on an La3 and an M1. I'll post some pictures soon. the only thing I really have a problem with is that I have made the wagon sides from 1mm thick plastic. This looks far too thick for scale, but for casting the thicker sections make life far easier.
Also, if anyone has plans for a Vb it would be very useful.
Also, if anyone has plans for a Vb it would be very useful.
Exhibition layouts
I've been thinking more about odd shaped layouts. The only New Zealand feature I can think of that would work like this would be the Raurimu spiral. I don't think anyone in this country has made a decent attempt at this in model form. Plus you would be looking at a layout that would be at least 8' square. OK for a home layout but not that great for an exhibition layout. On the RM web forum I've been looking at some of the layouts there. One thing that has struck me is the large number of layouts built for the exhibition circuit there. In NZ we build layouts for display, at maybe 3-4 shows a year ( and that's a high number only if you travel long distances). The UK circuit you could manage a show every weekend if you were so inclined.
Wednesday, December 24, 2008
Seasons greetngs
Well, its Christmas eve here, but still doesn't really feel like Christmas (well, I could be wrong, it is raining). Maybe its waking up this morning to 'let it Snow' playing on the radio, which lets face it is about the same odds as me winning lotto on the weekend. You would think a country thats been in existence for 150 years would have developed some more self identity than that.
Well, the latest Railfan is out. Some good articles and one that I found interesting on the Wanganui branch. It has got the little grey cells stirring with possibilities.
Finally, merry Christmas to all my regular readers. Here's hoping that next year is better than this one past.
Well, the latest Railfan is out. Some good articles and one that I found interesting on the Wanganui branch. It has got the little grey cells stirring with possibilities.
Finally, merry Christmas to all my regular readers. Here's hoping that next year is better than this one past.
Monday, December 22, 2008
I think I'll just give up now...
Found this on the Railway Modelers Web forum tonight. OK, so its OO9 and must be a pig to get to run well, but its just stunning.
http://www.rmweb.co.uk/forum/viewtopic.php?f=9&t=2757&st=0&sk=t&sd=a
Just as a teaser here's a picture of the layout to give you an idea.

I think I'll just not bother any more, as I'm never going to be able to match this. And the next thought is; 'How could we do something equally clever'.
http://www.rmweb.co.uk/forum/viewtopic.php?f=9&t=2757&st=0&sk=t&sd=a
Just as a teaser here's a picture of the layout to give you an idea.

I think I'll just not bother any more, as I'm never going to be able to match this. And the next thought is; 'How could we do something equally clever'.
Sunday, December 21, 2008
Fruitfull day
Heres the first products of my resin casting this decade.
 I'm still working on the airbubble problem, and I might have to invest in a cheap set of digital scales judging by the 3rd pour I've just done. The scales I have a fine for brewing beer and making cakes (mmm, cake...) but don't cut it to measure out 5g of each component.
 I'm still working on the airbubble problem, and I might have to invest in a cheap set of digital scales judging by the 3rd pour I've just done. The scales I have a fine for brewing beer and making cakes (mmm, cake...) but don't cut it to measure out 5g of each component.
Rubber mould making update
Current update: machine oil is no good to separate different layers of rubber. I've just spent a nerve wracking 10 minutes carefully cutting the master out of the block in approximately the correct place around the top of the Lc. Vaseline is the way to go.
I'm using easycast resin for the first time here, and while I'm impressed with the viscosity, I do have a minor problem with it. Back in the old days when men with mullets roamed the earth, I used epifill as my favorite polyurethane. this was a mix A with B in a 1:1 ratio, but it was nice and thick, and you could do it with a screwdriver and then smear it into the mould. the amounts could be measured by eye. with this stuff, you measure it by mass, and I fear my cheap plastic scales might not be up to it. on the other hand, the 2 piece mould has dropped into place under its own weight, is nicely lined up along the sides, and all things being equal, should work a treat.
Update; second time around, got the mix right. Had a stack of moulds on hand, and only got 1/2 of them filled, as the resin went to a rubbery form inside 3 minutes. will have to learn to be much faster, or work somewhere thats much colder.
First casts had air bubbles all round the place in the 2 part mould that I've had a go at fixing second time around by forcing the resin into the courners and edges etc.
Rubber mould making pt 2
To make a 2 part mould requires a bit more thinking. For a basic case like my lc top, not allot more.

Here I've taken the plastic surround that I built, removed it from the base it was on and glued it back together. I then have tried to reattach it to the 1st part of the mould with F2 glue. This has not worked as silicone rubber sticks to almost everything else incredibly badly, which is why it works fro this. The one thing that it sticks very well to is other silicone rubbers. I nearly feel down here as I almost forgot to paint a thin layer of oil on the rubber surface and the master before I poured in the rubber for the plug mould. Readers would have been able to hear the swearing from a substantial distance.
All things being equal, I should have my first casting out tonight.
Public transport not good for everything
Here's something that caught my eye this morning on another blog I read.
http://www.philly.com/philly/blogs/from_the_source/Men_rob_bank_take_SEPTA_trolley_to_escape.html
Of course if it happened in this country they would have been caught at the stop waiting for anything to turn up.
http://www.philly.com/philly/blogs/from_the_source/Men_rob_bank_take_SEPTA_trolley_to_escape.html
Of course if it happened in this country they would have been caught at the stop waiting for anything to turn up.
Saturday, December 20, 2008
Back in action
Got a pleasant surprise this morning.

Silicone rubber and resin delivered from http://www.topmark.co.nz/ in Auckland. May as well knock out a tutorial about what to do with it then.
The rubber is a 2 part mix with a 10:1 ratio between parts A (the big white one) and B (the blue one). I could give you a detailed discussion on catalysis etc but I can't be stuffed, so just accept that its fine as long as you don't stuff up the ratio.
To prepare your masters for casting, you will have to attach them to a piece of plasticard. On the left is the Lc top, and on the right is the casting for the headstocks, handbrake and brake cylinder. Build a plastic box around then to contain the rubber, (note that the Lc top will be a 2 part mould so there should be a 1cm gap arround the master so that the mould will be strong enough for casting). Finally, you will need to cover the masters with a thin coat of oil. This is to help release the master after the Silicone has cured. I've had problems extracting masters after forgetting this step. However take care as some oils may prevent the rubber from curing next to the master surface. I've used Vaseline before, and today's is using a lubricating oil. I'll report back if it goes wrong.
 This is what the Rubber looks like during the mixing process. to work out how much you need you will have to calculate the volume of your mould box in cubic centimetres, which will give you the mass of rubber that you will have to mix up. mine came out at 50g. use a set of kitchen scales to weight everything out. Don't get the rubber components on anything as its a bastard to clean off. Stirr it until the colour is uniform. At this point you should degas the rubber to get rid of trapped air bubbles which can lead to imperfections in your mould. Unfortunately, I've got plenty of hot air but no vacuum. We'll just have to solve this another way in a later step.
 The sharp end. I pour in a small amount of rubber into the mould, and then use an old paintbrush ( it will be useless for anything else after this) to give the master a good coat. The plan is to have a layer of rubber over the master and no air bubbles next to the surface. After you have done this then pour the rest of the rubber into the mould boxes.
 The final step is to remove any trapped air bubbles. Do this by gently tapping the mould on a hard surface for 10 minutes. I have also used an electric razor to vibrate the mould as well.
Now just put aside to cure overnight somewhere warm.
Update: the moulds were cured after about 4 hrs, and the oil does not affect the curing of the rubber. the 10 minutes spent getting all the air out seems to have worked, there are no large visible flaws in the mould surface.
Tuesday, December 16, 2008
Book your trips early
Posted here for your information and early planning. The Chch convention in 2010 (wow, where did that decade go?).http://www.nzamrc.org.nz/2010Newsletter1.pdf
(page 2 is of particular interest. I promise that I am working on it...)
(page 2 is of particular interest. I promise that I am working on it...)
Sunday, December 14, 2008
Of Underframes...
I've been letting my brain wander ( it like that while I'm on the bike or doing crap tasks at work) on wagon topics, and more precisely on how to model the underframes. As my brain sees it, there are 2 main alternatives.
1) An RP'd underframe cast in one piece. Pluses are the incredible amount of detail that can be incorporated. Minuses are that someone with the necessary know how and skills has to be chained to a computer till its sorted out (oh, and researching the incredible level of detail required). also, a new master has to made fro each different variation 0n the underframe.
2) Etching. This would use an inner frame with cosmetic outside bits. pluses are the level of flexibility possible with this approach. Minuses are having to build the damn things right.
My brain has come down in the 2nd camp. The position has been strengthened by the discovery of the following web site ( its in 4mm, but the ideas are pretty good). http://www.mousa.uk.com/Cat/OLCat4/index.html
What does seem like a good idea is for separate W irons for 4 wheeled wagons( http://www.clag.org.uk/bb-w-irons.html). While I don't think I'm going to have a go at the springing, the flexibility of this system shows a lot of promise. Cosmetic solebars and axle boxes can be added, and the wheelbase is simply sorted by gluing the W irons onto the chassis at the correct distance. This can also be extended to wagon bogies (again, http://www.mousa.uk.com/Review/bogie.html for more details). From memory most of the variations can be modeled with 3 wheelbases; 5', 5'6" and 6'. What is even more handy for modern image modelers is that the wagon bogies are almost identical (to all intents and purposes) apart from the springing and so can be represented by 1 bogie.
Another plus is that I think I can probably handle the 2D thinking required.
All I want for Christmas
Just idly thinking tonight, while I should really be doing some writing for work.
2008 will go down as a not great year for Nz120. We end the year with a general lack of decent kits ( etch-cetera excepted), and a very low local profile. This is something that will have to be rectified before the scale can move forward again. I have not been overly prolific this year, mostly being reduced to pontificating from my digital soap-box. Hopefully next year i can get back into doing some modeling.
I will now also admit that maybe the height of summer is not the best month to organise a model making challenge. I have not picked anything up on the workbench for 2 weeks.
Tonight's question to you all is;what Nz120 bits would you all like to see in your Christmas stocking this time next year?
Thursday, December 11, 2008
More loco news
Just while we are on the locomotive topic, Kato USA have finally started selling spare parts for their GG1. This includes the complete powered bogies with the correct wheels for an Ed. This also includes the drive train which is worth its weight in extremely expensive things. Based on the current exchange rate with the south pacific peso the basic bits for 2 Ed;s will set me back $100 (sans motor). Just as well I don't have to buy stuff from the British.
More steam loco stuff
This evening I've got out the measuring stick to see whats out there in the way of steam loco drivers.
to recap, here is a list of standard NZR driver sizes, and translation to their scale size.
3' (early loco's F, D, L etc) - 7.5mm
3'6" (B series) - 8.25mm
4' ish ( Wf, wg, Ww, Q, Aa U series) 10.0mm
4'6" ( A, Ab, K series, ja series) 11.25mm
so how does the commercial stuff line up.
Bachmann 4-8-2 9.5mm (10.5mm)
Bachmann J 4-8-4 10.5mm, 11.5mm)
Fleishman 2-6-0 8mm, (10mm)
Farish 0-6-0 9mm, (10.5mm)
Minitrix 4-6-2 11.5mm (14mm)
(numbers in brackets are the diameters over the wheel flanges)
A cursory look would suggest that the Minitrix 4-6-2 is almost ideal for any pacific, and the 8 coupled locos are way too small. however, the devil is in the detail ( or in this case the wheel flanges).
for any NZR 6 coupled loco the wheelbase spacing is 12.5mm ( 5'), and so any wheel has to have a flange measurement under this value. Likewise the 8 coupled locos. Now if anyone can get me measurements on the various kato loco's out there, I'll add them to the list (this goes for other loco's I've missed).
Wednesday, December 10, 2008
But still hard at work.
 'When engineers get to use their own crayons'
I did take a trip to the railway station to do some on site examinations. Found 2 of the EE red sets, one still with the original lights. What they were thinking with the yellow ends is beyond me.
also got some shots of the bogie brake gear.


its also interesting to note how little of the bogies is actually visible under normal lighting conditions.
What I've been up to
The reason for the lack of blog posts in the last week is...

'I'm the one at the front right'

'I'm the one at the front right'
....I got to wear a silly hat. The picture is as good as it got from where my wife was sitting. Its the final challenge to complete a doctorate. Walk across a stage, stand while someone summarised all those years of work in less than 100 words. Shake hands, move to the left of the stage, shake hands, take bit of paper and then move up to the rear of the stage to take your seat. Then stay awake for 2 hrs with no toilet breaks possible.
And the secret to my success here; not taking both feet off the ground at the same time.
Friday, December 05, 2008
Friday Night
Well, its been a long week at work. I've moved my companies laboratory this week, which has been a mission in itself. Carrying the can for $140K of instrument is a novel experience that leads to many sleepless nights. And to cap everything off, last night was the Christmas meeting for the local model railway support group. An excellent BBQ, some good discussions ( some even on model railways), and then someone brought out the single malt whiskey. The old body was not feeling particularly hot this morning. I'm blaming the salads.
Hopefully, this weekend I'll get some modeling in (as well as the sleep I've missed). I've sold some old 12mm gauge track I acquired a long time ago, which should cover the cost of buying some casting implements, and with that maybe "2' models" will be back in action again.
Hopefully, this weekend I'll get some modeling in (as well as the sleep I've missed). I've sold some old 12mm gauge track I acquired a long time ago, which should cover the cost of buying some casting implements, and with that maybe "2' models" will be back in action again.
Wednesday, December 03, 2008
Important questions
Sorry that there's been no updates for the last couple of nights. Its into the silly season at work, with invites to various Christmas parties, followed by equally important questions like 'just what is the legal blood /alcohol limit for someone riding a bicycle'. I'm guessing it may well be substantially less than the 6 pints I drank last night while holding conversations with scientists.
And so far we have 4 competitors I believe. Anyone else is free to join in, especially those of you who have yet to de-lurk.
And so far we have 4 competitors I believe. Anyone else is free to join in, especially those of you who have yet to de-lurk.
Monday, December 01, 2008
Off and Running
Well, tonight I start my signal box. the main problem with it is that it was assembled by a man who could not read a ruler.

Further problem is that the side thas wrong is the one that I've already done the work on. Still, whats 1mm between friends...

Further problem is that the side thas wrong is the one that I've already done the work on. Still, whats 1mm between friends...
Sunday, November 30, 2008
Workbench Challenge
Was wondering what i was going to post about tonight, then remembered that its December tomorrow, and the 'finish a project month'. I'm going to start here, by saying, I will finish the signal box fort he south end of Paikakariki. Photo's to come tomorrow night.
Other projects I'm going to commit to finishing by the end of the month are to mould my Lc3 master(which may have something to do with the prizes..) and finish the design work for the A3 module system.
OK, whats everyone else going to do?
Other projects I'm going to commit to finishing by the end of the month are to mould my Lc3 master(which may have something to do with the prizes..) and finish the design work for the A3 module system.
OK, whats everyone else going to do?
Friday, November 28, 2008
Something different
Just for a change from all the 50's and 60's stuff I've been prattling on about, tonight we actually have something a bit more modern. Actually, it couldn't possibly get more modern.

7008 in new paint on the Hillside traverser. No idea who took this.
Comments include 'They must have gotten a bulk discount on the cab side windows at Mitre 10.'
' And would like to raise a motion for pure red sides without the grey. All that grey is looking a bit depressing. Trains are supposed to be RED.'
' And would like to raise a motion for pure red sides without the grey. All that grey is looking a bit depressing. Trains are supposed to be RED.'
Thursday, November 27, 2008
Steam loco's part 3
I've been looking through http://www.visi.com/~spookshow/locos.html which is an amazingly useful site (and one which I should add to the sidebar) for inspiration on general layouts for putting together a steam loco chassis. The best stuff comes from the brass steam locos section.

The first is a very old loco from the 1970's, with an open frame motor, and a very simple chassis. This does show that things do not need to be high tech to work. it might be nice to come up with something better than the huge arse screws holding the siderods together.

The second photo shows a more up to date loco with a can motor and enclosed gearbox. It could even be a larger scale model
Wednesday, November 26, 2008
A challenge
Tonight I've lined up my unfinished railway (yes there are other fields as well) projects. Its crappy but...

From left to right; De mech needing some better pickups and a lid, possible Wa mech, Ja awaiting a boiler, Uc14 , Z15 on express bogies, G, lc top awaiting moulding rubber, 2 Da's in need of couplers. In front is the Signal box that needs a bit of TLC and a set square.
This sorry collection is also set against the fact that I have not actually done any modeling in the last 2 weeks.
To try to do something about this, and taking a leaf from other forums, I'm proposing a December 'complete a project' month. Entrants can announce a project that they wish to complete ( or start and finish) in the month of December. Weekly updates will be encouraged so that we can all see how everyone is going. At the end again we'll have a show of hand's to pick a winner. prizes will be whatever I can get the neighbourhood cats to give up.
So whos in then?
New E-mail scam?
This turned up in the mailbox today.
"Hello! This is Candy, member of Shenzhen kadler Mould manufacturing Company (KDL), which is a direct and professional manufacturer of die casting mould, injection mould and their products.
As knowing from your website, we can produce most kinds of product you want. For example, plastic products. You can see the photo attached.
You know that the material and labor cost is very low in china. We well know about DME and HASCO standard, we have passed ISO 9001:2000 certification.
Its our pleasure if we can do something for you!
If you need further information, please refer to our website: http://www.castingmould.net or feel free to contact me. "
And I've looked; there's no porn, or a shed full of diamonds, or any bank accounts with 20 million dollars.
(Her English skills are just as good as mine though).
I wonder what they are like making Nz120 wagon underframes that are 2" long....
Tuesday, November 25, 2008
Short post
Just to add onto the other nights post about steam loco's, which seems to have left you all completely speechless with its breathtaking brilliance :v)
Here's a link with a list of steam loco classes, a list of the numbers and the occasional plan and picture.
A good simple reference. http://www.trainweb.org/nzsteam/classes.htm
Here's a link with a list of steam loco classes, a list of the numbers and the occasional plan and picture.
A good simple reference. http://www.trainweb.org/nzsteam/classes.htm
Sunday, November 23, 2008
Steam locos part 2.

'Are you sure we've got the right wheels on then?'
I've been doing a bit more thinking on this topic this weekend while making more beer.
Pretty much any six coupled steam loco from the 50's and 60's can be modeled using a basic chassis that is 5' + 5'. there were differences of a few inches either way, but this is only plus or minus 1mm. Likewise the wheels are really only 2 sizes; 48" and 54", again with a few inches either way. Walschearts valve gear is standard on all types. The cylinders are either Ab type, or Ww/Wf that look almost identical from a distance. Above the footplate, things improve markedly. All the pacific locos (including the Aa and Q's) wound up with Ab boilers in the 50's, so one size fits all. This means that for these classes the cabs and tenders are the only major bits of kit that need to be modeled. Ok, its not that easy, but far simpler than having to redo all the powered bits every time.


So what does this all mean. Basically, that with a generic set of parts, someone could make any 6 coupled loco for the late 50's and 60's. This includes the actual drive train, which in modern n scale style would have gearing on all axles with the rods just on for the ride. a 10mm diameter can motor would fit inside the boiler.
Now, what about wheels. The British 2mm association do some excellent work, but there is a problem. To do all the wheels for a 4-6-2 plus tender split frame chassis would cost you the princely sum of $158 at today's exchange rate, without any gears or frames. Doesn't really sound like a good idea does it. However a brass plated wheel on a steel 1/2 axle could be made locally, for what I would image to be a fraction of the cost. The coupling rods, crossheads and valve gear could be etched.
The 8 coupled J/K classes are similarly dealt with, as the wheel spacings are the same, and the only difference is the valve gear and cylinders. the wheels can be recycled from the project above. Bigger motors can be fitted due to the larger boilers being available.
It all sounds so easy doesn't it. :v)
Saturday, November 22, 2008
Friday night track plan.
Well, its a bit late, but here it is (went to a Christmas party last night. Everyone liked my beer and not as a house cleaning aid., so there).
From the files of Amateur Fettler.
"Its back to the West Coast again, but this time we look at the other precious commodity exported to the rest of the country: Timber. Ruru 1919 exhibits a sprawling mill complex with a busy network of lines around the buildings. The NZR station is almost inconsequential in comparison: A simple passing loop with an exchange siding serving the mill. However, its not the main line that is the star here, but the bush tram. In Nz120, an S2 could be used as a starting point for either a Climax A or even a rough representation of one of the Price C geared locomotives. Unfortunately, I think you might be out of luck if you desire a Johnsons A or a chain driven Davidson lokey in this scale. With all the discussion elsewhere about "matching industries" on layouts for operational purposes, a mill like Ruru could act as a "hub" receiving unsawn logs from the bush as well as producing cut timber for shipping elsewhere.

If I was modelling this, I would focus on the tram winding down to the mill, with the NZR main line running to and from staging to shunt the exchange sidings."
Thursday, November 20, 2008
Head examination
I've been reading a couple of books I brought on trademe last week (well, more dissecting them). as a result of this I've been thinking ( which is all I seem to do lately) about how to model 6 coupled steam locomotives. Kato make a sizable collection of Pacific's and tank loco's that others have used with minimal modification (Wc etc). A hunt thought Japanese catalogs however reveals that almost all of these models have the cast 'Boxpox' wheels, and so are completely sodding useless to us.
However, one thing I have noticed looking at the pictures, and then a further hunt through the Cedric Green plans, is that NZR 6 coupled locomotives have a 5' +5' wheelbase, give or take 6" here and there. Thus, if some enterprising chap was to make a basic frame with the gearing etc, one could use it to model any NZR 6 coupled loco from the 50's and 60's simply by using different sized wheels and cylinders. only 2 types of wheels are required at 4' and 4'6" ( the Wf had 3'9" wheels, but this is 0.6mm difference, and I doubt if anyone could tell the difference)
This standardisation can be taken a bit further in the case of the Pacific 4-6-2's ( and add the Wab's here) as they all wound up with an Ab style boiler.
Tuesday, November 18, 2008
Dirt
Yes, a topic never before covered in this much detail in this country's model railway press. My module base colour looks far too dark, so I've ventured outside to have a look at the real thing.

'Eee by eck, thats som top grad dirt there mmm'
You can see here that there are 2 different types of dirt, the dry light stuff, and the dark wet stuff. neither looks remotely like Resenes 'coffee bean' which I have used. checking with my colour charts, something from the lighter end of the brown oxide colour chart like 'Silk' or 'Zorba' might be a better bet, or even 'Dusty grey'.
(Go out and get the colour charts. they are free, and you can mix and match the colours that you want to use on the terrain and scenic's. just don't use them on plastic)
Dear Aunty Dandruff
Leading further on from the previous post. Are there any other big questions that you out there in blogland would like to ask the brain trust regarding our years of experience in the scale screwing things up?
Monday, November 17, 2008
On couplers
Michael Harrison has asked the following question.
'I was wondering if you use kadee couplers fixed to the chassis instead of the standard type? What about bogie wagons? Do you use kadee couplers fixed to the bogie or wagon body or the standard type fixed to the bogies?'
The answer is' yes, I've used both couplers in both positions'.
On block trains that run together I've used rapido couplers in a fixed position with the corners cut on a diagonal to negotiate corners. This is a godsend for long days at an exhibition where you can just let the trains run without having to worry about the inevitable 'uncoupling in a spot that you don't see until the wagons are piling up on the floor'. On each end of these sets we would have Microtrains couplers, as well as on the loco's. However while this works well for mainline trains which never stop, if you should be predisposed to a bit of shunting, then Microtrains couplers on every wagon would be a good idea.
Couplers on long bogie wagons is another matter entirely. The general leaning amongst the brains trust is that bogie mounted couplers are a much better bet in terms of 'runability' vs the body mounted couplers. Just to confirm this ( to myself as much as you dear readers), I've just checked this out tonight.
First up is an Nc coupled to a 50' Z wagon on a 15" curve. I was surprised how little
offset there was, and theres probably not that much difference between the 2 options.

Surprised by this, and being a good scientist, I then checked the coupling geometry with 2 50' Z wagons. While the center of the curve is OK the entry point to the curve is a different matter entirely. The offset is quite large and frankly just asking for trouble.

so, you can be prototypical, or you can run trains.
To those who say, why can't we do both, the answer is either A)simple physics, or B) we could but we want a life as well thanks very much. Oh and a layout with more than 3 wagons on it.
Module idea # x
(more from Kiwibonds. I'm suffering from 'backatworkitius')
While copying a zillion files today I stumbled upon a scene that’s just begging to be modeled by one of the blog’s Wellington viewers. Or ‘moduled’, to coin a phrase.

It’s a compact, self contained, easy to build, very recogniseable, and fairly dramatic scene. You could operate it joined to other double track modules; as part of a Wellington Harbour home layout (more on that later); or connect up just one of the tracks for single track operation, leaving the other as a stand-alone powered track that you could shuffle a unit back and forth on - hence the ‘staging space’ in the tunnels there, accessible via slots in the backscene. I think you’d need about 1.5 x 3 feet to do the scene justice, although I did it in an A3-ish sized space once.

Pretty straightforward really. The buildings in the background and road would be modeled in forced perspective, the road hooking around to the right behind the hill. Cars in the extreme foreground could be HO and those behind the bridge N. The track and bridge could even be located quite to the backscene to reduce the module footprint, however as drawn, having the road climbing to join the backscene, with the join hidden by the bridge would be useful. Those buildings in the right foreground have only sprung up in the last few decades – you could use them to hide the tunnel, as the real one should be way off to the right, or eliminate them altogether. I’d be tempted to put an LV Martin sign on the corner even though his buildings are on the block closer to the camera. If you want to model the catenary wire in all its glory, luckily you only have to model a very short distance of it…
As an alternative, you could model this scene from the other side and look down the gorge to the harbour, with the motorway curving out to the right in forced perspective and hiding the backdrop join. I don’t have a pic of that view at hand, but here’s one of the southern end (left side) of the view showing the bridge detail.

The backscene could continue down the sides of the module, or you could put portals at both ends of the tunnels for mating to other ‘flat land’ modules.
Saturday, November 15, 2008
Operational thoughts.
There's been a bit of discussion on the Freemo boards in the last couple of weeks about building modules with complimentary industries. While the discussion is (understandably) USA orentated, its an interesting suggestion.
For New Zealand there is the most obvious 'Anything' to a port. Meat, Coal and Containers fit into this pattern. Historically, Sheep from stockyards to freezing works was a huge thing, necessitating special trains during the season. Lime from a lime works to either other rural stations or to a cement works. the last standby is anything under a tarpaulin from one goods shed to another. Last, and currently least is passengers (I think that while previous owners have done everything in their power to get rid of livestock, there are some who just refuse to stop riding trains).
There are possibilities for this as well. You could organise with a grioup of friends to each build a particular industry and then operate as a group at a 'meet'.
Going a wee bit further, one could build several scenes of modules, and run then as a home layout. If you got bored with coal traffic, you could just swap out the coal facilities for something else. with smaller modules sizes, its would not be such a huge ask to build more modules than one required and have sets in storage. I've done similar things with wargaming scenery in the day.
layout erection
(Dare I add V..gra to see the search hits I'd get, and expand my blog to a new group of readers?).
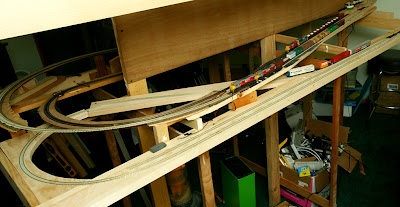
Yesterday I trekked out to the only model railway shop in the area (a 40 minute bike ride) to buy some more track bits. Today I actually got a chance to lay the track on my 3 small modules. I then decided to reorganise the disaster/work bench. Note the impressive polystyrene column balancing the end of the modules. I might staple it together later with some cardboard. I now have a test track of 6', with a 15" radius curves which the 4-8-2's will run around quite happily (well, without falling off).

The plan at the moment is to build a wharf at the right, where there is still 4' of space down one wall, and expand round to the left, possibly a small passing station, and then onto an 8' main yard down the other wall. Also you can see that the 60cm by 20cm modules don't have a large footprint, so there is not the feeling of taking over the room with the railway (although I already have 'annexed' the room with all my wargaming stuff).
Friday, November 14, 2008
Then and now
Ryan Has posed the question 'what sort of module should I build; the new untested (and quite honestly 'as yet not quite thought out') baby modules, or the tried and true NZ120 standard 2' by 4'.
My question for tonight is, how many people have the large sized modules, when was the most modern one built, and most importantly, when was the last time a layout was assembled from more than one persons modules( don't take this the wrong way, I'm a scientist, I'm just interested to know, and I'm not good at sugar coating questions.)
While I'm at it, here's another question;
Are people more comfortable with a round and round style layout for a get together, which in this country tends to be an exhibition where the roundy layouts have some big advantages, or would a Freemo style approach be more acceptable, with a more free form layout that might not be quite so ideal for the viewing public, but has more interest for the operators.
I'd note at this point that shunting operations can attract far larger groups of watchers at these exhibitions, than just watching trains hurtle past (I've tried it with our old Dunedin layout, and kept as group of 10 people spellbound for 5-10 minutes by shuffling cars between 2 tracks on my Dunedin railway station modules).
Would a branch line with a train running along it, shunting a few wagons at each station, be a layout that the public would watch. Would it be a layout that the operators could run for enjoyment, stopping to answer question's because they had time to as there was not an express freight rumbling through behind?
That Man Has Principles
(More from kiwibonds. makes me feel somewhat inadequate)
I watched the movie ‘In Bruges’ the other night. Funny, violent, profanity laden, and capped with a graphic presentation of sticking to your principles. Not one for the kiddies, but then again they probably see and hear worse at school anyway.
Writing my acidic postulation on staging the other day crystalised in my head what I wanted it to do on my layout. I didn’t want it to take up additional footprint in the room that could be used for a main line extension later, I did want it to be accessible and I wanted to be able to turn trains around with it. Ideally I’d have liked it to provide a fair bit of storage as well, but that doesn’t seem to have worked out completely yet, although another track could be added in the foreground later on. So here’s what I’ve done under Sawyers Bay…
Although it will be hidden, the tracks will be accessible via a viewport in the front and also from underneath (hence the wood cut away on the inside of the loop. The curve is tight at 12 inches/30cm radius, but things negotiate it even when pushed in reverse and despite being just below the waterline of Sawyers Bay at the back and the road that will go under a bridge in the foreground, there is enough clearance for track cleaning and retrieving stranded items. Towards the right end in the pic, there will be a low hill, so the points and track at that end will be more readily accessible.
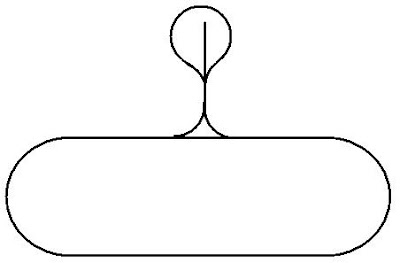
The ‘Port Chalmers line’ (dark sleepers) will run around the back and down to staging, as will another connection, probably from near the viaduct. So basically the concept is to have a roundyroundy layout that trains can appear or disappear from regardless of the direction they are travelling, and then they turn themselves in staging and can reappear in any direction. (obviously it’s a bit more complex that the pic below in the flesh) but you get the jist. Now… who’s up for wiring a reverse-loop on a wye?
I watched the movie ‘In Bruges’ the other night. Funny, violent, profanity laden, and capped with a graphic presentation of sticking to your principles. Not one for the kiddies, but then again they probably see and hear worse at school anyway.
Writing my acidic postulation on staging the other day crystalised in my head what I wanted it to do on my layout. I didn’t want it to take up additional footprint in the room that could be used for a main line extension later, I did want it to be accessible and I wanted to be able to turn trains around with it. Ideally I’d have liked it to provide a fair bit of storage as well, but that doesn’t seem to have worked out completely yet, although another track could be added in the foreground later on. So here’s what I’ve done under Sawyers Bay…

Although it will be hidden, the tracks will be accessible via a viewport in the front and also from underneath (hence the wood cut away on the inside of the loop. The curve is tight at 12 inches/30cm radius, but things negotiate it even when pushed in reverse and despite being just below the waterline of Sawyers Bay at the back and the road that will go under a bridge in the foreground, there is enough clearance for track cleaning and retrieving stranded items. Towards the right end in the pic, there will be a low hill, so the points and track at that end will be more readily accessible.
The ‘Port Chalmers line’ (dark sleepers) will run around the back and down to staging, as will another connection, probably from near the viaduct. So basically the concept is to have a roundyroundy layout that trains can appear or disappear from regardless of the direction they are travelling, and then they turn themselves in staging and can reappear in any direction. (obviously it’s a bit more complex that the pic below in the flesh) but you get the jist. Now… who’s up for wiring a reverse-loop on a wye?

Out of the woodwork
Our second overseas contribution, from Mick in Darwin( we are starting to sound like talkback radio).
I've always been fascinated with railways since the days I was a little tacker and stood by the tracks and said 'choo choo' whenever a train passed, even tho it was most likely a diesel...Even tho I was born in the earthquake zone of Mt Isa, Queensland I've always been a Cantabrian, tho my old man is from Wellington and my dear old mother (she still says shes 20something) is from Rotorua.
Since I started playing with trains they got smaller and smaller to the point I built my first 4x8' N scale layout based on everywhere. I considered modelling New Zealand railways in N scale but Nn3 is tediously small. After some online researching I discovered the light at the end of the tunnel, NZ120. It combines the space saving prowess of TT with N scale track to create the perfect combination to model New Zealand railways.
I've only recently converted to the 'chosen scale' and have been planning a freelanced Canterbury Railroad layout based on the Midland Line. Tho the only place close to being the real Midland Line is Staircase, with Coalgate being on the Whitecliffs Branch, Cass is totally wrong, and the Otira Tunnel would be nowhere near long enough to represent the real hole thru a mountain. Nor did a branch to Fox Glacier ever exist.
Anyway, included is a plan of the layout, its 5m long along both sides and about as deep as I decide to make it. I've always liked New Zealand steam and the CRR would have run the Kb Class 4-8-4's plus their own Kc Class 4-8-4's. Electrics would also feature, only from Coalgate to staging after Otira. Trains would mainly be coal trains, the electrics hauling them down thru Otira and from the coal branch staging to Coalgate, where the Kb/Kc's would take over for the run thru Staircase to staging. Passenger trains would also be run, along with a short milk train and a bunch of freights.
I'm excited about getting started but the space for the layout is currently unavailable. I've decided to build the layout in modules, and one is currently under construction.
I've always been fascinated with railways since the days I was a little tacker and stood by the tracks and said 'choo choo' whenever a train passed, even tho it was most likely a diesel...Even tho I was born in the earthquake zone of Mt Isa, Queensland I've always been a Cantabrian, tho my old man is from Wellington and my dear old mother (she still says shes 20something) is from Rotorua.
Since I started playing with trains they got smaller and smaller to the point I built my first 4x8' N scale layout based on everywhere. I considered modelling New Zealand railways in N scale but Nn3 is tediously small. After some online researching I discovered the light at the end of the tunnel, NZ120. It combines the space saving prowess of TT with N scale track to create the perfect combination to model New Zealand railways.
I've only recently converted to the 'chosen scale' and have been planning a freelanced Canterbury Railroad layout based on the Midland Line. Tho the only place close to being the real Midland Line is Staircase, with Coalgate being on the Whitecliffs Branch, Cass is totally wrong, and the Otira Tunnel would be nowhere near long enough to represent the real hole thru a mountain. Nor did a branch to Fox Glacier ever exist.
Anyway, included is a plan of the layout, its 5m long along both sides and about as deep as I decide to make it. I've always liked New Zealand steam and the CRR would have run the Kb Class 4-8-4's plus their own Kc Class 4-8-4's. Electrics would also feature, only from Coalgate to staging after Otira. Trains would mainly be coal trains, the electrics hauling them down thru Otira and from the coal branch staging to Coalgate, where the Kb/Kc's would take over for the run thru Staircase to staging. Passenger trains would also be run, along with a short milk train and a bunch of freights.

I'm excited about getting started but the space for the layout is currently unavailable. I've decided to build the layout in modules, and one is currently under construction.
Thursday, November 13, 2008
More 80's pics
More pics from the early 80's up at www.kiwibonds.com.
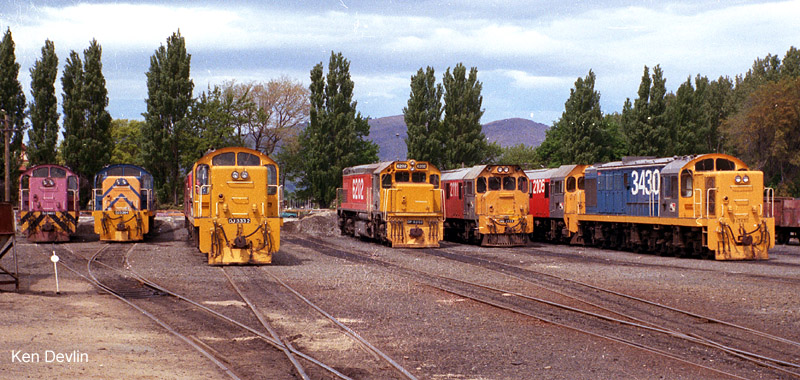
With a collection of motive power like this, why would you model anything else.
With a collection of motive power like this, why would you model anything else.
Gettin’ Jiggy With It
(Hmm, not sure what sort of google hits I'm going to see with this. Kiwibonds dives into a topic that we prefer to keep hidden)
Along with the Head Druff, I have for most of my life shared a similar aversion to hammers and saws, which is surprising given we both trained under a woodwork teacher called Mr Birch (“son, this job has your name all over it”). Where I dared to wield a saw, crooked cuts and mismatched angles forced the burden of layout structural integrity to be shouldered by thick cardboard and staples.
In recent years, I’ve taken a leaf from Tim The Tool Man Taylor and bolstered my natural woodworking wimpiness with hairy horsepower that whirrs and buzzes and makes lots of noise. Urrrrrgh.

My dirt cheap Ryobi combo cordless drill/saw set changed my life. The Jigsaw was another cheapie that is surprisingly useful for cutting roadbed. The chop saw is an unknown Chinese brand made of lead that will one day send a blade scooting across the room like a Ninja throwing star, but until then, cuts 90 degree angles all day without relying on my distorted view of reality to guide it.

Some tips for the carpentry-challenged:
Think lots before cutting
Measure and test fit pieces
Draw cuts on the wood using a T square
Cut as straight as you can (and you can always take more off, but it’s hard to stick it back on)
Screwing is much easier than hammering (insert rude comment)
Drill pilot holes for screws to prevent wood splitting
Triangles make things stronger as does glue
Baseboards and decking can provide a lot of rigidity
This is the first layout I’ve built ‘open’ with a raised roadbed rather than with a flat deck, so hopefully the scenery will be able to rise and fall more naturally. The jigsaw makes this fairly easy, but obviously you need to have a pretty good idea of where your track will go first. I’m recycling a lot of stuff from my previous layout so forgive the concrete sleepers. This is also the first time I’ve used proper cork after buying a few sections at 89c each yesterday to see what all the fuss is about.

And to close, sometimes you have to throw out the rules and use what you have. Ladies and Gentlemen, I present the vari-height riser.

It’s not as if anyone will be standing on it…
Wednesday, November 12, 2008
Progress of sorts
This afternoon I painted the 3 modules an earthy sort of brown. Resene 'Coffee bean' to be more exact (test pots are a great way to get a stack of colours fro not much money, and they tend to last a while). Dirt is such a subjective colour, as its different from place to place, and should really be grey or beige if its dry. This is probably/definately a bit dark, so I'll have to lighten it up a bit with some of the other colours in my paint box.

I've also decided to glue all 3 together, as they are non standard sizes, and I'm only going to use them in a corner of my room.

I've also decided to glue all 3 together, as they are non standard sizes, and I'm only going to use them in a corner of my room.
'What shade of green is this supposed to be?'
I've been thinking this morning while painting my modules brown. as well as some standards fro the end plates and electrical connections and so on, should there be standards for the colours of the modules themselves, so that at a get together there are no horribly jarring clashes between scenes. Should there be a specific base paint colour, an approved ground covering etc? What about ballast and track colours. Is it any different from painting loco's and wagons etc in their historical colours. The Woodland scenic range is available virtually anywhere in the world, and is a consistent range of shades, and so could be used as the default 'standard'.
Now there are problems with this. I can think of at least 3 different 'climates ' in New Zealand; lush grassland, sub-tropical rain forest/bush, and dry burnt summer grass (general I know, but it probably covers most areas). The first 2 will sit next to each other reasonably happily, but anyone trying to model one of the drier regions will be using a completely different colour pallet.
Opinions on the back of a postage stamp in large letters please.
Tuesday, November 11, 2008
Back to business.
There's been a bit much talking here in Nelson lately, and not enough doing. Tonight I got down and did something I haven't done for a while. Got plastered.

I had already done the base layers with wallpaper cement, and so just put a thin layer of plaster on to smooth everything out, and cos its what I've always done. Next I'll get some paint on them to see what they look like (hopefully tomorrow), and then a roadbed and get some track down (Ooooo). And I was quietly serenaded in the garage tonight by the gentle bubbling of 40L of beer. I'd get too grumpy listening to the national program.

That will help with the next plastering.
Monday, November 10, 2008
Modular designs
I've been having a bit of a crisis lately about my plan for small sized modules. It basically boils down to whether I'm selling out or not. When we signed up for the scale 20 years ago it was billed as trains in the landscape. My ideas are starting to make it look like an S scale layout, only smaller. There's a whole stack of competing things here. On the one hand its really great to be able to run trains across a large layout with the terrain stretching to the horizon. Reality tells us however that the space we get will be down to fiscal and domestic constraints. Skills also play a large part. I'm lucky if I can pick up a knife nowadays without the threat of amputation, and I lamented at the monthly support group last week that I've lost the skill to actually cut a straight line. I can paint eyebrows on a gnat, but I can't make a square model any more (some would say I've never been able to). Its also like that with being able to get a module that's square. My wood working is just not up to it, and so hopefully laser cutting and CAD will be able to solve that. By making the files available I hope others will have a crack at a small model, that they can either build into a layout or just have to bring to a meet to be part of a bigger set up. I stumbled across this tonight, http://www.westportterminal.de/meetings/alsfeld.html. Its where I'd like to see this idea go. A large exhibition layout that has a mix of modules, main lines and branch lines, yards, loco depots and industries. A real railway, not just a round and round or back and forward.
(This post has been brought to you by a fair bit of my raspberry wheat beer. Its another one of my good ideas that needs more work, but still does the job until something better comes along.)
(This post has been brought to you by a fair bit of my raspberry wheat beer. Its another one of my good ideas that needs more work, but still does the job until something better comes along.)
Contest results
Well, considering that ECMT voted against his design, the winner would have to be Michael, for what is a very well thought out (and explained) idea.. If you could contact me with your snail mail address I'll get some goodies in the post to you. (any preference on a phase 2 or 3 Da number plates?).
And I'm planning tomorrow to actually do some modeling on my week off, as I've spent today making another 30L of beer to make up for the stuff drunk during a recent visit (you didn't need THAT much to clean the car).
Finally, does anyone have any suggestions for another contest we could run (over a longer time scale), or should it just be a spontaneous thing?
“Bwahaha! I have you now, Mr Bond!” [Exits Stage Right]
(Another guest post. I swear these guys are writing more posts than me at the moment.)
I stared at that Onehunga plan for a while today. It’s a nice, compact, achievable, self-contained layout that could probably fit along your average bedroom wall and with it’s staging yard, has enough operating potential that could keep me amused for hours (“uncouple damn you!”).
Staging yards or interchange tracks are hardly a new innovation, but they certainly get a lot of airtime on the three pages of ‘Model Railroader’, that well known journal of dry modeling theory, that aren’t advertisements.
Staging yards serve at least two sensible purposes:
You spent time, effort and money on rolling stock so you might as well run it, but can’t fit it all in the four track Onehunga yard. Voila, keep it offstage-right and bring it in as the mood takes you.
You want to run different trains to destinations, through the layout, perhaps to match the schedule on “the real thing”. To save time, you stage them up behind the curtain and simply run them in right on time, or late if you are modeling NZR. You may even have staging yards at each end to present stuff coming from somewhere and going somewhere else. This appears to be the only approach sanctioned by the MR gruppenoperationsfuhrers, the rest of us are just playing with toy trains. As an aside, a tip for those on a budget: if you model the glory days of the recent Tranz Rail ‘Beard era’ you’ll only need one consist – a rake of empty container wagons to shuffle back and forth.
So that’s the good stuff, but staging yards also present locational challenges. If they are in “plain sight”, they never look as nice as the scenicked* part of the layout, they take up a lot of potential layout space, and to make things worse they usually take up the best bits of the room along the walls. So you could optionally hide them:
In another room through a ‘tunnel’ in the wall… unlikely.
Hidden around the outside of the room behind a backdrop or under hills, as featured in a number of MR plans, but probably the stupidest idea ever – have these armchair gurus never had to clean track, nudge locos, see if a train is completely in a siding or fix derailments/uncouples?
On a lower level under a modeled yard or scenery– sensible enough if you can get enough vertical clearance between levels for finger access, but this takes some length on a 1 in 50 grade.
You could scenick* them and actually have your trains starting and stopping at a modeled ‘somewhere’ rather than offstage.
Next, how do you get the most into your staging space while still allowing you to send trains back out. Some options:
Proper double ended yard ladders, as depicted in the Onehunga staging yard, give you the flexibility to run around your trains and shunt them about a-la the real thing and no need for excessive 0-5-0 shunting.
The “stub ended staging yard”, another gem from MR, saves space by eliminating one of the ladders and is probably OK with our short trains, but rearranging a 50 car American freight by hand in N scale so the heavy stuff is at the front and the light trailers are at the back (surprise, not all the manufacturers follow the weighting rules) and the 12 engines are all in the right place is just another silly idea in my book. Taken to an advanced level of absurdity is the “hidden stub yard”. Now there’s a winner.
Reversing loops – a great idea if you have the space as the yard folds itself in half and the train comes out facing the right way.
The clever Brits have evolved all manner of ways of staging short trains in small spaces – sector tables, traversers (made from desk drawer runners) and cassettes are common. Again a bit of five finger shunting is in order here, but with small trains, not such a big deal.
So. To close, here are two alternative staging possibilities for Onehunga. Firstly, you could scenick the right end later on and plop an industry or two there so each end is both a destination and a staging area. Secondly if space was an issue, you could shorten the staging yard using one of those English gimmicks to fit in a smaller space, or to make more room for the station and/or the single line journey between staging and Onehunga.

* Scenik: an NZ120 word derived from the Russian
Sunday, November 09, 2008
Sunday night
well, I'm still waiting for any of you at the back in the penny dreadfuls to have an opinion on either of these layout plans. I'm obviously going to have to find a coin somewhere.
(I've had a hard weekend. In our general election yesterday I spent 20 minutes trying to find where to vote for Obama, and since I have the week off I've had to do some intense planning for the homebrewing that I wish to do).
(I've had a hard weekend. In our general election yesterday I spent 20 minutes trying to find where to vote for Obama, and since I have the week off I've had to do some intense planning for the homebrewing that I wish to do).
Saturday, November 08, 2008
Layout Contest
Well, here are the entries in no particular order.
(This is a long post tonight, but worth it I think)
1) Onehunga Branch (Michael Harrison)
1970’s / 1980’s NZR Shunting Layout
One rainy day, I was having a look through some old New Zealand Railfan magazines and came across a photo by Ken Cousins in the DH Photo Stop in the June 1998 issue showing DH 903 shunting the small Onehunga yard.
Living in West Auckland, I had never really explored the Auckland rail system and having nothing better to do, drove out to Onehunga to have a look around and found…. well nothing. The yard was gone and the track looked in very poor shape.
Several years later, I decided to build a small layout and it didn’t take to long to come back to the photo of DH 903. A small loco, 4 wheel wagons and a compact yard. Perfect.
I managed to get my hands on a track plan of Onehunga and that’s about as far as my layout got. A work transfer to Dunedin has put the brakes on the whole scheme although recently I’ve started to have another look at Onehunga even though the prototype is now a little further away.
Onehunga – The Plan

The plan above shows Onehunga as it looked after the triangular platform was removed and the yard and goods shed were modernised sometime in the 1960’s (I think). I have left out the sidings that lead to the sealed loading area and the line that continued to the Onehunga Wharf. This leaves a very basic plan that includes the platform and small passenger shelter, the modern goods shed and the railway crossing.
Because this would be my first NZ 120 layout, I would use PECO points and flexi track because they are easy to use and reliable. You could use switch motors but I would change the points by hand to keep the wiring simple. The staging has been designed so that it can be easily extended and reused on a future layout.
Rolling Stock
Because of its small size, I reckon you could easily operate this layout with a single loco and around 10 wagons and carriages. I’ve included the carriages for the subbie service even though passenger services on the Onehunga branch finished on the 19th of January 1973, just to add some variety to operations.
I’m new to the whole NZ 120 scale so I’ve chosen locomotives and rolling stock that to my knowledge are available commercially in New Zealand.
eTch ceTra
DA 1970’s Red with white / silver stripes or
1980’s Fruit Salad
DC 1980’s Fruit Salad
Cross Creek Models
Bodies only. Requires chassis or bogies.
KP Weathered Silver and Red Oxide
LC Red Oxide
50’ Steel Carriages Red
Conclusion
I don’t have any pictures of the Onehunga Branch in the 1970’s or 1980’s that I could load onto the net and for some reason my scanner isn’t working. However, the June 2008 issue of New Zealand Railfan had a great article on the Onehunga Branch by Trevor Cheer that would invaluable for this project.
For someone with little room for a NZ themed layout or someone that is considering a change in scale (like me) this could be a good project to start off with.
2) " Eastern Approach To Kaimai Tunnel " (ECMT)

A simple set of 2 straight & 2 curved A3 (400 x 300) modules. The left hand module starts a bit before the points to the Whatakao Loop , the right hand module starts/ends at the tunnel mouth. A basic scenic module set, but has the ability to be expanded to the right, and used as a storage/fiddle yard inside the tunnel ( as suggested by the modules in yellow ). Or expanded to the left, adding additional modules of the Whatakao loop, bridge over the Wainui River, onto the Apata station.
 Tunnel entrance east portal.
Df 6006 having just exited the tunnel heading towards Tauranga.
Both pics taken in 1983. Contrasts quite nicely with todays vegetation regrowth.
As a bonus, here is a link to a Youtube vid of a cabride in a Dft from the Works Rd overbridge, through the Whatakao loop, ending in the tunnel.
http://www.youtube.com/watch?v=iQmiPAomXFY
Well, what does the peanut gallery think then?
Must go and find my tossing coin...
Friday, November 07, 2008
Counting down
3 hours to go, folks. So far we are up to 2 entries, which means I'll have to toss a coin now.
Any last entries out there?
Any last entries out there?
Darryl Builds a Layout.
(Have a sodding migraine tonight. Luckily someone else steps into the breach)
Now look what Rhys has made me do.
So it doesn’t look like my plans for a new tri-level Tehachapi layout will fit in my recently acquired Limited Edition trainroom, so to prevent myself going crazy I foolishly started building an NZ120 layout last night. While cleaning out a box in said room the previous night, one of those fuddy-duddy English Model Railway Journals leapt out at me (it belongs to Evan B and he may reclaim it at any time featuring an impressive layout called Amberley - thirty years in the making - that had me thinking about building a layout properly for once.
So here’s the vague plan… in both plan and cross sectional views:

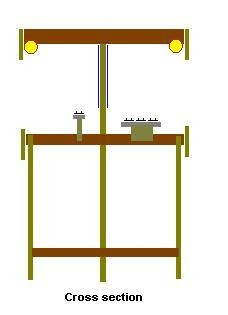 This is the first layout I’ve built that has integrated lighting behind a valance. Actually given that it is made of wood, it’s a bit of a groundbreaker, as a 4x3 section of my last Tehachapi layout had “baseboards” of wire netting and plaster. People who have seen my layouts before should note that a square and a level were used in addition to the usual blunt instruments. Progress in the 24 hours to date:


The real Sawyers bay:

I’ll keep you informed as to progress…
Now look what Rhys has made me do.
So it doesn’t look like my plans for a new tri-level Tehachapi layout will fit in my recently acquired Limited Edition trainroom, so to prevent myself going crazy I foolishly started building an NZ120 layout last night. While cleaning out a box in said room the previous night, one of those fuddy-duddy English Model Railway Journals leapt out at me (it belongs to Evan B and he may reclaim it at any time featuring an impressive layout called Amberley - thirty years in the making - that had me thinking about building a layout properly for once.
So here’s the vague plan… in both plan and cross sectional views:

 This is the first layout I’ve built that has integrated lighting behind a valance. Actually given that it is made of wood, it’s a bit of a groundbreaker, as a 4x3 section of my last Tehachapi layout had “baseboards” of wire netting and plaster. People who have seen my layouts before should note that a square and a level were used in addition to the usual blunt instruments. Progress in the 24 hours to date:

The real Sawyers bay:

I’ll keep you informed as to progress…
Subscribe to:
Posts (Atom)