Showing posts with label Casting. Show all posts

Wednesday, January 03, 2024

Taking stock of stock: The Good, the Bad and the Ugly.

DB juggling ten projects at  once:

Lord Dandruff the First stopped by a month ago, and we had a carful browse through some of my rolling stock that had been bundled up in paper towels and boxes for the last ten years. We didn't get to the bottom of all the boxes, and didn't unwrap much, but there was a lot that had been long forgotten. 

Yesterday I went dumpster diving to the bottom and unwrapped most of the mysterious items.

OK, apart from a bendy one at the bottom.

The Good:

The 'Hokitika' container train of commercial 40 foot containers and white cast TBC insulated jobs on resin cast UKs look decent, other than a few busted MicroTrains couplers and some misplaced wheels. A west coast coal train from c2010 is about 80% done (CBs and CWs)  plus there are four unused CE tops from Shapeways in the bin.

Ooo, Speights tanktainer! RFL containers, CF, Spaceracer, Well wagon, Urea wagon. Some nice Trackgang UR and LPA wagons. My own cast KP and XP tops look decent. Most of the HCC coal container train looks ok. I have a few good looking four wheelers of various types - scratchbuilt NCs,  and an MC, plus a few LC and LAs made from someone else's tops, five nice YCs from the 90s based on Rhys' cast hoppers. Plus two fairly basic, but acceptable log wagons and a SpaceLiner from the early days.

A lot of small projects fixing, painting, detailing and weathering will have this lot shipshape in no time. 

The Bad:

That PFC flour bomb doesn't look that good up close. Far worse are some of my first early-90s efforts: rudimentary container wagons (the 'Japan Line' UK above for example) that should be retired, the basic (yet mildly-effective) RoadRailer on its old Atlas rapido bogies.

For some reason I still have 15 LCs molded in Flashfix polyester bog from my awful master (my first attempt at casting anything).We always put Rhys' LCs at the head of the train on Otaki to Cass because they looked better than the 18 or 20(?) LCs that I had.

Eeek

I have a 12 wagon stone train filled with limestone! I must have cast the LA tops about 2012, but don't think it was blogged about. The LAs look a little big to my eye so I'll have to dig out my plans.

My cast side-opening 10 foot green and 20 foot blue containers are too wide and tall, but more on them below.


The Ugly:

About five of the container wagons are warped. Some subtly, one quite dramatically.

The bends

Some of the containers suffer from sticky resin syndrome and will be binned. 

Sticky Blue Star Line to be binned

The 10-foot green containers have shrunk oddly in some dimensions and the styrene handgrabs and spacers have melted into a sticky mess.

Cartoon containers

The two XCs have melted/softened their Peco chassis. One of the couplers pulled in half like its shank was made of bubblegum. Strangely, the KPs made at the same time are fine, and a whole bunch of spare cast containers at the bottom of a box were fine too.

Axleboxes, sides and coupler very soft.

I'm guessing its a particular brand of glue (contact or UHU style) that I used at one stage to fix some resin cast tops to Pecos; and resin containers to resin flat wagons. The glue reacted with the resin and emited a gas that plastic doesn't like. Having things locked away in boxes with no fresh airflow can't have helped. The Blog's resident chemist will likely weigh in on this once he's fired up his scanning electron spectral analyser.

The XCs have been cleaned and fixed with a new chassis - superglued on! I penciled a note to myself to discover in case this happens again:

A mildly bent container wagon was stripped of containers and bogies, and straightened successfully after 10-15 seconds under a hot tap, followed by cooling under the cold. Reassembled (with superglue!) it seems fine, so I will try this with the others.

^ Bent
^ Straightening
^ Flat flat wagon
^ With containers reattached.

A few sticky containers are being binned. I replaced the blue sticky side opener on the Speights wagon with the best of the green 10 footers even though its a bit big:

The PK with the greenies has picked up two Associated Container Transport containers from the 80s off a UK that will be straightened, and will keep its nice GraFar bogies with rapido couplers (see para below).

Doing this has me thinking about my varied and random trains, some of which have a mix of couplers. I'll probably convert the 'modern stuff' to MicroTrains and keep the four wheelers and a few bogie wagons that suit an 80s train with the rapido couplers. The PFC flour job, roadrailer and maybe the NZR container wagons would be more at home on a 90s express goods train so will get MT couplers. 

It's also started me thinking about a few things that are missing from the trains. White ventilated Z covered wagons are probably the most obvious omission from the 80s train. The work train needs a plow van. And I need a bunch of additional container wagons, although I have a pair of MMW IAs to make up. Now that I am not modelling Moana, the Hoki container train can be more generic, and some of its white TBCs might be backdated with NZR logos. 

Much to do.

Friday, May 25, 2012

Wheels??

Any takers asks Cabbage...?

Have been working with a local Wellington Jeweller who has a wax RP printer with 0.0254mm resolution
The first thing I decided to try making was a wheel for the Druff's K/J/Ab project. I had tried this through shapeways in Ultra fine frosted detail but was somewhat disappointed with the result. So it was time to try something else, the wax printer makes a master that can be cast directly, only problem is each wax costs $30, but once cast the brass is good enough to use as the master
We tried the same design I had sent to Shapeways but the spruing and how to turn the final wheel were still unproven and looking difficult. My Jeweller suggested we sprue the wheel from the front hub and this is the final design.
The plan now is to send this back to Morris and Watson as a master for casting in bulk (well maybe 10 at a time as I'll need two tyres of practice to get eight good ones)
The front

The castings is designed to be held by the big sprue on the front to turn the axle then held by the axle to turn the tyre and clean up the front

The rear

The tyre profile is to be NRMA but I still have to figure out how to do this.

Friday, February 25, 2011

Containers

Magikan scribbles...

After a discussion one day with Am-Fet about his plans for the saltworks and his need for GSY containers, the following conclusions were reached:

The GSY container

We felt that Rapid Prototyping was going to be the most effective way of reproducing the side door container. Given that these have been around since 1997 potentially quite a few could be used (and not just by Am_Fet), so the plan was to produce an RP pattern for resin casting.
So a couple of evenings with CAD produced this.

The CAD file ready to get sent for Rapid Prototyping.

A week later and a package arrived in the mail with the results.

The RP pattern

A little silicon rubber and we are ready to start casting more.

The Rubber Mould

The end result, GSY's by the train load

The resin cast GSY containers

To complete these we still need to sort out decals and we are currently working with our New York office to produce these.
At least these containers have worn the same paint scheme for their whole lives so only one set of decals will be needed.

Thursday, September 30, 2010

Lets do the time warp again....

From DB's "there's a prototype for everything department":

The Rocky Horror Picture Show receives far too much airtime on this Blog.

But be that as it may, you might have seen this picture of a UK wagon that quietly passed away on train 230 at Fielding earlier in the week (stolen from the NZ Locos Yahoo group who probably stole it from someone else).


A similar sight greeted me when I put my nose up onto the yard containing my wagon stash a few weeks ago.

? I thought they were supposed to be container 'flat' wagons?

None of my other cast resin UK/PKs exhibit this quirk, but I suppose it could have been summer's heat or humidity or badly mixed resin that never really set. Perhaps it went deep sea diving when I wasn't looking and surfaced too quickly. One of our Chemistry Wizards may have some thoughts. The Star Wars prequels sucked. The last one only partially. What's up with the weather?

Where was I... Fairly early on I started encapsulating brass rod into the castings by laying it into the mold during the pour, but it looks like this one escaped that process for some reason. This might push me to revisit a cast brass UK...

Monday, September 13, 2010

For sale

DB has spare these containers: 3x HLC mk3, 2x HCCs, 1x HLC mk3 ( in effect a highside HCC), 4x 10 foot side openers (these are about a mm too wide, they they don't look awful) . All 8$ per item plus postage.
All castings from molds as featured in this blog (filed under 'wagons' on the left hand side here) and in reasonable condition - i.e. good enough for me to use but I have enough already. Most/all air bubbles have been filled for you.
Contact purchases-at-kiwibonds-dot-com within the next few days if you want these.

Saturday, July 10, 2010

AO5 : A Sticky Situation

Goddamit.

DB recalls: Now that I have a nice blue mold, I poured my first AO car last week with the dregs of some lumpy 30-minute resin clearly stamped "Use by April 2010." Whatta-mistakea-to-makea.

It came out moderately well at first glance, but to the touch there were a few sticky bits on the roof and ends. Dammit. The lumpy bits in 'part a' obviously didn't mix well with 'part b' and that consigns the casting straight to the bin (along with the leftover resin) as paint will never set on them.

The next attempt was with the 18-hour resin (all I had left, and similarly stamped although unopened). Don't know what happened here but the stuff didn't set in 3 days. Yuck. Not only is this a pain because you have to dump the globby, sticky mess of a casting, but it's also bleedin' hard to clean that gunk out of all your crevices. Eeeek. Thus your next one and a half otherwise-perfect castings might end up with gunky residue in the corners as well.

Nonetheless, after those two disasters and one possibly recoverable, I'm left with the first decent casting.


Yay!

Sunday, January 17, 2010

Coal containers I have known

Carrying on from the last installment of coal container madness, 'proper' HLC curved-side coal containers were next on my 'little projects for rainy days' list. Again, the Dec 03 Journal has a nice set of NZ120 plans for both series 1 and 2 of these containers - the most obvious spotting difference these days being the shape of the forklift pocket surrounds on the base. Series 1 has chevronny HCC types, whereas series 2 has plainer - and easier to make - bevelled ones. Bet that made no sense at all. The above series 2 was snapped from down low at Oamaru in July while I was either sitting on the ground or in the Mighty Green Mini - a difference of only a few centimetres.

So today I spent about two hours making this series 2 master with the intention of trying to cast a few: It's not too fancy and a little chunky in places, but they should look the part when viewed from a few feet away through dirty spectacles. The master was built entirely from plasticard bits except for the curved sides, which came from the same small squeeze bottle of about 5cm dia from the 99 cent store that provided the CW sides last year. It's perhaps a smidge too curvy for this, but that's hardly noticeable.

It will be interesting to see how these will cast up given their complexity. I only got a handful of HCCs out of that mold before it gave up. This time I'm casting it upside down and have included the tarpaulin bars to save time later. I squeezed squadron toxic modelling putty under the bars to make removal from the rubber easier/possible. If I get time I'll make the mold tonight.

Tuesday, December 29, 2009

DX in Half a Day 4: Replicatious

DB says: I've been living like a recovering alcoholic all week, sitting in the train room with a bad case of the shakes, slowly building masters, while resisting the urge to just stick those masters on and just finish a damned DX already... But no. I've been good. I've abstained. Its been two weeks since I last bolted through anything in NZ120 without a care in the world.

Tonight I was relieved to stick the masters in a box, pour some rubber in to make a mold and begin some casting.The casting session dragged out over more than a day as its been a while... Most of my casting is done in very small efforts, so I use a disposable plastic spoon to measure 3 spoons of this and three spoons of that into a disposable picnic shot-glass. Then I'm supposed to use the handle of a disposable fork to stir it up well and apply drips of resin into the molds.

This time I forgot, and used the mixing spoon for the whole shebang. When you do that, you end up pouring unmixed resin (the layers on the spoon from the measuring process don't get mixed in thoroughly) into your mold, which won't set of course, and even when you take the whole soggy mess out hours later, there will be some sticky residue left behind on the mold surfaces to attach itself to future pours and ruin them as well... So: measure the resin with the spoon, pour with the fork handle. I usually get 5-10 or more pours out of each disposable item, each of which only costs a few cents, so this is an economical way to go for me.At long last, the assembly of our clone army is proceeding as planned. Darth Tyranus will be pleased. As will Temuera Morrison, who will no doubt be doing the voice-overs for the DCC sound chips.
Speaking of which, has anyone out there put DCC sound into an NZ120 model yet?

Wednesday, December 09, 2009

In another scale

I've been having a discussion with a recent convert to the scale over the last week or so. He's commented that he's enthusiastic again about modeling, which is a reoccurring theme that I've got from several others as well. Its set me into thinking mode (a dangerous state. theres nothing so dangerous on the planet as a bored scientist). I wonder how many other modelers would benefit from a change in scale (and not just into nz120 but to any other scale). The big problem would be the almost ingrained mindset ie "I've always modeled in this scale, that scale is too big/small to see, I've got to much stuff to change' etc.
For myself, I could see myself making a decent fist of 9mm (I have in the past, and somewhere have the convention certificates to prove it), but I think in S scale I would be a very average modeler. So in the end I'm quite happy where I am. I think the other thing is currently in our little corner there's still not right way and wrong way to do things, there's just better ways. we seem to have accidentally found ourselves at the forefront of laser cutting plastic to make wagons and loco tops. Yet this high tech approach also fits with paper and card modeling. The most important thing i think for our scale is that it sits square, and looks right from 2'. I hate looking at my mods close up, which is why the photo's on this blog alwys come as a large shock

I think it sort of hit home tonight when I received some more lost wax brass castings back for a new master. again, they are by no means perfect, but they are mine. That is not something you tend to get in S scale where you can buy almost any detailing part you might want.


I then had to fit them to a wagon to see how they looked.


The new coupler is on the left, the drop in Trackgang replacement coupler is on the right. There's still a wee bit of work to do with these to get them right, but they do look the part in my eye's.
In S scale, you would just go out and buy some.

Thursday, October 15, 2009

Meanwhile in ludville

With all the computer design and laser cutting featured lately my work bench tools are starting to feel a bit unloved. However they have been used a bit, and tonight I arrived home to the hard won fruits of my loins (so to speak).
A while ago I made a master for an NZR non working coupler, and sent it off to be cast. They are now back, and I'm very impressed with the casting finish, and also that I can't quite believe that something I made could come out so well.

'what a load of old couplers'

So how do they work then. I designed the block at the back to fit into the Trackgang coupler pocket. When the block in glued to the chassis floor, the couplers should all wind up at the same height. And yes, this is indeed the case.


The hooks are made from 0.5mm brass wire. this is soldered in so that the top of the wire is level with the top of the coupler shank. I then bend the wire 2mm away from the coupler face making sure that it is slightly more than a 90 degree bend. A pair of pliers cuts the hook to length. To finish up I then squash it and file to shape.

The airbrake hose is bent to a spot roughly under the coupler.


The results won't win any awards any time soon, but they are a step towards a more prototypical look, and are finitely better than the old rapido couplers I've used previously.

Sunday, June 21, 2009

Further Adventures in Resin Casting: multi-piece CWs

See? Double ewes! (groan).

DB says: Well, seven CB coal wagons isn’t going to make a terribly impressive coal train is it? I suppose I could hang a few CWs off the back, just like they do on the real trains, and that might look groovy. After all, if Evan can make ugly diesels, then I can make ugly wagons...

So... I had a couple of small plastic squeeze bottles from the dollar store sitting on my workbench, which naturally had me thinking about those CWs again. I know it’s a leap, but stay with me on this one. Das Fettler provided some great detail pictures and a barely-visible plan of something that looked fairly similar to a CW: lo and behold, the curved hopper tub sides are a perfect match to the curvature of the bottles. As I had planned. Mwuahahaha.

After a few days of umming and ahh-ing about scratchbuilding three of four of these things I decided to cast them. And in hindsight, I’m glad that I did. In the previous casting posts, you may recall I made everything in one piece for simplicity, but because of the fine underframe detail and the deep tub-end angles of the CW, I decided to make these up out of separate 'side' and (somewhat simplistic) 'end' castings. Masters were completed thus (note the clear plastic section from the squeeze bottle cut and scribed):

And assembled into a mold box thus:

Rapid resin was used for the pours, as the bogies will sit under the end castings which should be strong enough to bear the load without bending. If the bogies were to sit further outboard on the thin end sections of the underframe, I would have used the strong slow-cure resin. Components began to roll of the production line, also thus:

I was pleasantly surprised by the quality of the castings. Firstly, there are zero visible air bubbles – one of the beauties of doing these ‘flat’ simple castings is that any air bubbles rise and sit on the backside of the castings (inside the model) where they can’t be seen. Secondly, that raised triangular end piece is quite deep, yet all those castings came out perfectly. I dripped the resin into that deep triangular section carefully, one drop on top of one drop at a time, letting the resin swim its way into the deepest recesses and expel air naturally. Pardon me. The only flaw in my master plan, if you'll pardon the pun, was that I used .010 x .020 plastic for the underframe rib detail, and this is really too fine - serious mold scrunching is required to get the resin in there and care is required when extracting castings to keep the detail from breaking off.

Gluing two sides to two ends was straightforward, as you might expect. End plates were added above the ends of the underframe, a bolster put in place and Microtrains bogies added. Two false floors were added – an unfancy one on the very bottom to hold some lead weight (keeping the centre of gravity low), and one near the top to support some coal. In the Midland Line video I have, I note that the odd one or two seems to have additional ribbing (for her comfort) along the undersides. Perhaps someone out there in the Blogstadia can tell me whether they have different rib layouts on different sides or whether there are two batches of wagons. I added extra plastic ribs to both sides of two wagons and left the other four with the minimal ribs as cast.
One of these days I'll attempt to restart the decal factory.

Now you might say that these aren't quite in the same league as the DFT as far as detail and accuracy (and even squareness) goes, but to my mind they don't have to be - the shape of the tubs and end angles says "CW" loudly enough for me. A few brake details and brakewheels should probably be added on top of the end plates but in all honesty, as these will be running at the back of an NZ120 coal train, I doubt I'll bother.
I doubt you'd hear that said out loud inside the big house at 9 Mill Street.

Not pretty, yet effective

Thursday, May 28, 2009

Resin Casting 101: Part 4 - Castaway

Once you have your mold, it’s pretty straightforward to start pouring some resin into it to make your castings.

Check your room has ventilation, use rubber gloves and put some paper or old magazine pages (finally, a use for the Model Railroader!) down under the mold as you'll inevitably dribble a few drops of this araldite-like substance. I also recommend covering the floor if you care about it, in case you have a spillage incident. You will not get this stuff out of carpet...

Use the right resin. You have a choice between fast cure and slow cure resins. I have a quick resin that sets in about 10 minutes which is great for making lots of simple castings in a short timeframe, for example, I find it OK for containers. However I've surprised myself by becoming a fan of the slower overnight resins for most of my stuff. They are much stronger, making them perfect for for thin container wagons and for more complex castings. But their real benefit, is that you can take your time as they have a longer 'pot time' (mixing time). The fast cure resin just doesn't give me enough working time to ensure that mold corners are filled and air bubbles are exorcised from complex details before it starts setting.

[NZ content as required by the Commerce Commission: I can recommend the Procast resin from Topmark. its a slow cure resin but sets very hard. I had previously been using easycast which runs like water, but doesn't set hard enough, sets very fast and can deform over time leading to droopy wagons]

Mix WELL. If you don’t do this, you may end up with nasty, sticky, uncured resin seeping out of your otherwise perfect casting forever, even after ou paint it. This is a real heartbreaker and will probably consign that item to the rubbish bin. Mix WELL! I use disposable plastic cups and spoons, and get 3-4 pours from each before they get totally encrusted in layers of resin. Did I mention MIX WELL!

BUT - avoid mixing in air bubbles!

Ensure your rubber mold is sitting flat (yes I have accidentally had a lump of plastic sitting under a PK mold and made a bent wagon) and has any support it might need. The mold in the picture below had a too-small mold box and needs to be supported in the wooden frame behind it to prevent the production of overweight KPs and containers.


Scrunching the mold while half full of resin. Then it will be relocated into the wooden support behind for the final pour. Position of little fingers optional.

After pouring the mould about half-way, I usually scrunch, flex and stretch the mold rubber walls (above pic) to ensure that the resin flows into all the details. I also use a toothpick or stick of plastic to get resin into the corners and pop any visible air bubbles. Then I pour in the rest and use the bubble popper again.

For my flat container wagons, I apply the slow-cure, strong resin with the handle of a disposable mixing spoon a few drops at a time. This lets the resin flow naturally into all the crevices without trapping air. I add shotgun pellets and folded lead (from dental x-rays) to add weight to my container flat castings.


Making a UK one drop at a time. You can just see the dark shotgun pellets in the poured resin. The dental x-ray lead (foreground right and sets of folded sheets to the left) are about to go in as well. This is how they really made UKs at Hillside.

I often place a flat rubber surface (another mold) on top after most of the air bubbles have come to the surface for popping to get a nice flat top to the casting. This saves a dusty mess of sanding off any excess resin later on.


Using another mold (stuffed with containers!) to provide a flat surface on top of the container wagon casting

Wait till the resin has cured per the instructions and then carefully pinch the rubber to break any vacuums and free the casting.

Peeling Out - note the 'flash'

If you placed flat rubber on top, you may have some flash spewage (as in the above pic) that can be cleaned up with scissors and a knife. Do this sooner rather than later because after the prescribed demolding time, the resin will normally continue to harden – the slow cure stuff will do so for up to 2 days, so set aside the casting on a flat surface, or it could bend before it hardens completely.

All done!

And here are some results. It may not be clear in the pic below but the painted UK has a few air bubbles on top - most of these will be hidden by containers, but I have filled the ones that would be visible that the paint didn't. The KP is a good example of a careful, steady pour with very few imperfections to be fixed (or ignored!). The GSX containers show a quick straight pour (at left), and a slow careful pour with scrunching of the mold (in the centre). Note the considerable difference in the rendering of the side rodding detail. This only comes out well when you get the resin into all the nooks and crannies by scrunching.

Monday, May 25, 2009

Resin Casting 101: Part 3 - Growing Mold

As two-piece molds are more complex, we'll start things easy with a simple one piece rubber mold for our container flat. First up, you need to make some sort of 'box' around the master to contain your rubber which you will pour in on top. Being lazy, I often use Kato/Atlas rollingstock boxes for my boxing, being careful to glue the master down well - if rubber gets under the master, strange things might happen. As for the size of your boxing, I like to keep at least 1 cm around the sides of the master and half a cm on top of it. A slightly thinner top allows you to push in and squeeze your master/casting out of the completed mold.


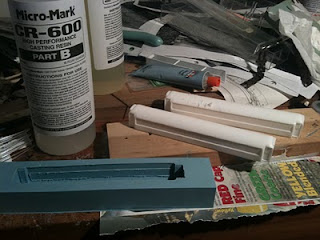
The rubber used is RTV, or Room Temperature Vulcanising, which simply means it sets without any pressure cooking. I'm using Micro Mark RTV rubber but the best source of RTV rubber in NZ is Topmark.

Different rubbers vary in their properties along a stiffness/strechyness spectrum. If you have a softer/strechier rubber, making the mold box larger to let more rubber mass lie around the master will ensure the mold holds itself in shape better when you're casting as the mold walls will be thicker and stiffer (preventing bent wagons), but this may make it harder to get larger castings out without tearing the mold. If your rubber is stiff, you may want thinner walls, but a large item (a 4w box wagon or larger) with thin rubber walls will need support against the weight of the resin or you’ll end up with bulging sides in your castings. You'll figure out pretty quickly what works for the rubber you have. Stretchier rubber tends to last longer than the tougher stuff which tears easier.

(Here at the Waihaorunga Creek workshops we are using the blue stuff which also goes by the name Ultrasil®. It appears to be a stretchy type rubber which has not given me any trouble yet)


Painting a thin layer of rubber into all the crevices to banish air

Once you thoroughly mix up your rubber and let it settle briefly to remove air bubbles, the key to getting a good mold free of air bubbles is to brush a thin layer of rubber all over the master with a paintbrush (and not your Sunday best paintbrush that you save for special occasions either), ensuring you get a thin coating in all the nooks and crannies. Once this is done you can carefully pour the rubber on top slowly. Once you’re done, it is common practice to slap the mold box on the table a few times to dislodge any remaining air and scare away the air bubble spirits.

(At this point I tend to spend 10-15 minutes slapping my rubber. Its to get the air bubbles out, honest!)

As the bit that's currently facing up will eventually be on the bottom (when you turn it upside down to pour resin in it), you want it to be as flat as possible, especially if it is a thin mold like this UK. If the rubber is not settling flat, check your mold box is sitting nice and level - you might prop up a corner with some plasticard. If the rubber is lumpy and not sitting flat, you could drop in some stiff thick plasticard on top and apply a light weight (you don't want it sinking under the rubber, and you do want it flat and level). As a last resort to avoid risking progress so far, mix and pour more rubber in either now or once this batch has set.

A cured rubber mold removed from the box successfully (UK) and with neccessary destruction of the box to avoid tearing the mold (XP)

Give the rubber plenty of time to cure per the instructions that you probably threw away without reading them, and then carefully remove the set flubby (blue in my case) blob. Magic isn’t it? Sometimes destroying the mold box is a good idea so that you can flex the rubber and carefully extract your master. Hang onto that precious master as you might want to make a second mold later - either to speed mass production, or as a replacement - all molds fail and tear eventually.

You should be able to get your master out without tearing the rubber mold, if not, you will struggle to get the castings out as well! There will probably be a thin meniscus where the rubber meets the mold box and in the interests of getting a nice flat mold bottom, you can carefully cut this off with scissors as a final step.