
Well, its been rather a long week. Not much/any modeling done due to a variety of reasons. The main one is that the lady of the house has been particularly unwell. This has necessitated a couple of trips to A&E (including an all nighter after the rugby) and some days of enforced rest for her. as such I've not been particularly in the mood, or indeed had the energy to do much else. Shes slowly getting back up on her feet, and I'm due to be 'directed in the garden' this afternoon.
This has put me a bit behind in organising for railex, but since I'm only making track work (on the VCC stand I think, but still to be confirmed if I'm allowed to play with the big boys and girls) it's probably not going to be much problem. I don't have any code 40 rail currently (I'm struggling to make it to the bank to pay Woodsworks, who is busy himself) but I suppose I can get by with some code 55.
Anyway, I'm looking forward to having a day talking rubbish (I'm only out for one of the 2 days for obvious reasons). Might even have to get myself a Fedora hat with a big 'press' lable on the side of it.
Saturday, October 29, 2011
Wednesday, October 26, 2011
Platform 1
Ive been thinking for a while now about how to do the station platform. Most of this has centered around getting the base material. I've been thinking about getting some 5mm MDF for a while now, but have not had the chance to get out to a hardware shop in the last couple of weeks. The other night I was looking for something else I suddenly noticed that my new stock of foam core board was 5mm think. out with the knife and away we cut. It took an extra 5mm off the width (35 scale feet) to allow to add for a more precise top surface later. I also struggled to cut the foam core as it has a harder outer surface than the material that I'm use to. very good stuff though. I must raid Kiwirail for some more. Anyway, here is the photo.

Stuck down with no more nails. If it wasn't so sodding hard to get off fingers I would be in love with it.

Stuck down with no more nails. If it wasn't so sodding hard to get off fingers I would be in love with it.
Tuesday, October 25, 2011
layout pictures time
A few pictures tonight just messing around, and asked for by the newly remonikered 'armless fetler'.
First up it was suggested that I should add some shape to show how the terrain will look. Now I'm really not keen to do this as its hard enough to move the modules round single handedly as it is without having anything in the way. plus I'm not finished under the hood yet, so to speak, and I still want to get at things. I then remembered that I had my wargaming cover cloths. a few pins and here we go.
 'A good example of why you should always take 2 shots of the same scene...'

Now you will be thinking, 'that looks really good'. I found it terribly disappointing, as it does not fit my mental perception of how the overall scene is going to come together. I shot these two pictures and took everything back down inside 30 seconds.
Second up, here's the Waihao Forks layout with some wagons on it to give an idea of size.
 I'm just a bit happier with this. Hopefully I will be working on part of this at Railex next weekend assuming I'm allowed to play with the VCC crowd.
First up it was suggested that I should add some shape to show how the terrain will look. Now I'm really not keen to do this as its hard enough to move the modules round single handedly as it is without having anything in the way. plus I'm not finished under the hood yet, so to speak, and I still want to get at things. I then remembered that I had my wargaming cover cloths. a few pins and here we go.
 'A good example of why you should always take 2 shots of the same scene...'
Now you will be thinking, 'that looks really good'. I found it terribly disappointing, as it does not fit my mental perception of how the overall scene is going to come together. I shot these two pictures and took everything back down inside 30 seconds.
Second up, here's the Waihao Forks layout with some wagons on it to give an idea of size.
 I'm just a bit happier with this. Hopefully I will be working on part of this at Railex next weekend assuming I'm allowed to play with the VCC crowd.
Monday, October 24, 2011
Not so much to go wrong with this - Phew

Cut out the frame

Bend up the centre braces

Bend in the sides

Strengthen with solder once the wheels are in
Must get some wheels one day
Hmmm ...... maybe not
Just past these bits onto some other poor unsuspecting sucker who already has the wheels
AHHH! No - Epic failure
Well Am Fet you were right the IB didn't work as planned.

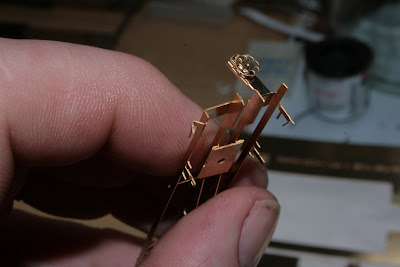
But as Thomas Edison once said "I have not failed I have just found another way not to make a light bulb"
Points to note for the next version:
- Brake handle on the left
- Main beams need to be future apart by about 1.2mm
- Deck needs to be slightly longer

D'oh not wide enough
D'oh Deck too short
Things that did work:
- Brake handle looks real nice
- Twist locks folded nicely

Wahoo - Brake handle looks nice and is only folded
Well back to the drawing board for version 2.0 then off to the etches again
Look what the postman left.....
Wahooooooo......
New toys.
Just arrived, hot of the plane, the Mini-Me-Wagons KiwiRail Ia and Ib came today. Now the question is can they wait until the RailX or do they get built before then.
Ahhhhh the suspense

Ia etch

Ib etch
These little beasties are the same design as the Uk wagon that Amateur Fettler reported on before he became Armless Fettler.
The under frame is designed to concertina fold up and includes the twist locks, braces, bogie mounts, brake handle and ferry hooks. The deck is designed so the headstock fold down and into the under frame locking into position at the ends holding the completed model together. Then tap out the bogie mounts, screw on some bogies, stick in some couplers and then go nuts with some paint.
Weather it will work like that or if it is going to need to be soldered or glued to stop the parts unfolding we have yet to try out.
Maybe one will be made up, just to find out.

Type 16/18 bogie frames
Also the etched type 16/18 bogie frames designed for 14mm axles and 2mm Association pin point bearings. These will require side frame details but the hope is they will make building simpler as the etch can be varied for longer or shorter axles by packing the pin point bearings with the etched washers provided, each washer will take 0.25mm off the axle length, sort of one size will fit many.
excavation
To celebrate this long weekend, I have spent some time digging a space for the turntable pit. The first incision was made through the rubber layer to reveal the plywood underneath. I then resorted to the method of drilling a series of holes along the line that I wished to cut. I blame a lack of power tools more than anything else. The picture shows progress halted by the drills battery running out.
 After removing the underlying plywood, we struck the next problem. The various bracing under the layout.
 Fortunately with a smallish handsaw and some cunning I managed to remove enough of the offending articles to carry on.
 'I don't think they were holding up anything important...'
With all this done, the turntable dropped into position nicely. It sits level with the top of the rubber so that it should be a doddle to lay the track up to the edge.

I have also not fixed it into place yet so that it is easy to sort out the rest of the rotatie bit.
Sunday, October 23, 2011
Lining it up, and a bit of a rethink
I had a chance yesterday to do a bit of practical thinking about the location of the turntable. In the last discussion I was intending to set the rest of the track in place and then sort out the geometry for the connecting rails. When I finally got round to it, I discovered that things were not quite so simple.

The plan has been for the turntable to rotate between 2 fixed positions to get round the insurmountable problem of indexing it by eye. My intention was to introduce locomotives from the top right track, turn them and run them off to the center right. I also intended to have the tracks lines up from the top right to the bottom left. Doing the geometry tonight its quite obvious that this won't work out. (UPDATE; looking at the plans from 1940 and 1955 the real thing doesn't line up either. However I can't get tiny men to push the damn thing round to solve the indexing problem.)
Looking at the whole thing it suddenly became clear that the obvious option is to run locos on from the center right, and rotate the turntable 180 degrees to run the locomotives off the same way.
(Just as a recap, the operational plan is as follows. The steam/diesel loco cuts of from the southbound train and moves back to the turntable. it is turned then moves back to the servicing area. it them moves through the shed to the loco ready track where it then departs with a northbound train.)
Saturday, October 22, 2011
In control
I've been doing a bit of thinking about location of control panels on the layout. There's 2 different competing demands. the first is that it has to be operatable (is that a word?) by one person at home, where it will spend 99% of its life. The other 1% will be in a drafty hall somewhere out in the exhibition wilds. This means that there has to be some plan ahead for 3-4 operators at times.
Most important is where to put the master control box. After a fair bit of thinking about it the middle seemed to be the obvious choice.
Deploy saws.....
 Next we need a base plate for the controller. I was trying to sort out a mathematical way to get the shape correct, but reverted to the seat of my pants instead.
 'Not that the seat of my pants are a rectangular quadrilateral'
 Almost neat and tidy, but better than just sitting it on top of the frame members.
its also reminded me that at some point I will have to paint all the framework.
Friday, October 21, 2011
A pattern forming?
Last week I received a couple of boxes of stuff, which I think is a circular thing (take something out, put something in sort of thing).
Among the bits was another little Kato underframe. No use for any real loco but shifting the frame of reference...
 OK, so it has possibilities. Whats under the grey plastic hood?
 So, the grey plastic clip is just holding the motor down. Out with the fret saw and we get....
 The next thing to note is that the PCB pickup holder is no longer held down. just what is it holding down?
 Nothing really important. with a bit of work, it has a bit of potential. Possibly as a Heisler, but also another Price's product.

OK so it doesn't have the right bogies, but the side tanks are useful to hide a multiple of sins.
Among the bits was another little Kato underframe. No use for any real loco but shifting the frame of reference...
 OK, so it has possibilities. Whats under the grey plastic hood?
 So, the grey plastic clip is just holding the motor down. Out with the fret saw and we get....
 The next thing to note is that the PCB pickup holder is no longer held down. just what is it holding down?
 Nothing really important. with a bit of work, it has a bit of potential. Possibly as a Heisler, but also another Price's product.
OK so it doesn't have the right bogies, but the side tanks are useful to hide a multiple of sins.
Thursday, October 20, 2011
Old movies
A bit of a first for me tonight. I attempted to take some videos of the layout. Now, its not easy shooting and driving, but I've sort of managed.
Don't look too close at the rough track work.
Don't look too close at the rough track work.
Wednesday, October 19, 2011
Theres more where that came from.
Over the last week or so theres been a bit of E-mail to-ing and fro-ing. The end result is the following.
Having rattled on a bit about building smaller layouts it was time to front up and start one.
(the boxfile layout not withstanding. I'm not happy with it which might be why its died a bit of a death at the moment).
Waihao Forks is a station which we have talked a fair bit about. It has a few things to recommend it. It's on a curve, is quite short and also has the added interest of a scissors crossover in the yard.
 ''The pubs not too bad either'
I spent a day at the weekend sorting out the track alignment to my satisfaction. Drawing things out full size beats buggering round on a computer any day.
 The tools of the trade. The curve radii are 600 and 750. Easy enough to make on a computer drawing package, then attach to a bit of card and cut out. These were done the old fashioned way using a tramel. Sellotape is used to stick the paper down to the floor (its big and flat, and we don't have a table)
 Here is the final plan, with the paper cut to the shape of the layout. It seems to pass the daft 'track shouldn't line up with the front edge of the layout'.
 While Mark was pottering away the other night, I got stuck into the hard job of sorting the sleepers out.
 Marking, cutting and placing all of these took 90 minutes. I didn't run out of anything (just)which surprised me. This is where things will sit for a while as I'm completely out of code 40 rail. Hopefully I'll have supplies by Railex so will be able to show people how daft I am by making track 'al fresco'.
Having rattled on a bit about building smaller layouts it was time to front up and start one.
(the boxfile layout not withstanding. I'm not happy with it which might be why its died a bit of a death at the moment).
Waihao Forks is a station which we have talked a fair bit about. It has a few things to recommend it. It's on a curve, is quite short and also has the added interest of a scissors crossover in the yard.
''The pubs not too bad either'I spent a day at the weekend sorting out the track alignment to my satisfaction. Drawing things out full size beats buggering round on a computer any day.
 The tools of the trade. The curve radii are 600 and 750. Easy enough to make on a computer drawing package, then attach to a bit of card and cut out. These were done the old fashioned way using a tramel. Sellotape is used to stick the paper down to the floor (its big and flat, and we don't have a table)
 Here is the final plan, with the paper cut to the shape of the layout. It seems to pass the daft 'track shouldn't line up with the front edge of the layout'.
 While Mark was pottering away the other night, I got stuck into the hard job of sorting the sleepers out.
 Marking, cutting and placing all of these took 90 minutes. I didn't run out of anything (just)which surprised me. This is where things will sit for a while as I'm completely out of code 40 rail. Hopefully I'll have supplies by Railex so will be able to show people how daft I am by making track 'al fresco'.
Tuesday, October 18, 2011
Squatters
Here you are sitting at home one night minding your own business, and suddenly there is a toot of a horn, a white van rolls up and before you know it there's people modeling in your garage....
 'damn pikies'
Mark of marks model works was in town (well, Bunnythorp sort of counts) and so brought his modeling gear and layout up. there was also time for plenty of free ranging discussions on a variety of modeling (and non modeling) topics.
I also had a chance to indulge in a bit of silliness.
 'Hand over the honey, and no one gets hurt'
 'damn pikies'
I also had a chance to indulge in a bit of silliness.
 'Hand over the honey, and no one gets hurt'
Sunday, October 16, 2011
What lies beneath
After 3 hours yesterday, the layout looked like this.
 'Well, I suppose its a bit tidier...'
Again, the change is all under the hood, so to speak. As we here at MD believe in showing the unvarnished truth to our readers, here is my wiring layout in all its horror.
 'You can also get it in a tin from Watties'
The green wiring from the top is the control panel to the point frogs. The auto reversing module for the crossover frogs takes center stage. There are 2 connecting plugs to the next module on the left. One for the main line and one for the loco depot as they will be separate power districts. in retrospect I should have used different colour wiring for them. The brown wire is present as they didn't have any hookup wire in black when I went into Jaycar that weekend, so I had to make do. I've used tag strips to be able to isolate parts of the layout on the off chance that I need to track down a short. Chances of shorts vary from non existent when operating on ones own to close to 100% at an exhibition of when guests are due.
At the end of the 3 hours, the Da could run onto the shed tracks and both main lines. The next couple of jobs (in no particular order) are;
-Sort out the track heights at the module joins. something that would be OK in the larger scales is a big no-no in this one . 9mm modelers must have it easy.
-get the track positions for the back tracks on the depot sorted, so that I can then lay the track across the turntable area.
-think about doing some real modeling again. Its been an awful long time since I've made a model
Saturday, October 15, 2011
Saturday morning
Well, its another day, another trip to Jaycar for wire. For some odd reason I've managed to put 20M each of red and black wire into the 2.4M sections that are so far wired. This really doesn't make sense to me somehow, but the lack of any leftover material in the man-sion seems to confirm my observations.
For inspiration this weekend, I'm back to the 2mm chaps, who seem to have cracked building small sensible layouts.
 'Framsden. photo from RMweb by Jerry'
This is a neat wee (4-5' across) layout with a novel shape and a simple track plan. I wish I was 1/2 as original with my ideas. Actually, none of my ideas are really original, I just distill and stuff historical track plans into smaller spaces...
Friday, October 14, 2011
Container Madness
Here at Mini-Me-Wagons the NZ120 division the Mark's Model Works while we have been waiting for the test etches for the IA and IB to turn up from Scotland we've been looking for containers.
Along the same theme as the wagons we are looking to do it on the cheap
Of course if we allow the models to be viewed, only from a distance, so all the details that DB has got with those lovely cast examples are not a big driver.
Travelling around the internet the cardboard-paper version found at http://www.scalescenes.com/products/T031-Shipping-Containers look to be exactly what we need and if any of you out there have any good photos of local examples we should be able to design our own range of NZ120 containers.
The OO sheet can be printed at 63% to make it NZ120 and a special trip into work to see the friendly draught person

Printed
Cut
Glued
Cut again

Then glued again
One 20 ft ISO container in 120th scale
Not sure about this gluing business, just don't have the patience for it.
Still only cost, the time and the original 3.99 GBP for the download.
Thursday, October 13, 2011
Coal Containers
 DB says: I see someone was asking for a pic of one of these on NZ120.org
This seen at Oamaru in August, with an older HLC at right, so if you have the plans in the Journal, you can probably guestimate the dimensions pretty well, as the footprint will be the same
If you click here you can see examples of modeling earlier HLC versions in NZ120. Armless Fettler still has those spare ones for sale if you want to make a donation to the DG 2376 Restoration Fund...
Wednesday, October 12, 2011
Steps forward, steps back
Yesterday I arrived home to a package from the US.
Step forward; Auto reversing unit installed on scissors crossover. the center crossover is now powered and switches with a nicely audible click when it changes. (I'm a sucker for a click to tell me something is still doing its job).
Step back; Installing a decoder in the twinset railcar, only to have the smoke escape after 5 minutes of running. All rather odd. Will have to check with Digitrax about repairing it, even if it was only $20.
Sunday, October 09, 2011
Idiocy in the Weekend....
Am_Fet scribbles:
They should never have put video cameras on phones....
The Cb lopes along the Paekakariki yard at pretty close to top speed (with inane comments from the camera crew).
They should never have put video cameras on phones....
The Cb lopes along the Paekakariki yard at pretty close to top speed (with inane comments from the camera crew).
Saturday, October 08, 2011
The delivery
An impromptu visit from Fetler d'Amateur and his family also brought gifts. Even reduced to a left hand hes still very useful (and we may expect more from him when he has 2 hands back).

The first parts for the turntable pit in 3mm acrylic sheet (he first attempt in plastic failed dismally). These were cleverly designed with a 3mm hole in each corner so that it was easier to line everything up. however I could not find a bit of 3mm brass rod. I also only had 1 3mm drill. Fortunately the 2 'good' files that I own had the right handle size.

Note the sleepers for the turntable track marked in position. I will make up a shaper to sculpt the sloping ground at the bottom of the pit. Acrylic is not the easiest material to glue together. However I did have some 5 year old glue from another project which says on the label that its thick acrylic cement. It was quite a bit gummier than I had remembered but seems to have done the job.
 'In Position'
The pit is designed with a larger top so that I can let it into the module. It's the same thickness as the track base so I'll just be laying the track on top.
Putting it roughly into position has altered the order that I will be doing things. My initial plan was to position the pit and then lay the track up to it. I can see now that I will have to make the track first (with a 180mm straight piece in the correct spot)and then position the turntable and cut the track. Discussions have now turned to the turntable itself.

Powering the turntable will be one of the Switchmaster point motors that I've had for eons. its got a top speed of 4 RPM so will do a 1/2 rotation in about 7 seconds. this seems to be about right speed wise for me. lining up will be simplified as its a stall motor that will just run the turntable up to a block and stop.
Unfortunately I've run out of flux to solder the track up with, so it will have to wait till next week.
( Enquirys about avaliability are rather premature as theres still no ideas about the table mounting and if it will actually work like it says on the box. And speaking from personal experience, acrylic sheet really ain't cheap.)
Friday, October 07, 2011
Out of Action.....
Am_Fet types (one handed):
I noticed my last post on the blog was dated Sunday the 18th. Interesting, as the next evening my world got....even more interesting.
A cooking oil fire and a reactionary action to save the house earned me a ride in an ambulance, a close look at the emergency department at Hutt hospital, 4 days of interesting food combinations and boredom followed by a look at an operating theatre....end result is a right hand that Vincent Price would be proud of and a seriously sore right thigh from where the (large) skin graft came from.

(Apologies for the blurry photo, its off the phone cam)
Things I learned in hospital:
- All visitors are to be cherished (thanks to Herr and Lady Druff for making the drive down...It means more than they'll ever know).
- A smartphone is mandatory! With sms, outlook and hotmail in the palm of my hand I was in constant touch with friends and family.
- All emergency and hospital staff (fire, ambulance, nurses, doctors) are SAINTS!
Anyway, I'm now at home in recuperation mode....I don't now when I'll be able to pick up any tools again as rehabilitation looks a bit of a long road and depends on my ability to regain a strong pincer grip again. Computer work is being done, but its a bit tiring with just the left hand.
Despite all this, I'm very upbeat....I am VERY lucky it wasnt worse, plus I get to gross everyone out with pictures taken during dressing changes. Oh, and the painkillers are great.
And who would have thought my graft was being held on by SuperGlue while it took! Now THAT was an interesting conversation with the nurse (while she picked most of it off with tweezers)....
Thursday, October 06, 2011
Another day
Well, another session in the Man-sion tonight. This consisted of lifting all the track on the north end module to put in the point throws. These things would have been easier if I had thought of them beforehand, which is a statement I tend to make allot. I have wondered at times if the whole project would be easier if I had some help. Thinking about it tonight, I've decided that for the most part I'm a bit of a lone wolf when it comes to the day to day building stuff on the layout. I don't tend to be particularly organised, so I just pick up jobs when I feel like it, or if it has to be done before the next step. Hence tonight's taking up track so that I can fix track more permanently in this area. I also have to do something about this area in particular as I can't finish things up till its done.

This is one place where I've subcontracted out the work, and with luck the first iteration may be here at the weekend. After this is in and working (the most important bit) I can then sort out the positions for the rest of the track around it.
Things might change once its time to do the scenic work, but for the most part I'm happier doing the track and electrics on my own. Its easier to spot and fix mistakes on my own.
The otehr issue is that if I had guests I would have to clean up and locate all the tools, rather than spending the obligatory 5 minutes looking for then every time I need a new one.
Sunday, October 02, 2011
Hidden progress
Got to spend some quality time in the shed today. Yah.
If I had soldered together a couple of random bits of brass into something vaguely approximating a prototypical object I would have felt like I made progress. Instead I spent the afternoon soldering up the power feeds for the loco depot on the middle module. Turn it over and nothing to show for 4 hours work. And, while I can now run a loco on all the tracks (bar some rail adjustments where things are a bit tight) , I still don't feel like I have achieved much at all. Just another box ticked, and a few more things to fix. At least the dead shorts I discovered were easy to find and fix.
And for some odd reason the Da DCC chips keep reverting to old deceleration settings. All a bit of a shock when one kills the juice and watch the loco sale blissfully on towards the end of the world.
Saturday, October 01, 2011
Inspiration
Well, I must admit to being rather uninspired of late. I have not really lifted a tool in anger on the layout or picked up a plan. I have been doing a bit of research for a left field 2mm fine scale layout, but my brain is still mindful of having too many projects on the go at one time, so its in the box for the time being.
Today an off the cuff visit by an old friend and a suggestion to visit fielding to see if there was anything interesting their brought a bit of a surprise in the form of F163 running up and down the yard with 2 56' cars. A reminder that I need to come back to take some photos and do something useful with the bits I have from the 2mm association. Unfortunately I had no camera with me to record any of it.
Second up is the arrival of the September Railfan. Photos from lucky photographers of the Dl class moving. Also a great article on the Wairarapa rail cars with plenty of photos which is leading to deep primeval stirrings again on a Rimutaka incline layout. Unfortunately this beast is harder to keep in the cage. Maybe if I build some 3mm scale wagons it might go away....
Subscribe to:
Posts (Atom)