
In the second part of our end of year 'specials' I'm going to look into my crystal ball and try to predict what the coming year might hold for the scale.
- On the immediate horizon there is the promise of an etched Ds and Dsc models. I'm looking forward to see what these look like in the flesh. The initial etches seem to hold quite a bit of promise and personally I'm looking forward to them. If anyone mentions a De I'll have to ban them from the comments section.
-Laser Etching; this sleeping giant could revolutionise the scale as we know it. the possibilities here are endless quite honestly. The initial work that has been done suggests that amazing things are possible if one wants to spend the time learning CAD. I've also been told that the etcher enjoys the challenge doing this stuff as its so much more interesting than the run of the mill stuff that normally comes through the door.
-I think that there are huge advances that could be made in the wagon underframe department. One only has to look at the 2mm website to see what can be done with brass etching, and we should be looking at moving towards this sort of etched brass fold up underframe with pin point bearings. The axle lengths are a problem currently though.
- Steam loco's; There is so much potential here, both in the modified ready-to-run and the start-from-scratch areas. It will take a bit of thinking outside the box, but I'd like to think that by this time next year that there will be some big moves in this area. The only problem I can see here is that the costs for this may well be prohibitive for some modelers,. This in turn affects the economics of the exercise in that if one is going to do a kit of a loco then the number of sales required to break even has to be set at a lower number cf other scales which increases the price, possibly above the price point for most modelers. This is yet to be proved or disproved in a real world example and I would love to be proved wrong ( but I'd be surprised if I was).
-Nz120.org. the take up on this has been quite good, but there still appears to be some reluctance for people to use it as a workbench blog style thingy. Some still persist in uploading pictures to the yahoo group where only a limited number of people can see them. I assume there is a stack of good modeling going on out there but the wider world does not get to see much of it.
Any other thoughts gentlemen?
Thursday, December 31, 2009
Wednesday, December 30, 2009
A wrap of the year
well its that time of the year to look back on what has been and what is to come.
I'll split this into 2 posts. Today its bouquets and brickbats for 2009.
To single out anyone is hard but I'll give it a shot. This year the awards would go to:
-Trackgang; For rescuing Pats legacy and making it available to modelers once again, with a web ordering service and fast mail. Its been a pleasure to deal with and I've had no problems (and I see we are up to 157 orders). I'd also like to thank Russell for taking the punt purchasing the molds. No one is going to get rich out of this scale any time soon so it was a huge leap of faith. thanks for doing it.
-My fellow writers; Amateur fetler and Kiwibonds (Darryl, you just aren't cool on the net unless you have a nickname!). Having 3 different voices instead of one has really helped. We all have different ideas and styles but its helped a lot at times when I've been burnt out at work to be able to take a break, and I think we all brought something different to the table.
-Wes; For suggesting the Nz120.org site and doing all the donkey work for it. its given all the modelers in the scale somewhere to discuss stuff, and swap ideas, no matter how daft they are. it may not seem much, but it is the only such site for any scale modeling New Zealand railways which means we are in the forefront on the web, even if we are 30 years behind in other places.
-Cabbage and Amateur fetler (and Kingi) for making a bold step into laser cutting, which from the few results to hand so far shows great potential for future developments.
The brickbats section is quite hard, as I'm hardly in a position to tell anyone that they are crap. Maybe a things to improve on section would be a better name.
- I think we as a scale need to start working on catching up with the rest of the world in our modeling. By this I mean making do with commercially available mechanisms as a basis for locomotives (something that S scale guys stopped doing 30 years ago). We should no longer have to accept 'close enough' for our modeling. Wee duggie has moved in this direction with an etched Ds shunter and the possibility of an etched correct Dsc. In the steam loco area the field is wide open for anyone to exploit, and the technology is all there for some great strides to be made.
-Not any one scale related, but I'd like to see the guild move into the 21st century with its Internet presence. Some of the 'why is this published' sections in the journal would be the local group reports. These are to all intents and purposes completely useless unless you were actually at the meetings. There's no extra pictures of anything that's described, and these sections would be far more suited to a blog/forum style presentation.
There, that wasn't too hard, and more positives than negatives. next post will be what the coming year holds.
Tuesday, December 29, 2009
DX in Half a Day 4: Replicatious
 DB says: I've been living like a recovering alcoholic all week, sitting in the train room with a bad case of the shakes, slowly building masters, while resisting the urge to just stick those masters on and just finish a damned DX already... But no. I've been good. I've abstained. Its been two weeks since I last bolted through anything in NZ120 without a care in the world.
Tonight I was relieved to stick the masters in a box, pour some rubber in to make a mold and begin some casting.
 The casting session dragged out over more than a day as its been a while... Most of my casting is done in very small efforts, so I use a disposable plastic spoon to measure 3 spoons of this and three spoons of that into a disposable picnic shot-glass. Then I'm supposed to use the handle of a disposable fork to stir it up well and apply drips of resin into the molds.
This time I forgot, and used the mixing spoon for the whole shebang. When you do that, you end up pouring unmixed resin (the layers on the spoon from the measuring process don't get mixed in thoroughly) into your mold, which won't set of course, and even when you take the whole soggy mess out hours later, there will be some sticky residue left behind on the mold surfaces to attach itself to future pours and ruin them as well... So: measure the resin with the spoon, pour with the fork handle. I usually get 5-10 or more pours out of each disposable item, each of which only costs a few cents, so this is an economical way to go for me.
 At long last, the assembly of our clone army is proceeding as planned. Darth Tyranus will be pleased. As will Temuera Morrison, who will no doubt be doing the voice-overs for the DCC sound chips.
 Speaking of which, has anyone out there put DCC sound into an NZ120 model yet?
Monday, December 28, 2009
Assuming the position
In the mail box for the last post before Christmas I received a box of unassembled microtrains couplers. This was ordered from Kelmara loco depot who also stock a fair bit of TT scale stuff (i must order some figures from them at some point). I must admit to a bit of hesitation about this purchase as previous experience with assembling these had not been good. From what i can determine the historical process ran something like the following. Holding the base with one had position the 2 bits for the coupler with a second hand while positioning the spring with a 3rd hand while positioning the lid with a 4th hand while sealing the lid with a hot iron with a 5th hand. this is of course assuming that you get it all together in one go without the tiny spring deciding it want's to fly free to the nether reaches of the modeling room. I always wondered if they were assembled by the Indian god Krishna.
Fortunately there has been a few modifications made over the years, and I've got smarter (or more cunning) in my older years. the lids now clip into place. If you use a needle of some sort to hold the base it almost proves possible to do the entire assembly with 2 hands.
 "Doing the work of 3 hands"
To cap it all off there are extra springs in the packet (well, there were in mine) and I needed every last one to assemble 10 pairs of couplers. I did spend some time assuming the position for another hunt for a missing spring, but for some odd reason I found every one that vanished.
 "Cor, it's like Aladins cave down here..."
Fortunately there has been a few modifications made over the years, and I've got smarter (or more cunning) in my older years. the lids now clip into place. If you use a needle of some sort to hold the base it almost proves possible to do the entire assembly with 2 hands.
 "Doing the work of 3 hands"
 "Cor, it's like Aladins cave down here..."
Saturday, December 26, 2009
Holiday Archeology pt2
The second in this set of posts.
The other well known railway in golden bay was the Takaka tramway. This ran from the Waitapu wharf down the main street of Takaka and off up the valley a ways to a collecting of sawmills.
Unfortunately there's seems to be nothing left of this railway (it did close over 100 years ago). There was no evidence of any railway fittings at the wharf, and the rest of the route has been covered by roads. Google earth suggests that there are some signs of the formation left but these are on private property so are virtually impossible to get at.
No photos with this post as there is nothing left to see. I thought I had found some bridge abutments but these turned out to be associated with the roads in the area.
Thursday, December 24, 2009
Holiday Archeology
A couple of days in Golden bay gave me the chance to have a hunt for the remains of a couple of narrow gauge railways in the area.
The first was the Puponga coal company line at the base of Farewell spit. This line ran from a mine out into Golden bay, and is covered in Peter Dyers book which is a cracking good read. I've reproduced a map of the original line here.
 Driving along the road the first sign on anything vaguely ancient is the remains of the wharf extending out into the harbour.
 "It would look better without all the water in the way..."
In the next shot we can see the first causeway built when the companies wharf was further north as shown on the map. It was replaced by a later track alignment which is far harder to get at as it lies on private land. and is a bit further south on the map. the current road runs along this causeway

The modern road roughly follows the line on the map until it gets to the bins and mine at the other end. This is on DOC land and is an easy graded 2 minute walk. Even then there was some skepticism articulated by the lady of the house.
 "You want me to come up there?"
The first evidence for anything ever having been here is a large retaining wall.

I then ran into problems caused by A) not having brought the copy of the bins map I have and B) DOC not having a plan anywhere on site. This is a pity as some other sites I've seen like this (Cross Creek, Charming Creek to name 2) have excellent displays putting the remains in their original historical context. I hope its something that they rectify in the future.
A bit of poking around in the flat bit above the retaining wall however produced a few more items. a pair of tracks leading into a slip which I assume is where the mine haulage line came out.
 The remains of the hauler lined up with this.
 Further along was a skip tipper(try saying that fast 3 times on Christmas day).

There was also some evidence further along the same level back towards the car park of several other small drives, with some coal still in evidence in the area.

So, if you ever manage to make it to this remote part of the country (and the guys who built the road across the Takaka hill were paid by the curve) this little spot is well worth a visit. I've also discovered that there were some other industries that could be worth checking out up here including an ironwork's location in the same area as a brewpub that could repay a few days investigations.
Finally, when we started out on our days wanderings, the lady of the house asked why there was a bungee cord in my backpack." Just in case" was the reply. McGiver eat your heart out.
 "Walking repairs"
The first was the Puponga coal company line at the base of Farewell spit. This line ran from a mine out into Golden bay, and is covered in Peter Dyers book which is a cracking good read. I've reproduced a map of the original line here.
 Driving along the road the first sign on anything vaguely ancient is the remains of the wharf extending out into the harbour.
 "It would look better without all the water in the way..."
In the next shot we can see the first causeway built when the companies wharf was further north as shown on the map. It was replaced by a later track alignment which is far harder to get at as it lies on private land. and is a bit further south on the map. the current road runs along this causeway

The modern road roughly follows the line on the map until it gets to the bins and mine at the other end. This is on DOC land and is an easy graded 2 minute walk. Even then there was some skepticism articulated by the lady of the house.
 "You want me to come up there?"
The first evidence for anything ever having been here is a large retaining wall.

I then ran into problems caused by A) not having brought the copy of the bins map I have and B) DOC not having a plan anywhere on site. This is a pity as some other sites I've seen like this (Cross Creek, Charming Creek to name 2) have excellent displays putting the remains in their original historical context. I hope its something that they rectify in the future.
A bit of poking around in the flat bit above the retaining wall however produced a few more items. a pair of tracks leading into a slip which I assume is where the mine haulage line came out.
 The remains of the hauler lined up with this.
 Further along was a skip tipper(try saying that fast 3 times on Christmas day).
There was also some evidence further along the same level back towards the car park of several other small drives, with some coal still in evidence in the area.

So, if you ever manage to make it to this remote part of the country (and the guys who built the road across the Takaka hill were paid by the curve) this little spot is well worth a visit. I've also discovered that there were some other industries that could be worth checking out up here including an ironwork's location in the same area as a brewpub that could repay a few days investigations.
Finally, when we started out on our days wanderings, the lady of the house asked why there was a bungee cord in my backpack." Just in case" was the reply. McGiver eat your heart out.
 "Walking repairs"
Wednesday, December 23, 2009
DX in Half a Day 3: Originals In
For the blog readers who aren't already on holiday, here is an update from DX central. For those that are, you can always read this when you get back to work on Monday.
Over the past week I've been making up some DX bits to cast. So far I've made a decent nose, a roof that looks like ass, a rear end that isn't much better, some ducts and headlights.

I intend to cast these, which has lowered my normal frenetic pace and in hindsight, I could have ordered some of these bits from Russell at Trackgang, but they're made now. If you have a scratchbuilding project underway, you might want to ping him and see if he can provide any bits to save you time.
Monday, December 21, 2009
DX in Half a Day 2 : Some assembly required
DB says: One of the downsides of returning to the rat-race a month ago is that there isn't nearly as much time in the week for modelling. On the plus side, my wallet didn't know what hit it on Tuesday. I'm thinking about buying some new lenses and taking six months off...
I've managed to fit in a few hours this week though as I start to sort out my DX puzzle. First up, here's some bits for your perusal. As with my 'paper' cabs, the thin styrene sides .(25mm/.005in) are backed with clear glass-ic styrene to give 'flush-ish' windows and a stiffer structure.
 The bases were cut from thickish styrene, but I'd almost be tempted to laser them in future, although this might beyond the abilities of my Laser Gun Wielding Stormtroopers without turning everything into a smoldering puddle of white. Given the bits, it was then a pretty straightforward process of sticking tab A in slot B, although unlike Mark's work, I don't have any tabs or slots, preferring to guess where the bits go and estimate the right-angles for that homely look.
 I used a fine tipped permenant marker to do the 'window rubbers' before sticking the 'glass' in and have identified a few changes that I'll make to Mk2 of the CAD drawing. Long hood sides were straightened overnight (bent over a styrene rod with paint tins weighing down the ends) and attached thus:
 I then set about making a rear end to cast. After carefully making one up to match the plan I find that... my hood as attached is way too narrow, despite attaching it X distance in from the edges per my feeble reading of the plan... Dammit, here I was thinking I was doing a bang-up job. It' not often you make a diesel hood too narrow, its usually the other way around to clear the mech. The Atlas Dash 8 is amazingly skinny...
The anorexia plastica was remedied by simply attaching another etched hood side over the top of the etched hood sides and this brought things out to the correct width (picture not shown). Its not as if I don't have etched hood sides coming out my ears.
Completely Off Topic: Getting into the Christmas Spirit
DB says: Yes, we had some snow today on Long Island - 26 inches, or 66 cm for those working with advanced measuring systems. I managed to get some DX-ing done after the shoveling and there is a post scheduled for later today covering the previous week's efforts just in case you thought we'd all given up on the whole modelling thing.
But for now, forget about mowing the grass, sit back in your collapsible sun chair, put the radio onto the cricket, grab a bevvie and be glad you're in the bottom hemisphere.
My neighbour starting to dig out his cars at noon (a black Maxima and a white long-dead Chevy Lumina in case you can't pick them): And we eventually venture out in the cold:
 Moar power!
 It's Beginning To Look A Lot Like Christmas

But for now, forget about mowing the grass, sit back in your collapsible sun chair, put the radio onto the cricket, grab a bevvie and be glad you're in the bottom hemisphere.
My neighbour starting to dig out his cars at noon (a black Maxima and a white long-dead Chevy Lumina in case you can't pick them):
 And we eventually venture out in the cold:
 Moar power!
 It's Beginning To Look A Lot Like Christmas
I'm off...
To golden bay for a couple of days, so things might get a bit slow around here.
Maybe Darryl will write a quick post on how to shovel 16" of snow efficiently!
Maybe Darryl will write a quick post on how to shovel 16" of snow efficiently!
Sunday, December 20, 2009
On Competitions
While washing the dishes this morning, my mind wandered (as it does during domestic tasks like this) to some more ponderings on competitions, which in part has been promted by Amateurfetlers last post for the year (and then the one after that).
If you have a look at the competition rules (to be found here) there is a distinction drawn between scratch built and kit built, I guess because they require different skill sets. To be in the scratch built category 50% of the model must be hand made from basic materials. My question was ; Where does this put CAD/laser cut models. If someone is going to sit down and do the work on a computer then is this still hand crafting? and whats the difference between using this technique and making a master by hand to make a mould to cast 10 or so (Note that the rules define a kit as a set of parts commercially available, so if you make 10 for yourself from a mould is it a kit?).
What are everyone else's opinions on this?
J5 - Update
Am_Fet writes:

If anyone is looking for me, I'll be in a dark room trying to uncross my eyes...

If anyone is looking for me, I'll be in a dark room trying to uncross my eyes...
Saturday, December 19, 2009
What colour cayon?
I've been doing a wee bit more work on the signal boxes just putting on some of the bracing outside. As I was sitting at the work bench the other night my brain (which was not really involved with any other important tasks) started wondering what colour I should paint it. I guessed it would be whatever colour the paint colour central committee had decided was accurate for the NZR 'salmon' from the 50's. last night I had a look at the colour pictures I had. Imagine my surprise...
 Duck egg blue? WTF~!!!!!!
Now this is a bit of a surprise to me, and I'm hoping that one of the more knowledgeable readers can point me in the right direction for a colour match. Otherwise I'll have to assume the position in front of the colour wonks and ask just whats going on here...
The pictures comes from the Paekakariki historical society site which has all sorts of goodies including some articles from the observer)
Friday, December 18, 2009
Friday Night Funnies: 0-5-0 (The Hand Of God)
This just in from from the There's a Prototype for Everything Department:


Thursday, December 17, 2009
Only 100 sleeps to go
To the convention of course.
While I myself will not be present in body, many of you will be making the trek, possibly even adorning yourselves in tribal colours (just please no hats, the hats wearers are just a tad sad. there, I've said it out loud).
One thing I would suggest is that everyone start thinking about what they are going to enter in the competitions. We need a big showing here to show that the scale is resurgent. I'm planning to send some models down with friends to enter.
The more popular categories tend to be overloaded with S and 9mm modelers, and given the detail problems that we face its almost impossibly to compete with them on an even basis. However, using the scales advantages to the full I would suggest that trains or scenes would be a better idea.
Maybe we should start a thread on the NZ120.org site? Or does everyone prefer to play secret squirrels?
UPDATE: the rules for the competitions and sundry data can be found here
Wednesday, December 16, 2009
Set Lasers to "Explode"...
Am_Fet writes: Mostly everyone I talk to in my close circle of associates here in the capital has lamented the fact that they havent had the time to really do anything over the last month as we wind down (up?) to the end of the year. Even Cabbage (He of the "Laser Wagon in a Weekend") already has his work calender booked through to April and has been able to measure the time spent at his workbench this month in minutes rather than days.
However, a brief spurt over the last two days has allowed for a few meetings plus deliveries of the latest output from our "Mr Laser".
Just to show some of us are more prone to mistakes than others, this is a J wagon I'm playing around with for the Head Druff. Numerous issues here, but I've found my main problem from a personal perspective is trying to shoot all the design bugs in my head before it goes to print, and then losing interest 3/4 of the way through a project because there is nothing to show for my time (to whit, the OM, VRB, etc...). So, this is a first run after 30 minutes drawing and pondering (and yelling "Damn the Torpedoes!").

First issue was Mr Laser doing it in 1.0mm styrene instead of 0.5 (communications at fault there). This resulted in the laser needing more power to do the cut, hence it "blew out" (to use the technical term) some of the parts that were stacked beside each other. The doors suffered the most, followed by the sides. However, the planking and ends worked okay, so we are on the right track.

Cabbage has put forward the plan that it will work better in 0.4 wood, and so thats what we'll do in the new year.
In other news from the Hutt Valley Car and Wagon Works, I've got a ZH in my bag to assemble over Xmas, lalover also has one to try (an official convert from 3/16ths?), A 3/16ths ZG was delivered to Skippy to try, Drew has 3 (Yes! 3!) 1:24 La 6 tops to assemble after another mis-communication with Mr Laser (not that he's complaining though!) with possibly more designs in that scale to follow and a Xmas coffee with the erstwhile Squadron Leader will see the undergubbins for the ZG emerge as a 9mm UK for his layout (again in the New Year).
Seeing as we are now at the end of the year (and this will probably be my last post before 2010), can I just note how far we've all come this year. A big thanks to you all for staying involved and feeding your enthusiasm back into the scale. I would especially like to give a special mention to Wes and the Head Druff for their time in making sure the scale has a "Shop Window" on the web, and to Russell for his continuing work with TrackGang. And with the new projects currently underway (such as the DS and DSC), I honestly think the next year will be a pearler!
Finally, can I close by wishing you all the best for the holiday season and a safe and productive new year.
Tuesday, December 15, 2009
Laying it out
There are some huge differences between hand laying track and using the store brought items. In the old days one would just grab some points and flex track and just stick it down willy-nilly so that it looked like the plan you had sketched on the back of the fish and chip wrappers the night before.
With hand laying track its all different and there's something called planning which one must do. This involves firstly laying out the center lines of the track. with such a complex track layout I went with the easiest point to do which is the join between the 2 boards with the station building on it. I marked out the center line, then the station platform. The first line is marked out based on the loading gauge (checked with a Da) and the outside ones based on what I had premeasured in an old post.
With hand laying track its all different and there's something called planning which one must do. This involves firstly laying out the center lines of the track. with such a complex track layout I went with the easiest point to do which is the join between the 2 boards with the station building on it. I marked out the center line, then the station platform. The first line is marked out based on the loading gauge (checked with a Da) and the outside ones based on what I had premeasured in an old post.

OK, so I am cheating to use flexitrack to see if the curves are OK. I'm still trying to work out how to draw the curved bits in, but apparently it involves a tramel (which is not an East German car), and my first attempt to build one last night was a bit of a dud.
One thing that is becoming apparent very slowly is that I might not be able to fit in all the trackage that I want. Maybe if I had drawn an accurate plan in the first place.....
Monday, December 14, 2009
Milking it: the Hoki Train
DB says: Making a UK mold was the best thing I've ever done in NZ120 - I must have run off about 20 of the little buggers by now.
The Midland line isn't all coal trains and skittles, you know. For the past few years, trains 827 and 828 have run back and forth across the Alps moving dairy traffic from the plant at Hokitika on weekdays during the season. Now that DBR 1213 has migrated its old bones north, it's usually powered by two DCs, with one of them taking the train down from Greymouth in the afternoon as X6 shunt. It then gets loaded with milk powder, butter and other dairy products and comes gingerly back into Greymouth across some beaut old bridges in the early-evening to depart for Christchurch after dark.
The 40 foot lo-cubes were covered in this blog a few weeks ago, and the 20s are fresh pours of those covered last year. These ones are plain white resin with some leftover transfers and the blue line was drawn in using a blue permanent marker. They'll be weathered a little later on and the UKs painted up with the details visible on the rightmost 40.
The Midland line isn't all coal trains and skittles, you know. For the past few years, trains 827 and 828 have run back and forth across the Alps moving dairy traffic from the plant at Hokitika on weekdays during the season. Now that DBR 1213 has migrated its old bones north, it's usually powered by two DCs, with one of them taking the train down from Greymouth in the afternoon as X6 shunt. It then gets loaded with milk powder, butter and other dairy products and comes gingerly back into Greymouth across some beaut old bridges in the early-evening to depart for Christchurch after dark.

The 40 foot lo-cubes were covered in this blog a few weeks ago, and the 20s are fresh pours of those covered last year. These ones are plain white resin with some leftover transfers and the blue line was drawn in using a blue permanent marker. They'll be weathered a little later on and the UKs painted up with the details visible on the rightmost 40.
 I'm up to four completed UKs with 40s and two with 20s as I type this and intend to resume production this weekend after running out of MT bogies a week or so ago, with my dealer of such substances being (oddly) out of them. Must be global warming or those theivin' zombie goblins or something. I received some last night from a competitor (whatever did we do before the internet).
As the UK (and other modern container wagon) bogies are a fair way inboard, I had been cutting off the couplers, saving them for other uses (locos, 4 wheelers etc) and gluing the revolutionary 'underslung' couplers straight to the wagon underside to get me a nice low wagon with correct coupler height (as discussed in the 40 footer post), and this has been working well. This time, I cleverly ordered a bulk pack (10 sets) of bogies without couplers (as used on articulated US stack cars) to save me the chopping hassle, and 10 sets with couplers for other wagons. Noice.
Sunday, December 13, 2009
Tis the season
Just a note to all the regular lurkers here that updates will start becoming a bit haphazard here for the next few weeks as the festive season makes inroads into modeling and blogging time. I'm even considering taking a holiday out of internet range (its not hard in the Nelson region...)
Saturday, December 12, 2009
Tracklaying and Tanking
As a bit 'get out of your comfort zone' stuff, I have spent the last couple of days learning how to make pointwork. Unfortunately this has been in S scale, but fortunately this means its a bit bigger. The tutoring has been very good, with the added bonus of a stream of cups of tea. At some stage I'll write a post on how to go about this in a bit more detail. The method certainly seems to be a bit easier than some I've seen on the web (especially for forming the frog, which is a doddle), as it allows you to build track formations tailored to individual spots rather than building track on a template that just looks like a brought switch. The results are beautiful flowing track that I'm looking forward to having a crack at in the smaller scale. It seems to be quite easy but I think that's down to actually having the correct tools for the job, and the experience of the teacher. As for the tolerances I think they work to far finer ones in the larger scales, where as we have the joys of running a wide variety of NMRA compliant and Peco wheels at the same time. I'm not sure what thats going to do to the whole thig. I've also just remembered that I have to get 8 coupled steam locos to operate through them faultlessly as well. How hard could that be....
Time to get Mr Woods to stock some code 40 rail. I also found some 3mm dark brown craft rubber at Para Rubber that is quite hard and should be good to use as a track base. It does however smell rather solventy at the moment, and is sitting in the garage till it de-smells a bit.
I've also been working on some wagons. I found last week in an old local rag a plan for a Uc16 tank wagon with 2 domes. This has restarted my tank wagon build that dies the first time after I discovered I'd brought the wrong sized dowel. I started off by cutting the pieces to length and then sanding the dome shape into the ends. Its a bit of a challenge but quite a relaxing way to spend an hour at the workbench. I'll have to do a bit of filling here to fill up the end grain so that I can get a smooth surface.

The sides of the dowel were a bit dinged in places so I PVA'd a layer of thin paper (in retrospect tracing paper would be better as its a bit stiffer) onto the sides.
 'Crap Christmas crackers'
When dry this was painted black and, after the paint had dried, sanded back smooth for a second coat.

I have to cut up some 2mm plasticard for underframes (the plan say it should be 1mm, but this won't be stiff enough and but this is starting to look a nice straightforward project that will hit its Waterloo when I attempt to make the domes.
Time to get Mr Woods to stock some code 40 rail. I also found some 3mm dark brown craft rubber at Para Rubber that is quite hard and should be good to use as a track base. It does however smell rather solventy at the moment, and is sitting in the garage till it de-smells a bit.
I've also been working on some wagons. I found last week in an old local rag a plan for a Uc16 tank wagon with 2 domes. This has restarted my tank wagon build that dies the first time after I discovered I'd brought the wrong sized dowel. I started off by cutting the pieces to length and then sanding the dome shape into the ends. Its a bit of a challenge but quite a relaxing way to spend an hour at the workbench. I'll have to do a bit of filling here to fill up the end grain so that I can get a smooth surface.

The sides of the dowel were a bit dinged in places so I PVA'd a layer of thin paper (in retrospect tracing paper would be better as its a bit stiffer) onto the sides.
 'Crap Christmas crackers'
I have to cut up some 2mm plasticard for underframes (the plan say it should be 1mm, but this won't be stiff enough and but this is starting to look a nice straightforward project that will hit its Waterloo when I attempt to make the domes.
Friday, December 11, 2009
Friday night
We haven't had a video evening in a while.
(some might find this a bit objectionable, I just laughed)
(some might find this a bit objectionable, I just laughed)
A wee bit wobbly
Coming back to the work bench after a couple of days away, I noticed something about my signal boxes.
They had developed bendy sides.
Oh bugger.
So it was out with the 1mm card, which I cut into 3mm strips, and proceeded to brace the insides of the buildings.

I'm assuming that once I paint them they won't do anything else funny like this.
On another note, anyone seen this months Journal yet? or the Railfan for that matter?I'm starting to get a hankering to read some new magazines.
Thursday, December 10, 2009
Wf revisited
Here's a project I have not looked at for a long time, plus its a steam loco to boot so is something completely different to those boxes I've been doing. I've had some problems coming to terms with the fact that the wheelbase isn't quite right. While my inner finescaler was otherwise engaged I had another look at the plan and after 5 minutes decided on a course of action. I discovered that if I lined up the center drivers then the lead bogie was in about the right place, and I could probably trim a bit of the weight at the front to get the tanks in roughly the right place.
 I also cut the top clips holding the motor in (which I had previously so industriously whittled down), as I had noticed that there was probably enough metal left to hold the motor in place. luckily I was proved correct. However there is still a bit much of the motor poking out, and I may have to fudge things by creating a belpaire style firebox
I then decided to have a go at installing the front headstock and associated top plate. The headstock was cut out from the plan, a bit of plasticard was used to mount it at the correct height on the existing frame, and then the top plate was fudged to fit between the headstocks and the cylinders.

Then the downside to the evening. The valvegear is held together by weak plastic pins which keep popping out. Without noticing, I had done this and lost the 3mm bit between the crosshead and the droplink next to the cylinders. I've since had several separate goes totaling 2 hours crawling around on the floor looking for this bit, which seems to have now evaded my best efforts at recapture. I don't think I'm able to fabricate a replacement, so the loco will have to run forever with one side facing the room, and the other hidden away, unless a minor miracle occurs an this bit turns up.
Bugger
Wednesday, December 09, 2009
In another scale
I've been having a discussion with a recent convert to the scale over the last week or so. He's commented that he's enthusiastic again about modeling, which is a reoccurring theme that I've got from several others as well. Its set me into thinking mode (a dangerous state. theres nothing so dangerous on the planet as a bored scientist). I wonder how many other modelers would benefit from a change in scale (and not just into nz120 but to any other scale). The big problem would be the almost ingrained mindset ie "I've always modeled in this scale, that scale is too big/small to see, I've got to much stuff to change' etc.
For myself, I could see myself making a decent fist of 9mm (I have in the past, and somewhere have the convention certificates to prove it), but I think in S scale I would be a very average modeler. So in the end I'm quite happy where I am. I think the other thing is currently in our little corner there's still not right way and wrong way to do things, there's just better ways. we seem to have accidentally found ourselves at the forefront of laser cutting plastic to make wagons and loco tops. Yet this high tech approach also fits with paper and card modeling. The most important thing i think for our scale is that it sits square, and looks right from 2'. I hate looking at my mods close up, which is why the photo's on this blog alwys come as a large shock
I think it sort of hit home tonight when I received some more lost wax brass castings back for a new master. again, they are by no means perfect, but they are mine. That is not something you tend to get in S scale where you can buy almost any detailing part you might want.

I then had to fit them to a wagon to see how they looked.

The new coupler is on the left, the drop in Trackgang replacement coupler is on the right. There's still a wee bit of work to do with these to get them right, but they do look the part in my eye's.
In S scale, you would just go out and buy some.
Tuesday, December 08, 2009
Diesel in half a day: The DX project
DB says: If there's one thing my Coal Route layout needs (other than more coal wagons, some passenger carriages, and now that I think about it, the layout itself), it's DXs. lots of long, elegant, colourful, snorting DXs. I've been thinking for quite some time as to how I can make a bunch of them fairly quickly and my current 'thinking' has led me to lasered-styrene hood sides, cab and headstocks; resin cast nose, ducts and possibly the roof and rear end; and styrene for the main base and other details. Oh, and perhaps some RP'd bogie sides (then cast in resin) if I can get around to pushing the button on that one.
So of course, let me introduce the diesel-in-half-a-day project. The first loco is going to take longer than that, as I'll need to make some castings, but hopefully from then on, I can churn them out as fast as I can sneak funding out to my Atlas Dash-8 Chassis Dealer without my better half noticing.
The first step, which started a few months ago, was to draw up some parts and get them laser cut My laser dudes are not the sharpest tools in the shed, but after several weeks of attempts, I received a sheet of DX sides yesterday that were not melted, not in the wrong thickness of styrene sheet, and in NZ120 scale.
They look pretty decent. The hood detail isn't dissimilar to the "Dunedin etched" DXs of 20 years ago, although the metal-etched detail is a little 'smoother' than that lasered here. The plastic shows a very slightly ragged edge (up extremely close), from the laser pulses in the rastered door panels. Still, my louvres and door catches came out well. I should probably space the 'grille lines' a little wider, although they don't look too bad.
One of the nicest things is a cab front (and rear) with nice round-cornered windows. Yummy.
Maybe I'll make up a TR black one first so it will be easier to hide any messy bits....
 Above is a closer look at the sides, although it's hard to see much in this picture of white styrene with white lines cut into it and scorch marks to add some excitement. See? They come pre-weathered.
 I've been thinking for quite some time as to how I can make a bunch of them fairly quickly and my current 'thinking' has led me to lasered-styrene hood sides, cab and headstocks; resin cast nose, ducts and possibly the roof and rear end; and styrene for the main base and other details. Oh, and perhaps some RP'd bogie sides (then cast in resin) if I can get around to pushing the button on that one.
So of course, let me introduce the diesel-in-half-a-day project. The first loco is going to take longer than that, as I'll need to make some castings, but hopefully from then on, I can churn them out as fast as I can sneak funding out to my Atlas Dash-8 Chassis Dealer without my better half noticing.
The first step, which started a few months ago, was to draw up some parts and get them laser cut
 My laser dudes are not the sharpest tools in the shed, but after several weeks of attempts, I received a sheet of DX sides yesterday that were not melted, not in the wrong thickness of styrene sheet, and in NZ120 scale.
They look pretty decent. The hood detail isn't dissimilar to the "Dunedin etched" DXs of 20 years ago, although the metal-etched detail is a little 'smoother' than that lasered here. The plastic shows a very slightly ragged edge (up extremely close), from the laser pulses in the rastered door panels. Still, my louvres and door catches came out well. I should probably space the 'grille lines' a little wider, although they don't look too bad.
One of the nicest things is a cab front (and rear) with nice round-cornered windows. Yummy.
Maybe I'll make up a TR black one first so it will be easier to hide any messy bits....
 Above is a closer look at the sides, although it's hard to see much in this picture of white styrene with white lines cut into it and scorch marks to add some excitement. See? They come pre-weathered.
Monday, December 07, 2009
NZ120 Photography - DOF and light
DB says:
Depth of Field
The basic rule of model photography, which has been done to death elsewhere, is to set your camera to 'aperture priority' or 'manual' and use the smallest aperture (large f-number) to get as much depth of field as possible. DOF refers to the area both before and beyond the thing you've set your focus on, which appears acceptably sharp in an image. As an aside, if you ever made a pinhole camera at school from a shoebox, perhaps to watch an eclipse with, you'll know that with a really tiny aperture, the size of the pinhole, you don't need to focus at all - everything's nice and sharp! Alas few lenses have apertures that stop down that small.
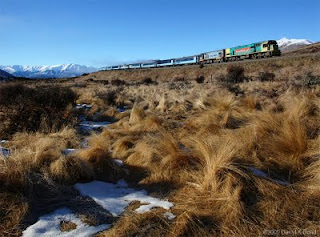
...whereas in this shot, the entire scene, from the near grasses to the distant mountains is in focus. So that's some nice DOF there.
The depth of field will be longer/deeper/bigger the further the focus point is away from the camera, so if you're taking a pic of something quite close to the camera, say for example, a model, then DOF becomes quite a problem and you're often buggered when it comes to keeping foregrounds and backgrounds sharp. Now that even cameraphones are equipped with one zillion megapixel sensors though, you might consider taking the shot from further away than you intended to (in order to get more depth of field) and crop the picture down to the proper view on the computer. Or, for those still shooting film, have an 8x12 print done and get out the scissors...
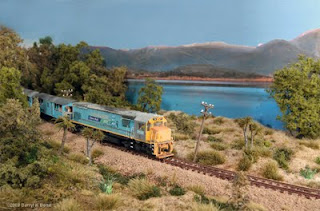
The distance that is acceptably sharp is also longer behind the point of focus than before it (the side closer to the camera). This is why I often focus on a diesel cab front (or steamer's dome in the elaborate illustration above) rather than the nose: I assume that the DOF will render the nose and the rear end reasonably sharp even if nothing else outside that. And afterall, that's usually what you want - the 'subject' to be acceptably sharp. In the big telephoto shot of the DXs above, it doesn't matter that the back of the train is soft, because that's not what you were looking at (unless you are in the process of making some coal wagons).
The depth of field is also 'better' when you use a wide angle lens rather than 'zooming in'. Interestingly (or perhaps not so) the two prototype pictures above were actually taken at similar apertures with vastly different results. The 24mm wide angle is sharp throughout, whereas the big tele shot, at around 800mm isn't.
Backgrounds
With all due respect to The Big Druff Rainbow and other forms of abstract modern art... just as when you're snapping the real thing, you want to think about what distractions lie behind your main subject. A bit of cardboard or a portable blue-sky backdrop can do wonders.
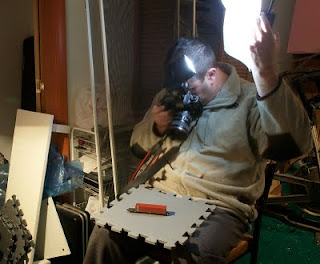
While that is more important in 'scenic' shots than 'construction' shots, this is how I take most of my static "builder's picture" subjects - on a piece of gray foam rubber matting. I try to position the subject on the mat so that I can crop any distracting background out. Not usually on my knee of course, but my workbench is full at the moment. Note the bouncing of the flash lighting off a piece of photocopied paper per the instructions below:
Nice Even Lighting
Good lighting makes good model shots.
Photography at its most basic, is simply the recording of light coming in through the lens. A measurable amount of light is required to expose an image correctly, and you, or more commonly your camera, fiddles with three levers to get that amount just right. One of these levers we can't do much about: as discussed above, we need to set the aperture to the biggest f-number (smallest hole) we can for sharpness purposes. To make up for the few bleams of light that can squeeze through that small lens hole, requires either an increase in sensitivity of the film/sensor (ISO rating) or using a longer shutter speed (usually with a tripod) to let the light come in for longer.
The alternative beyond that equation is to artificially increase the amount of light available. With digital cameras it's easier than ever to experiment with extra incandescent lights or something more powerful from Mitre Ten. Or you could use a camera flash.
The problem with the camera flash is that it throws a lot of harsh light on things, and that intense power often turns foreground subjects white but it drops off quickly to a dark background.
The shadows can also be annoying. Not Cliff Richard's ones, but the "shadow of someone's head on the wall behind them that makes them appear as if they have an afro" look.
There are two things you can do to minimise nasty flashing. If the flash is built-in to the camera, you can try flashing through some tissue paper (ideally unused) to diffuse the light a little. The camera should punch out more light to make up for the obstruction, but the lighting should be more even and less shadowy. You might try holding the tissue paper out from the flash a little without getting it in the picture. This diffusion of light also helps when your subject is up close, and thus probably below where the beam of the flash is pointing
If you are using an external (clip on/big) flash attached to your camera, you can sometimes swivel the flash heads of these off to the side, up or even backwards and bounce the light off a sheet of paper or some foamboard.
Doing the latter will light a scene surprisingly evenly from right up close on a layout to the back scene, as you can see in the following shot, and also remove the 'afro effect' shadows behind the subject:
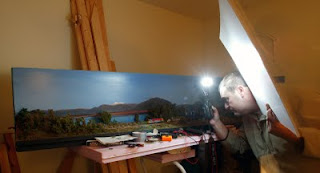
 That shot was taken using a piece of foamboard to bounce the light off, a similar setup to this cheesy re-enactment:
Tripod, Jimmy!
A final tip: because the shutter needs to stay open longer (to let enough light in with our small aperture to expose the image correctly), I always use a tripod for 'scenic' model shots. As you can see, I couldn't here because the camera that was taking the picture was hogging it.
More camera stuff in an upcoming installment. Same Bat-Time, same Bat-Channel.
Depth of Field
The basic rule of model photography, which has been done to death elsewhere, is to set your camera to 'aperture priority' or 'manual' and use the smallest aperture (large f-number) to get as much depth of field as possible. DOF refers to the area both before and beyond the thing you've set your focus on, which appears acceptably sharp in an image.
 As an aside, if you ever made a pinhole camera at school from a shoebox, perhaps to watch an eclipse with, you'll know that with a really tiny aperture, the size of the pinhole, you don't need to focus at all - everything's nice and sharp! Alas few lenses have apertures that stop down that small.

...whereas in this shot, the entire scene, from the near grasses to the distant mountains is in focus. So that's some nice DOF there.
The depth of field will be longer/deeper/bigger the further the focus point is away from the camera, so if you're taking a pic of something quite close to the camera, say for example, a model, then DOF becomes quite a problem and you're often buggered when it comes to keeping foregrounds and backgrounds sharp. Now that even cameraphones are equipped with one zillion megapixel sensors though, you might consider taking the shot from further away than you intended to (in order to get more depth of field) and crop the picture down to the proper view on the computer. Or, for those still shooting film, have an 8x12 print done and get out the scissors...
The distance that is acceptably sharp is also longer behind the point of focus than before it (the side closer to the camera). This is why I often focus on a diesel cab front (or steamer's dome in the elaborate illustration above) rather than the nose: I assume that the DOF will render the nose and the rear end reasonably sharp even if nothing else outside that. And afterall, that's usually what you want - the 'subject' to be acceptably sharp. In the big telephoto shot of the DXs above, it doesn't matter that the back of the train is soft, because that's not what you were looking at (unless you are in the process of making some coal wagons).
The depth of field is also 'better' when you use a wide angle lens rather than 'zooming in'. Interestingly (or perhaps not so) the two prototype pictures above were actually taken at similar apertures with vastly different results. The 24mm wide angle is sharp throughout, whereas the big tele shot, at around 800mm isn't.
Backgrounds
With all due respect to The Big Druff Rainbow and other forms of abstract modern art... just as when you're snapping the real thing, you want to think about what distractions lie behind your main subject. A bit of cardboard or a portable blue-sky backdrop can do wonders.
While that is more important in 'scenic' shots than 'construction' shots, this is how I take most of my static "builder's picture" subjects - on a piece of gray foam rubber matting. I try to position the subject on the mat so that I can crop any distracting background out. Not usually on my knee of course, but my workbench is full at the moment. Note the bouncing of the flash lighting off a piece of photocopied paper per the instructions below:

Nice Even Lighting
Good lighting makes good model shots.
Photography at its most basic, is simply the recording of light coming in through the lens. A measurable amount of light is required to expose an image correctly, and you, or more commonly your camera, fiddles with three levers to get that amount just right. One of these levers we can't do much about: as discussed above, we need to set the aperture to the biggest f-number (smallest hole) we can for sharpness purposes. To make up for the few bleams of light that can squeeze through that small lens hole, requires either an increase in sensitivity of the film/sensor (ISO rating) or using a longer shutter speed (usually with a tripod) to let the light come in for longer.
The alternative beyond that equation is to artificially increase the amount of light available. With digital cameras it's easier than ever to experiment with extra incandescent lights or something more powerful from Mitre Ten. Or you could use a camera flash.
The problem with the camera flash is that it throws a lot of harsh light on things, and that intense power often turns foreground subjects white but it drops off quickly to a dark background.
The shadows can also be annoying. Not Cliff Richard's ones, but the "shadow of someone's head on the wall behind them that makes them appear as if they have an afro" look.
There are two things you can do to minimise nasty flashing. If the flash is built-in to the camera, you can try flashing through some tissue paper (ideally unused) to diffuse the light a little. The camera should punch out more light to make up for the obstruction, but the lighting should be more even and less shadowy. You might try holding the tissue paper out from the flash a little without getting it in the picture. This diffusion of light also helps when your subject is up close, and thus probably below where the beam of the flash is pointing
If you are using an external (clip on/big) flash attached to your camera, you can sometimes swivel the flash heads of these off to the side, up or even backwards and bounce the light off a sheet of paper or some foamboard.
Doing the latter will light a scene surprisingly evenly from right up close on a layout to the back scene, as you can see in the following shot, and also remove the 'afro effect' shadows behind the subject:
 That shot was taken using a piece of foamboard to bounce the light off, a similar setup to this cheesy re-enactment:
Tripod, Jimmy!
A final tip: because the shutter needs to stay open longer (to let enough light in with our small aperture to expose the image correctly), I always use a tripod for 'scenic' model shots. As you can see, I couldn't here because the camera that was taking the picture was hogging it.
More camera stuff in an upcoming installment. Same Bat-Time, same Bat-Channel.
Sunday, December 06, 2009
Ringing the changes
'Der room' has become a bit of a tip of late. I think this is a genetic thing as its a trait my brother and I share, though he has most of it, and the lady of the house is a tidy freak (still, she did choose me, and she can't claim she didn't know what I was like before we got married).

A plan was hatched last week that involved some low cunning. After the lady of the house had had one too many beers at the work Christmas do I sprung my trap.
'can I buy some more shelves like I was talking about last week?'
'Ok, just put them on Visa'
Wooo Hoooo.
So, after two trip's to warehouse stationary (the first was where I almost got to the buying point, then realised I had come into town on the bike rather than in the car...) I had two of the 9 cube bookshelves. Assembly proved no problems although I was disappointed about not being able to use a soldering iron for any of it.

Now I have some place to put all of the various treasures/trash, and it just happens to be the right height for a test track.
(the shelves are on special at the moment from warehouse stationary $120, and the stool was from the warehouse for $50)
Subscribe to:
Posts (Atom)