
Its that time of the year again when the inhabitants of Schloss dandruff set off for the yearly break. This year its back to the wilds of the south. Some would say its a step 20 years back in time, To do that you need to go to West Australia. The camera is fully charged, but I do not have a fixed plan of what to hunt out.
Updates when I get time.
Wednesday, December 19, 2012
Saturday, December 15, 2012
Bugger
Well, its a fine sunny day here, so its obviously too hot to do anything outside. Off to the train room.
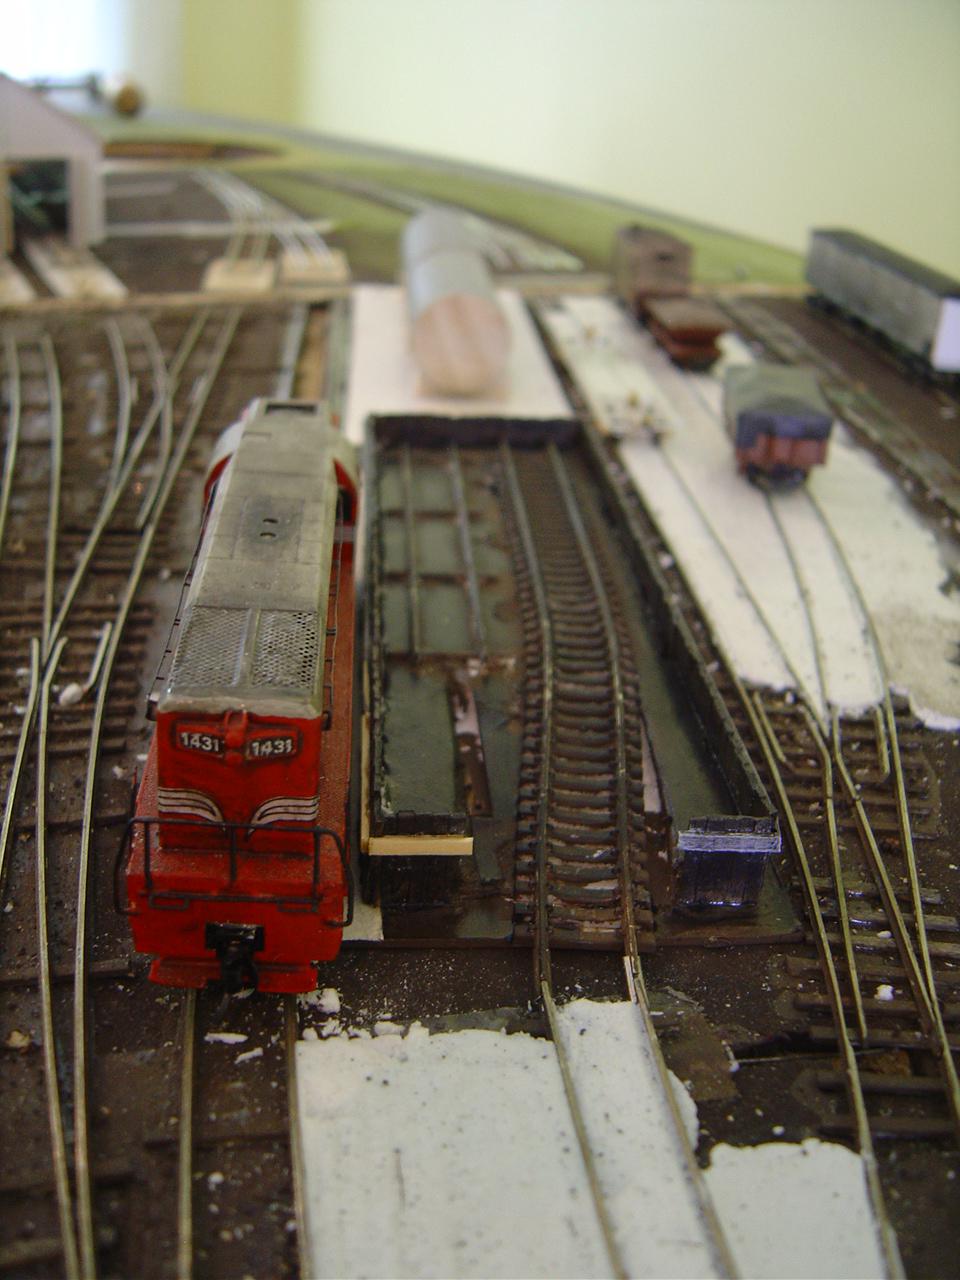
I was not happy with the colour of the coal stage, so a trip back to the work bench for some black was in order. Now normally I just give models a wash with my smoke mix. However this time round it just wasn't adding enough grime for my liking. In a flash of inspiration I got out the black and dry brushed the whole thing. And it worked really well. At this point I would normally offer you a picture but......
I replaced the scene on the layout and suddenly wondered 'will a loco run past it?'. Onto the track with 1431 and the answer is (drum roll)
Hmmm, what to do. The main problem was that the Da would not fit round the curve as the fuel tank was rubbing on the horizontal beam. At first I thought 'I'll just pare it back, that will fix it'

It did almost fix the problem, but I knew I was not going to be happy with it. And what if those big 4-8-4's didn't fit past? There was nothing for it but to cut 2mm off and move the side in. Sounds quite scary, but in practice it took 10 minutes and was a piece of cake. The end result?
So, after a bit of as touch up, the almost finished article looks like this.
 Maybe still not grubby enough, but better than it was, and waiting for a heavy covering of coal.
I was not happy with the colour of the coal stage, so a trip back to the work bench for some black was in order. Now normally I just give models a wash with my smoke mix. However this time round it just wasn't adding enough grime for my liking. In a flash of inspiration I got out the black and dry brushed the whole thing. And it worked really well. At this point I would normally offer you a picture but......
I replaced the scene on the layout and suddenly wondered 'will a loco run past it?'. Onto the track with 1431 and the answer is (drum roll)
 |
| 'Someone has blundered' |

It did almost fix the problem, but I knew I was not going to be happy with it. And what if those big 4-8-4's didn't fit past? There was nothing for it but to cut 2mm off and move the side in. Sounds quite scary, but in practice it took 10 minutes and was a piece of cake. The end result?
 |
| 'Daylight!' |

Thursday, December 13, 2012
Throwing away the past
DB says:
We're throwing out a lot of stuff at home these days and this includes a stash of magazines picked up over the past 20 years years and rarely looked at since (most of my older mags are hiding at various locations around the NZ countryside).
Its interesting to revisit Model Railroader and Trains to see the changes in the rail world and how modeling has moved ahead, although a better lens on modern modeling is provided by the RMWeb links that R. Druff posted the other day.
Also interesting to look at what's changed in NZ's rail scene (Rails and NZRO mags) over the past 20 years, including:
The first CC wagons in the mid 90s - built to a 22.5 tone axle load yet 15 years later they still run around half empty - presumably despite the considerable efforts put into replacing and strengthening bridges we are still a fair way away off from that dream (which would also enable more tractive effort from from heavier locos)
The emergence of the DFT prototype 20 years ago - there might be people reading this who never saw a red DF running around.
Around the same time, DXR 8007 was completed, with grand plans of building more, and even retrofitting this 'new standard cab' to DCs. However, that cab became standard for only a brief period, as subsequent DX rebuilds including 5310 reverted to a design very similar to the original, and the eventual second DXR had a simpler (read: 'uglier') design that was also later retrofitted to 8007.
The DXR seems modern to me, yet that was 20 years ago - a rebuild of a loco that at the time was less than 20 years old itself. The first batch of DXs turn 40 this year.
I've saved a few of these gems but the rest are being recycled.
 |
| More interesting that Winston's wine box |
I'm about to trawl through the NZMRJs as well and it will be interesting to see how much is saved from that haul. My membership is up for renewal at the moment and while I do enjoy getting mail and like to support the Guild it would be fair to say I'm not sure how much real value I receive from that.
As a pictures person, I am keeping all my Railfan mags - haven't missed one of those since they started in 1994.
Monday, December 10, 2012
Wearing it out
Having a bit more spare time after the previous post, I did the painting and weathering on the coaling area. We left this project last post looking like this.

Out with the Valejo Brown leather ( my preferred dark brown for just about everything from track to brake dust) and a good coat. make sure not to miss any bits.

Then its out with the old crappy large brush and dry brushing with Valejo Iraqi sand, which if you are careful builds up the highlights.

The last touch prior to lots of washes of thinned out Tamiya smoke is the white around the bracing board, to scream out to the cream of the NZR crews that 'There's a honking great coal yard here, don't walk into/off it!'

After the Tamiya wash it will be time for the piles of coal to go on, plus one or 2 detail bits. I must dig out the plan of the NZR compressed air crane and buckets.
Sunday, December 09, 2012
One bored at a time
After feeling like I had been in a 'Model Railway Craftsman' article (A magazine where it almost seemed to be obligatory to make the raw materials before you started), I have a Coaling area that will hold coal when I get round to putting it in.
Number of bits of wood cut; heaps and heaps
Number of bits of wood pinging off into the ether; dozens
Nuber of bits of wood going into boots; 2
Number of bits of wood glued to fingers; 0
Numer of spare bits of wood left at the end; 5
What it looks like at the end.

 Tatty and uneven. Who knew that the prototype could match my modeling skills so closely.
Oh, and 1200th post up for anyone thats still counting. Yah us....
Number of bits of wood cut; heaps and heaps
Number of bits of wood pinging off into the ether; dozens
Nuber of bits of wood going into boots; 2
Number of bits of wood glued to fingers; 0
Numer of spare bits of wood left at the end; 5
What it looks like at the end.

'Taken from the same angle as this.'

Oh, and 1200th post up for anyone thats still counting. Yah us....
Saturday, December 08, 2012
Saturday Morning
Well, its that time of the week to sit back with the morning cuppa and have a ponder.
This week brought a surprise visit from the chairman of Cabbage enterprises. It appears that I'm not the only one afflicted by excessive work at the moment. A wide ranging discussion was had covering a variety of topics. I can also reveal that an unnatural interest was shown in GWR broad gauge books. I was also shown some very nice etchings for an Om wagon.
From the wandering brain files this morning, why are their not more small shelf layouts built in the scale? For some odd reason any man (or woman for that matter) that moves to NZ120 seems to automatically think that they need to build a large layout to showcase the scene. I'm as guilty as the next man unfortunately. In England you get guys who happily model on a bit of 3 by 1 from IKEA and construct a small shunting layout, often in less time than it takes to say 'I think I could fit a layout on that'. OK, so its all RTR but they just plunge in with gay abandon to run trains for a couple of months, learn some stuff and move on to the next one. Contrast this with my 10 year project that is Paekakariki (and I'm 3 years in I think....). its going to work out in the end (I think), but there is a lot of water to go under the bridge before that happens, and it is hard to stay focused (and Imust take a trip out today to do some more on the coal yard. must get that wip cracking app, or indeed a phone that runs apps).
Maybe its time for another scale challenge; build a small layout in a year (2013), with a set maximum size etc? Its worked well overseas in slightly larger scales. Maybe for something a bit more left field that I did come across is a 'flexible' layout with removable scenes and a common base. With a standard size scene base everyone could have a go. Maybe small layouts have a hard time getting traction here because they don't look 'New Zealand ' enough (a comment I've heard about the currently stalled 9mm shunting layout in Auckland), or because its not overly easy assembling a collection of rolling stock and a loco to run (though that seems to be getting easier)
To charge off into the other side of the coin ie big layouts I have been thinking about designing larger layouts for operations. It helps to pass the time in meetings of the 'Just why was I invited to this when i have not been on this project for 2 months?'I missed a chance when I was asked 'So, what do you think?' to which the correct reply would have been 'Oh, I was just wondering how to feign my own death so I could escape and go home...'. Anyway, I was trying to work out how to do a 1950's west coast layout featuring a couple of branch lines and a loads in-empties out set up between a port and a coal mine. This very quickly got out of hand, but its left me wondering how much more people want to do in the scale, or if we are happy with a roundy-roundy set up to let the trains run.
Thursday, December 06, 2012
A slight adjustment
After a bit of thinking I decided that the coaling siding needed to be realigned so that I could fit a compressed air coaling crane on a parallel track. The existing track was removed and a short piece of commercial flex track was substituted. I also shortened the diesel tanks and the coal yard a bit to fit the (what I assume is the) pump shed in. There is now space for a 25 by 50mm building (10' by 20') which is a bit on the small side but should do the job visually.
I've compressed the whole area (the coaling area should be 3 times the length that it is) so its now a matter of making do with the space that I have. Another 30 cm would have been good (there's not quite enough space to move locos round in the depot area without fouling the passing loop on the hill side), but that would have meant space compromises elsewhere on the layout. At the end of the day It will work OK.
I'm just starting to like this area a bit more now. I sat for about 10 minutes thinking about the various scenic elements which will fit in this area. One thing that did strike me was how large even the loco depot would be in S scale. it could possibly be forced to fit on a 12' by 3' board, but you would not get the rest of the station in. The platform alone would be 9' long.
 |
| 'Before' |
 |
| 'After' |
I'm just starting to like this area a bit more now. I sat for about 10 minutes thinking about the various scenic elements which will fit in this area. One thing that did strike me was how large even the loco depot would be in S scale. it could possibly be forced to fit on a 12' by 3' board, but you would not get the rest of the station in. The platform alone would be 9' long.
Tuesday, December 04, 2012
Broken River 6: Green Day
DB posts for the second time in living memory (although technically I wrote this a week ago but forgot to post it. Seeing papa Druff's recent greening reminded me of this):
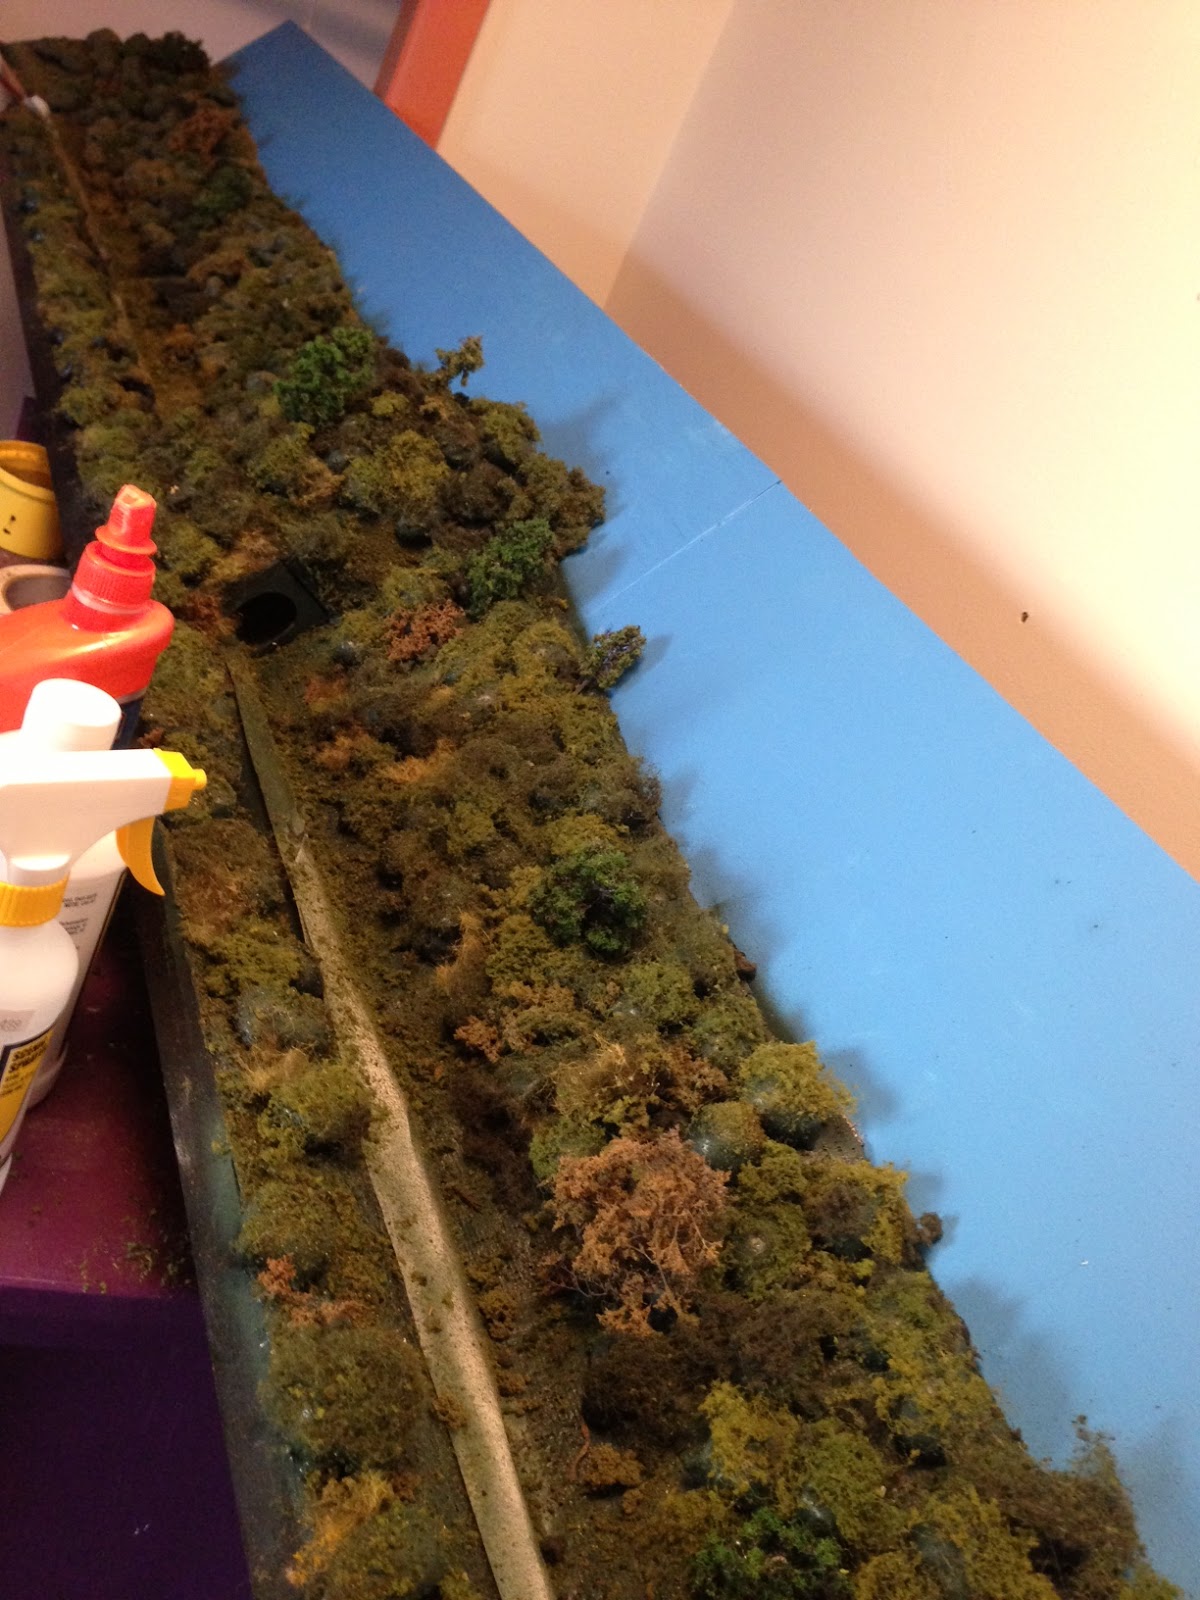
After bulldozering some crap out of the train room (seeing Comrade Druff's messy room kicked me into action) I stared at my steaming Broken River folly and decided to do something about it.
You may recall from my previous field dispatches that some time ago I had built a hillside with silly foam meringues all over it. In the intervening months I have slowly turned that whole scene matt black with the help of a small paint brush. This was a pain, but I didn't want any white bits to show through subsequent scenerising.
And this is where things have sat for a while.
Yesterday I went at it with a dull green spray - "safe for plastic" it said on the can... and it was over a layer of paint anyway... so after a test patch, I went wild.
Can you guess what happened next? Melting? Noxious fumes? Fires? Explosions? Plagues of locusts? Nope. Nothing but healthy greenliness. Within seconds my collection of black dog turds had been transformed into green dog turds - something that would almost pass as really bad model railway scenery if viewed through a welders mask under candlelight.
Buoyed by this success, I started applying second-hand scenery material to the droppings: brush with mildly diluted PVA, blow on some fine turf in a variety of leftover shades from the bottom of the scenery box, plenty of recycled foliage net in three colours (like applying toupees to my round mounds), a little fine leaf foliage here and there, some crappy old reused trees press-ganged into service...
I still need to spray on some matt finish and touchups in patches as the glue has left some of the underturds a little shiny, but suddenly it doesn't look completely awful.
 Apologies for cellphone pics. Next: some ballast.
After bulldozering some crap out of the train room (seeing Comrade Druff's messy room kicked me into action) I stared at my steaming Broken River folly and decided to do something about it.
You may recall from my previous field dispatches that some time ago I had built a hillside with silly foam meringues all over it. In the intervening months I have slowly turned that whole scene matt black with the help of a small paint brush. This was a pain, but I didn't want any white bits to show through subsequent scenerising.
And this is where things have sat for a while.
Yesterday I went at it with a dull green spray - "safe for plastic" it said on the can... and it was over a layer of paint anyway... so after a test patch, I went wild.
Can you guess what happened next? Melting? Noxious fumes? Fires? Explosions? Plagues of locusts? Nope. Nothing but healthy greenliness. Within seconds my collection of black dog turds had been transformed into green dog turds - something that would almost pass as really bad model railway scenery if viewed through a welders mask under candlelight.
Buoyed by this success, I started applying second-hand scenery material to the droppings: brush with mildly diluted PVA, blow on some fine turf in a variety of leftover shades from the bottom of the scenery box, plenty of recycled foliage net in three colours (like applying toupees to my round mounds), a little fine leaf foliage here and there, some crappy old reused trees press-ganged into service...
 |
| Layering in Action. From L to R: Black blobs; black blobs with diluted pva bushed on; black blobs with foliage blown on; black blobs with foliage netting; black blobs filled in with other misc scenery items. |
I still need to spray on some matt finish and touchups in patches as the glue has left some of the underturds a little shiny, but suddenly it doesn't look completely awful.
Monday, December 03, 2012
Pushing on
Thanks to the bad weather it was time to get back into the Man-sion.
I carried on from last time and covered the rest of the hill. More glue, pins and a bit of waiting. I'm reasonably happy with how it is turning out.

And after locating a plentiful source of NZ120 scale coal, I thought it might be time to make a start on the coaling point at the loco depot. It will not be a 'running' siding which will make things much simpler.
I had a short piece of track made for something or other and so I just bent it into shape and glued it down. seems to do the job OK.

The thinking at the moment is to have 2 wagons, a full one at the bottom, and a partly unloaded one at the top. I also have to work out how a standard NZR coaling crane fits in.

There is also a shed between the fuel tanks and the coaling compound, with a visible lack of space for it to slot in. A bit of clever thinking will be required there.
Sunday, December 02, 2012
Cheating?
Since I've been pottering round working on the station platform I also though that it was time to do something about the hill behind the station. I had purchased a Grass mat by Busch (though I see every man and his dog seem to make them) at Railex for this purpose, and at $37 for a mat 80cm by 80cm it seems like a good idea. Essentially it is static grass stuck to a crepe paper base.
So, after a bit of land form sculpting (which will not satisfy all readers of this blog)....

It was time to have a go so i cut out as first piece and glued it down with the good old PVA.

First thoughts are that its easy to work with. it looks OK, but I will still be doing a bit more colouring to lighten it up. The inside bits in the roll are a bit flat, and I'll leave this spread out from a couple of days to see if it improves.
The huge plus for me is that it has saved a vast amount of time, given that I would have to acquire a static grass dispenser, get the grass, then spend time learning how to do it all. Add to this the fact that I don't think static grass works visually (it just doesn't look right to me, especially when some seem to think its the bees knees).
I also added some offcuts from the mat to do some other areas at the Wellington end of the layout.
 These pieces will allow me to have a bit of a play with ballasting, plus I will have to do some work on the shaping of the main road.
However, I could not resist having a bit of a play
This reveals that I really need to add the cowcatchers to the Ed's, and that from close range code 55 rail still looks too big. Oh, and I need to do something about those cars (colour wise)
So, after a bit of land form sculpting (which will not satisfy all readers of this blog)....

It was time to have a go so i cut out as first piece and glued it down with the good old PVA.

First thoughts are that its easy to work with. it looks OK, but I will still be doing a bit more colouring to lighten it up. The inside bits in the roll are a bit flat, and I'll leave this spread out from a couple of days to see if it improves.
The huge plus for me is that it has saved a vast amount of time, given that I would have to acquire a static grass dispenser, get the grass, then spend time learning how to do it all. Add to this the fact that I don't think static grass works visually (it just doesn't look right to me, especially when some seem to think its the bees knees).
I also added some offcuts from the mat to do some other areas at the Wellington end of the layout.

However, I could not resist having a bit of a play
 |
| 'The back one probably is broken down' |
Saturday, December 01, 2012
Saturday Morning
Well, it seems to be the only time I get to blog round here at the moment. My large project is winding down now (just the analysis to finish up) so there should be more time for summer pontificating.
Time for a further episode of 'whats in my room'.
This morning we have the workbench and surrounds.

Here we have the top of the 'railway bookcase'. The Bosphoran army is on the wrong side, but appears to have made a hostile takeover. There are a collection of loco mechs (a couple of SD-7's and I think the remains of my first DFT). A wooden train whistle from a preservation site in The British isles. There are some etched birds, and then containers of 'once were models' that I've got so far with. plus a collection of old wheels and bits which quietly wait their turn for fame. Also note part of the poster from Sir Peter Jacksons first film. I still wonder if the movie men would have advanced him so much money for the lord of the rings if they had seem 'Meet the Feebles'. The Pith hat is for BBQ's

My actual workbench. not a lot to see here. More UGA's ,a British 2mm good shed and some random tools. Also some 1/2 assembled microtrains couplers. I seem to have found my knack for firing the springs off into the never-never again. In the plastic case are a collection of Teddy bear cowboys. The less questions asked about those the better.

And the layout, which is where most of my projects are kept/left to die. I've been doing some work on the station platform in the last week. The side has been filled and painted, which lead me to notice that the paint wasn't sticking to the foam board very well (at all). this has lead to a bout of sanding and repainting, but I think I'm going to have to mix some talc in to get a decent asphalt surface.I also have a quick solution to my hillside scenicing, which I'll look at deploying tomorrow afternoon, when its rainy.
Right, its sunny, I have my end of year bonus so apparently its time to visit the local garden shops....
Subscribe to:
Posts (Atom)