Showing posts with label Wagons. Show all posts

Saturday, September 13, 2025

Balls of Cement - URC Sputnik Wagon

 DB says:

I received a care package from 3 Foot 6 models yesterday. 

There are some impressive items within it, and I'm pleased to say that the quality is superb. Lewis mentioned a few months back that he has changed up his processes and the results really show here. No strata! Flat surfaces! Straight edges! No sags! Even the resin seems slightly less brittle and a little more forgiving, unless you drop something onto concrete from a height that is...

But more on that in a moment.

Its been a while since I have 'made something' with wheels, so why not let 3'-6 do most of the work and I'll finish things off. 

A prototype that I've always wanted is a cement wagon or two. There were two main bogie tank styles - these spherical Sputnik URCs, and the UBCs that came with either spherical or flat sided tanks with more conical tops. These are appropriate from the late steam era through until the mid 1990s. 

Here is a URC laid up at Taita in the early 90s.

The 3-6 one, which I believe was designed up by Simon Lister, is a Sputnik type. So that's what I'm making, and handily I have the picture above. There are a few wagons preserved too:  https://www.nzrsr.co.nz - search for URC in class. One has a picture showing the piping on the other side. There is also one UBC of the other shape preserved. David Mac's rolling stock register is a great resource for remembering what older wagons looked like without having to go and see them.


The 3D print quality here is great. Despite these being spherical surfaces, there is no strata at all on this print, the tubs are smooth and completely free of facets, the flat surface of the wagon top is completely perfect. There is not even any warp in the sides or the truss rods, or in the width of the trusses. The only slight blemish is in one of the corners, but its so minor I'm not going to touch it. There is a slight ring around each of the four cement balls (in the top half). I'm not sure if this is intentional from the design or a slight printing defect but I gave them a quick ineffective rub with some fine sandpaper that must have last been used on something yellow.

The four lids were glued on top, as these are printed as separate parts. I needed to open up the holes for these slightly in two of the balls. 

Then I did my usual removal of coupling pockets and shortening the bogie mounting points so the wagon will sit lower.


About this stage I managed to drop the whole thing onto the concrete floor. I can never manage to hit the little carpet mat under me and am finding such fumbles are one of many perils of getting older. 

The terminus of the dropping motion all but snapped the frame in half and removed two of the balls. Bugger. Some glue had it back together in short order. I put some steel wire (my point rodding) under the wagon floor to keep things together and flat.

I then had the clever idea of enlarging the two central holes in the bottom to fit some chunky short steel screws into. This would add some much needed weight to the wagon. I very slowly and carefully drilled these out to the required size, being careful not to damage the truss rod cross braces. This took a while at very slow RPMs. After all that care, I realised I'd need to remove the cross pieces anyway to fit the screw heads. D'oh.

The cross pieces were replaced with some thin styrene strip. The above pic shows the underframe with its removals, additions and repairs.

Then the action moved topside. After a 'first coat' of painting, I added the two platforms between the sets of tanks out of some scribed wood that was lying on my desk, and some ladders which are Marks Model Works CB ladders, some of the most useful things you can buy. I've can used these on many models. If they were a little longer and I was a little smarter, I might have tried shaping them better and making the nice hoopy bits on the top. I could have used some brass wire here. Maybe I will. Nah, that's never going to happen. 

But some .020 Evergreen styrene rod made some pipes on the deck, and along the side that doesn't have the ladders. 

And then it was time for paint and weathering. The base wagon is flat black, and the tops Tamiya Royal Light Grey. Weathering was a little brown wash on the truss rods, and on the top some pale grey Vallejo Game Wash and white Jacquard Pinata Alcohol Ink wash, running from the top down, and concentrating on the top half of the spheres. A little rust was dabbed on in places too. I may go back with the white ink at some stage, but then again its a subtle effect and I will use these on trains at their 'early to mid-life'  - either 1960s steam or behind 1980s DJs. So before they got really scungy.


The wagon was shod with some Kato Japanese 'Taki' tank wagon bogies that were reviewed here a decade or more ago. I used these rather the usual than MicroTrains ones because I will be running this among four-wheeled wagons which have Rapido couplers, as do these bogies. These also have a longer wheelbase and slightly larger wheels than the MT ones.

Sometimes the manufacturers, Kato especially, make spare parts available when they rerun certain models, but usually in limited numbers. I put these bogies on my Hobbysearch Japan wish list quite a while ago, and also some bogies that might suit a 30 foot guards van. When they all briefly showed up as orderable recently, I snagged a few sets and they arrived a couple of days ago. As this is typed, I'm not sure how much they cost.

The final touch, done after these pictures were taken, was to spray a little Dullcote on. The mysterious 'rings' on the top quarter of the tanks show up a bit in the photos, but aren't that noticeable when you're staring at the wagon going by. The Dullcote may help too. The bendiness in the second to last pic is due to the phone wide angle/close up, not any printing problems! 

Other than waiting for things to set this was a pretty quick project, taking about two hours up until the weathering.  

The most tricky job with all these resin bogie wagon prints is getting the bogie mounting points to take screws. I'm not sure what the perfect answer is here as different bogie manufacturers require different sized screws or mounting techniques. Every screw I've tried on a 3D print has trouble biting into the tough resin, even if you enlarge the hole very generously. And sometimes the mounting piece will crack or break off while you are doing this, or you end up damaging your nicely detailed wagon. 

What worked with this URC, on the third attempt at enlarging the holes, was discovering that I own a small 'tap' which scours out a thread inside a drilled hole nicely. Its not quite the same thread pitch/type/size as the small bag of metal bogie holding screws that I've used forever (seriously, they need a straight screwdriver bit if anyone can remember those). But the tap will gently and efficiently remove enough material that the screws seem to find a home reasonably well. I must find a handle for it rather than using pliers. Perhaps it would fit into the handheld pin vice thing I use for small drills. So if you have this issue too, you might consider going to one of the local engineering firms with one of your screws and get the right sized tap. They aren't terribly expensive and will last a lifetime of making 3D bogie wagons up.

Its a cute wagon. Something quite different in a train that's for sure. Highly recommended.

The southern branch of MD will be away over the hills for the next week doing research in the field.  

Sunday, June 22, 2025

Elmer Lane 28 - Coal Bin

DB says:

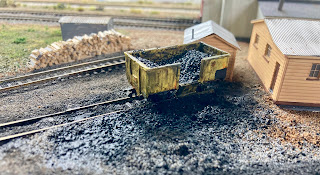
Elmer Lane always seemed to have an old yellow La with coal on the stub tracks outside the Supervisor's office.

So mine does now too. This was one of a dozen La castings I got from someone (Rod Murgatroyd? Cross Creek?) that were the start of an undisclosed (and inelegant) Stone Train that I started putting together when I built the DI all those years ago. 

One of the wagons was de-limestoned (and what a surprise to find I'd buried a lead slug under there), its door was cut open, filled with coal and repainted. I suppose I expended about ten minutes on this. It's now permanently attached to Elmer Lane. 

Obviously needs more rust and fading, but that might look unprototypical...


Tuesday, March 25, 2025

LC wrap up

 DB finishes up:

A bit of paint, weathering, coal and decalling has this batch of LCs (10 of Lewis H's latest model and two of the older prints) added to the coal train. My homemade black-on-white laser printed 'Lyttelton coal traffic' decals somtimes exhibit a little cracking at the edges if they are cut out with a less-sharp knife, and then some white shows through, so most of that was touched up with some flat black paint.

One of the neat features of the latest iteration of the 3-Foot-6 LC is that, because it is downscaled from an Sn3.5 model, it has a lot of really nice fine detail in the doors, end handgrabs, and a footstep at one end. Picking the last two items out in white really makes the wagons look nicely detailed. I need to add a few handbrake levers at some stage. Something that might be a good thing to etch.  

Recent efforts with the Trackgang whitemetal kits and 3-Foot-6 3D-printed ones have eradicated my early 1990s bog-cast resin ones from service, leaving me with a pretty good looking decent-length classic 1980s Midland Line coal train. When you add locos, guards van and the little protective XP or KP in front of it, it is about 2.1m long, or as long as the Studholme loops will take. 

The train looks pretty good. Hardly finescale, but its uber-Bondscale quality. 

I'll probably add another 5-10 of Lewis' next version, as I'd like to have the option of having an even longer train, plus having a few extras to drop into normal goods trains. And it sounds like a few LAs might be on the cards too. 

In summary, with no naked-eye visible strata, these latest LCs take the 'Nicest 3D Print That I Have' title away from the ZAs, and with the addition of new floor mounting points and some interior door lines, they will be just perfect. As Lewis says "the beauty of this tech is we can constantly and fairly easily iterate our designs to improve them"

And all credit to him for not only making these models available to the NZ120 community (filling the void left by the demise of Shapeways) but continuing to improve them; and to the earlier pioneers of 3D printing whose designwork have enabled this. And in the days before 3D, lets not forget Russell Jones' Trackgang (and Pat Eade's earlier Trackside) - all of this had made NZ120 a more viable scale. Three cheers for the suppliers!

Wednesday, March 19, 2025

Are we there yet? Taking Stock of 3d Printing with some LCs

DB completes the 3D printing review with what was to be the opener in the post...

I've had quite a few purchases from the Lewis Holden Printing Factory on my workbench for a while. Some for well over than a year now. So lets look at a few frustrations from 3D printing (this has since been started in previous posts on passenger cars). 

Some of these models are LC tops. These are the same as ones I've bought and posted about previously, but putting them up against the latest additions to the four-wheeled coal train, the Trackgang whitemetal LCs (the brown completed one below) shows a contrast when it comes to the details like the placement and 'finery' of the ribs and internal tie-down 'bumps', and also the overall straightness and squareness that 3D Printing was supposed to help us with, although I suppose in this case, bent bodies were pretty realistic for coal route LCs!


But also note the chunkiness of the ribs and wall thickness of this particular design (and my earlier KS wagons).

My Z scale exploits have made me pay more attention to wagons 'riding high', and in recent projects you may have noticed me sanding down bogie mounting points and inserting the Peco chassis 'up into the body' for the recent batches of LCs. To my eye, this presents a far more accurate portrayal of the LC than when the top is sitting way up high on top of the chassis.

Modelling that lower look with these printed models (or making any alterations at all) is more of a pain than with scratchbuilt stuff, because the resin is so tough and brittle, so to 'raise the floor' you really have to get in there with a dremel, which is challenging to get into tight corners, and messy.


To make a proper low-rider, I need to remove the above areas painted black with a Sharpie pen, to let me insert the chassis. 

In fact even without my low-rider desire, I'd still need to either thin the Peco's plastic chassis or remove a smaller amount of resin print because those walls are so thick the Peco won't fit between them as intended anyway.

And ideally, for looks, you want to thin the inner side walls a little when viewed from the top. Further surgery had to be performed on the Pecos (see in the pic below) to make up for not being able to get a dremel deep into the corners of the underside....

The end result is nice:

In the pic below, compare the low slung LC (light brown one at right) with the sit-on-top Euro-look LC (darker model at left) in the below pic:

But getting to this point is too much work for a 3D print. I could have scratchbuilt this from styrene in half the time I spent dremelling. Why not just modify the design to save everyone the hassle? 

And that is exactly what Lewis has done with his latest creation, after some back and forth with Dandruff HQ.

This is his build in the pic above, looking pretty sweet. This is a great example of "if you're going to go to the effort of designing it, why not make it as good as you can?"

So, a number were acquired, but they have been sitting on my bench for a while as they required some pondering time. The outsides look superb:

That's some mighty tasty and fine detail. Note the handgrab and footstep on the end (the little knobs on top are from supports used in the 3d printing and curing process and are easily removed with a file.

The floor is supplied as a separate piece:

The challenge is fitting it... The tops have a little protrusion that is probably supposed to locate the floor, but mine were only on three of the inner sides. It was a very tight and tricky fit for the floor. Plus they are inclined to be a little warpy by their flat nature, so after many attempts I decided there was no way I was going to get flat or consistently located floors without assistance. 

After fiddling with various sizes of plasticard rod, I reckon 0.060 inches-worth of Evergreen styrene is the right depth of stopper to have the floor sit at the height I want.  So strips of .040x.060 were cut and levelled with the bottom of the side walls thus:

I quickly found it easiest to do it the way pictured below, holding the wagon down and simultaneously pressing the strip against a knife blade (or a ruler or something) held in the other hand for a few seconds while the superglue took:

Then it was time to create some NZ120 marching powder by thinning one side and one end of the floor:

So the floor drops in nicely against the stoppers. If it warps up in the middle that's no drama, because the chassis will be secured at the corners anyway:

From here it was paint time: various shades of reddy brown on top:

And some drybrushed brown on the bottoms as the wagon assembly plant rolled into action:

Ta-da:

About 15 years ago, I had three holy grails for NZ120. 

  1. A module standard.
  2. A realistic one-piece modern freight bogie.
  3. And a relatively cheap LC and KP top that you could just pop onto a Peco - meaning anyone could churn out trains quickly without needing any special tools or skills.   

It looks we are getting very close to being 2/3rds of the way there.

Tuesday, December 31, 2024

3 Foot 6 Metal 3D Printed UK review -2

 DB ends the year with:

As mentioned in the previous edition, it would seem a crime to add a bunch of containers on top of the lovely open decking of my second nice open-decked wagon - the 3 Foot 6 Models UK, printed in aluminium.

So in a first for me - I now have an empty container flat - the must-model idem for those who like the Beard bumble bee era.

I managed to glue back on the leg of the nice bogie that I snapped in the previous instalment and added a little reinforcement. I hope that it will hold, as such a nice wagon deserves some nice bogies, and at least there isn't a lot of force placed on that one axle bearing, because my couplers are body mounted, the pulling/pushing forces are borne by the frame, and with no containers, it won't have much weight to bear.

Recycled couplers were installed, the bogie screw holes were filled and sanded down, some more black was used to touch up these and other bits. 

I decided to put a number decal on the deck to add a bit of flair, as I think Russell Trackgang had done with some of his wagons. I found some BNSF patch decals that seemed a reasonable match, and found a few numbers in that sheet that would combine easily enough to match a little UK number decal that I had printed out previously for the sides. I checked with Gerald Petrie's 2000 rolling stock booklet, and it was indeed a valid UK number that was still in service then. The decals were added, some dullcote sprayed on top the next day, and then some weathering powders were applied. 

For some reason I then went mad adding some brake cylinders (turned up from Plastruct rod in the drill, with some piping stuck in one end. 

As this is a plain wagon, I wanted it to pop a little, so I added a handbrake lever to both sides. A little unprototypical, but its rare that people can see both sides at once... These were hung off oversize wire handgrabs that were painted white. (there should really be an inboard set of rodding for these as well).

I then remembered my trick from a dozen years ago of dabbing some white onto the twistlocks and 'painting in' yellow ferry hooks. Must do that to yesterday's wine wagon.

Looking pretty good I reckon. Will have to try playing trains with it to see if it needs any weight. Happy New Ones and all the best for 2025 from the House of MD. 


Sunday, December 29, 2024

3 Foot 6 Metal 3D Printed UK review

 DB carries on:

Another tasty item in the Red Cross parcel from Mr Holden were 3D printed UK container wagons. Neat, because they are the first items I've seen that are 3D printed in metal. Aluminium in this case. I ordered a pair of these beauties.

The detail is great, and they look well proportioned. The aluminium looks a little grainy in the scary closeup pictures (those may indeed be the component molecules you are seeing) but the wagons seem quite smooth to the touch.  

I ordered these two to replace the handful of my old resin UKs that sagged - most of my cast UKs are still fine, but a few mustn't have had reinforcing rods put into the resin during the casting process. 

On second thoughts though, putting containers on top of these printed ones, with their lovely undecked open girder details, would be such a waste... so I've decided to have one as a replacement bulk wine wagon (which had become a bendy old one) and perhaps leave the other as an empty flat. Or maybe it will get a container on one end.

The first step in the process was to use a Dremel to remove the coupler pins and open up the headstocks for Microtrains couplers salvaged from a couple of my old sagging resin UKs. Boy this aluminium stuff is really tough and requires a fair bit of cutting. I found a fresh sanding drum more useful than a cutting wheel. The bogie mounting points were also drilled out, and a file applied to a couple of rough edges.

Both of these wagons had some slight imperfections across one end by the angled undergirders (see pic below - both the wagon sides and the angled girders underneath aren't well formed), plus one 'missing or partially formed' twistlock that you can also see in this pic (second twistlock from the right). I'll fix the sides in a moment, but the scrawny angled undergirders aren't really that noticeable so I didn't do anything to them.

Both wagons were hung up and sprayed with primer:

And then the sides with the dings were overlaid with some .010x.080 styrene. I was going to fill them with squadron putty but thought this would be a faster and lazier approach.

The tops were then brush painted black. I had planned to buy a spraycan of black to make life easier, but the shop was closed before taking action. Partway through the brushpaint, I remembered that I have an airbrush...

Eventually my bogie mounting holes were widened enough so some screws could be forced in (did I mention this stuff is tough!) and a pair of Microtrains bogies were then attached to the first wagon (seen upside down: 

Oh, that won't do. Firstly this wagon deserves better bogies than that, and secondly, it looks like the wagon is flying up on tippy toes. 

The bogie mounts were dremeled down, almost to the height of the main side beams. Some Kato freight bogies were then attached, which look a lot better, but (curses) I broke one of them in the process.

After some further fiddling, I feared the metal wheels might make contact with the metal frame, so once again out to the Dremel in the shed to remove more of the underbits to provide additional clearance between the wheels and the floor:


OK that feels more comfy, and the lower-set wagon looks better too. Arguably still a bit tall as the bottom girders are still a little high above rail height but the bogies can't be mounted much closer to the  top deck unless the floor was paper thin:


Arguably my bogies could have been mounted a smidge closer to the ends too.

The missing twistlocks were replaced with an overly-engineered piece of plastic strip (.060 x .040 I think) which was drilled, then cut at an angle (one in progress here):
Cut off, then attached. The twistlocks on the model are unusual compared to the prototype, but effective.

Finally, after the black bits were touched up, a little weathering powder was added, the wine tanks onboarded, recycled Microtrains couplers stuck on, and number decals added. A bit of the crookedness in the below pics is from my phone camera lens, and some from my inability to make anything straight and square, which is why 3D printing is such a boon. I hadn't noticed until I saw these pics up close, but I obviously need to straighten out the tanktop walkways.

Widthways, the twistlocks on the wagons stick out a smidge far, and inconveniently, the ISO bases on my tanks are a little thin. Lengthways, the twistlocks on the centre 10-foot slot line up nicely, but the outer ones don't quite match, being a bit far apart.


The Verdict? 8 or 9 out of 10. These are really nice. But my two felt like a lot of work for 60 bucks a pop. Partly because I want to use Microtrains couplers, and want to have these good looking models sitting nice and low, close to the track. Perhaps if you use Trackgang bogies and couplers, they are perfect. Personally I'd prefer:
  1. the depth of the round bogie mounting points be reduced (one can always add thin washers if needed if you do want a high-rider),
  2. eliminating the subtle strengthening girderwork etc (see first pic in this post) around the bogie mounts to give more wheel clearance, as the aluminium is plenty strong enough already, 
  3. and perhaps even thinning the floor above the wheels to the absolute bare minimum to further reduce the risk of shorts. Or the floor above the wheels could be eliminated altogether and added by the end user - from thin plasticard or even paper ...or not at all if a container will be mounted there anyway.
  4. having little blobs for the 5 ferry tiedown hooks each side and maybe the handbrake mounting points would be nice. But not the vertical handgrabs, as these would get in the way when drilling and dremeling is being done.

On the plus side, they look fantastic, and assembly of the core wagon shell is a breeze - as it comes in one piece! As it is computer modelled, it is possible some of these suggestions could be incorporated in future, as Mr Holden continues to improve the 3 Foot 6 offerings. 

Just looking at that prototype pic, it would seem a sin for me not to add the brake cylinder in the open frames and maybe even some piping too so I might just do that next.

The wagons may need a little extra weight if they are going to run as empty flats, as they are surprisingly light. Or unsurprisingly I suppose, given they are made of aluminium. 

The models are currently available from 3 Foot 6 Models at this URL: NZR UK class container wagon - open decking - NZ120

Saturday, December 28, 2024

Elevation, and more wagon rejuvenation

DB continues to rehabilitate dozen-year old wagons:

With the dramas of Christmas now behind us, it was time to pull out some more damaged wagons. Most of these have moved country a few times and despite being fairly well packed, a few bits have fallen off, quite a few couplers have been damaged, the odd bogie is broken, and even a dozen years ago there were a few cripples amongst the herd.

A bit of gluing and cannibalisation had four of the 40-footers back in action, as well as the four HLC coal carrying wagons. One of these has been a chronically bent UK for a dozen or more years. It was replaced with a straight UK borrowed from under a 40 foot container which I have other plans for.

The HLC set is below (on three PKs and one UK), with the bent and disgraced UK (now sans containers, couplers and bogies) lying on its back:

I could probably do another one or two additional wagons with HLCs as I have a few spare bits. A few of the worst wagons (including that PK with four green 10-footers, and some of the other sticky container castings) are being binned. 

Some "1990s-era" wagons are in the track behind, including the roadrailer, which is still on some ancient Bachmann(?) bogies with old school rapido couplers. The roadrailer, the IB with 3x20-footers, and the Spaceracer were built in the Otaki-to-Cass days. 


A few of these locos were converted for my West Coast fetish of a decade or so ago. Wish I'd left the zinc etched blue DXC in Fruit salad now. Maybe I'll strip the paint off and repaint it one day.
I've also been thinking about the Fremo layout height. I absolutely love the 1200mm above the floor height personally, but it might just be too tall (with a backdrop) for most people to reach over comfortably at exhibitions. Maybe for me too. 1200mm might be fun for playing trains, but it isn't very exhibition-friendly when punters are forced to observe from a distance, and as I'd like to join up with the Trackgang layout one day, with its rail height at a more exhibition-standard 1000mm, that would require a massive gradient to bridge 20cm in height... then consider the heavy resin and whitemetal wagons.  Perhaps the incumbent should set the standards... 

Maybe I'll whack 10cm off the legs and see if that is a reasonable compromise. Even down at 1000mm (a bit low for my liking personally), I could always sit it on simple riser feet (or even bricks) at home for my own use.   

Monday, December 16, 2024

The 3-6 ZA Wagon


 DB says:

As soon as Mr Holden's 3-foot-6 Emporium listed the ZA wagon a year ago, I snapped up a pair, but they have sat in my pile of yet-to-be-started projects on the bench since.

These are perhaps the best 3D prints I have received. 

I'm usually a fettler and adjuster when it comes to procured items, but for this I basically applied some paint and stuck some bogies under it. 


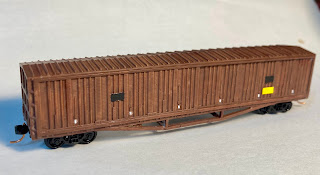
Two sections of the below-the-belt trusses were a bit wobbly, so they got replaced. There was also some bowing of the sides in places, so on this, I've tried simply gluing a plate across the bottom to see if that holds things together, clamped while setting. I also buzzed off the underends to give space for the couplers attached to the Microtrains bogies.

Nicely proportioned, this, and some great detail in the roof and side ribs. 


I added the little white door handles (six per side) to add a little spice, and the yellow plate for the numbers. Note the quite accurate (to my eye) variations in the roof and door ribs, door detail, and detail below the bottom door rails too. There is a little strata visible under the scanning electron microscope, but its not noticeable from normal viewing distances.


Few dramas here. It will probably need a little weight, and a some weathering will come.

If you were ever wanting to get a 3d print, this should be it, firstly the detail is great, secondly these wagons were all over the place from the mid 70s until the early 2000s, and lastly, these are almost impossible to make convincingly yourself!

Updated with some weathering and numbers:


And a further update from the scary closeups department after some little white bits were added on the on the upper door chain tubes and the big V shaped door alignment stripes (done with a ruler and a Derwent white pastel pencil). Must get a yellow one of those. Plus another layer of Dullcote for good measure.