
I was lucky enough to get hold of a copy of this book at much less than cost price off Trademe a couple of weeks ago. Now Derek Cross needs no introduction (fortunately) as a photographer of a railway system long since gone, so I was very interested to see just what had shaken out of his collection.
The answer is, I'm not quite sure. Given that colour photography was in ifs infancy in the 1950's and you couldn't just change film etc, the photos themselves show just how good he was as a photographer by getting the best out of a very difficult medium. I think that the down side might be in the actual selection of pictures. Some are very nice and useful, but others are just odd (A picture of the band playing on the station platform at Glenhope during the 'last' train on the Nelson section? The only use would be to reveal how truly poor men's fashion and haircuts were in those long gone days. And I'm sure that its Danial Craig smoking a cigarette wearing a trench coat on the platform beside them). There is also two of a branch line train on the causeway at Riverton. The same train at virtually the same shot, and both 3/4 views. Was there nothing else left in the box?
Overall I'll have to give this a 'Not quite there' quite honestly. There are not quite enough useful shots to give a man modeling ideas. If you can pick it up cheap, all well and good but there are other Steam era books I would buy before this one.
Saturday, January 28, 2012
Thursday, January 26, 2012
BR4 - DIY Cardboard Recycling
DB says with greenliness:
The Broken River blob* continues its pathetic treck forward.
On Saturday I undercoated the area of the backdrop that was expected to be visible above the mountains and then followed that up with some 'Utah Sky'. Alas there were no 'Avoca Sky' test pots left in stock at the local hardware store. Close enough for a base I feel.
 The next step was to put in some landforms so it will look like we're making some progress here. My intention was to use some of the various bits of NZ wire netting that have been under various layouts since the Casseolithic period becasue I like the way you can cut shape and fiddle with the stuff in real time to get the terrain you want. Unfortunately while this has always worked fine in the past for larger hills, on these small narrow cliffsides it was just making me grumpy, so I thought I'd give that cardboard lattice trick a try. Strangely enough, I don't think I've ever done this before.
A quick raid on the recycling bin uncovered some corrugated cardboad boxes and some lighter manila folders that might do the trick. These were cut up into strips approx 2cm wide.
The electric glue gun (what a marvellous invention) was then fired up and I quickly started sticking vertical mountain bones on, with the odd horizontal bit weaved in for good measure near the cliff top although I'm not sure they really added much value.
 After some strips of the thin card were placed on the tracks to protect them from drippage, the hardshell went on. This job used to be pretty messy before before that Woodland Scenics plaster cloth of unknown flamability entered the market.
Suddenly things are starting to look partially half-arsed. I would have liked the cliffside to be taller, so I might nudge the track closer to the edge at the left side of the centre tunnel to allow that.
 *bloody layout operational block
Wednesday, January 25, 2012
Mid week
Well, after the weekend I have not made much progress. I did manage to add some more weight to the railtruck, and it has improved the running quite a bit in that it will not run in reverse. Previously this had occurred with a lot of wheel spinning. However.... there appears to be a ghost in the machine, or at least in the DCC chip. This manifests itself by ignoring commands to start or stop, and changing direction at random. Might be time for either reading the instructions or an exorcism.
Today's picture comes from a fishing trip. I've always thought that static grass clumps don't quite look right colour wise. there is no depth. However, there's a prototype for everything.

Who knew model scenic texture people go fishing on the Rangatiki.
Today's picture comes from a fishing trip. I've always thought that static grass clumps don't quite look right colour wise. there is no depth. However, there's a prototype for everything.

Who knew model scenic texture people go fishing on the Rangatiki.
Tuesday, January 24, 2012
Going Off-Grid...
Am_Fet scribbles:
Since arriving back in the hobby a few years back now, I've spent a lot of time looking and reading about other peoples layouts and have started to form opinions about what (in my eyes) "works" and what "stinks". With actual modelling time being severly limited, its been an interesting thought exercise and a lot of ideas have been written down in a manifesto, and then promptly locked away in a safe and forgotten.
Now that I have contracted the layout building out to a successful local contractor (Druff & Co) it looks like things may finally be moving on finally having a layout, but the hunt for good ideas continues.
This is the one that really has me thinking. 0-4-4-0T is a bit of a clever chap, and his "Yellow Box" has featured here earlier with Herr Druff expounding its folding virtues:

However, the bit that excited me was the electrics: its entirely run on AA batteries. Cabbage (who plays with ergs for a living) has said that it was an incredibly easy circuit. And now The Don(Druff) has built a couple of similar 9V throttles for Paekak to use with his Digitrax system. What has me aflame is the whole portability factor; Not having to worry about extension leads acting as trip hazards (or fatal harbingers of death, if you read the HSE leaflets) is a big bonus for a layout that could live on a shelf and be bought down to a desk for operation (such as The Forks).
Another thing that has me thinking was the recent silly season and the slowly dying pine branch that took up one corner of our living room. Adorning this vacuum cleaners nightmare was a set of cheap AA powered LED lights....and all I could think of was "lighting rig". Obviously the ones that flash multi coloured in time with a tinny speaker squeaking "Jingle Bells" may not really be suitable, but the long strings of white ones might do the trick. It might be worth looking at.....
And then there was the bit in the Wanganui show post that mentioned running a layout from a Laptops USB port....now the geek in me thinks that would be the ultimate...
Monday, January 23, 2012
The day that was
Well, here is the report from yesterdays open home.

After the cleanup we were ready to go. The drink making facilities were shifted to the garage to save the endless tramp of people through the house.
A grand total of 4 modelers braved the trip to Palmerston North yesterday. Thanks to mark, mike, Bruce and Quentin for turning up. An interesting day was had (I think) with a BBQ for lunch.
 A few topics were discussed. Bruce enlightened me on the ins and outs of the JMRI DCC software, and I can see that I'll probably wind up downloading it onto the baby laptop for shows. Quentin brought along his NZ finescale Wb that he is working on, and I could only marvel at the wiggly bits underneath.
There was a fair bit of soldering done as well. mark had brought the mk 2 version of the 4 wheeled underframe and this was merrily attacked by both of us.
 There are still a few bugs to iron out and tweaks to be made, but they are still sex on a stick quite honestly. However I am going to possibly have to have a rethink about my wheel choices. in the picture above on the left we have the NMRA standard wheels. On the right are the 2mm FS ones. These just look much better all round. My only concern if I go full noise with these is that I'm not sure if my track is good enough. It will also preclude anyone without NMRA compliant gear from running trains on my layout. Maybe I just shouldn't worry about it and go for it.
 Its starting to look quite nice.
So, thanks to everyone who turned up, I really enjoyed myself. Its just a pity that there were not a few more local modelers around.
Oh, and by my count, its 73 days to the Convention. Hows your planning going?
Sunday, January 22, 2012
Rush job
With the impending stampede of modelers expected today, I was wondering what I could do to add throttles. The Digitrax Zephyr has the ability to use 2 DC controllers as extra throttles (which is one of the reasons that I brought it). The main problem that I had was getting 2 old DC throttles cheaply. However I came across a simple circuit on the net which has a handful of parts and runs off a 9V battery. So, it was off to Jaycar.

Looks easy doesn't it. Sorry I can't post a circuit diagram due to that whole copyright thingy.

After 20 minutes with the drill and soldering iron, here's the first one finished. Now to find out if it actually works.
UPDATE; well, it does work, but the bastards have sold me log pots instead of linear pots. For the non electrically minded of you, this means that the useful speed range is compressed into 2mm of rotary movement. So, technically fine, but functionally useless.
Saturday, January 21, 2012
The countdown begins
Well, the snarlers are in the fridge and I'm just about to head out for an afternoon cleaning out the Man-sion. So far I think I've got 8 modelers turning up tomorrow, a mix of nz120ers and some other odd scale. I recieved in the mail enough bits to make some trackwork and I think theres enough food for the BBQ. Still have to nip out and get some coffee though.
 'Theres still a wee bit of work to do....'
 'Theres still a wee bit of work to do....'
Book Review: Journey to the Pass
Am_Fet writes:
I mentioned this book back in my post about the mysterious "Raven Tea" wagon and lalover asked for more info. SO, here is the full un-expurgated review:

Normally I can take or leave social history, but I was immediately taken by this book when I first encountered TCO Fred Carter reading it one day while not much was moving on the CHCH-PCTN line. Sure, I was drawn to the photos (mostly B&W with a few in colour) but found that once I finally finangled it off Fred I was really taken with the stories contained within.
Father and Son team Stephen and Matthew Wright started the project as an oral history exercise with no intention of it becoming a book, but luckily they chose to publish. It is made up of interviews with eight people who had links with the "Midland Line" (now termed the coal route) and each person tells there own story with their own voice...It does suggest very little editing happened between drafts and final manuscript. Those interviewed range from railways staff from different areas (driver, guard, station master, etc) through to those who used the line (a gangers son, a girl who rode the school trains). Chapters on the history of the line and a photo gallery close out the contents.

As youd somehow expect, the two biggest chapters revolve around the old refreshment rooms (Doreen Dudley and Bid Elson) and engine driver Jim Dillon. All three have enthralling stories to tell about how it used to be living in Springfield.
The photos range from well known ones (John Cooke and John Brouwer feature) through to those not seen before from private collections. Reproduction is good with the photos very clear. My favourite has to be the shot of several workmen in the cage used to transport them via cable from one side of Staircase gully to the other...dont look down!

Those whose interests dont progress much further than locomotives and wagons will probably think nothing of avoiding this book, but theyd be doing themselves a great disservice to do so. As a modeller (loosly), I found enough operational detail in the book to keep me entertained and I must admit I polished it off in one sitting.
Final verdict? Highly recommended. At the very least search it out through the library system for a look.
I mentioned this book back in my post about the mysterious "Raven Tea" wagon and lalover asked for more info. SO, here is the full un-expurgated review:
Journey to the Pass (Memories of the Midland Line)
Stephen and Matthew Wright
(Hilton Press, A4 card cover, 211 pages)
Stephen and Matthew Wright
(Hilton Press, A4 card cover, 211 pages)

Normally I can take or leave social history, but I was immediately taken by this book when I first encountered TCO Fred Carter reading it one day while not much was moving on the CHCH-PCTN line. Sure, I was drawn to the photos (mostly B&W with a few in colour) but found that once I finally finangled it off Fred I was really taken with the stories contained within.
Father and Son team Stephen and Matthew Wright started the project as an oral history exercise with no intention of it becoming a book, but luckily they chose to publish. It is made up of interviews with eight people who had links with the "Midland Line" (now termed the coal route) and each person tells there own story with their own voice...It does suggest very little editing happened between drafts and final manuscript. Those interviewed range from railways staff from different areas (driver, guard, station master, etc) through to those who used the line (a gangers son, a girl who rode the school trains). Chapters on the history of the line and a photo gallery close out the contents.

As youd somehow expect, the two biggest chapters revolve around the old refreshment rooms (Doreen Dudley and Bid Elson) and engine driver Jim Dillon. All three have enthralling stories to tell about how it used to be living in Springfield.
The photos range from well known ones (John Cooke and John Brouwer feature) through to those not seen before from private collections. Reproduction is good with the photos very clear. My favourite has to be the shot of several workmen in the cage used to transport them via cable from one side of Staircase gully to the other...dont look down!

Those whose interests dont progress much further than locomotives and wagons will probably think nothing of avoiding this book, but theyd be doing themselves a great disservice to do so. As a modeller (loosly), I found enough operational detail in the book to keep me entertained and I must admit I polished it off in one sitting.
Final verdict? Highly recommended. At the very least search it out through the library system for a look.
Friday, January 20, 2012
More Nutter Details
Who said NZ120 needs to viewed from two feet away.....
Oh yeah it was the Druff himself.
Well for those of you who like the idea of being able to get a little closer here is a photo of the latest nutter details we have been working on. You may remember I talked about my own Mini Me building a trackgang products Df kit set at the Wellington RailX last November. We got the kits cheap as there a few bits missing like the grills and we talked to Mr trackgang about working on an etch for these parts.
Info and photos were collected from a few good foamer's we know and using the Df Dft and Dx kit we bought a simple set of grill details was designed. The drawings went away just after Christmas to the etcher's and the finished articles arrived back this week.

DFT grills example
The etch is 0.1mm brass and the details are approximately correct.... I think there are one too many bars in each direction so if anyone would like to count them be my guest....
There are 2 grills for the radiator intakes and one for top plus the dynamic brake fan and grill. If you are feeling like a true massacist you could even try making it go round using a simple friction drive :)
These parts will be available from Trackgang very soon and we will have them at the convention too
A Damn Good Fossick....
Am_Fet writes:
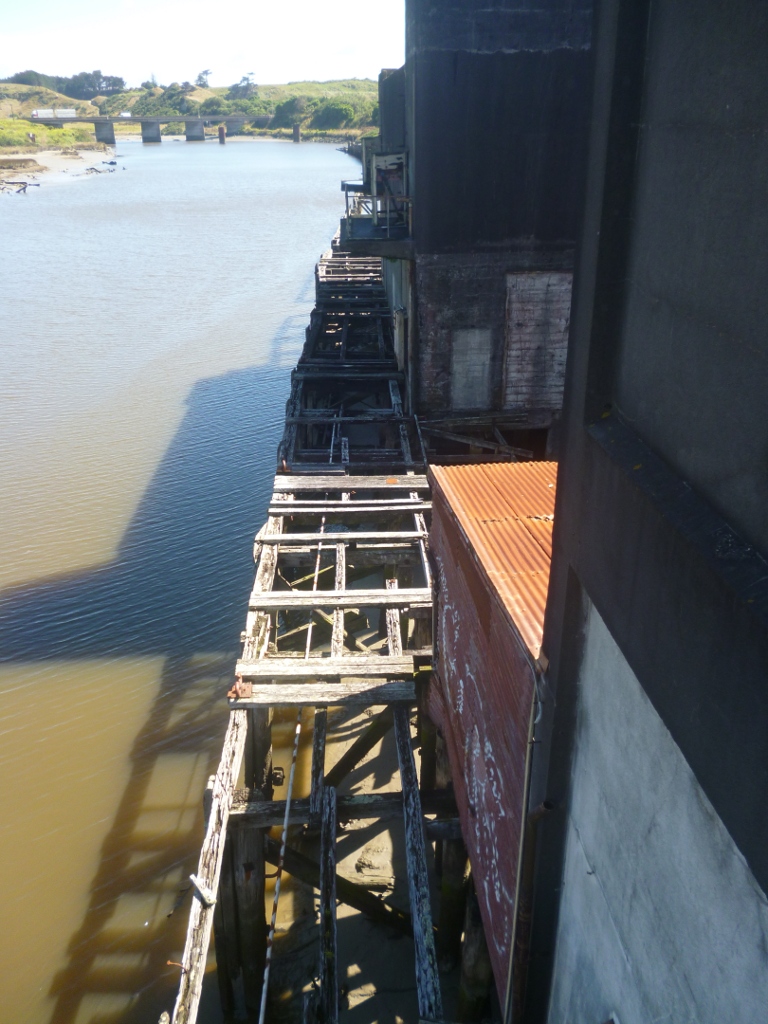
Well, Monday found me again in the wilds of Taranaki occupying the left seat of a few locomotives with hospitality and lunch provided by Drew. As I dont get up that way as often as I'd like, I decided that Monday was the day to spend some time in Patea photographing the old waterfront cool stores and trying hard to get the song "Poi E" out of my head....

Turned out that it was well worth the visit and an enjoyable hour was had by all (well, Drew and I) as we risked life and limb walking over end-of-life timber.

First stop was the compressor room that drove the refrigeration plant. Drew can remember it when it was full of equipment, but now regrettably only the main wheel remains on its pedestals (its about my height, BTW, so it aint small).

The cheese stores are massive reinforced concrete structures, and this is the view on the ground floor showing all the buttressing needed to stop the 2nd floor suddenly being at ground level....It was very eeiry walking through here, and Drew mentioned the local scroatlings used the area to abandon cars in.
After traversing an external staircase that looked none to stable, we emerged onto the upstairs loading bays for a view over the old wharf and the river.

From there, we wandered back out through a gaping hole in the other side of the building to find the worlds most perfect "railfan deckchair" spot. Might have to visit this again, methinks...

Our final stop was the old railway wharf further to the north which is in a similar state of dereliction to the cheese store wharf.

Although I was a bit ambivalent about the exploring when Drew first suggested it to me (I had been awake since 0300 that morning), I am very happy that I relented. I've now got enough photos and a new understanding of the place to help when I get around to building a layout based on the place (obviously not soon!)
For those with a similar love of industrial archeology, I've uploaded the whole collection to flickr here.
Well, Monday found me again in the wilds of Taranaki occupying the left seat of a few locomotives with hospitality and lunch provided by Drew. As I dont get up that way as often as I'd like, I decided that Monday was the day to spend some time in Patea photographing the old waterfront cool stores and trying hard to get the song "Poi E" out of my head....

Turned out that it was well worth the visit and an enjoyable hour was had by all (well, Drew and I) as we risked life and limb walking over end-of-life timber.

First stop was the compressor room that drove the refrigeration plant. Drew can remember it when it was full of equipment, but now regrettably only the main wheel remains on its pedestals (its about my height, BTW, so it aint small).

The cheese stores are massive reinforced concrete structures, and this is the view on the ground floor showing all the buttressing needed to stop the 2nd floor suddenly being at ground level....It was very eeiry walking through here, and Drew mentioned the local scroatlings used the area to abandon cars in.
After traversing an external staircase that looked none to stable, we emerged onto the upstairs loading bays for a view over the old wharf and the river.
From there, we wandered back out through a gaping hole in the other side of the building to find the worlds most perfect "railfan deckchair" spot. Might have to visit this again, methinks...

Our final stop was the old railway wharf further to the north which is in a similar state of dereliction to the cheese store wharf.

Although I was a bit ambivalent about the exploring when Drew first suggested it to me (I had been awake since 0300 that morning), I am very happy that I relented. I've now got enough photos and a new understanding of the place to help when I get around to building a layout based on the place (obviously not soon!)
For those with a similar love of industrial archeology, I've uploaded the whole collection to flickr here.
Thursday, January 19, 2012
Undergubbins
The other night Fetler D'amatuer dropped off the mk1 4 wheeled underframe etchs. Naturally I had to have a crack at them with a soldering iron.
First up, as it comes....
 'Wroowww'
While there are no instructions its all pretty straightforward. here we see it 1/2 way through. I've used Carrs solder paste which really makes things easy.
 After a few more poor photos of various assembly stages, here is the final article with its predecessors. On the left is a Trackgang 10' underframe (modified slightly) and on the right is the good old Peco underframe. Total assembly time was about 45 minutes.

I've got a few suggestions that will be thrashed out (figuratively of course) this weekend.
However I'm still extremely happy with it
First up, as it comes....
 'Wroowww'
 After a few more poor photos of various assembly stages, here is the final article with its predecessors. On the left is a Trackgang 10' underframe (modified slightly) and on the right is the good old Peco underframe. Total assembly time was about 45 minutes.
I've got a few suggestions that will be thrashed out (figuratively of course) this weekend.
However I'm still extremely happy with it
Wednesday, January 18, 2012
Broken River 3 - Some progress
DB reports on another adventure in the trainroom:
After that exciting Broken River prototype flyby in my last post, let's now return to 6 inches x 8 feet of sky-high reality.
Checking aroundabout where the Broken River left-end track should go to meet up with the yard points, I de-lifted the section down onto a set of drawers so that I could do some work on it.
The first item to be addressed was the join between the backscene panels, which are plywood sheets approx 4mm thick. I white-glued a small piece of the same material behind them and clamped this all together while it sets. I also ran some white glue down the join as a filler between the two pieces, although I expect that area of the backscene will be largely hidden by the middle tunnel in my group of three.
Recycled flextrack was then attached with the staplecannon and a few wagons were pushed over the joins to make sure everything was smooth. Being too lazy or incompetent to make my own track (and lets face it, for a layout at this height, why would I bother!) I cut the rails with pliers and then file any burrs off the tops, bottoms and the surfaces where the fishplates go (otherwise you end up fighting with them and don't get a great join). As I happen to be using code 55 Peco track - the one that has 'two webs'; the latter step means running a triangular file between the webs on each side of each rail.
I'm soldering about every second rail jointer (mainly because most of my old recycled track is two sections soldered together) and will be running copious wire jumpers to connect everything else to a thick bus wire running around the layout. Don't want things to be running erratically up in the sky.

DJ 3067 and DG 2376 run the first (unpowered, non-revenue) train of crusty old wagons to 'see how things will look'
Tuesday, January 17, 2012
Weekend meet
Well, since the question has been posed, I was thinking about starting at 10:30 ish to give out of towners time to get here. Lunch I'm not sure what will happen but we do own a small BBQ.
As for what is planned, not really that much. Some are planning to bring along a project, and Paekakariki will be available to those who have trains to run (well, even if its only 12' up and back). Oh, and they will need to be DCCed. The power supply seems to be quite grunty and could well fry anything else. Hopefully I'll have enough bits by Sunday to do a track making clinic of some sort. Marks model works will be around to supply assistance in the dark arts of whatever it is he does. Others I'm sure will be there to supply pithy and/or useless comments.
For those who want to come along, e-mail me and you can get the secret password (oh and the location). Remember admission is a model that you are either working on (and I think we will have some tables) or have recently finished. Only fair I think.
Monday, January 16, 2012
Tunnel Vision - Revisiting the Broken River Gorge
DB hopes that writing this will spur him into action:
 I put a lump of wood up in the sky a while back before becoming distracted by other things, but now that it is winter here up in the Top Half of the planet (albeit the mildest I've ever seen) I need a few indoor projects to get on with. And I wouldn't mind seeing a train run around the room under it's own digital steam either...
 The Midland Line is a spectacular piece of railway, with the segment between Springfield and Cragieburn, and more specificly, between the coastal abutments of the Pattersons Creek and Slovens Creek viaducts being the most dramatic. While the area around Staircase and the viaducts are all well known, the few tunnel-encrusted kilometres alongside Broken River are less so - probably due both to their inaccessibility and often being bathed in shadow or tricky light; making photography difficult.
 Other than the familiar triple tunnels scene below of course. Unfortunately I couldn't conjure up a train at the time of taking the real picture (but I was tempted to photoshop in my new NZ120 DG nose).
 So this is kinda what I'm going for in a representative fashion. Something akin to the second shot I would be very happy with: the tunnel 15-14-13 straight section.
 I'd quite like some snow but it's not really in keeping with the rest of the layout. Maybe at the far left end there could be some dregs before going into the tunnel leading to the 'fiddle yard' behind it.

Sunday, January 15, 2012
An overview
More cheap and cheerful buildings going up today. After looking at all the plans for the station (which seems to have been rebuilt more times than I've had hot dinners) I managed to work out the size of the main building. with the craft knife set to cut we were off and soon the building appeared. Glued up and on the platform it looked like this.
 With the railcar parked next to it, it doesn't seem tall enough, so when I go back and build the real one I'll have to get it right. I was also worried that there would not be enough space on the platform for the station building. Its obvious from this that space will not be a problem.
As the last photos were a bit dark, here is one from the cold hard light of day looking down the whole layout.
 Still to come are the houses and town at the far right, the hill close right, and the airail shed on the left.
And here's one of the loco depot showing the recently completed control panels.
 'Note the H&S approved soldering iron hanger'
Now if I could just get the minions onto sorting out the turntable then I could get the rest of the track finished. I also will have to decide what to make the final fascia boards from. Ideally it would be 3 or 4mm ply, but I might have to settle for thin MDF (assuming I can get hold of some) of the same thickness. I can't really use card as it is easy to ding, and foam core board has the same problem.
Saturday, January 14, 2012
Knocking things up
Well, with Convention just round the corner, things layout wise have taken a turn towards scenics. I've spent a bit of time in the last couple of days looking at building plans and working out just how I'm going to fit things in to areas that seemed perfectly fine, but are now just a bit small (the water tank area being one). Further to this, today I chopped up some perfectly good cardboard boxes to make some tatty landforms.

Its just there to give visitors next weekend a rough idea of what it will eventually look like. its only sitting there and will not be the final article. I'm not overly impressed with it as I now have nowhere to lean on the layout at the front when I'm working.
I'm tossing up whether or not to build some mock up buildings out of card to see how it looks, and what will fit into some of the areas which are a bit tight.
Ok, so a few beers later and we have a couple of buildings up.
First the goods shed opposite the station. Comments from the peanut galley have said that its not that important. However its one of the few buildings in this area and so it gets made. I followed the guild plans for the standard 20' by 30' shed, and the result was...
 Too tall by quite a bit. knocking 5 feet off the bottom and its a much better fit.

Also for a first attempt, here is the loco shed in place. It will be useful to size and place the other buildings in the area relative to it.
 So, we have a start on the pretty bits.
(sorry about the lighting, the lady of the house has borrowed the movable lighting for other more important jobs inside.)

Its just there to give visitors next weekend a rough idea of what it will eventually look like. its only sitting there and will not be the final article. I'm not overly impressed with it as I now have nowhere to lean on the layout at the front when I'm working.
I'm tossing up whether or not to build some mock up buildings out of card to see how it looks, and what will fit into some of the areas which are a bit tight.
Ok, so a few beers later and we have a couple of buildings up.
First the goods shed opposite the station. Comments from the peanut galley have said that its not that important. However its one of the few buildings in this area and so it gets made. I followed the guild plans for the standard 20' by 30' shed, and the result was...
 Too tall by quite a bit. knocking 5 feet off the bottom and its a much better fit.
Also for a first attempt, here is the loco shed in place. It will be useful to size and place the other buildings in the area relative to it.
 So, we have a start on the pretty bits.
(sorry about the lighting, the lady of the house has borrowed the movable lighting for other more important jobs inside.)
Thursday, January 12, 2012
Timaru in the 1900's
Well, after another day in the mansion there is a bit of progress to actually see, but its only painting the track. Oh, and adding some check rails and tweaking others to get the gaps right.
So, sitting down in the evening and having a read and I come across this photo (in New Zealand railway memories).

This struck me as providing the germ of an idea for a shelf layout. the main station is out of shot on the left the main line curves away from the camera on the right and there is a wharf curving towards the camera on the right. Thus one could have main line trains running behind and shunting at the front.
I'd come up with a plan, but I'm busy cutting up bits of cardboard today in the Man-sion
Running in place
Well, after several hours in the Man-sion yesterday, there is no sign of progress short of the appearance of 2 small control panels on the last module. While this is the final instalation of the point throws on the layout, it doesn't seem like I'm getting anywhere on the surface which is the bit everyone sees. As part of the control panels I also installed the wiring for the point frogs, with the acompanying obligatory shorts. As an interesting aside, for some odd reason I seem to have run out of the black wire, while still having plenty of red. Common sense would suggest that I should have used equal amounts of both. Perhaps the extra black wire is off having fun with my missing socks?
I am also starting to look round and there are a few tidiying jobs to do before the meet next weekend and some vacuuming as well. By the silence I'm assuming I'll just be looking after the usual suspects....
Also, and I'm not sure if I have linked to it before, here is an extremely useful little table of scale rail sizes. Basically for us choosen scale modelers the 2 useful ones are code 55 which corresponds to 100 pound rail, and code 40 which corresponds to 75 pound. Code 70 at >160 pounds is too far out. At the other end of the scale code 30 (which can be got as strip) corresponds to 45 pound, which would work for early track work pre 1900 and later on remote branch lines. However its increased fiddlyness I think would push it beyond my meagre track making skills.
Wednesday, January 11, 2012
Something a little bit bigger.
A while ago I blogged about working on some rolling stock for the Fell Museum in Featherstone. Since then, its taken up space on one of my work surface but not much else. Yesterday some pictures were circulated that indicate that the scenery bit of the layout is at the finishing end of getting on. Freshly armed with a new enthusiasm to 'not be last to the party', I started. I had decided to replace the collection of 4 wheeled wagons with something a bit more period accurate. First up was a standard La1. I rescaled the plan for 1:100 which was what my memory told me was the right scale. Banging the old plasticard together and we got to this.
 'Hmmmmmm'
On the left, we have the NZ120 La, in the middle the 1:00 La and on the right a Lc of indeterminate scale. The La looks very narrow gauge. Running the measuring stick along the rest of the various bits give various ratios from 1:105 to 1:110. Its like stepping back 25 years to our young days of rubber banding scales. Now normally I would say 'stuff it, lets build everything from scratch', but in this case there is a stack of well made stock that I could never replicate, including a very nice 47' car/van. so, back to the drawing board we go.
(If anyone wants a plasticard la top in 1:100 scale, give me a yell, I've got one going cheap...)
I also managed to fit in some work on Paekakariki, completely the Air rail siding. Not much, but its just ticking things off. There are few jobs I want to get done before I get back to being behind at work next week.
Tuesday, January 10, 2012
Clearing house
A stack of small stuff tonight, so without further adoo;
- A small group works on towards an NZ120 competition cup for the convention competitions. Initial thoughts fort he name are the John Rappard memorial trophy. Awarded for the model of a New Zealand prototype to a scale of 1:120 that gains the highest percentage of possible marks during judging. (Categories 2.1 to 2.12). Hopefully this is OK with everyone and we can hopefully get it past the convention committee in time for the convention.
- The initial get together is now down or Schloss dandruff on the 22nd of January. Entry will be a model (of some sort) that you are currently working on or have recently finished. Some S scalers are allowed :v). Not sure what we will do for lunch, but there is also a steam/diesel excursion that day, with a locomotive swap at palmy, which might be a good assembly point. No idea what we will do for lunch either but we will take it as it comes.
-2 hours in the shed today gave no visual improvements but I added in the loco depot DCC booster. This involved working out just what the hell I had done under the hood, but turned out to be as easy as cutting a couple of wires. I had to make a few alterations to the wiring but its now all up and running. The power supply has a bit less juice that the main one so locos slow down/speed up on entering/leaving the depot track. Next up I will look at doing some hand held controllers to add to the Zepher jump ports. I'll also have to come up with some 'novel' control boxes. Still not too sexy, but more important than the pretty stuff. I also fixed another couple of track problems, but I keep finding more.
Monday, January 09, 2012
On Tour; Another little gem.
On tour to another out of the way preservation site. Today its the turn of the Tokomaru steam museum. I had been thinking of paying this site a visit for the whole of 2011, but didn't quite get that far. Looking for things to do with the parents I noticed that yesterday was a steam day with everything up and running.
The museum has a large collection of stationary steam engines rescued from many old industries, mostly along the lines of 'If you can shift it, you can have it!'. Watching some of these huge machines in almost silent motion is very impressive.
 'A very large silent steam engine'
 'A steamy steam engine'
But that's not why you keep turning up to read this blog, so lets cut to the good stuff. The museum has a surprisingly good collection of small steam locos. In steam today we had a Manning Wardle 0-4-0. This was towing a home made coach which reminded me a bit of some Swiss maintenance wagons I have seen.
 Now unique in New Zealand, Tokomaru has a train set type loop of track, which means that one can walk a very short distance to photograph the 'train' again.
 As can be imagined the curves are quite tight, and the grades quite steep at each end. I have seen photographs of a 47' carriage and 30' van running and this must have been a struggle for the small locos involved.
 A Fowler ex the Napier harbour board. A sister loco is restored to running condition at Silverstream. I think this might be a runner (I've certainly seen photos of it running in the not too distant past, and the funnel cover is a bit of a give away as well).
 A second Fowler, this one ex the Linton army camp where it was used to shunt the sidings at the bottom end of the camp.
There are also a couple of bush locos. Climax 522 worked for Ellis and Burnard and was apparently at one point named Mountaineer. Today its looking a bit worse for wear.
 The other side of the cab looks a bit worse.
 Next to it in the shed is a price C 0-4-4-0, forerunner of the Cb.
 Looking at this I wonder why I spent so much time getting the cab front right.
 The bogies are just as small as they look.
Granted that these locos are in rather a poor condition at the moment. I have no idea about any current plans to restore them. However, they are undercover and safe for the time being, and far more restorable than locos that have been pulled out of river banks.
There was also the obligatory baby Tr.
 'Does every preservation line have one of these?'
'Does one get handed one for saying "we are going to open a preservation site?"
 The station, while looking rather nondescript, is rather important historically. It is one of the few WMR buildings (or indeed artifacts) left.
So, all in all a very interesting day out. if you are planning a visit check up here to see if there is a steaming day on. Its well worth the extra effort to have a look. Oh and on a cold day its nice and warm inside.
Subscribe to:
Comments (Atom)