Saturday, October 29, 2016

Waihao Forks: Interlude


Am_Fet pulls out the "Prototype for Everything" file and recites:

One of my formative Model Train memories revolves around the many layouts that were built in KiwiBonds front room back when we werent old enough to know any better but before girls came along and changed all the rules.  Back in those days it seemed that the best train we could run was a long train of Hornby open 4 wheel wagons pulled by a cardboard DGr.  The load?  Why, coal of course!  To us, Coal was the raison d'tre of railways everywhere.  Everywhere you looked in books all you saw was long trains of black gold, and so thats what we modelled.

Everyone mellows with age however (except maybe Keith Richards) and the lure of Canterbury agrarian branch lines proved too much to resist.  Sure, it would be nice to have a few coal wagons floating about, but in rural South Canterbury?

Well oddly enough.....


Exhibit A, m'lud:  The Allanholme Coal Mine located on the table lands above Waihao Forks.  In discussions with the late and much missed Euan McQueen about this, he said the coal here was of the same type as that seen at several smaller mines all the way up the east coast of the island from Kaitangata to Shag Point and further up to Mt Somers.  However, as far as he was aware the coal was for local domestic use and was never railed out.

And then an article was found online from the Oamaru Mail from 1920 about a visit to the mine.  I wont reproduce the whole article here, but the highlights were:

- The Waimate Branch of the Sth Canterbury Development League visited to ascertain whether it was worth extending the rail line to the mine.
- Thanks to the amount of coal to be seen in the mine, it was agreed that an extension of the line would be of benefit to the community.
- "At present, Messers Meredith and Co keep a traction engine continually hauling to the Waihao Forks railway station...."
- Production was over 3300 tons per annum, much of which went as far away as Christchurch.

I can only guess that any extension would have branched of the branchline at McLeans Station and headed NW towards where the mine was located.

Modelling wise, it would make for a great scene at The Forks:  A Traction Engine with trailers in the goods yard with coal wagons awaiting loading.  Seeing as this was in the 1920's, it would be in the era when Waihao Downs still had a loco shed and staff and the main loco's on the branch were the Fa's.....not quite fitting in with what I'm aiming for, but definitely tempting if I feel the need to backdate the layout.....


Tuesday, October 25, 2016

Waihao Forks: The Fill In

Am_Fet explains:

Another momentous occasion in the life of the layout this evening.  After a tour of most of the region, it is now safely domociled in the Top Secret Layout Building Facility in Stokes Valley where construction will continue over the coming months.

This evenings work session had our protagonists mostly standing around and discussing ways and means....before seizing the day and just leaping in anyway.  The plan was for the landscape to be built up from 5mm foamboard before being covered with putty to recreate the undulations of a normal landscape.  The plan is for the switches controlling the points to be contained within a small "box" that can be covered for photography or if the layout is not being shunted.


In this action photo, we can see your scribe hacking merrily at the foamcore with possibly the worlds sharpest (and dangerous) craft knife, while 0-4-4-0T starts drawing landforms for the hill at the left hand edge of the baseboard.  Also visible is the first test of the putty (applied by Cabbage, who also provided the photo).

Hopefully these layout building evenings will now become a bit more frequent as the weather warms up and working in someones garage isnt the imposition it was in mid winter.

My plan now for the next few days is to finally get back into some CAD work and get the stock yards and goods shed drawn using the guild drawings.

Saturday, October 22, 2016

Waihao Forks....Saturday Update


Am_Fet writes in block capitals:

Well, the weekend plans for the major protagonists to get together at Cabbages top secret layout building facility on Friday night fell apart in spectacular fashion thanks to illness and family commitments.  Poor Cabbage, he had to go and spend time with the Marklin Club....

Anyway, here is the latest email from 0-4-4-0T with progress:

"We now have slow speed running on all parts of Waihao Forks.

The electrical interlocking doesn't successfully stop the engine if the points aren't set completely correctly - essentially because everything ran fine on insulfrog. But we have slow speed running through all areas.

Finer testing is beyond the quality of my engines to date. The Graham Farish 0-6-0 has a very long wheel base plus its motor doesn't run well at very slow speeds. The Microace 4-6-4 doesn't run well on the slightly rough code 40 track because its power pick-ups (on the first two driving axles and the last axle of the trailing truck) are only just good enough for very smooth heavier track."

I believe the meeting will be postponed until next week when hopefully we can start the landforms.  There is also talk of sub-contracting out the grass planting to another well known modeller.  I'm waiting for Cabbage to confirm.

In the meantime, I had better pickup my mouse and start designing the buildings and structures.

In closing, does anyone have any ideas for modelling stucco in the smaller scales?  Everything I read seems to be aimed at HO and bigger, ranging from sandpaper to talc or white pepper mixed with paint.

All answers on the back of a postcard please!

Monday, October 17, 2016

Waihao Forks.....On Point.


Am_Fet, with great relief, pens:

Whew!  We are up to date.  This is the latest report from Backward Engineering in Karori ("Where the past is being made today!").


The curtain wire is now glued down, and then the ends of the push-pull wire have been bent and threaded into the pre-drilled holes in the switches using small pliers.  The kink in the push-pull wire can be opened and closed slightly to make fine adjustments to the length of the wire.


All the brass dropouts to get power to the track from underneath are now fitted and soldered on.

Next, turn it all over and attach wires to the switches and dropouts."


Sunday, October 16, 2016

Waihao Forks....gaining control.

Am_Fet enthuses:

Can I just start off by saying that although it may seem like this work has been moving quickly, nothing could be further from the truth.  0-4-4-0T and I have only really had the chance to catchup during the planned monthly meetings in Lower Hutt, so most of the work documented here has only really happened since the Palmy show...whenever that was.

So hopefully todays post will take us up to where things sit currently and you can then marvel at the pace that things normally happen at around here.

This pic arrived in my inbox last weekend:


As can be seen from this picture from Backward Engineering in Karori ("Where the past is being made today!") things are now focussing on the gubbins needed to make things work.

(Hilariously enough, my iphone autocorrected "control gubbins" to "control gibbons"....which probably isnt far from the truth!)

Anyway, here is the written report from 0-4-4-0T:

"The trackwork for Waihao Forks has been glued to some 10mm foamboard.  Head Druff says this dampens the amount of track noise.  Slots have been cut in it to take curtain wire which takes curved routes to the switches.  Music wire just under 1mm thick runs inside the curtain wire from the point blades to the switches.  Some 5mm foamboard in the slots holds up the curtain wire next to the point blades.


The music wire is bent through a right angle to go through the end of the moving sleeper that the point blades are attached to. Having the track on 10mm foamboard rather than 5mm board means Am_Fet will be able to shape the ground level in the area surrounding the yard to levels lower than the trackwork when required.  Otherwise the ground surface of the whole module would look dead flat and unreal.


Next job is to attach the music wires to the switches - to be shown in a future post.  After that, the electrical wiring can go in underneath."

Saturday, October 15, 2016

Waihao Forks - Setting the Scene


Am_Fet Postulates:

After the baseboards triumphant return from its southern sojourn, the next task was to work out where all the scenic features were going to go.

A meeting was hastily convened at the monthly club night with plans and photos in abundance.  Some mad rash fool started scribbling with a pencil, and by the end of the evening we had the beginnings of what (we hope) will be a very attractive scene.

And...no one had a camera to record the moment...Doh!

So instead, lets revisit my favourite photo of the station from the 1920's:


The three structures that really anchor the scene are the goods shed, the stock yards and the pub.  The goods shed was a stock 60' by 30' shed but with a strangely steep pitched roof.  As it was a known size, it became the "anchor structure" of the whole precinct, meaning it was sited first and we used its place to position the minor structures that related to it, such as the station platform and shelter shed and the loading bank.

Then onto the pub (what a grand idea!).  As the building was separated from the precinct by the road, we first needed to make an arbitrary decision on what looked like the acceptable width for a 1950's metaled country road.  Once this was drawn in, the pub was located in relation to the goods shed and station shelter.  It became apparent that the pub will need to be "split" at the baseboard edge, but discussions came up with a good way to make the most of the situation.


The stock yards were next.  We made a call on the position of the stock loading race and then drew the rest of the yards in position based on this.  As with the pub, the position of the road was critical and this was also drawn in.

The final structure to complete the scene is that non-descript corrugated iron shed on the roadside past the pub.  It will serve as a counterpoint to the obvious railway designed structures, being a simple rural shed seen in thousands of places around the country.

Final job was to rough in where the scenic landforms will sit.  There is a perceptible dip to the left of the track in the photo as well as the small hill the photo was taken from to include.  numerous lines were scribbled until something believable was deemed to be acceptable.

Apologies for all the words (lack of photos of the process is a bug bear) but I thought it was important to record how the process went.

And to finish off, here is a more recent photo from Joe Wallace.....its a brilliant photo for landscape detail.  The old loading bank and road can still be seen, and the roadbed leading up the hill to Mcleans can be discerned climbing up out of shot to the top right.


Friday, October 14, 2016

Waihao Forks.....On Tour


Am_Fet continues....

With the completion of the undergubbins (as seen in a previous instalment), the time had come for the focus to shift from the wastes of Lower Hutt to the leafy gentrified suburb of Karori.  0-4-4-0T took the baseboard home from club night and started the careful and painstaking task of marrying up the track with the baseboard (i.e he winged it).

The track was gently cut in the correct places and located on the baseboard....


....before being transported across the water to play a starring role at the Christchurch Show, even if only as a workbench....


I have no idea what Cabbage is saying here....a caption contest, perchance?  Note 0-4-4-0T using the area earmarked for paddocks and willow trees to assemble wagons....the philistine.


Recriminations will be swift, and effective....

(Luckily for our protagonist, the track was completed over the course of the weekend, appeasing the landowner)

Next:  Setting the Scene.


Wednesday, October 12, 2016

Waihao Forks....what lurks beneath...


Am_Fet expounds:

In designing the baseboard supporting structure, I was keen to produce something that would be simple yet strong as well as providing suitable attachment points for the MMW module ends to be screwed into.  Being a curvy baseboard doesnt make life easy either....but thats the shape of the station, so it is what it is.

The design I finally came up with is:


Effectively there are 2 quarter circles CNC routed out of 12mm plywood with right angle bends to suit the MMW endcaps.  I did 4 in all so they could be laminated together for a total thickness of roughly an inch (I said roughly....).  The pieces on the inner edge have a 3mm slot cut in them (just visible here) so that 3mm MDF can be used as a layout fascia at a later date.  A smaller crossbrace is added to provide a bit of stability for both the baseboard surface and the fascia.

Here are the parts being routed out on the Atomik Design CNC machine.  BTW, I have seen it do 1mm brass, I'm thinking one day I might try a simple chassis on it...


Also starring in the picture of the leg components, of which more later....

One momentous club night, the components were bought together and securely fastened.  Tip it on its side and it looks like this:


The more clever amongst you will notice the distinct lack of endacps.  The reason is purely practical:  As it stands, the board can still quickly be flicked upside down/stored sideways/flown like a frisbee.

Next up, baseboard is reunited with track.

Tuesday, October 11, 2016

Waihao Forks....Now with added length!


Am_Fet continues:

Initial Permanent Way meetings were held between 0-4-4-0T and myself during one of the monthly club nights.  The layout was viewed from all angles and measured up to within an inch of its life....

One of the decisions coming out of the meeting was that the loops were just a little too short, especially when a goods shed sized cutout was plonked on for a good look.  After a bit of deliberation and dicking about (A Noble Art, Sir!), it was decided that the loops all needed to be lengthened by about 150mm.

To facilitate the building of the baseboards at this point, the track was removed from its paper template which was duly sent on to Atomik Design, leaving the good stuff in Karori to be stretched.


Once the paper template had arrived in the Seaview workshops of Atomik Design (Layout Baseboards a Specialty), a quick attack of the "cut and paste" machine added in the necessary inches so that baseboard planning could commence.


It was then a simple matter to lay the template out on a piece of 4mm ply (purchased for this very task) and start jockeying around until a suitable size, shape and curve radius could be established.


The ply was then measured up and cut with the CNC router....and set aside to get in everyones way as they moved between the machines.


Next up: the baseboard supports and getting the whole thing together......

Sunday, October 09, 2016

Waihao Forks, the Rethink.


Am_Fet elucidates:

From the start, Waihao Forks was always going to be built with MMW endcaps.  Not only did I want to enjoy running it at home, but I also wanted to take it to shows and being able to join it up with other like-minded module builders made a lot of sense.

But I also wanted the chance to model what happened at each end of the station as that was just as important as the station itself.  Waihao Forks is located in a river valley with stiff climbs and bridges out each side.  To the west was Bridge number 9, the "Big Bridge" which was a multi truss affair:


To the east was the side by side bridges that carried the rail and road back towards Waimate as well as the start of the ruling grade up to McLeans (seen in the photo yesterday).

So already I had the idea that there were an additional 2 scenes that needed to be included to tell the story of the line.  It was a quick mental leap to decide that 3 scenes plus a fiddle yard equals a nice standalone 1 person layout perfect for exhibiting.  A quick CAD scribble confirmed that this was indeed a good idea.


While I was thinking about the layout and the exhibiting thereoff, my mind turned to how to support everything.  MMW modules are designed to sit comfortably on tables, but I wanted something more "leggish".  Remembering photos of tab and slot structures from the UK, I started playing around with some slot together leg structures that will clamp the endcaps together and hold the layout at a consistent height, yet be lasered so they can be produced accurately ad infinitum.  Here is the prototype undergoing testing:


So thats the civil engineering sorted.  The next things to discuss with 0-4-4-0T at a club night was rolling stock and operations.  My goal is to be able to run a B 4-8-0 (No 305) and Wf 389 (which was the mainstay back when the branch closed in the 50's) but maybe mix things up a bit by running a Red Dj to show "what might have been".  Wagons will be lots of J's (those sheep yards will need lots) plus your joe-average L and K wagons with a few interlopers thrown in.

SO!  Thats the thinking out of the way, tomorrow (with 0-4-4-0T's help) we can start looking at the revamping of the trackwork and the new baseboard.


Saturday, October 08, 2016

Waihao Forks....Reborn!

Am_Fet blows the dust off his quill pen and writes:

Many of you will remember that ages ago (possibly in a previous geological epoch), I contracted the Civil Engineering arm of Dandruff Labs to build me a layout.  After much sweating and burnt fingers (who would be mad enough to try this Code 40 rubbish?), a layout was produced that looked a lot like this:


And then.....apathy set in.  And life.  And lots of other excuses to tedious to detail here.

Fast Forward to earlier this year.  11 years of working at KiwiRail had evolved into a full blown mid life crisis, complete with unemployment and wondering where life had gone.  0-4-4-0T of this parish, under the tutelage of Lord Druff, was making a damn good fist of laying his own track for his Conns Creek layout (which has featured here previously) and enjoying the process.  Somehow (and I've still got to get this right in my mind) he made me an offer I couldn't refuse.....to work in partnership to get the ailing Waihao Forks layout back under way.

SO.....here we are.  Work has been started and an exciting concrete plan has been formulated to create a "Roundy Roundy" layout for display.  Over the next few posts I'll bring everyone up to date with whats been going on and where we are aiming to get to in the near future.

As a teaser, here is an excellent photo gleaned from the Interweb (courtesy of the Waimo Hysterical Society) showing things sometime during the 30's.  Admittedly we will be setting the layout in the 50's (just before closure), but looking at photos like this it seems not a lot changed over the decades.


Next up....plans and philosophies.

Sunday, July 24, 2016

Palmy Rail-X 2016

Well, another 2 years, another Rail-X.

Again this year I joined the peanut galley to make models while the masses look on in mostly bemusement. On Saturday I spent the day building some larger scale track, while B 0-4-4-0 flew the flag by working on his model of Conns Creek. After the completion of the track work on Saturday night, we had to come up with a way to clean off the residual flux at the venue.
Cue the kitchen sink and a couple of table spoons of bicarb.


We then patted the track work dry with hand towels, did a quick runner and no one was any the wiser...


On Sunday morning, I had a crack at the Tomytec bus chassis. In the previous post on this topic I had pointed out that there needed to be a visit to the chop shop. After having a bit of a think I came up with a plan. After doing a bit of measurement some brass tube was soldered to nickel silver shim to create a hinge type contraption with the front steering unit attached to one side of the hinge and the rest of the mech attached to the other. I added a second piece of nickel silver to act as a clip to hold everything together.

I then added a few bits of cardboard to hold the top in about the right place and stuck it on temporarily


The rear wheel looks a bit odd due to the photo angle but it is actually in the right place.
I didn't have any road prepared but it roamed the table with a surprising amount of grunt.

Finally, I quickly knocked together a test piece to check if an idea I had for a bush tram layout would work. using some of the grass mat and some code 40 track, plus a handful of donated scenics, I knocked up the idea in about 30 minutes.


It needs a shave in places but for a first attempt I think it shows promise.


Sunday, July 10, 2016

That time of the year again

For those of you how live close to palmy, on the 23rd and 24th of this month there is a Railx on at the normal location (Barber Hall which is part of the arena Manawatu). All the usual suspects will bet  there, plus Mr Trackgang and at least one unusual suspect.

I should be there most of the time though I may have to visit the Home show at some point which is on the other side of the complex. Houses don't just insulate themselves......

Thursday, June 09, 2016

Completed

At the weekend I finally secured  the final item in a collection that I have been building for a while.
Its taken many evenings checking Trademe, buying small collections just for 1 or 2 items, and passing the unwanted on to others.

So, what have I got?
A complete collection of Railfan magazines. 20 years of railway history, both old and modern.


38cm high, which does lead to a bit of a storage problem, if one requires quick access to any article, for which I will have to develop an index of some sort. No doubt the editors will now release series collection books (which i think would be a great idea. The collected branch line articles would be brilliant).

Can anyone point me at a set of plain magazine binders?

Thursday, May 19, 2016

Wharf IV


A bit of checking last night.


I think that the height is about right. Now I just have to come up with a jig to knock out 20 sets of wharf pilings

Wednesday, May 18, 2016

A surprise

While down south I was asked to help identify an NZ120 collection as part of an estate. While a large porton of it was Japanese wagons and locos, there were a handfull of gems. these included;
- A zinc etch Dx (2nd batch ) assembled by Kelvin barry.
-A John Rappard resin cast Dx.
-An RB Resin cast DFT.

There were also several Japanese steam locos.the standard 2-6-0 and 4-6-2 and then there was this.....


Now, this is a beast I've never seen before (which is saying quite something), and some research reveals that this is a B6 by kawai Shokai which unfortunately is long out of production.
The mech also shows that it is not a normal Japanese N scale loco as the motor looks like an old Bachmann 3 pole from the late 80's


Of real interest is the wheel diameter (8.5mm or 3'4") and the wheel spacing (12.5mm +13mm) which is not far off useful.
Unfortunately it is one of those things that is long out of production, and since this one is the first I have ever seen its probably as rare as hens teeth.

Tuesday, May 17, 2016

An apology

After my previous post, I noticed that Trackgang now sells S scale kits. Sorry Russel I did not know this.
So, the prognosis for the patient is not as terminal as first thought.

Monday, May 16, 2016

A question.


The occupants of La Casa Dandruff have been on holiday down south. Oddly enough a visit to Dunedin coincided with a local train show. Despite the wrong dates being published in the journal (and I guessed that a train show would probably not be on a Monday and Tuesday) I managed to turn up on the right day.

While most of the layouts were of the non-prototype sort, one that did catch my eye was Arauatu from Invercargill. This has been featured in the journal but I had not sen it in the flesh before.
As the following pictures show, it is a nicely observed layout with some nice scenes,


Apparently the back scenes are painted by one of the modelers wives who is an artist.

As I don't tend to have a lot of contact with your average S scale modeler and I'm not on the gated community, I struck up a conversation with the layouts occupants. One question that i did ask was how they found the availability of S scale kits. 'Trademe" was the reply.
Now this throws up a few red flags for me. If the average NZR modeler can't get kits from a manufacturer and instead relies on an auction site and estate sales, then its very hard to attract new modelers to the scale. NZ120 was in this position when I started modeling in the scale 25 years ago, and it was scratch build almost everything, which is not much fun for new modelers.
This lead me down a rather dark path with arrived at the stop "Is NZR S scale dying?"
Now I'll be happy to admit that the fine scale boys seem to be doing fine which is all well and dandy, but there does not seem to be the incoming base to support that indefinitely.
Now I'm expecting to see in the comments that the scale has never been stronger etc, but I'd like to see it backed up with some hard data.

Update; A check on the links from the Guild website revells that John gardeners website is defunct (so no direct order of steam loco kits ) and the owner of Southdock/Railmaster is reduced to an E-mail address. Good luck with the estate sales......

Sunday, May 01, 2016

Organising

The modeling room has been,for want of a better word, a tip for quite a while now.
At the moment I do my modeling and painting on 600mm shelves that were in place in the house when we brought it which are now surplus to requirements. Now, normally these just live on the floor when not the current project, which is a bit limiting as there is only so much floor to go round.
last weekend I knocked up a storage rack out of some old MDF bits, and smuggled it into the house while the wife was out this morning.


So there we have it. a selection of 6mm wargaming projects on the go at the moment, but plenty of space to add other projects to ignore at my leisure.


Some of you will be wondering why I didn't just buy something from a shop. Mostly its because I'm cheap, but more because I wanted something that fitted into the room without wasting any space. The lesser bit is because we don't have many options in terms of buying items like this in a shop.
However those living in civilised countries might be able to find something that fits the bill much better.

Monday, April 25, 2016

Magazine review time

While on the way out to pick up a few bags of premix cement, I was able to stop off at the local magazine shop for the latest issue of the Railfan. In this quarters magazine we have;
-17 pages of modern image holiday snaps. That is a lot of trains. also a note that again DB gets the center spread. I believe he has sold his soul for these things....
-An article on early turntables.
-An article on 44' birdcage cars.
-The usual suspects. nice to see progress being made on the 88 seat railcar restoration just over the hill, and I must pay them another visit at some point.
For once there was not a lot to float my boat, though some of the early photographs may well repay some closer study.

I also picked up a copy of the Local rag (the Journal). several items caught my eye in the 10 second flick through, so I plonked down my money for it.
-A well illustrated article on sawmills in NZ, a topic which I have been pondering for quite a while. Some good info and photos which should aid replication the prototype in model form. One photo in particular is pretty much exactly what I had been planning to model.
-A photo article on John Agnews west coast railway in S scale. I reneber seeing pictures of this layout in the first journals we found in the mid 80's and its nice to have a more complete overview including a track plan. It was interesting to see someone elses thoughts on how to model a large system, as I have spent some time kicking round various plans on paper for similar layouts.
-NZ120 in the Journal jewels (which might be a first?) again its from the bench of the convention sweeping Mike Gee.
Negatives were;
-Peter Ross' column. when I read an opinion piece and come away wondering what exactly the point was then I wonder if maybe its time to let someone else do the writing....
-An article on building a 13335mm (or 44') guards van. This has somehow annoyed me to the point where I would like to tie the author up and beat him with a stout stick until he starts using feet as a measurement. When reference is made to 9144mm guards vans as well (yes 30', but why couldn't he just sodding write it), it really does just smack of the author being caught up in his own cleverness.

despite this, I would rate the journal on top, which for me is a bit of a rarity.

Sunday, February 28, 2016

First steps.

Right, the days are getting shorter and its time to start on those winter modeling projects.
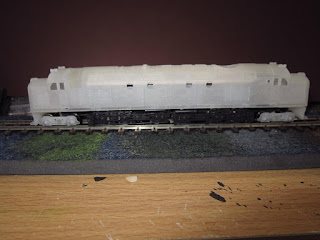
So, today I had a first look at the Shapeways Df top, and did some preliminary work.

The first thing to understand is that these prints should be treated as a Scratch aid, so there are no instructions and the modeler is left to fend for him/her self in the construction process.
So I'm going to blog my build to show how I approach things and possibly why I do things the way I do (or not, who knows).

The main bogie side frames were cut away from the top with a piecing saw. Similarly the front and rear bogies were also cut off. The braces between the sides were also cut/snapped away.
Dropping the top onto the mech revealed that the top sat too low. I then noticed that Peter had quite thoughtfully provided some steps on the inside of the roof. I cut out a piece of 1.5mm thick card 17mm by 85 mm which fitted nicely.


Placing the top on the mech gives an overall height of ~30mm, which is about right height wise.


Next up are the bogies. Again, Peter has thoughtfully included some locating dimples for the axle pinpoints, which take a 15mm axle. This appears to be standard on British wheels (Peco, Parkside Dundas or Farish), so its up to you for your choice. I've gone with (I think) Parkside Dundas solid disk 6.2mm wheels cos I like metal tires. Comparing the old with the new.....


The older bogies pop out of the locating beams, and the new ones will drop in once finished.
With the new bogies temporarily in place here's how things stand.


It has also answered one of my worries that the underframe was not going to look 'full enough' for want of better phrasing. The replacement bogies carry the underframe all the way to the ends, though I'll make some adjustments to the placement to balance things up.