
Discussed on the yahoo group in the last week or so, sources of inspiration for modeling. There's been a few posts about the journal being a good source, and it is, to a certain extent. Certainly when we first discovered it in the mid 1980's it was an amazing revelation and getting hold of a new issue was a big thrill. It inspired an explosion of cardboard wagon and loco manufacture, some of which was even close to the right scale. When I started in Nz120 the guys in the group were a source of inspiration. John Rappards model output was nothing short of incredible, which I guess is one of the pluses of being retired. It seemed he would turn up with a new model of something every week and in a variety of scales. After moving from Dunedin to Wellington Darryl and I spent a fair bit of time inspiring each other onward to create a layout and exhibit it.
And today? I've been re-reading some old journals that I've got hold of recently, but most of the inspiration I get is from 2 sources. the first is older books; Spirit of steam, Steam finale, New Zealand steam spectacular and others of the same ilk. The work of these old guys in the 1950's and 60's is made even more impressive by the limitations of the media in that period. No shooting of a gazillion pictures and swapping of memory sticks. One chance to get it right and no second chances. The second source is the Railfan, which is a magazine that rates well among any in the world (a real credit to the hard work of the editors). Their ongoing series about branch lines is always of interest, and even modern developments a good for an idea or 2. The cover of the March 2009 is a good example. The new track layout at Newmarket looks like it would make a very good looking layout and the selection of new trains has not been modeled yet.
Comments from the peanut gallery?
Tuesday, June 30, 2009
Monday, June 29, 2009
Superdetailing the superdetailed: DC parts?
Few who have seen an eTch ceTera DA or DC, even an unassembled one, would argue that it’s a nicely detailed kit that is hard to improve upon.
Yet an ad from Attic Products (Massey, Auckland) in the Dec 2003 Journal offers a set of detail parts for the NZ120 DC: sills, detail piping, fuel tanks, speedo, tablet exchangers, aerial, exhaust stacks, tail lamps, horns, dynamic brakes and handbrake. All for $20.
Intriguing. Has anyone got or seen a set of these parts? I’d be interested in any pictures or comments if you've seen these or know if Attic Products are still around.
Sunday, June 28, 2009
Meat wagons
Not much to report today. I've been doing a wee bit of work off and on with the W wagons, and with an influx of Peco wagon chassis (Yes, I don't like them, but any old port in a storm;tawny for preference) I've managed to put the first 4 W's onto the rails. From left to right is the W5, W6, W7 and W8. There's still a wee bit of work to do with the undergubbins, but they still look the part.

I do like the look of spoked wheels. I now just have to cast the W11 master and do another 1/2 dozen.

I do like the look of spoked wheels. I now just have to cast the W11 master and do another 1/2 dozen.
Saturday, June 27, 2009
Waimate Station...as requested....
AmFet writes:
After the Friday night plan of Waimate, Manaia opined:
"I'd love to have the plans for this lost relic."
Well, thanks to the ONTRACK archives, here they are....(all 448k of them)

After the Friday night plan of Waimate, Manaia opined:
"I'd love to have the plans for this lost relic."
Well, thanks to the ONTRACK archives, here they are....(all 448k of them)

Parcel from home
Well, sort of. This morning on the doorstep I found a care package from Kiwibonds with a collection of goodies.
 'No more coloured wires round here...'
First up, some Kp and Xc bodies. These are very yummy, and I was surprised to find that they are cast as solid blocks. The green bits on the Xc are just filler taking care of the air bubbles. Doing a bit of research on other wagon types tonight and I was surprised to see just how many Xc's were around in the early 60's.

Next up an old lifelike SD-7 with some attempts made to improve the power pick up. There are plans for this that don't involve Dc's. It turns out that if you remove the center axle the outer axles are the right distance apart for a standard railcar bogie. The plastic frame will have to be cut up, but that's not a huge problem is it. I might replace one of the bogies with an Atlas one (spares available online) to improve the power pickup. This would also mean I would have enough drive bits for 2 railcars.
Friday, June 26, 2009
Friday night layout idea
Its been a while since we have had one of these.
Tonight, Something that I came across on a CD of scans I've acquired.
 Waimate has a unique trackplan which sets the station as the stub end off a turning triangle. The engine depot was located in the middle of the triangle, with the other 2 lines leading to Studholme and Waihao downs. It also received a Gordon Troop designed station (one of 7 I believe).In this photo we can see the tracklayout is quite interesting for shunting with several sidings off the main yard. Also note the G horse box and the Ua gas wagon, as well as the three legged crane.

It would be relatively easy to incorporate this station into a layout as an island peninsular, and it could be very useful in an exhibition layout as an 'unhidden' yard.
From a history point of view, nothing survives today, and the site of the station is now the town swimming pool. Part of the line out to Waihao downs has been converted into a walking track, and out towards the downs there are plenty of reminders that a railway once ran through.
(See the September 2007 Railfan for more info and an excellent article)
Tonight, Something that I came across on a CD of scans I've acquired.
 Waimate has a unique trackplan which sets the station as the stub end off a turning triangle. The engine depot was located in the middle of the triangle, with the other 2 lines leading to Studholme and Waihao downs. It also received a Gordon Troop designed station (one of 7 I believe).In this photo we can see the tracklayout is quite interesting for shunting with several sidings off the main yard. Also note the G horse box and the Ua gas wagon, as well as the three legged crane.
It would be relatively easy to incorporate this station into a layout as an island peninsular, and it could be very useful in an exhibition layout as an 'unhidden' yard.
From a history point of view, nothing survives today, and the site of the station is now the town swimming pool. Part of the line out to Waihao downs has been converted into a walking track, and out towards the downs there are plenty of reminders that a railway once ran through.
(See the September 2007 Railfan for more info and an excellent article)
Thursday, June 25, 2009
Haulin’ (p)Ass : Tranz Scenic DCP
 DB says: I quite like the picture above, so with an almost finished blue DFT sitting on the workbench, I really needed a blue DC to go with it. This model is one of the superb eTch ceTera (Andrew Wells) brass etched kits that I prepared earlier. Quite a bit earlier actually, as it was assembled in 2000 (anybody still remember the millenium?) as Fruit Salad DC 4191 for reasons lost in the mists of time. I don’t think its ever even run under its own steam. Superb kit though. Superb. The DAs I've struggled to get together squarely, I think due to the curved roof, which I never mastered, but being all angles, the DCs are fairly easy to put together into a really, really nice model. Even with my neanderthal-level soldering abilities. The dynamic fan and grilles are from an N donor shell, I cut half a mm or so off the bottom of the etched side sills as I felt in stock form they extended a little lower than I'd like (same on the DA kits), and made up the back wall from brass, passing on the big cast end supplied with the kit which I expect only fits when using a LifeLike chassis. The anticlimber castings are missing the MU cutout as well, not really obvious when that strip is painted fruit salad black, but more so on these plain yellow fronted locos.
 This week that red DC got a makeover into Tranz Scenic DCP 4559 with a quick repainting of the long hood and the addition of a yellow side stripe. Well that was easy. I’ve been enjoying a little Testors flat Sky Blue enamel with a very thin wash of Model Master Gull Gray acrylic over the top of late, and after some experimentation, have settled on Model Master Insignia Yellow for the bright bits.
 The Tranz Scenic decals were a pain, taking me more than 30 goes and pages of decal paper to get a useable pair out (not their fault), and the top is sitting on an Atlas SD35 chassis. Strangely enough, the N scale donor top's side sills are glued inside the brass DC sills for a nice snug fit..
Borrowing a tip from Evan's 'On The Roof' post, I used a light gray stick of artists chalk on the long hood and cab roof edges as a finishing touch which doesn't look too bad. In the final picture you can also see reflective strips on the sill which were intended to be decals, but the blue patches came out green and the white as clear due to a malfunction in the thinking department. They were attached anyway and the white and blue overpainted by hand under a scanning electron microscope using the decals as a guide. I was expecting this last effort to look stinky, but the stripes came up surprisingly well.
 Finished with reflective stripes, steps, bolloxed MU socket and ditch lights
Go the Blues! And I don't mean the rugby team from that unkempt and sprawly Auckland place.
Wednesday, June 24, 2009
Coupling
Well, I said last night that I would have a look at this, so may as well have a crack.
Couplers in Nz120 have historically been of 2 types; the Rapido style massively out of scale type, and the microtrains very nice but not quite prototypical type. The Rapido coupler has several pluses. It is ubiquitous (standard) and reliable. Its downsides are its the size of a bus. It is difficult to get it to remote uncouple. Its just plain ugly.
The Microtrains coupler is a very nice bit of kit. its made in a stack of different versions to suit the application, and it has a remote/delayed mode of action that is relatively easy to set up. Its only real minus is that its not prototypically correct (apart from passenger and unit trains).
So, what chance a scale working coupler in Nz120. after all its possible in S scale...
Unfortunately its not that simple. Lets have a look at the real thing.

In scale this would be about 2mm wide with a <1mm notch in the middle. To couple your wagons the hook has to hit this 1mm gap EVERY time. This is completely unlike the other 2 couplers who's important dimension is the vertical, which is far easier to sort out. The other main problem is Physic's. Those who haven't just fallen asleep can now follow the rest of the reasoning. for the hook to work, it needs to raise up into the buffer, then drop down again. in the real thing this is powered by gravity (and the hooks are a heavy sucker to boot). However by the time we get down to Nz120 we are talking about a tiny piece of brass with very little mass that has to do exactly the same job. not only do we not have gravity on our side, but we are also at the mercy of friction. This force does not scale, so the tiny light piece of brass has to move very freely as well. Now I'm not saying that this is impossible, but its not going to be a walk in the park either.
Pat Eade got around these problems by creating a permanently coupled bar between wagons. I can't see why a fixed non working coupler would not work equally as well. If you still want to shunt your wagons, you will need a working coupler, like a microtrains type.
Next time round I'll have a look at options available to the Brits, who have been quite inventive in this field
Tuesday, June 23, 2009
Into Print (part III)
First off tonight, a note on the article for the local rag. I've been asked how I'm off for pictures. To this end I'd like you, the viewing public in the penny dreadfuls out there to send me in your favorite NZ120 picture. I'd also love to see any of John Rappard's layouts, the old Dunedin layout or anything else that you might have. Depending on how many I get we can then have some sort of run off for the ones that get forwarded.
Monday, June 22, 2009
Flat night
Well, it had to happen. after 3 months of flat out posting of above average content, there's probably going to be a bit of a lull for a wee while. I would have written a post tonight but I've been playing with theme's for my new operating system (Ubuntu, which kicks the crap out of windows BTW). I do have some ideas based on posts from the yahoogroup in the last week or so, like; where do we all go for inspiration, and; are Nz120 couplers a possibility, and if not, just what else is available out there.
I would ask you all to take a look at the history document I wrote, and please help with the period from 1997 to now. Again I'd also like to hear from people with projects on the go. there must be some of you out there.
I would ask you all to take a look at the history document I wrote, and please help with the period from 1997 to now. Again I'd also like to hear from people with projects on the go. there must be some of you out there.
Sunday, June 21, 2009
Further Adventures in Resin Casting: multi-piece CWs

See? Double ewes! (groan).
DB says: Well, seven CB coal wagons isn’t going to make a terribly impressive coal train is it? I suppose I could hang a few CWs off the back, just like they do on the real trains, and that might look groovy. After all, if Evan can make ugly diesels, then I can make ugly wagons...
So... I had a couple of small plastic squeeze bottles from the dollar store sitting on my workbench, which naturally had me thinking about those CWs again. I know it’s a leap, but stay with me on this one. Das Fettler provided some great detail pictures and a barely-visible plan of something that looked fairly similar to a CW: lo and behold, the curved hopper tub sides are a perfect match to the curvature of the bottles. As I had planned. Mwuahahaha.
After a few days of umming and ahh-ing about scratchbuilding three of four of these things I decided to cast them. And in hindsight, I’m glad that I did. In the previous casting posts, you may recall I made everything in one piece for simplicity, but because of the fine underframe detail and the deep tub-end angles of the CW, I decided to make these up out of separate 'side' and (somewhat simplistic) 'end' castings. Masters were completed thus (note the clear plastic section from the squeeze bottle cut and scribed):
 And assembled into a mold box thus:
 Rapid resin was used for the pours, as the bogies will sit under the end castings which should be strong enough to bear the load without bending. If the bogies were to sit further outboard on the thin end sections of the underframe, I would have used the strong slow-cure resin. Components began to roll of the production line, also thus:
 I was pleasantly surprised by the quality of the castings. Firstly, there are zero visible air bubbles – one of the beauties of doing these ‘flat’ simple castings is that any air bubbles rise and sit on the backside of the castings (inside the model) where they can’t be seen. Secondly, that raised triangular end piece is quite deep, yet all those castings came out perfectly. I dripped the resin into that deep triangular section carefully, one drop on top of one drop at a time, letting the resin swim its way into the deepest recesses and expel air naturally. Pardon me. The only flaw in my master plan, if you'll pardon the pun, was that I used .010 x .020 plastic for the underframe rib detail, and this is really too fine - serious mold scrunching is required to get the resin in there and care is required when extracting castings to keep the detail from breaking off.
 Gluing two sides to two ends was straightforward, as you might expect. End plates were added above the ends of the underframe, a bolster put in place and Microtrains bogies added. Two false floors were added – an unfancy one on the very bottom to hold some lead weight (keeping the centre of gravity low), and one near the top to support some coal. In the Midland Line video I have, I note that the odd one or two seems to have additional ribbing (for her comfort) along the undersides. Perhaps someone out there in the Blogstadia can tell me whether they have different rib layouts on different sides or whether there are two batches of wagons. I added extra plastic ribs to both sides of two wagons and left the other four with the minimal ribs as cast.
 One of these days I'll attempt to restart the decal factory.

 One of these days I'll attempt to restart the decal factory.
 Now you might say that these aren't quite in the same league as the DFT as far as detail and accuracy (and even squareness) goes, but to my mind they don't have to be - the shape of the tubs and end angles says "CW" loudly enough for me. A few brake details and brakewheels should probably be added on top of the end plates but in all honesty, as these will be running at the back of an NZ120 coal train, I doubt I'll bother.
I doubt you'd hear that said out loud inside the big house at 9 Mill Street.

Not pretty, yet effective
Saturday, June 20, 2009
Of Ed's again
I have not done much on this project for a while, but this week I had a crack at the underframes. The sideframes were cut to shape from 1mm plasticard, and glued to the 0.5mm thick footplate (I've neglected to add cutouts in the frame, I'll probably just paint these on in black later as it will be easier than cutting the holes, and I'm not sure i can get them all square). The footplate is supposed to be an I beam shape but this just seemed to be too much trouble for something I would hardly notice. After the headstocks were glued on as well, a hole was cut for the mech to fit in. So filing of the metal chassis was required for everything to fit between the sideframes. I then added some plasticard shapes to the ends so that the footplate would sit at the right height.

Its looking good so far. Next step is to add the journals and bearings on the outside (the real thing has an asymmetric wheelbase but I'm going to do mine with the bearings at the same wheelbase as the wheels otherwise its going to look funny), and add the sandboxes. Theres not much else to them.

Its looking good so far. Next step is to add the journals and bearings on the outside (the real thing has an asymmetric wheelbase but I'm going to do mine with the bearings at the same wheelbase as the wheels otherwise its going to look funny), and add the sandboxes. Theres not much else to them.
A request
I was going to write a post about painting figures (I've done a wee bit of it over the years). However I had been going to use Railmaster S scale figures to illustrate various techniques I use. I had forgotten just how crap the sculpting of the figures is. Admittedly they are over 40 years old, but some of its still pretty horrible. Some of the faces bring to mind the 'face on Mars', and there's a lack of detail on anything. So, what I'm wondering is if there is anyone out there with 5-10 Preiser TT scale figures that would like them painted to a better than commercial standard?
(Darryl, don't worry, I've almost finished them)
UPDATE; I now have an offer for some figures, so I don't need any more.
(Darryl, don't worry, I've almost finished them)
UPDATE; I now have an offer for some figures, so I don't need any more.
Thursday, June 18, 2009
Dunny Manifestus

DB says: This is a follow-up to recent written thinkings of L’Amateur de Fettler.
[MD comments: someone was obviously away from school that day, it should be Fettler D'Amateur. just to show that 3 years of french was not wasted. I can also buy tickets for a train in a non smoking compartment, and its not often you see the Swiss laughing at tourists either!]
[MD comments: someone was obviously away from school that day, it should be Fettler D'Amateur. just to show that 3 years of french was not wasted. I can also buy tickets for a train in a non smoking compartment, and its not often you see the Swiss laughing at tourists either!]
Back to the beginning of the recent beginning: Since charging headlong back into NZ120 nine months ago, I’ve made around 50 items of rolling stock. FIFTY! Way more than doubling the number of wagons I have. From an MC wagon to my most recent project, 7 hungry-boarded CBs.
F van, DI, Urea wagon, KiwiRail DX... Hmmm. Anything seem a little odd with that?
I suppose it’s natural to model what you’ve loved in the real world. I look back with fondness on South Canterbury and Otago in the early 1980s – the time when the Railways Department became a corporation; the end of the country stations and a bunch of branch lines; the higgelty piggelty trains; guards vans; the stone train; the last signalboxes;the mix of old diesels on their last legs being replaced by shiny new ones. (Can you believe the first DFs were purchased 30 years ago this year and the DXs are almost 40 years old? Don’t even think about the guts of the TranzAlpine cars…)
Then I moved to Wellington where I chased long, fruit-salad triple-headed express goods trains through the countryside; packed with all manner of interesting bogie stock – containers, big yellow and blue curtainsiders, the new fiberglass-sided box wagons and swapbodies, the roadrailers. The early 1990s were interesting times just before the start of what looked like the end for rail.
And for Darryl since then, it’s been the odd few days here and there on the Midland Line. Long black coal trains rumbling through lands of swamp and bush, over spindly bridges, over stony riverbeds set against a picture perfect backdrop of snowy mountain peaks. The scenery! The majesty! This place that I’m drawn to...
I’ve never had a problem running trains from different eras on sectional layouts representing different parts of the country; but I can’t model everything and I can’t model everywhere.
I’m also what Brent Hopley calls a Railfan Modeler. Sure I like shunting, detailed models, operations and so forth, but all of that takes a distant back seat (like at the back of a really long bus) to watching a model train snake through a swathe of scenery.
So in the past month or two I’ve been thinking more and more about modeling the Midland Line in the current millennium. Does that mean I’ll not be finishing that second DA or making interesting wagons from the 80s? Heck no. But I’m going to try to focus the bulk of my energies a little further west.
So in the past month or two I’ve been thinking more and more about modeling the Midland Line in the current millennium. Does that mean I’ll not be finishing that second DA or making interesting wagons from the 80s? Heck no. But I’m going to try to focus the bulk of my energies a little further west.
After all, you can’t ignore passion.
Into print (part II)
Darryl has kindly donated the space t host the history of the scale PDF here. I'm reasonably happy with the first part, but the later stages are a bit more of a mystery, as I was doing other things when Trackside started and the last 10 years needs beefing up.
Bny more info that anyone thinks should be added/altered/incorrect please E-mail me, rather than using the comments section. I'll then re-draft the article.
Bny more info that anyone thinks should be added/altered/incorrect please E-mail me, rather than using the comments section. I'll then re-draft the article.
Wednesday, June 17, 2009
Up on the Roof....
AmFet says: After KiwiBonds insistence about putting in a shot of a DFT roof in a previous post of mine, it got me thinking about how the roof of the locomotives and wagons that we model are invariably the part we see the most of, especially in the smaller scales. While wandering through my photo collection, I was taken by how varied the weathering on locomotive roofs really is; it isnt all just "exhaust black". With the Head Druffs permission, below are some pics with commentary of a few roof shots I've chosen and some thoughts on how to achieve them.

This is DC4104 back before it became the second KR DC. This highlights what I was saying about it not all being exhaust smudges; the main weathering is actually an accumulation of what could be heat discolouration (around the DB fans) and dings from the fitters. Note most of it is where they would stand: at the top of the ladder, and the panel between the exhausts and the radiators. By contrast, the fold up side panels are comparitively clean. To recreate this would require some nice silver dry brushing, but I would also make a point of defining the edges of the roof; note they show up almost as a light grey line.

DC4398 at Welly, and the weathering on the roof here is much more muted....but again, I would call your attention to the edges of the roof. Maybe just a lighter drybrushing with silver in this case, although the cab roof looks like its had some snails on it as well. That black roof must be working a treat, no cleaning required....

DC4110 with a bad case of cab rash. The rest of the roof is similar to 4104, but I would call your attention to the slight "rust" effect on the slope of the cab roof. I can only think of doing the top of the cab with a toothpick dipped in silver to "draw" on the lines, followed by a dry brush, first in rust on the sides followed by silver over the whole thing. Finally, I'd hit it with a light misting of "smoke" gunge from an airbrush to pull it all together. Sounds great in theory.

Cripes, what happened here? DXR8007 before they ruined her....This would take a lot of subtle "blobbing" of various colours with a final spray to bring it together. The rust on the side of the cab roof would be a very heavy "dry brush" followed by a lighter white once it had dryed.
And finally:

Wouldnt have thought of painting the Rads red and white! This is DX5143 at Westfield before she became a KR DXB. Again, the paint looks more like heat discolouration....and it looks like it could be recreated with strategically placed blobs of almost a sand colour with a smaller blob of gunge black in the centre.
As with all weathering jobs, try and refer to photos where possible. And that, as they say in the trade, sounds like a subject of another future post...
Again, thanks to Skippy and MRK for the pics. And if people have any requests, let me know. I'm sure we can pull something useful out of a hat.
News at 11
To update the previous post, here's a few more pictures of the setup as requested by Amateur Fettler.


'So thats where those Kato bogies went...'
Tuesday, June 16, 2009
A One Nighter
(Here's a neat idea from ECMT, so I got him to write it up)
For those that want to display their favorite piece of rolling stock is this simple one ( or maybe two ) night project. Perfect if you don't have a layout, or if you just want to display it on the mantelpiece or wifey's china cabinet. Also good for trying new scenery techniques on, or using as a photography aid for sale items for Trademe.

Items needed :
1 Real Estate sign or foam board
1 piece of track
1 photo of your fav location
spray glue
a hot glue gun
scenic materials
Start by cutting out a piece of foam board etc about A4 in size ( but double the length of A4 would be better). Apply road bed or 3mm cork with hot glue gun. Fix your piece of track also with hot glue. Apply your scenic materials eg. ballast, ground cover, trees etc and let dry. Leave a bare strip of board about 20 - 40mm wide along the length of your photo module base at the rear, (this will be where the backdrop will go).
Print out your fav scenic location pic onto an A4 sheet of paper (I did mine on plain paper, but photo paper would have been a better idea). Apply spray glue to reverse side then apply to your piece of foam board and trim to size. Glue your photo backdrop onto the back of your module. Cut out two triangular wedges of foam board about 20mm x 100mm and glue at each end at rear to brace the backdrop and keep it vertical. Done !
Optional :
Brace the base (applying hot glue and scenic materials has the tendency to warp it a little), lengthen if needed, wire two power feeds to track, and you've got a running module ready to be connected to another one. "
Into print
I've been asked a while back by the guild to write an article on the orgins of the scale. Now I've knocked up 1300 words on my own, but I would like to post the article here to see if anyone else can add to it where they feel its important. What does everyone else think about this. its going to take up a huge amount of space on the blog and will not really be written in the same form (the local rag is a bit different t our pub conversations)
Monday, June 15, 2009
Trackside CB Coal Wagons

See? Bees! (groan)
I bit the bullet and built up the remaining seven Trackside CBs last week, assembling them with the bolster-in-the-right-place mod per the CF, and then I stared at them for a while. They look good, but they don’t look right. Like they’re perched up high, sitting on high heels. So I compared the models to a CB plan. Aha.
A thin strip of plasticard was added under the CB bodysides to make the things look like they sit lower. The three way-too-short bomb-bay doors were extracted (I should have been a dentist) and replaced with ones longer in the fore-aft direction. Ahhhh, now that’s more like it. Because the Trackside bolsters are so far inboard to clear the couplers, there was only room left for shorty discharge doors in the kit. When I moved my homemade bolsters out to where they should be, a large gap was left, now plugged by proper length doors. I wasn’t going to make 21 of these painful wee doors, so I made a mold to do a wagon in one pop. If anyone else out there has CBs that you want to re-bolster and would like some door castings, let me know. Interestingly, the 21 metal door castings off the seven wagons weighs more than a complete wagon...
Hungry boards were made up from styrene strips to represent current practice and the CBs were starting to look pretty good. I made three variations of CB ends, four as the kits were intended('phase 1' CBs?), two as ‘phase 3’ CBs with the CF style raised bridge walkways, and one CB that is missing its angled shelter completely at one end and has a skeletonal one at the other – both variations that exist in the real world. Take the red pill, Neo. CB modifications - compare the CF nethers (top left) with the CBs below. Decals to come.
A thin strip of plasticard was added under the CB bodysides to make the things look like they sit lower. The three way-too-short bomb-bay doors were extracted (I should have been a dentist) and replaced with ones longer in the fore-aft direction. Ahhhh, now that’s more like it. Because the Trackside bolsters are so far inboard to clear the couplers, there was only room left for shorty discharge doors in the kit. When I moved my homemade bolsters out to where they should be, a large gap was left, now plugged by proper length doors. I wasn’t going to make 21 of these painful wee doors, so I made a mold to do a wagon in one pop. If anyone else out there has CBs that you want to re-bolster and would like some door castings, let me know. Interestingly, the 21 metal door castings off the seven wagons weighs more than a complete wagon...
Hungry boards were made up from styrene strips to represent current practice and the CBs were starting to look pretty good. I made three variations of CB ends, four as the kits were intended('phase 1' CBs?), two as ‘phase 3’ CBs with the CF style raised bridge walkways, and one CB that is missing its angled shelter completely at one end and has a skeletonal one at the other – both variations that exist in the real world. Take the red pill, Neo.
 CB modifications - compare the CF nethers (top left) with the CBs below. Decals to come.
Despite my recent Grafar bogie thrillride, Microtrains were used here. I have a bunch of them in inventory so they're 'free', they run well (important under these heavy fellows), and hey, it's a black snakey coal train. Nobody will be looking at the bogies too closely. They won't be allowed.
I discovered a nifty trick for painting these quite by accident. If you take enamel flat medium gray Testors paint and mix it with Model Master acrylic flat black (thinking it was enamel), the enamel and acrylic doesn’t blend perfectly, but as long as you keep stirring the concoction with your brush, you end up with a really cool dark-gray 'metallic-look' finish. Quite the shiznit, as Snoop Dog would say if he was an NZ120 modeler.
I discovered a nifty trick for painting these quite by accident. If you take enamel flat medium gray Testors paint and mix it with Model Master acrylic flat black (thinking it was enamel), the enamel and acrylic doesn’t blend perfectly, but as long as you keep stirring the concoction with your brush, you end up with a really cool dark-gray 'metallic-look' finish. Quite the shiznit, as Snoop Dog would say if he was an NZ120 modeler.
Sunday, June 14, 2009
(Not so) Great Workbenches of the World: Lower Hutt
AmFet writes: After seeing the superlative workspaces belonging to the Head Druff and KiwiBonds, I thought I would amuse the pundits and present where I wile away the odd spare moments when they present themselves:

The bench itself was grabbed from an able Squadron Leader and is hinged so the front drops down for easy storage. As I dont have a permannent place to "spread out", I need to be able to setup and take down at the end of every session, hence the reason why the bench is looking so tidy! In the pic above, the bench is setup for soldering operations with the hand-built lowmelt setup featuring upstage left.

The bench itself was grabbed from an able Squadron Leader and is hinged so the front drops down for easy storage. As I dont have a permannent place to "spread out", I need to be able to setup and take down at the end of every session, hence the reason why the bench is looking so tidy! In the pic above, the bench is setup for soldering operations with the hand-built lowmelt setup featuring upstage left.
Pointing the way
Well, I finally got over my fear of making trackwork this week. I had made a short stretch of straight track, but if I was going to get anywhere I had to be able to make a point. Woodsworks provided the template for an NZR No 7 point, and so I was off (well, it sounds easy but actually getting the gumption up to actually start took some time). As this was to be a test piece I just went ahead and had a crack to see where the pitfalls were.
First up I glued the plan down onto a piece of MDF. The PCB sleepers were then glued down with a glue stick so that I could remove them at the end. The outer rails had areas filed into them where the point blades would sit in them. then soldered down the outer rails, using an old track gauge given to me by John Rappard 20 odd years ago. I assume its about right. I then filed up the crossing point bit (sorry, can't remember its name) and using the track guages installed it about the right spot. the wing rails were next to go in. I bent these up and then positioned them, discovering in the process that 2 pieces of code 55 rail soldered side by side give a surprisingly good gap that even the Peco 'cookie cutter' wheelsets will pass through. Yah number one here.
 'don't look at the solder'
Next up was the point blades themselves. These have to be filed quite thin so that they will bend and fit into the rail notches at the head end of the point. I didn't have anything to make a tie bar out of so I've left this.

For a first up effort I've found that there's some things that worked, and some bits I need to do better. I do need an NMRA track guage, and some jigs to solder up several bits. Apart from that I think it's the way I will go on the new layout.
Saturday, June 13, 2009
Saturday morning comments
Well, I've finally woken up, had the first hot chocolate of the day (I hate coffee and vast amounts of tea are not good for me either) and just checked though the comments to see what's been going on while I was in the land of nod. And I see everyones been playing while I've been asleep.
The 'lets build a loco kit' discussion rolls around every 6 months or so. It quickly splits into 2 camps and then fades into the distance again (I've written about this before here).
I'm not sure if going with the Bullant is the right way though. $240 for the mech before you do anything else is a lot of cash. Add in $150 for the top etc and thats basically $400, which is more than you would pay for an S scale kit. At that price demnad for the model could/would be very close to a round number (how many people WOULD pay $400 for a De or an Ab KIT). I could be corrected but I think most of the modelers in the scale operate on far lower budgets than that. Rumour has it that North Yard doesn't make wheels in 120 becoause 'theres no big market for it' and he is most probably right.
I think any loco kit thats going to come about will be due to some kind soul who wants to sink his money into a project and lose some of it to get a model he really wants. Anything else may just lead to getting burnt.
(well, thats my opinion, but you are all welcome to toss in your own.)
Friday, June 12, 2009
La-Z-Boy: RFL and Speights containers
DB says: I think I can reclaim my Laziest NZ120 Modeler title. Sn3.5 modeler Darryl Palmer sent me two pictures overnight of a couple of wee gems on my wish list.

 Pics courtesy Darryl Palmer
So now I have a beer container to go with my wine ones. Shame they never made cider containers, or Blenheimer Cask box containers with little plastic taps on the ends. Time for a beer methinks.

 Pics courtesy Darryl Palmer
I adjusted the RFL picture's perspective in Photoshop, cleaned it up and eventually managed to get a complete copy out of the printer. Yes, the entire side of my wagon - door, hinges, rain gutter, rubbing strip and all, is a white backed decal. Lazy bugger.
If you'd like to make your own, I've included a file at the bottom of this post, so don't say you don't never get nothing from the Dandruff Brothers. Print it out on a laser or photo printer, stick it on a plasticard box and you'll be laughing. (at it).
RFLs ran in both Islands from 1980 through 2008, albeit now rebuilt with treble doors and alas they lost their signwriting in the late 1990s, by which time the former-UK wagon and the container were jointly considered a "VRA" wagon. Presumably they ran around with TranzLink branding until recently. Our contacts at KiwiRail seem to think these haven't run in a few months, so it may be all over red rover. There are plans in the August 99 Journal that (as usual) surfaced right after I built it - just in time to point out my mistakes!
 I found the Speights logo in a dark corner of the interweb and printed it out on the same sheet. By the time you read this, the horrible blue GSX box container will hopefully have been made more presentable.

So now I have a beer container to go with my wine ones. Shame they never made cider containers, or Blenheimer Cask box containers with little plastic taps on the ends. Time for a beer methinks.

RFL jpeg file provided for your pleasure.
Hope the blog didn't down-res this too much...

Thursday, June 11, 2009
It had to happen
I see there's been yet another enquiry about a De model in the comments on Darryl's DFT build. For those of you not on the yahoo group this has been cropping up since 2005, when someone was busy collecting drawings and was just doing the masters. Now personally I can't see the fascination with the loco; the photo's in the Railfan articles showed a loco that was not overly pretty from some angles and only really worked as a shunter. I'll admit it did look nice in the fruit salad scheme.
The main problem with building a model of a De is that there is no powered bogie I'm aware of that is remotely close. If anyone knows of anything usable ( The Minitrix H12-44 and the Farish class 20 are wrong sorry) the following criteria need to be met; bogie wheelbase of 20mm, and a bogie pivot spacing of 41mm (this one is negotiable).
Finally (again) we have the normal question; So whats everyone else doing. send us some pictures and we'll publish them, if only to give Darryl a break from slaving away at the modeling bench so he can enjoy the Long Island summer.
UPDATE; doing a bit of searching last night, and it seems to my Mk1 eyeball that the Dapol Hymek might have the right bogie wheelbase for donation. I'd like some confirmation though about either the models bogie wheelbase or the real things bogie wheelbase.
Kettle time
Another new project tonight here at Chateau Dandruff. Why finish anything when you can start something exciting and new. I made a trade with another modeler to move one of my 4-8-2's which I was not happy with (don't get me wrong, its a very nice bit of kit, but to my MK1 eyeball the wheels are just too small; a fact backed by my plastic Chinese calipers). The replacement is this lovely Dapol 4MT 2-6-2.

The immediate possibility that springs to mind with that beautifully made valve gear is a Wf. Looking at the NZMRG plan the immediate observations are that the wheels are a bit big and the wheel spacing is 1mm too large, the cylinders are a bit on the small side and too high, and the trailing truck needs to be replaced with a 2 axle bogie. The driving wheels I can't do that much about, but the rest...
First up remove the top. The screws are under the trailing truck and in the chimney of all places. The plastic top is then removed for future sale to some simple minded English outline modeler on trademe. Carefully break the glue bonds that hold the cylinders on and then remove them by moving them forward and up. Take care of the waggly bits as they are made either from some really soft reject Chinese steel or toothpaste tubes; easy to bend, but just as easy to bend back. To lower the cylinders you will need to remove about 1.5mm of plastic from the marked area. Carefully remove the plastic by filing until the center line of the cylinder lines up approximately with the center of the driving wheels. At this point I also cut all the detail off the front of the cylinders.

The cylinders are then carefully repositioned and all the waggly bits lined up again. its times like this you wonder why god didn't give us more arms and hands to do jobs like this as you always need a spare pair of tweezers to move something else into position. I just did it sober...

A very minor detail is that the upper link on the valve gear should be flat. I did this by removing a plastic pip at the front of the valve hanger and gluing the link in a level position.

The next job is to remove some of the metal from the motor holder in order to fit the boiler underneath. I'm not sure if its needed yet but best to do it now while the beast is in bits. You can see from the picture its possible to remove quite a bit of metal without breaking anything.

Final picture is everything back together. Next step will be the construction of the rear bogie and fitting it into position, accompanied by the removal of a fair bit of metal.

Wednesday, June 10, 2009
Diesel in a day (or three): DFT part 5
I ended my second afternoon of DFTing by painting her up blue, yellow, gray and black, and now that the paint is dry, its now time to wrap things up by documenting the third visit to the trainroom.
Going back to that epic post on colour, I began the session by dulling down my deep sky blue and dark gray with a wash of rapid-drying light gray acrylic which has made it look a bit more like the real 7132 trailing in this shot from a few months ago (which has just this week become my inspiration for this model).
I absolutely loathe doing handrails, but once they're done they make everything look more finished. I used very fine brass wire this time instead of my usual piano wire and the superthin ones look waaaaay better. The light attached to my workbench (the black thing in Ev's workbench post) has a (scratched) plastic magnifier built in that has never been used until painting those handrails. Boy does it make that job so much easier. My eyes must finally catching up the rest of me. Tranz Rail's flashy decals were from the superb Etchcetera (Andrew Wells) DC set - the cab numbers aren't the right font for the blue livery, but they will do for now. I gave the loco that ugly 'patch job' look with one more wash of the gray paint in an approximate rectangle. For some reason, many of the DFTs got a much lighter patch than their underlying blue paint. I might cover some of these 'finishing' steps in more detail in future models/blog posts because I forgot to take pictures and I'm sure you're getting sick of DFT tops by now.
Finally, a Kato SD40-2 chassis for it to sit on: I pruned the shock absorbers and some of the 'underbrake' bits off the bogies and made battery box sides from strene. The -2 fuel tank was simply shortened to save time as the end profiles are similar.
 And that’s that!
 Having not seen a lot of real DFTs in action, I must confess to not being a huge fan of them ...last week. This project started out more as something that would be 'good for the blog' rather than a loco I just had to make, but once the thing started to come together, I started to enjoy that feeling of making something from scratch and am now quite in love with a model which turned out really well.
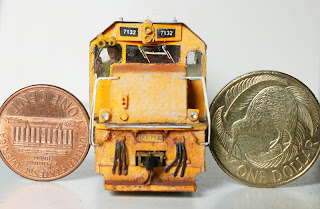
Dangerously close. Ditch lights in, but needs headlights.
Having said that, if you are going to have a go at scratchbuilding for the very first time, I'll warn that the DFT is a more difficult model than I'd thought. There's all the lumps and bumps, the underframe stuff, the painting of the raised walkways and yellow stripe - that make it quite a bit more tricky than doing, say a DC, which would be a more straightforward scratchbuilding project.And -before I forget - something I forgot to do on this DFT, was to make the whole top about a mm shorter than it should be as I did with my DFs. This would have tightened up the gap between the rear bogies and the back end a smidge, although looking at the pics above it doesn't look too bad.
 Scratch That
 I started this project with the comment “Before you ask, it’s not going to be cast, RP’d or etched. Instead, it will be quick to make, cost next to nothing and require almost no skill.”
That wasn’t intended to be a swipe at the technologies that will turn NZ120 upside down in a few years. But... isn’t that what everyone said ten years ago? I'll reiterate from a few months back: manufacturers rarely produce products for love, the market is tiny and bringing products to that market is an incredibly time consuming and expensive proposition. You do the maths.
My point is this: you can wait for things to drop into your lap, but you can also make something out of nothing today, and get a great feeling of accomplishment from doing it. Surprise yourself and then surprise someone else with it and perhaps get them interested in the scale. Given the usual 2-3 foot viewing distance, there’s no better scale than NZ120 for scratchbuilding stuff; which is a good job given the incredible number of fancy kitsets and RTR items available.
So get of that armchair, bring that beer with you and have a go. After all, this DFT top isn’t too bad for a ten dollar, paper-and-plastic, two and a half day effort eh? As Bruce Forsyth used to say : “Hope you’re all doing this at ‘ome!”
Subscribe to:
Posts (Atom)