Wednesday, June 29, 2011

In the shed

The middle of winter is often seen as prime modeling time. Men from all walks of life, unencumbered by requests to mow the lawns or do the gardens or go on holiday by the beach, can head off to the modeling bench to create great works.
(I have just managed to type the last sentence with a straight face).

Seriously though folks, there must be other people working away on models out there. how about a photo or two at Nz120.org?

Here at Schloss Dandruff I would take pictures of the last couple of days work, but there only so many pictures you can take of soldering wires to point switches. The one other thing I have done was to make a funnel for the Cb.

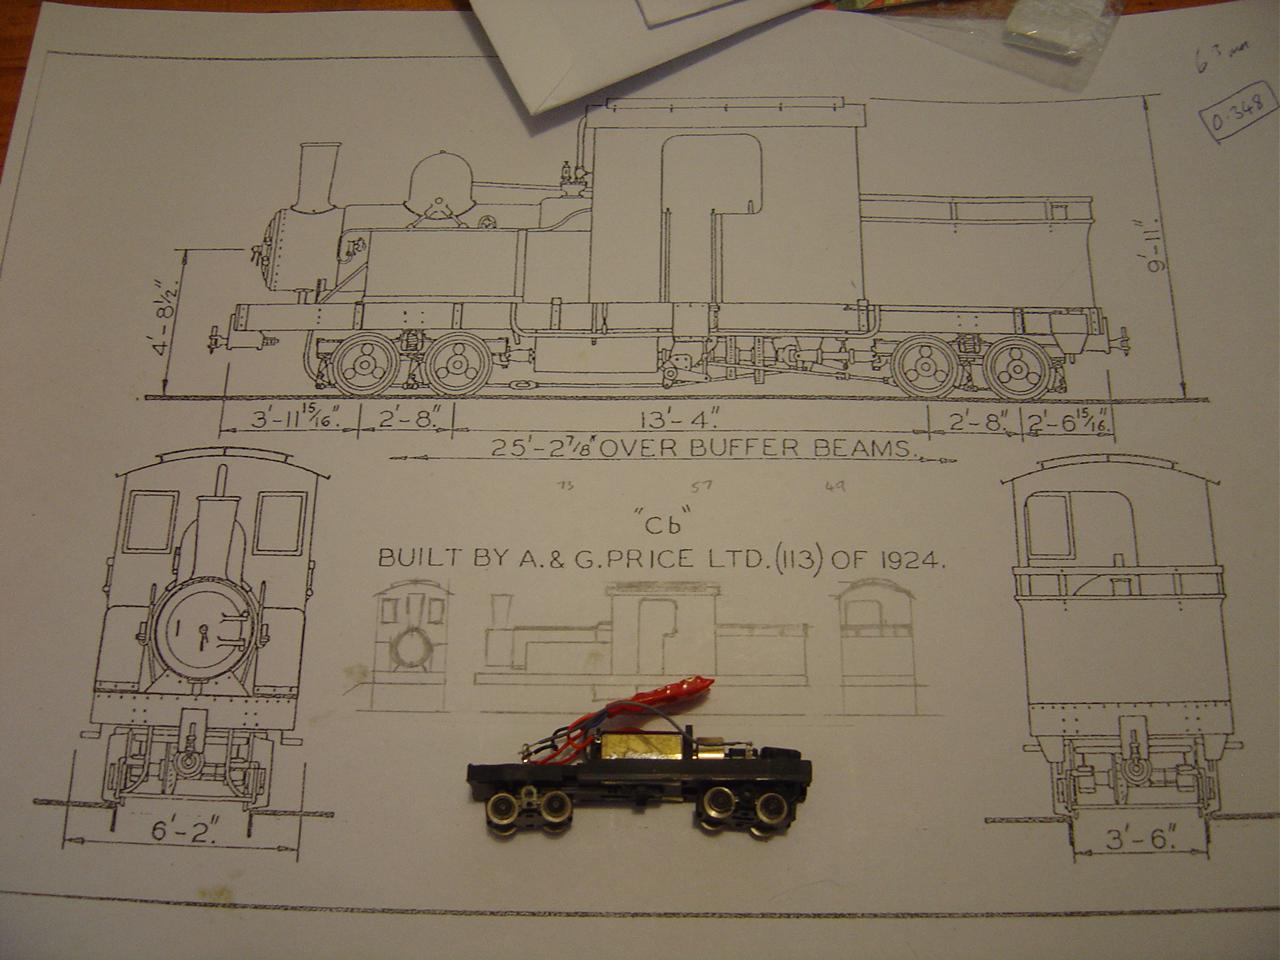
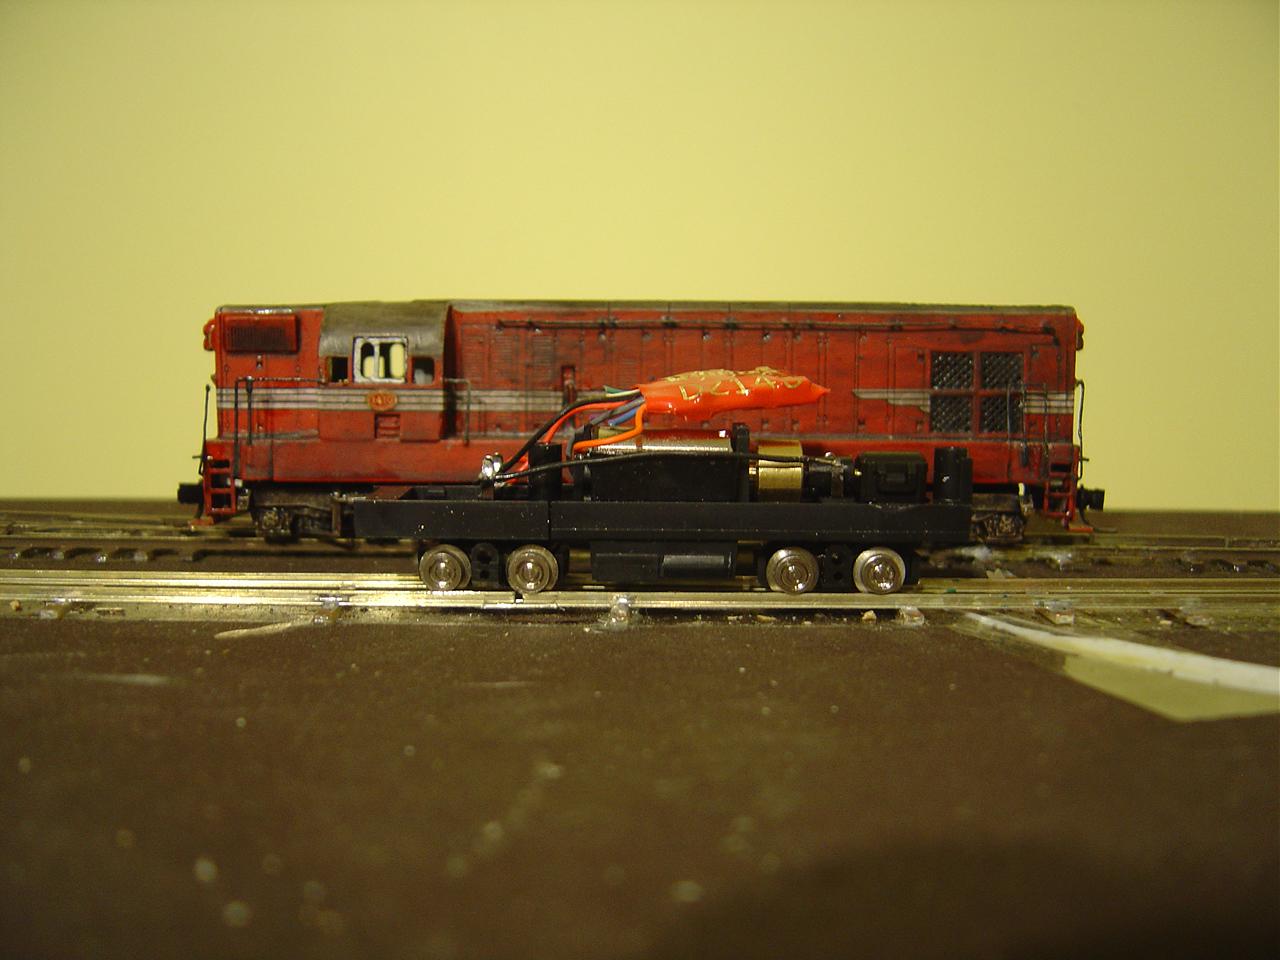
This has improved the look no end. I will just have to sort out how to mount microtrains couplers to it as there is sod all room for them.

Sunday, June 26, 2011

Meanwhile, out in the man-sion...

Well, my excursions yesterday revealed a few things;
-No one seems to stock metal cutting fret saw blades locally (well, of the 2 outlets I tried, I have yet to visit the local hobby shop).
-Who the hell knew that Foxton had a trolley bus museum? It was somewhat of a surprise to drive down the main street and see the overhead wires.

This afternoon I was allowed out in the Man-sion for a bit, and it was time to attack the middle modules wiring. I had picked up some screw tag terminal strips as well as some more switches. It is amazing just how much stuff a layout soaks up without not much seeming to happen. I had to add in all the power feed droppers which gave me a few surprises.

'1/2 way through the process'

I had purchased a roll of enameled wire from Jaycar, and proceeded to cut it into short lengths and solder it into place. Before I flipped the module over I checked that the rails were connected to the bus wires.
Not a flicker.
Heat and more solder did not have any effect short of solder dropping off the joints. I had to scrape some of the enameled paint off to get it to 'stick'.

After these tribulations I finally got everything connected up and was able to drive both Da's along all of the mainline.


I now have to sort out how to wire up the scissors crossover. Its going to be complicated a bit by the manual point throws. I'll just have to sit down one evening and nut it out. I guess I could use the auto-reversing feature on the Digitrax booster, but the question then becomes can I use this feature on the 4 sections it is going to power (Loco, both ends and the center of the crossover) away from the Zephyrs one (main line only).

Thursday, June 23, 2011

Good news, bad news.

Tonight in the shed it was Cb project time again. I had been concerned that I was not going to be able to get enough weight into the body to get decent electrical contact (traction, blah).
I started off with some brass bar and cut it into shapes to fit into the side tanks. the boiler also got filled at the same time. Now the more perceptive of you will be asking why I didn't use lead. basically it was because I could not find any lead sheet in any of my boxes. I do have plenty of lead but I didn't really feel like beating any of my wargaming miniatures flat for the cause. plus the difference in densities is only about 3g/cc (8.4 g/cc vs 11.3g/cc). I suppose I could have used Tungsten at 19.2g/cc as I have a couple of bottles somewhere, but it just seemed to be overkill.

Here it is tonight in all its unsquare and incomplete glory.


Anyway, back onto the layout and it runs much better than previously, so I'm quite happy with it. There is still more space to fit weight in the roof and the firebox under the main frame.

And the bad news? at 8:13 PM the last of my fretsaw blades let go with a sad little 'plink'.
I assume I can buy more of these things at Bunnings or Mitre 10 here in Palmy.

Wiring still plods along on the big layout, but It just hasn't excited me too much this week, plus I'm having a bit of a rethink in terms of 'how do I chase down potential shorts in the wiring with DCC'. Back in Nelson Teach solved some of these problems by using screw connector tag strips, so that when a problem manifested itself you could at least isolate it to one area. Looks liek another visit to Jaycar is on the cards. I'm out of switches again anyway.

Monday, June 20, 2011

BoxfileVI; Moving along

Things have been moving along in the last few days. I now have rails along the entire length of the modulettes.

However all is not quite what it seems. I've only got the outside rails on the second crossover, and have still to do the point blades.


I'm moderately surprised that the rails seem to line up OK when the layout is thrown together. I will have to add some better guides to make sure that the ends mate properly (almost) every time. Still, I've got 10 days to get it finished, or at least running.....

In other projects, progress is being made on the Cb. I've now got the sides on (the boiler is just sitting in place for the photo before anyone questions my modeling skills).

I'm still amazed at the size of the loco. Here its dwarfed by some W wagons.


The large layout has not been neglected either. I've got the throw wires in for the scissors crossover, and so once it gets glued down I should be able to get the main line running on the center module in the not too distant future.

Saturday, June 18, 2011

Saturday morning

Its a bit chilly here at Shloss dandruff this morning, but the fires on. We just don't appear to have any decent cofee in the house. Thus I'm off on a provisioning trip, which will include jaycar, a model shop and the homebrew emporium as well.

last night I sat down and drew out a scaled dowm plan for the Cb. I could have photocopied it, but I wanted to get a better feel for how everything went together and where I was going to make compromises. I was surprised to find that there may not be many to make. I would just describe it to you, but after recieving thefollowing message from the peanut galley I had no choice.
Dont just tell me, I need photos dammit!!!!!!! 
'Happy?'

Possibly the cab might have to come forward a bit, but thats probably it. The more observent will notice that I have done some more slimming down of the chassis by removing the big weight under the mech. This will be compensated by the amount of brass I intend to make the top out of. I also painted the wheels black last night as well, as I was getting tired of the shinyness on the workbench.

Thursday, June 16, 2011

Why you should not drink and surf

A couple of weeks ago the lads were having an E-mail chat on Saturday afternoon. As with all these things, various dumb ideas got kicked around. One of the oddest was the question of whether a working model could be made of this.

Several daft plans were kicked around, none of which made any real sense to me

A few beers later I was looking online and came across a possible solution. A Tomix TR01.

The attraction is that the wheelbase is adjustable, and the wheels are tiny. Its only driven on one end, but I don't think that it is a huge crisis. Its not like I'm going to haul container trains with it.


Having had a few beers or 2, it seemed like a good idea, and through the wonders of Ebay and Paypal with the addition of a few mouse clicks the ill conceived plan was put into action.

Tonight I arrived home to a box in the mail. Inside was one of those marvelous creations from the tiny engineers of Japan. (not that I have anything against the tiny engineers of Japan, but I sometimes wish that when it came to scientific instruments they would make things large enough for large 'gaijin' fingers).

So, out of the box and onto the bench. Size wise it looks the part. Maybe a bit boxy on top.


Compared to a Da its tiny.


Onto the layout and it runs quite well. Nice and slowly with a reasonable top speed. The wheel back-to-backs were a bit narrow but this isn't too hard to fix. From this point things got a bit out of hand. The plastic top piece and the power connections to the motor were the first to go. In their place a Digitrax DZ143 DCC chip which had turned up in a care package from Long Island some time ago. I had not previously had a worthwhile project to put it into, and I'm now glad I saved it for this.


With a brass top for weight it should be able to pull several wagons, which is more than enough for a couple of log bogies.

And the moral of the story; Don't drink in front of the computer. After a while anything seems reasonable.

Tuesday, June 14, 2011

BoxfileV; throwing it.

As well as how to connect the modules together I had also been thinking about how I was going to actuate the single point blades. The list of potential problems was reasonably long. There was not much space under the modulettes. there was not much space on top of the modules. The mechanism had to have a fair bit of grunt to throw the stiff point blade. The mechanism also had to be able to switch power to the frog. Whatever was chosen, the 3 modulettes still had to fit into the box file.

Sounds rather easy really, doesn't it. Here is how I did it.

First up I soldered a piece of piano wire to the point blade. There was a right angled bend passing through a hole in the baseboard.


This then matched up with a miniature DPDT slider switch underneath the board. A hole was drilled through to actuate the point blade wire.

If you look closely you can also see that I had drilled a second larger hole in the switch. This was 'tapped' to take a Jacar screw thingy. These are more normally used to space out and hold Computer circuit boards. By 'tapped' I mean that I drilled out the hole to the right size and then force threaded the screw into the hole with the good old electric screwdriver.

To get the length for the actuator, I used some of the bits that are more commonly used to attach computer cables to desktop computers.


The second switch on the modulette was still to be actuated from the same side as the first one, so needed some extensions.


The long actuators can be unscrewed when the layoutette is traveling, so that it will all fit in to the box.

Next up is the track for the other 2 modulettes, some wiring and then immersing the track in 'concrete'.

Sunday, June 12, 2011

Trackmaking XXXI

In the last week or so with sorting out the track and layout joins, one thing has become blindingly obvious. I seriously have to sort out the rats nest of low amperage hook up wire under the layout. Now I have memories of old stories on DCC about how everything has to be heavy duty, and that you could potentially weld locos to the track with a short (though I very much doubt that you could get enough current out of a small power unit to generate the required heat).

'Early DCC layout disasters due to poor wiring.'

Anyhoo, I still needed to sort this out. A trip down to Jaycar (Dick Smith? Whos Dick Smith) and I'm wired up to the nines. The old wire was quickly removed and new high amperage wiring put in.
Its far tidier as well.

Next up were the point throws for the center module. after my experiences with the first module this was done in a far more organised and orderly fashion, with all the soldering done at the bench before installation.

I have also cut the curtain wire to the right length and will be installing the piano wire throws in the next work session (maybe next weekend; there's also the boxfile layout to get done before the end of the month).

And then there is the question of how to power it all.

'I'm not quite sure where it's going to fit under the layout.'

Friday, June 10, 2011

Boxfile IV; clipons

I've been doing some thinking for a while about how I was going to connect the 3 modulettes together. Given that they are small and very light, the standard bolt system seemed to be somewhat overkill. I also wanted something much faster.

Yesterday I received in the mail 10 rare earth magnets. These little suckers are very strong, and can act across a surprising distance (and are only 10mm in diameter. $10 for 10 off Trademe). Do try to avoid getting them too close to anything electronic (like computers or magnetic cards) as it will be curtains for your precious data.


I made up some module ends from thick paper backed with card. The magnets were then glued in place using their neighbours to hold them in place.


And yes, it does work. The magnetic attraction is strong enough to hold it together on a tabletop. I'm going to attach some small positive guides to make sure it correctly lines up.

With these in place, I can now move on to laying the track on the next 2 modulettes, and then look at the point actuating mechanisms for which I also have a cunning plan.

Monday, June 06, 2011

One of those days

First up, John, my Queens birthday honour for services to blogging about model railways has obviously got lost in the post. Privatise NZ post immediately to improve its performance (or just to sell off a perfectly good public asset to address a made up economic problem; your choice).

An extra day in a weekend care of Bettie the 2nd was not to be wasted. While the lady of the house sheltered inside with the lurgy, I ventured out into the man-sion with great and grand plans.

Purchases on Sunday at Spotlight and Jaycar gave me enough bits to make a start on point actuation for the second module. This involved lifting almost all of the track to put in the curtain wire. This was further complicated by the fact that it was glued down with PVA. I doused everything liberally with water to soften the glue. I then only had to defeat the double sided tape and the heavy duty copper droppers that had fitted. These had been bent over to avoid being knocked during the move so were very hard to move. The soldering iron soon removed them as well, but not before there was recourse to the superglue for first aid.

So, with the track all up, I then had to cut out the groves for the curtain wire to run through the base foam. this meant that I had to put the various track assemblies back to see where the curtain wire was going to run to the switches. For this module I decided to group the point throws into 2 different 'boxes', one with 6 and one with 7. After a bit of thought I decided not to try and separate out the controls for the mail line and the loco depot as this would be in the 'wee bit too hard' box.

When looking more closely at several of the track assemblies I noticed that I had neglected/not bothered to gap the PCB sleepers or cut the rail for the point frogs. At this point I must admit I just stopped and stared at the offending trackage for a couple of minutes. This had absolutely no effect, and so it was off to the workbench to sort it out. I'm sure if I was a woman the copper would have parted under my withering gaze. Men must make do with small files.
I took the opportunity to add a few more sleepers to hold everything together. Unfortunately I could not test the insulation properly as the brass braces at the module ends precluded this. I could confirm that the point frogs were insulated from the rest which is probably enough for the moment.

So, all in all it was one of those days when I probably should have given up when the mojo was not working, but I wasn't prepared to lose the day. I'm a wee bit further on, but it took an awful lot of work. Work which i should really have done the first time round on the workbench.

Just as a final note, the controls for the 13 points on this module are going to cost about $30. I dread to think how much I would be staring down the barrel of if I had gone with commercial points and point motors.

Sunday, June 05, 2011

Book Ideas

Following up on a comment on yesterdays post on books.

I personally would like to see more 'technical' publications - a lot of what is published now is okay, some with good detail - but I switch off a bit when it comes to the "old trains in NZ" or "life on the main trunk" type of book - I'd like to see something like "pioneer diesels" or "EMD in NZ", something along the lines of Ian Allen publications.
Some articles on locomotives written here are excellent, but most things in books seem to be a repeat of what was in the other previous book etc...
Consider a publication by NZ Railfan "Pioneer diesels" with basically a collection of the articles from the magazine - the 88 seater, De, Da etc, just altogether and available in a book...

This has struck me as being an interesting idea, and also quite an obvious one. I can see some problems with this, like getting the individual authors to agree to it (as they still hold the overall IP) and the photograph copyright holders. however I would really like to buy collections of the Railfan articles, possibly with the addition of some plans and some detail photos.

Lets take this a step further. how about a bundling up of another series into something like North island and South island branch lines. Again the addition of track plans for some of the stations, and possibly some building plans would be nice.

There may well be a market for this sort of thing. the British railway press seems to survive publishing books with very specific. One only has to look at the list published by the Oakwood Press to see that people will indeed buy anything.

Saturday, June 04, 2011

Saturday morning

Its been a while since I've written on of these, probably because there has been a bit more modeling going on recently.

last week I found a book on trademe that I had not seen before, Jack Mahoneys 'New Zealand Railway Memories'. This is from his collection of photos taken over a very wide time span. This span does not extend to the diesel age (well, only just with 1 picture of an EE Df).

What I was pleasantly surprised about was that there was not a lot of pictures that I had seen before. I've read quite a few books and magazines, and when I pick up a new one its normally a case of 'seen it, seen it, seen it new, seen it...' Now, climbing on one of my favorite hobby horses, I know that there are a vast number of photos out there in collections, and indeed in the various archives. Why do we keep seeing the same pictures over and over again? Is it because Geoff Churchman is involved in most of them and he either has limited access to the archives (through financial or other reasons), or that there are photos that he really likes and keeps putting in. Or maybe he just has a short memory?

Anyway, the book has provided an interesting couple of evenings diversion. There are quite a few pictures which gives one ideas for small 'vignettes' which I really must sweep under the rug as there is too much work to do on the large layout.

Also, from the painting files. The rookie mistake here is not weathering the top and the bottom at the same time. You would think that those resposible would be better organised.

Friday, June 03, 2011

Trackmaking XXX

I'm at home today with a head cold. not the most fun thing to have, but modern pills seem to make things better. I wonder how people survived without them (oh, that's right, they didn't).

I managed to spend some time out in the man-sion this afternoon when things warmed up a bit. The short job was to wire up the first module at least. So, digging out the DCC box, I connected up the wires. To my great surprise it worked. after some toing and froing with the locos I then decided to connect up the point frogs.

Things I have learned this afternoon.
1) I am no longer as young as I once was, and crawling under the layout is accompanied by a lot more groans.
2) No matter how many years you spend in the tertiary education system and how many letters you have behind your name, you still seem to screw up where the red and blue wires go 50% of the time.

At some point this weekend I must sit down and sort out a list of jobs to be done to get the track finished at least. However I'm starting to get distracted by ideas for smaller layouts.

Wednesday, June 01, 2011

Boxfile III; something new

Another session out in the man-sion and things are really starting to move along. As I mentioned last time, the plan is to build points with only one blade. I wasn't sure that this was going to work at all, and I'd have to come up with something else. So with a merry flick of the file and fizz of the iron, we set off into unknown territory.

The results? Well it seems to work OK. the straight track has a slight bevel cut into the back of it to allow the flange past on the curved path.


With the first point in and working, the second one was a bit easier, having discovered what worked and what didn't. The only problem left is to solve the point blade height issue. currently they stand a bit 'proud' of the running rail. This is normally pulled down by the throw bar underneath the rails, but at the moment I don't have anything like this in place.

And there we have the track finished for the first 'modulette'. It doesn't feel right to call it anything else. The next step is to sort out the alignment system before the rest of the track goes in.