Showing posts with label Oddities. Show all posts

Thursday, May 01, 2014

Tomytec moving bus system

In my hunt for more information on how the system works (and there are some very good Youtube vids), no one has taken one apart to have a look at the innards. So as we always like to go where fools fear to tread, out with the screwdriver. First up a better picture of the model. 2 LR44 batteries in place.


 The steering mechanism is a quite impressive piece of engineering, as it not only steers, but also rocks from side to side so that all 4 wheels are always in contact with the road. The white knob is the on/off switch.

 Taking the back panel off we can see the gearing. Nothing else interesting in this bit so its goes back on.
 Undoing the screw in the middle of the top and suddenly its all on.


From left to right we have:
- The control chip with a detector unit attached. This picks up magnets in the roadway which can be used to start and stop the bus and change its speed. The square plastic piece holds the detector in place in the chassis.
-The motor bit. Not much that could be changed here.
-The battery holder. It is part of the chassis so would be hard to do away with.
-The steering mechanism. The top piece is the rocking part, and the bottom piece is the steering part.

So, there are some options for altering this. I think it could be shortened with the detector at the back of the chassis and the batteries on top of the chip. This would work better for a delivery truck.

Its an interesting wee beast/and I think that there is a bit of potential to add this to a layout. I already have some thoughts.....

Tuesday, April 29, 2014

In the post

An interesting package today from a shop in Japan.
First up a Bo-Bo chassis. I had been interested to see what the inside of this unit looked like. The bogie wheelbase is 14mm and the distance between the bogie centers is 27.5. Wheel diameter is 5.5mm. No idea what I'll do with it yet, but I'm sure something will present itself.


Next up is a bit more left field. I have been looking at the trams and buses for a while, and when I discovered that you didn't actually need to buy the track sets, I thought 'why not'. Its designed to follow a steel guide wire under the road surface (1-2mm thick from initial tests).


It runs on 2 button batteries and can be stopped and slowed by magnets.
This could be quite interesting on a small layout.
The size doesn't hit home until placed next to the Cb.


I was very surprised when I opened the package.

Monday, June 03, 2013

Live from Dandruff Labs....

I think we need to demand a new judging category....


(Apologies for the blurriness)

Tuesday, April 09, 2013

Druff & Co. - Precision Engineers


No job too precise or delicate!  Accurate to 0.4 of a metre!


Let our trained staff help with your projects using tools from our extensive workshop!


Pizza Layouts a specialty!!


Druff & Co. - We put the "Ass" in "World Class".

Sunday, September 02, 2012

Back to Broken River

DB temporarily awakes from hibernation just in time for the end of the northern summer:

 I've not had much to post about over the past while because I've not really been doing any modeling. This may be because the train room has become the default storage place for all manner of household junk, or because I've not had a lot of free time, or a million other excuses; but with my good woman away for a few weeks I thought maybe this might be a good time to get back into it.

 As an aside, this was supposed to be the second post in my comeback series (which usually last for about two posts per comeback) but I don't have any pictures for the initial sermon on rail prostitution that will now follow as Senor Druff permits.

 Anyway in this second edition, being presented first, [can you tell I'm watching The Matrix on a full tank of Ben Marco Malbec as I type this? God bless spell checkers] I was clearing out the train room today and decided to revisit the barely started Broken River module. I figured I might as well bite the bullet and attempt soldering some track feeders onto it just to get the damn thing finished, otherwise we'll end up selling the house without ever seeing if this layout in the sky with diamonds thing would ever work.

 As you might have noticed, I'll often happily be modeling along at a million miles an hour and then suddenly run into a minor roadblock (like painting a backdrop or wiring a Tortoise or soldering some track feeds, or putting underframes on my 56 foot cars) that you sensible modelers would just plow through, but just stop me dead in my tracks. And once the momentum is lost, I end up in hibernation for a year.

 So, fortified with copious glasses of resolve (too early for wine at that stage), I managed to solder my way along Broken River with the elegance of an elephant driving a space shuttle through the eye of a camel: a bus wire pair along the length, a few fishplates soldered together, and two pairs of feeders. Wow. Despite being allergic to soldering, that wasn't so hard now was it.


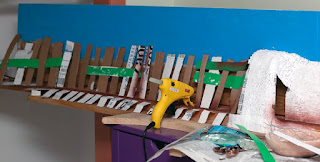
After handing the keys of the Discovery off to the valet, I hot glued some cardboard strips onto the bare left hand half of the layout in the approximate shape of Mt Eiger and covered these with Woodland Scenics plaster cloth. A quick spray of the tracks with some brown primer from a can and suddenly, after a year of pausing, I'm suddenly in scenicking mode, which is something I enjoy far more than the building of the infrastructure which has held me back for so long. So in the spirit of cheap, disposable and embarrassing, I made a few tunnel portals out of corrugated cardboard painted grey and also some tunnel liners (a sheet of corrugated card painted almost-black). Ugly.


About this time I was also thinking about a post on this very blogary that mentioned the use of expanding foam as treeforms. Clearly I was not concentrating on tunnel portals.

Funnily enough, I recall buying such an expanding foam insulation product some time ago and after some rummaging I found it. On the top of the can it said "Dow Great Stuff Gaps and Cracks." On the bottom of the can it said "best before Feb 2010" but nonetheless, I foolishly tried this on a small 6 foot section of the 6 foot module as a test. The stuff comes out like whipped cream from a can so you have to be gentle extracting it, and then it slowly blobs up about 50% into a sticky ball before later setting as a hardish, nonsticky blob.


Unfortunately the drinking-straw-length applicator on mine had broken so I had some trouble aiming the puffballs and ended up getting more than a few sticky carcinogens on me during the process.  I'm not sure whether my life-expired can is truly representative of a fresh batch of the current product's capabilities, but nonetheless, I can report that he results are definitely: ummm, odd.


Now (thanks to the Malbec) that I have regained my senses upstairs, I have actually read that blog and see that they put their blobs in a denser pattern than I on the Cliffhanger layout. 

Any moment now I expect to see Teletubbies and unicorns weaving through the meringues on my layout. Will I get my just desserts? Tune in for the next exciting episode.

Saturday, April 28, 2012

Ivor Biggun....

Am Fet angles off on a tangent.....

Although I hate to admit it, there are...."other" scales that people model in. It turns out that some of the guys at work are irrevocably attached to that odd scale where no one can quite decide on what scale ratio they are using and you need to mortgage off the wife and/or children to afford a locomotive. I am talking, of course, of G scale.

I made the mistake of going to a club night (again) and was talking idly about what I had got up to in laser cutting. As soon as I mentioned "...Oh, and a 1:24th scale La6 in styrene", Her Majesties Representative of the Armed Forces (Not the Sqn Ldr, the other one) said "Ooo, can I have one?".

Photos were duly dispatched to both him and our resident KiwiRail G scaler who we shall call "Gav" (mainly because, as a moniker, it seems to suit him; His personality somehow has a certain amount of "Gav-ness" to it, and possibly more importantly, its actually his name).


I was swiftly corralled in the tea room with no hope of an easy escape via that small gap between the coke fridge and the pot plant and asked "What else can you do?" "Ummm...what do you want?" was my witty reply. I then told him what I had the best drawings already Cad'ed for, namely the award winning J5 and Ug, both of which he had dribbled over at the convention. "Yes Please!", he squealed, almost fainting with delirious delight.

And so, I wandered into the den of Mr Laser yesterday and said "You know that Ug drawing? Can we multiply it by 5 and try it?"


Okay sure, its the Uga, but we couldn't get our hands on the Ug quickly. The top laminate is in 08mm ply and the bottom structure is 3.8mm Poplar. I have just done a side as a test as the drawing needs to be rejigged to cope with the 3.8/0.8 combination (previously the UGA consisted of two layers of 0.8).

So! Another little adventure starts. Drew wants some more La's for his planned garden empire, and Gav is keen to see the J5 done as well in 2mm. Both of these are on hold while we try and find some suitable material, we seem to be all out of the 1mm styrene for a start....how inconvenient!

Well, a happy ending to what was a crap week. Heres a word to the wise: If you hear an alarm going off in train control, WALK QUICKLY IN THE OTHER DIRECTION!!!

Sunday, March 11, 2012

How good is your wiring??

(I just can't hold this important information back any longer)

Am_Fet scribbles:

Found this on the Interweb Thursday on Makezine (actually linked from an Analog Synth forum I'm a member of).

How-To: Splice Wire to NASA Standards

Some commenters on Friday’s post about using a washer as a soldering aid noticed my sloppy splicing technique and were kind enough to educate me about the so-called “Western Union splice,” aka the “Lineman’s splice,” which is the preferred method for twisting solid-core wire leads together for inline electrical connections.

Developed during the heydey of the telegraph, the Lineman’s splice is designed for connections that will be under tension. It is commonly claimed that, properly made, a Lineman’s splice is stronger than the wires of which it is composed. In any case, it is a time-proven method, and, coolest of all, one of NASA’s Required Workmanship Standards. To wit, in a NASA-approved Lineman’s splice:

  1. The conductors shall be pre-tinned.
  2. There shall be at least 3 turns around each conductor and the wraps shall be tight with no gaps between adjacent turns.
  3. The wraps shall not overlap and the ends of the wrap shall be trimmed flush prior to soldering to prevent protruding ends.
  4. Conductors shall not overlap the insulation of the other wire.

Though the Lineman’s splice was originally used without solder, today soldering is common. And NASA insists on it:

  1. Solder shall wet all elements of the connection.
  2. The solder shall fillet between connection elements over the complete periphery
    of the connection.

This material comes from page 84 of NASA-STD 8739.4, which is a great reference if you’re interested in best practices for interconnecting cables and wires. [Thanks, Alex Barclay!]

NASA-STD 8739.4 (PDF)


Friday, December 23, 2011

History is alive and well....

Armless_Fet writes:

I was wandering aimlessly into work the other morning and saw the interior design team were in with all their tools in the lobby by the lifts. Sitting on some trestles was a long plank of varnished wood. Didint really think much more of it, until I left for lunch and was greeted by this:


Gobsmacked I was! As a student of fine locomotive design, I knew that is from Sir Nigel Gresleys A4 locomotive built in the 1930's.


I've always had a soft spot for the A4's....they looked much nicer than the LMS "Coronation" streamliners, and Sir Nigel's influence lasted even after his death....apart from Thompson ballsing about, the Peppercorn A1's are still the best looking 4-6-2 locomotives to come out of the British Isles.

And for those who love all things steam, that sounds like an open invitation for an argument....Begin!

Sunday, October 09, 2011

Idiocy in the Weekend....

Am_Fet scribbles:

They should never have put video cameras on phones....


The Cb lopes along the Paekakariki yard at pretty close to top speed (with inane comments from the camera crew).

Thursday, August 04, 2011

Colour me dirty

With some discussion on colour that steam locos should be painted, I'll submit my take on the matter.

A bit more grotty than the average main line loco, and it still needs some more stains from leaky valves. I also need to add a load of wood to the back.

Thursday, June 23, 2011

Good news, bad news.

Tonight in the shed it was Cb project time again. I had been concerned that I was not going to be able to get enough weight into the body to get decent electrical contact (traction, blah).
I started off with some brass bar and cut it into shapes to fit into the side tanks. the boiler also got filled at the same time. Now the more perceptive of you will be asking why I didn't use lead. basically it was because I could not find any lead sheet in any of my boxes. I do have plenty of lead but I didn't really feel like beating any of my wargaming miniatures flat for the cause. plus the difference in densities is only about 3g/cc (8.4 g/cc vs 11.3g/cc). I suppose I could have used Tungsten at 19.2g/cc as I have a couple of bottles somewhere, but it just seemed to be overkill.

Here it is tonight in all its unsquare and incomplete glory.


Anyway, back onto the layout and it runs much better than previously, so I'm quite happy with it. There is still more space to fit weight in the roof and the firebox under the main frame.

And the bad news? at 8:13 PM the last of my fretsaw blades let go with a sad little 'plink'.
I assume I can buy more of these things at Bunnings or Mitre 10 here in Palmy.

Wiring still plods along on the big layout, but It just hasn't excited me too much this week, plus I'm having a bit of a rethink in terms of 'how do I chase down potential shorts in the wiring with DCC'. Back in Nelson Teach solved some of these problems by using screw connector tag strips, so that when a problem manifested itself you could at least isolate it to one area. Looks liek another visit to Jaycar is on the cards. I'm out of switches again anyway.

Saturday, June 18, 2011

Saturday morning

Its a bit chilly here at Shloss dandruff this morning, but the fires on. We just don't appear to have any decent cofee in the house. Thus I'm off on a provisioning trip, which will include jaycar, a model shop and the homebrew emporium as well.

last night I sat down and drew out a scaled dowm plan for the Cb. I could have photocopied it, but I wanted to get a better feel for how everything went together and where I was going to make compromises. I was surprised to find that there may not be many to make. I would just describe it to you, but after recieving thefollowing message from the peanut galley I had no choice.
Dont just tell me, I need photos dammit!!!!!!! 
'Happy?'

Possibly the cab might have to come forward a bit, but thats probably it. The more observent will notice that I have done some more slimming down of the chassis by removing the big weight under the mech. This will be compensated by the amount of brass I intend to make the top out of. I also painted the wheels black last night as well, as I was getting tired of the shinyness on the workbench.

Thursday, June 16, 2011

Why you should not drink and surf

A couple of weeks ago the lads were having an E-mail chat on Saturday afternoon. As with all these things, various dumb ideas got kicked around. One of the oddest was the question of whether a working model could be made of this.

Several daft plans were kicked around, none of which made any real sense to me

A few beers later I was looking online and came across a possible solution. A Tomix TR01.

The attraction is that the wheelbase is adjustable, and the wheels are tiny. Its only driven on one end, but I don't think that it is a huge crisis. Its not like I'm going to haul container trains with it.


Having had a few beers or 2, it seemed like a good idea, and through the wonders of Ebay and Paypal with the addition of a few mouse clicks the ill conceived plan was put into action.

Tonight I arrived home to a box in the mail. Inside was one of those marvelous creations from the tiny engineers of Japan. (not that I have anything against the tiny engineers of Japan, but I sometimes wish that when it came to scientific instruments they would make things large enough for large 'gaijin' fingers).

So, out of the box and onto the bench. Size wise it looks the part. Maybe a bit boxy on top.


Compared to a Da its tiny.


Onto the layout and it runs quite well. Nice and slowly with a reasonable top speed. The wheel back-to-backs were a bit narrow but this isn't too hard to fix. From this point things got a bit out of hand. The plastic top piece and the power connections to the motor were the first to go. In their place a Digitrax DZ143 DCC chip which had turned up in a care package from Long Island some time ago. I had not previously had a worthwhile project to put it into, and I'm now glad I saved it for this.


With a brass top for weight it should be able to pull several wagons, which is more than enough for a couple of log bogies.

And the moral of the story; Don't drink in front of the computer. After a while anything seems reasonable.

Sunday, March 06, 2011

Now with Working Ditchlights

Am-Fet writes:

Just lately I seem to be a bit more mindful of ditchlights. I have no idea why, I think conversations have turned to them as we are looking at how to do locomotives and even if they could be lit or not. And everything seems to have them these days, even 1954 English Electric Diesel Locomotives.

So there I was, minding my own business while hitching a lift with Drew on Friday on train 535 (Whareroa-Palmerston North) when things took a bit of a surreal turn.

We'd stopped at Easttown (Wanganui) to get a warrant through to Marton and I took the chance to get out for a PNB (personal needs break, I'll let you fill in the details) as well as get some pics of the locos. We had 5448 and 5068 on point with 4231 along for the ride. I had previously hitched a lift on 4231 coming home on 201 (The Overlander) on my last jaunt, so I was keen to get some photos of the beast as it is now.


Interest is given by the just visible NZRC logo hidden behind the Tranzrail stuff.


And then I spotted it...what in the name of W.W Stewart was the story with the ditchlights?


"Oh", replied Drew, "Those are the Repco models...".

Now thats a modeling challenge in any scale.

Friday, December 10, 2010

A Reader Writes:

"Dear MD,

I'm hoping you can help. I have a love of DA locomotives and Tank Wagons, but cant for the life of me make decent foliage (grass, trees, etc) that just screams "New Zealand Native Bush" to save myself. Can you help?

Signed,

Yellowed Thumbs"


Dear Yellowed Thumbs,

Youre modelling the wrong country. Can I suggest you try Chile?

Love,

MD.


Thursday, September 30, 2010

Lets do the time warp again....

From DB's "there's a prototype for everything department":

The Rocky Horror Picture Show receives far too much airtime on this Blog.

But be that as it may, you might have seen this picture of a UK wagon that quietly passed away on train 230 at Fielding earlier in the week (stolen from the NZ Locos Yahoo group who probably stole it from someone else).


A similar sight greeted me when I put my nose up onto the yard containing my wagon stash a few weeks ago.

? I thought they were supposed to be container 'flat' wagons?

None of my other cast resin UK/PKs exhibit this quirk, but I suppose it could have been summer's heat or humidity or badly mixed resin that never really set. Perhaps it went deep sea diving when I wasn't looking and surfaced too quickly. One of our Chemistry Wizards may have some thoughts. The Star Wars prequels sucked. The last one only partially. What's up with the weather?

Where was I... Fairly early on I started encapsulating brass rod into the castings by laying it into the mold during the pour, but it looks like this one escaped that process for some reason. This might push me to revisit a cast brass UK...

Friday, April 30, 2010

Even Fuglier

Am_Fet cant quite believe he's writing:

While cleaning up one of the spare rooms I came across a first edition copy of Ken Cassells "The Sanson Tramway" that I'd squirreled away many years previously. Its a nice wee read, not too taxing, quite pleasant in a way....until you reach page 64:

"...the frames of a "Wa" class 2-6-2 tank locomotive lying at Gisborne were purchased from the NZR and on these was mounted a Holt petrol engine from an old tractor. To the motor was fitted a gas producer, as a fuel economy measure, and a drive was taken through a gearbox, made by A. & G. Price Ltd of Thames, on to a pair of six coupled wheels from one of the old Fairlies. Over all was placed a housing of the "steeple-cab" type, fabricated in the County workshops out of welded steel plate."


The author does wonder about including streamlining on a locomotive designed to run on a line with a speed limit of 12mph, and apparently it drank a gallon of petrol every 200 yards! Apparently it was modified and ended its days in Westland, probably on some out of the way log tramway where it couldn't offend the sensibilities of townsfolk.

So there you have it...possibly New Zealand's ugliest locomotive. To me it looks like a beagle...maybe a two headed beagle....It does raise the question "At what point in the design phase did they think this would be stylish?"

Friday, April 09, 2010

The "Other" 9mm...

Am_Fet warns:

Please make sure your laser cutter NEVER EVER takes anything said after work on a Friday evening seriously...


Recipe: Take Nz120 IA drawing and multiply by 4 (roughly). Print on 2mm clear acrylic. Assemble with Chloroform. Swoon.

Monday, April 05, 2010

Doing the Business...

Definition:

"Business cards are cards bearing business information about a company or individual. They are shared during formal introductions as a convenience and a memory aid. A business card typically includes the giver's name, company affiliation (usually with a logo) and contact information such as street addresses, telephone number(s), fax number, e-mail addresses and website. It can also include telex, bank account, tax code. Traditionally many cards were simple black text on white stock; today a professional business card will sometimes include one or more aspects of striking visual design."

Am_Fet writes:

Okay, so this idea came through a wee bit late to get to the convention, but I was throwing around the idea in my mind of whether to give Cabbage some business cards to hand around at the convention this easter weekend.

One of the more effective business cards that I had seen came from Fiddlers Green, a card modelling website. In a nutshell, their business card came with a complete J3 Cub that you could cut out and assemble...good stuff!

So....would such a dodge work with us? I quickly scribbled off an L4 top on the standard business card size in 0.4mm ply and sent it around the MD hierachy for comments:


The Head Druff himself replied:

"I think its a good one. Its a pity that you can’t do it for modern wagons. So an L1, L2a, M, a workmans hutt, a Jigger? If the underframe thing comes off then a Q. A K box wagon (no roof). In fact anything that would take up a card space (wee lineside buildings etc). Very much along the lines of the old BM model, so don’t have to be perfect (no roofs general outline correct). Maybe charge $5 a piece"

So what do the Peanut Gallery think? I dont think there would have been many left if I had got them done!

Sunday, March 28, 2010

Sunday morning cooking

This morning how to make an Omelette, First, take 156000 eggs.


Then add 1 locomotive and stir vigorously.


Very nutritious as there is a load of iron and trace elements, plus some organic goodness. The only problem would seem to be the size of the kitchen required