Showing posts with label Bush tram. Show all posts

Monday, June 19, 2023

Book review time

A couple of weeks ago A PDF copy of a new book was shared with me. Its a surprise to find a railway in this country that I haven't heard of. In the late 1920's the Auckland city council built a dam in the upper Huia valley to supply water to the growing city. 

As part of this a tramway was built to transport building materials from The Manuka harbour 6 km up the Huia river to the dam site. The tramway then ran a futher 2.5km above the dam site to a quarry.

Unlike a typical bush tramway, the line was built to a much higher standard as it carried quite substantial loads of cement, sand and rock. Several bridges were required as well as a couple of tunnels.

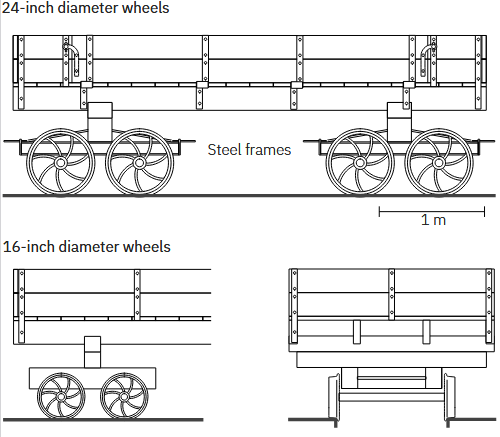
The line from the landing on the Manakau moved sand and cement brought in by barge with a typical days load being 120 tons in 4 trains. This was carried in bogie wagons built on log bogies. 

Several locos were used on the line. A Price Cb was purchased new in 1927, and a Gibbons and Harris 0-4-0 and a 9 ton Barcley 0-4-0 also worked on the project. The Cb was used to move trains from the landing to the dam site and the other 2 on the quarry line. When the dam was completed in 1929 the Quarry line was lifted and the line down to the Manakau was left for access to the dam untill it was lifted in 1959.

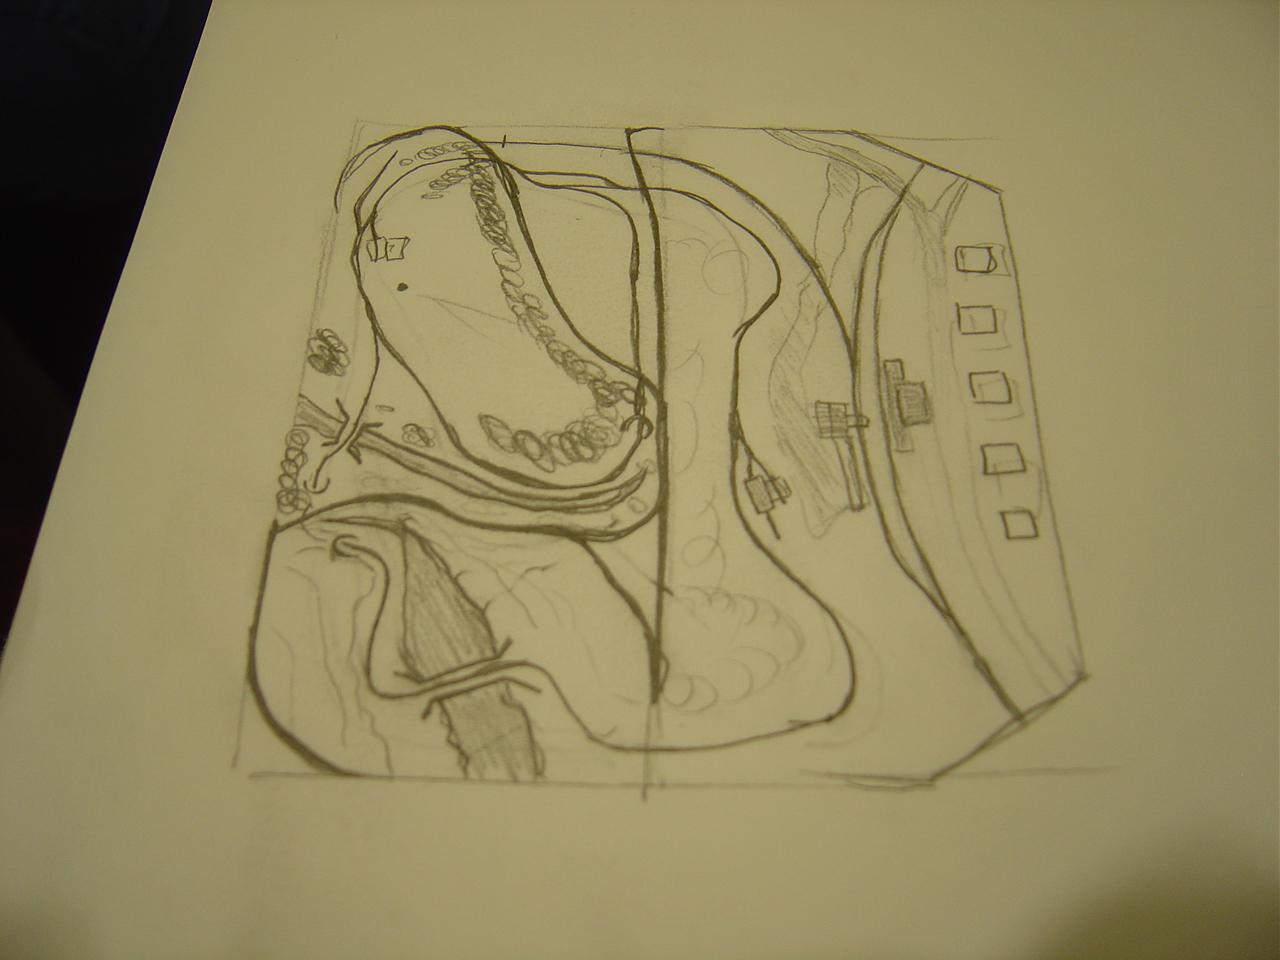
So, thats a rough summary of the history, whats in the book. Well, for once there's much more, and quite honestly its christmas for the modeler. A map of the line with all the interesting spots covered. Track plans for the landing, dam and quarry, along with a detailed discussion of how they were operated. There are plans for the locos (or close to) that ran on the line as well as a plan for the main type of wagon used. there are also plans (and detailed information) for the major bridges, tunnels and other locations of interest (including where the line ran across a rock shelf which had to be blasted).

Admittedly the book is writen from a historians view with detailed explanations about the difference between NZR and bush trams which for the average railway modeler are a bit long winded. Thats not why we are here. The rest of the book is absolutely brilliant and my hats off to Peter Hopcroft for writing a book which should be a blueprint for historical railway writing in this country.

Hiua Dam Railway.

Saturday, May 06, 2023

How many boxes over is that?

 I've been kicking this around over the last few days with a collection of wise asses men.

Could you model narrow gauge in NZ120 using Z scale mechanisms?
I get notifications from one of the Japanese model shops as their bits can be quite interesting. One was for a Z scale mech which is dirt cheap (and I didn't think Z scale was a Japanese thing). 6.5mm is 2'7" in TT so close enough to 2'6".
Dimensions are ....tiny.
And what to do with it?
Well, a powered small steam loco is out I think. However a powered wagon pushing the train round would work.
And so we come to the Takaka Tramway, one of the very few narrow gauge lines in New Zealand. Built to move wood and farm product down the valley to the wharf at Waitapu.
Plenty of space to hide a motor. A better option would be in the carriage the line had which would look OK attached to the loco all the time.
The loco itself is not much but was aparently described as "colourful". It could sit on a free bogie with side skirts to cover up the lack of wagly bits (and taking me back to my modeling of 40 years ago).
The wagons are not much either.
 The scenes worth modeling include the main street which is quite plain.
 

A look in the bits tonight gives me 5 x 1m pieces of code 40 rail (more finger cuts I guess) and enough PCB sleepers to manage (though if any readers are members of the 2mm Society I'd be interested in a shopping expedition). There's not alot of pointwork to build (yah!).

Its also been pointed out that N scale (the US version at 1:160, why ) 3'6" scales to 6.7mm which is good enough for for Z guage track. I do wonder if anyone (apart from Mr G) has had a crack at this? Its not something I recollect having seen anywhere.

Friday, May 02, 2014

Friday evening

To be a real bush tram you have to have a line running through the weeds.


It should be do-able with a bit of thought.


Wednesday, August 28, 2013

Cruel camera

Sent in By Grant Morell are pictures of my bush locos on his layout. For some odd reason they didn't move and I can only assume ;
1) I need to set up the decoder CV's correctly so that they read DC correctly.
2) The current draw in the Masterton town hall was a bit much to power my DCC box there.

This was a bit of a bugger as I was hoping for some information on how they ran on hills.

 The rail truck precariously perched on a bridge with no pilings. It does look the part from this angle, even if I have to paint the wires.

The Cb on a piece of ballasted track. This view may push me to at least build a small diorama. I've always wondered if stub points can be made to work OK in code 40 rail. Grant has made a pair that work for his layout in larger rail.


Sunday, April 07, 2013

Sunday meet.

Well, open the door to the garage and it attracts all sorts of odd people.
'Officer, my garage is full of modelers'
 So, what happened on the day? New models were examined, the urine was taken , borax was poked, and my collection of tools were mocked (again). Business as usual really.

One thing that did get moved on was the Bush tram layout. I have not been overly happy with all of it for quite a while now, and today was the catalyst. The new blue plastic was put on the table, and some track was plonked down. The piece of track work from the abortive 'Grassmere' was returned from its 3rd owner. It has now become part of the layout on the NZR side. The main line will have the NZ120 Freemo modular face plates (of which another set was sold today to an unsuspecting S scale modeler). Wagons will be dropped off on the back shunt front center. They will then be transferred to the sawmill/ fiddle yard at the back. the bush tram locos will run on the separate loop.
I lie this plan a lot more as its much smaller (it fits in the back of the car) and it gives me a chance to have a second shot at bush scenery that I failed so dismally with on the first attempt.


As a final note, any other photos or videos that may appear on here in the next few days casting aspersions on my mechanical skills have obviously been faked on photo shop. You have been warned...

Sunday, October 21, 2012

Fooled me...

Saturday afternoons modeling session started with the forced eviction of an interloper who obviously couldn't tell the difference between the New Zealand bush and my highly detailed (though incomplete) replica.


'Looks like it might be a bit harder to shift than Hone'
'Seems to have the right number of legs left'
 I'm happy to say that it is now enjoying the exotic delights of an old woodpile behind the garage in the company of its mate who I found trying to bum a lift to work in the back of the car on Friday morning.
This incident has now added 'Weta creek' to a list of possible names for this scene.

With that out of the way, I decided to have a crack at highlighting the Cliff faces. This was done by dry brushing shades of grey starting with a mid grey and working up to a light grey. I will still have to to a wash of dilute black to add the shadows to it, and then glue on some foliage.


The only problem is that it now screams 'bad wargaming terrain!' at me when I look at it. I may as well be playing warhammer.

Friday, October 12, 2012

Going Bush IX

Well, after last weeks rush of blood to the modeling regions, the pace has somewhat slowed this week.

I've done a bit more work on the second scene. Mostly just sculpting the creek bed and part of the hill. Oh and adding the back scene for this side of the layout.


 I still have to cut the exit hole in the left hand back scene, but I have yet to sort out just where it will be. I will need to mock up a workers camp and a log hauler here, as well as some loading skids.

I also added a bit more paint to the 1st scene with the undercoat for the cliff face. A bit of green was added to the none grey bits. I then added the track and loco for a quick photo or 2.


Its starting to look a bit better. Hopefully I'll get some more done this weekend, which given that it is the lady of the houses' birthday, may not happen.

Thursday, October 04, 2012

Going Bush VIII

Cutting & gluing & carving & smearing continues a pack out in the Man-sion.

First up the gorge scene. Added tonight was the last of the scenic break and more of the magic filler. Its not perfect but tidier than any of the alternatives. I've found a good way to apply it is with a large artists brush. seems to work (for me) better than a spatula.


I also started on the second scene, 7 mile camp. More messy carving and adding the back scene formers. The track is (again) just to show what the track plan will be like.


And finally heres the overview of the other side of the module (the one away from the NZR).


The left hand scene is not quite the way I had envisaged it, but it is very hard not to overestimate just how much space you have to do things. The far left will be the fiddle yard and the mill siding from the NZR station on the other module.

Monday, October 01, 2012

Going bush VI

Right, back to the shed.

I got tired of looking at the expanse of white and so decided it was time to throw a bit of colour around. The end result is this.
 

Its a start, and I can now start blending in the surfaces to make it a bit less layery. I can see I need to make another moonlight raid to get some more road gravel for my patented west coast river bed making method. Then tehres all the bushy bits to add on top, which will hide a multitude of sins. First up will be the cliff face, which currently looks like....

Cake anyone?

Friday, September 14, 2012

Going bush (for the next week)


Well, still busy at work, and just winding down to the first holiday this year. I have however had a chance to have a bit of a hack with the foam. its no fun to work with, and if I was working inside the lady of the house would have some words to say. Some of possibly more than 4 letters.

Anyhoo, heres where we are up to.


This is a combination of charming creek and the Ongarue tram.


Looking the other way


The railtruck heads up the valley. there will be a scenic break along the purple line at the back, and the line will vanish round a corner into a tunnel off to the left.

When I get back I'll get some plaster and do the hillside and riverbed.

Wednesday, September 05, 2012

Going Bush V


So, a rethink on my plan for the layout/module. I was not overly happy with the tight curve on the mainline which was less than 600 mm.
having a bit of a rethink I then came up with this.

By moving the module ends to the corners of the layout the curve on the mainline is reduced and the station becomes larger, which looks better I think. The other change is on the bush tram side where I've split the viewing area in 2, and added a second loop. The plan is to add a bush camp, possibly with a steam powered skid and a log loading point, but there is a very real possibility that it won't all fit in.

I then started waving the knife around to cut out some of the river gorges. This re aquainted me with the 'joys' of expanded polystyrene...

It looks good, but the mess is unreal and really doesn't want to be cleaned up. I'll have to get the vacuum out there to tidy up. At least its not sticking to my clothes that much. It does give me some interesting riverbed effects though.
I'm now trying to work out how to bend MDF round the edges and get it to hold its shape while it dries. All good fun....

Monday, September 03, 2012

Going Bush IV

More bush tramming. First up, what you are looking for in a Rhododendron tree to supply scale logs.

'Size and cat are optional'

I also spent some time pondering track layouts and have come up with a major rejig, which I'll work on in the next week or so. One of the big questions that I've been thinking about is how deep/high should the river gorge be. The options are 60mm......

And 120mm


The Judge decided that 120mm was the way to go, as I want the trains to be completely dwarfed by the scenery. I've glued 2 pairs of sheets together with Gorilla glue and once this dries I'll get on with terraforming. once tahts done then I'll get the trackbed sorted.

Oh, and with impendng holidays the number of weekends is shrinking quickly before the hutt show, and I have to have something sorted by then.

Friday, August 31, 2012

Baby trains

In Wednesdays post you will have noticed that I have got a bit further in completing my log train. Thanks to Grant Morells advice I cut some buts of Rhododendron off the 30' tree in the front yard. This was then cut into sections. This is a not bad representation of a cut down tree. It looks like something out of the KATO 'pocket line' series of short trains.

And the whole train is less than 1' long. Still needs the chains, some pivots and coupling devices. Oh and paint as well.


Looks more interesting than 3 Dc's and 70 odd log wagons. Well a bit more modelable anyway.


Wednesday, August 29, 2012

Going Bush III


So, a day off (my first since the start of the year), and what to do. Make a start on the bush tram for real, that's what. Working from the base knowledge that Kerosene creek is built on expanded polystyrene and has lasted 20 odd years, i figured why not do something similar. While shopping for (more) plants at the weekend I noticed that underfloor insulation is relatively cheap at the moment, so purchased a bag of 1200 by 560 by 60 (9 pieces for $58 at Bunnings).


The next question was size and a track plan. The first was sensibly limited by the size of the back of the car, which is 1200 by 600 by 900. given that the end plates are 200 deep, and I wanted at least that high again for hills, this gives about 1200 by 1200 with a height of 400. Sounds about right. Next up is the track plan. Normally I'd sketch and sketch until something fell out. Since I'd done some thinking and had some flexitrack I could just do it in real life.


The main line is limited by the 600mm radius that 'we' decided on for the minimodules. It will have a passing loop, goods shed, small station and a siding that heads off stage to the sawmill (which I'm not going to model, its in the 'too hard to let trains run through it' basket). The Bush tram will be on a separate loop. This will include a loco shed next to the NZR station, a couple of bridges and river scene similar to Charming Creek, and a log loading point. The module end plates can be seen as well, so its a 90 degree corner. Not sure if this is a good idea, but that's never stopped me before.

And what layout planning session would be complete without the chief project engineer placing some trains on to see how things might look. The Cb is just passing where the loco shed will sit. The area behind the Da will have a general store and a couple of houses. I still have to sort out where I'll put the logging camp plus a few other items, but I like the base idea.

Monday, August 27, 2012

Going bush II

I've always struggled to make large numbers of trees. Well, more correctly I've never really attempted it, unless you count using sphagnum moss spray painted green 25 odd years ago.

In my wanderings on the net I came across this last night. While not New Zealand I think its an idea worth looking at.

The base of the forest is expanding foam filler, that is shaped, painted and flocked. Looks a lot faster and cheaper than using Woodland scenics foliage blocks.

Thursday, August 09, 2012

Gone bush II

Another day, another jig.

I had to work out how I was going to put the axle bearings on. more importantly, how I was going to put them on parallel. I came up with this solution.

I figured that the best way to get the axle bearings parallel was to stat with them parallel. its worked for 4 sets, but as you can see this set has a wee bit of a twist.
I've also had a few false starts due to the merry heat conducting properties of bits of brass. And before anyone suggest different melt solders etc, I don't have those lying round the workbench, and to order so just slows things down. Plus its always exciting to see if you can solder one more piece on before the rest fall off into a puddle of solder.Its a mans hobby after all.
In response to Beaka's comment yesterday, here s shot of the bogies with a ruler (my special double scale one)

And after a bit of work with the file to clean everything up, here we go with the wheels in. Still have to remove the pinpoints though. A train less than 10" long. The Cb should be able to manage downhill.

Back to layout ponderings, and can anyone suggest where I might be able to get Micro engineering or Atlas code 55 flexitrack locally? I've decided to build this for fun, and since its a bush tram, (almost) anything goes as far as I'm concerned.