Sunday, June 11, 2017

Man your knives

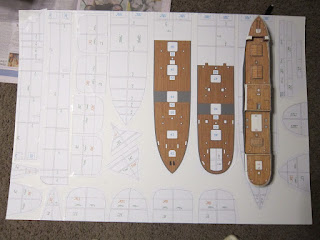
I've picked up the other 3 sheets of printing for my steamship.

No idea why it continues to load this way
I wish that the guy who drew this was a bit tighter with his placement of bits as theres a lot of wasted space which, while not important at A4, does grate a bit at A1.

so, just as a running cost for the model, so far I have $15 (or so) for the basic download, 3 80g sheets at $4.50, 2 160g sheets at $5.50 and $7 for the heavy card (glue and knife not taken into account) which give $36.50 which I think is quite cheap for a model of this size. I dread to think what it would be worth in plastic (assuming that there is a market for them).

Saturday, June 10, 2017

Saturday morning

Before I head of into the great outside for my 1:1 projects, here's a progress report on the ships.
Plonking the wharf down on the work bench gives a sense of scale to the whole thing


I had worried that the new ship might be a bit big, but its actually spot on as far as things thrown together can be.
And looking along the wharf
Right, off to get the other 3 A1 sheets printed.

Tuesday, June 06, 2017

Wrists of steel


The first job with the kit was to glue it to some 1/16 card stock, as it was printed on the cheapest paper I could get. I took the opportunity to cut some of the pieces out and make more optimal use of the space on the card sheet. Again my other boat for scale.


 Then comes the physically hard bit. All the pieces have to be cut out accurately which was a couple of hours work made hard work by the thickness of the card. I also had to take into account that while I didn't want a full display model, I didn't want a ship at full load either. After a bit of thinking about how much I could cut out of the lower frames of the ship, I came up with a height which would allow part of the propeller out of the water.

I then put it together to check that everything fit OK.


The bends will vanish as more parts are glued together. In think picture I've added a 30cm ruler to give a better idea of just how big this model will be.

Sunday, June 04, 2017

Scaling it up.

Previously on the blog I've discussed paper models as a cheap source of ships for modeling a port.

A long time ago I purchased an online model of the SS Californian (for $10 US), a ship who's main claim to fame was not coming to the aid of the Titanic until it was far too late. Despite this, it is a good example of a turn of the century general cargo steamer. The model scale is 1:400. A bit of calculating gave me an approximate increase from A4 to A1 (283% giving a  scale of 1:140 or thereabouts). Since I don't have ready access to an A1 capable printer I trekked off to the local warehouse stationary. I wasn't sure how much it would cost I opted to print out the 2 sheets with the basic structure (there are 5 total). A couple of hours later (and 1/2 a greenhouse rebuilt) I had them back, for the princely sum of $4.50 a page (about 1/2 of what I was expecting). I was happy to see that the PDF had scaled very well with no pixelation that you would expect to see in a photocopy.

And how big is it? The Californian was ~5000 tons (so not that big) and 136 m long. That is not going to mean much to the blogs readership, so I thought I would show you visually. Here is a
re post of the picture of the ship that's been sitting on the workbench for a long while sitting next to the wharf with some wagons for scale. Its 50 cm long.
.

Here's the same ship sitting on the printouts.....
It looks as though its going to be about 1m long.


Now some of you will be asking "Isn't this just a bit too big?"

I'll re post this picture of Timaru. Note the large steamer at the back. The wharf at the front is approximately 200m long (judging from google maps) and the steamer at the back is roughly 2/3 of that length (and looks remarkably similar in basic design).


I'm planning to use it as a backscene for the wharf module.

Thursday, June 01, 2017

Welcome to June

Am_Fet writes:

Well, its been a busy wee while sine the last update on Waihao Forks.

A lot of that was taken up with going broke, finding a job, working at said job, hating said job, leaving said job, finding better job, finally having money (Yay!) and getting my life and my health back on track.

One of the things I have learnt is that I have the attention span of a gnat (does it show?) with too many projects vying for my attention.  So what I have done is taken a step back and nominated the 5 projects I really want to make progress on and then devote a month to each one.  So far I've been working on my HO American shelf layout (April) and making progress on the Mini restoration (May).

So this month:  Waihao Forks!

Firstly, I've been having a think about the overall layout plan and decided that the module containing the large truss bridge was going to be too small as well as being on a curve which isnt ideal.

What I've done is redesigned the layout to be more of a triangular shape:


This will allow the large truss bridge to now have a dedicated module of its own (upper left) as well as increasing the amount of room inside the layout for the tame operators.  On the downside, it does mean I'll need a few more endcaps than first thought, and we have yet to come up with an alternative source for these.  (Might need to make that a priority for this month as well!)

Club night next Tuesday is planned for a bit of action, mainly attaching the endcaps onto the layout (and maybe the faschia) and starting to mockup the buildings out of cardboard.  The goods shed should be easy, the pub maybe not so much.  Hopefully 0-4-4-0T will also be on hand to start mocking up some of the ground forms.