Tuesday, April 30, 2013

Lean on in

Moving along a bit, after the hill went in I've been looking at developing the track at the north end. Before adding sleepers and ballast I wondered about adding in some super elevation to the curves. Now this subject doesn't tend to be covered too much in the mainstream press, and if it does, it quickly descends into an intellectual discussion with plenty of engineering diagrams. Now I've never been one for engineering as my tool collection will attest. I do tend to zone out when its mentioned, even at work, though I can at least read a chemical engineering diagram.
I did use super elevation quite successfully at the top of the Cass bank. Watching a long train start to lean into a curve looked really spectacular.Well, I liked it, and that was all that counted. I am somewhats surprised that trains never fell over when going round the curve though.

So, how do we replicate this without a civil engineering degree? By using the time honoured method 'have a go ya mug'.

To start, here we have 1410 sitting on the curve just north of the loco depot.


 So, how much super elevation do we need? About a piece of cardboard's thickness.


To my eye this looks about right (maybe a wee bit far, but the glue is in). If I had gone with a scale engineering drawing I would have arrived at an angle of about a third of this, and it just would not look right to the eye.
To glue it down, I have glued the higher outside sleepers down first, and next time I'll glue down the inner rails. then it will be time to do some ballasting.

I must admit I thought that the first bit of ballasting I would do would be at the Wellington end of the station. To be at the other end is a bit of a surprise.

Monday, April 29, 2013

Monday musings

On Saturday, among other discussions we spent some time looking at the turntable. One of the things that I noticed was that I might have problems with feeding power to the turntable bridge.

There is a huge sodding motor stuck in the middle of it. One suggestion was to have a rotating piece sitting on top of the turntable pit (not full size) that rotated with the bridge. I will not be using a system that relies on wheels rolling round the outer track.

Oh, and to end on a positive note, here's a shot looking down the new hillside to the loco depot.


Sunday, April 28, 2013

The ends

 Asked in the comments section from yesterdays post.

Carbon8 said... This has possibly already come up in discussion, but would a turntable fiddle yard be of any use at one or both ends?

The answer is 'I don't think so, but....'

I'll qualify this a bit more.  At the southern (Wellington) end the electric locos don't get turned (the Ed's had one end facing north their whole lives), so I am leaning towards a cassette type system. I'll come back to this later.

For the north ( rest of the world) end I was leaning towards a loop arrangement, as its a bit easier for my limited wood working skills. a Turntable has to turn and do it reliably to the correct spot time and time again. However its only going to take up 5' by 2' of space. A loop will be 5' by 4' and I will have to go below a self imposed minimum radius of 600mm. the loop , unless it splits in 1/2, will be a bugger to transport, though I'm already at 2 car loads to shift it anyway. And how many exhibitions will I be doing a year? Maybe 3? Hmm, I now appear to have argued myself into a turntable set up. This could test my measurement skills somewhat.

For cassettes I'm thinking of using 2 pieces of non anodised aluminium angle on a wood base. the outside of the aluminium will have to be covered in paper so as to avoid the gentle tickle of the full powered DCC system. (it gave me a bit of a hurry up yesterday afternoon). Separate cassettes for the train and locomotives, and a simple connecting system (possibly just bulldog clips on the top).

I suppose I should also look at the number of 'consists' that I'm planning to build/run, not counting the self propelled stuff.

At the moment I have plans for;
Passenger;
-Daylight limited. 4 56' cars and a van, all nice and shiny.
-Steam express. 4 x 56' cars, 56' van and a 50' Z. A bit dirtier.
-Relief express. 4 x 50' cars and a 47' van. It may well wind up being more 'bitza' than this.
-Suburban. 4 x 47' and 47' van. Possibly a car-van as well.

Freight;
-Express freight.
-General goods (possibly with shunting)
-Perishables (fruit and veg from Hawkes bay).
-Frozen meat train.
-Sheep wagons.
-The tank train.

And that is a lot of storage required isn't it and a lot of modeling to do as well. Still I had planned to take 10 years to complete this project, and since I've only been building this since October 2009 I still have a fair bit of time to go.

Saturday, April 27, 2013

Work day

I received a text on Friday afternoon, asking what my modeling plans were today. A good question, and I wasn't sure who had sent it. Was I going to have to find a modeling job for a one armed paper hanger?
Fortunately it was B 0-4-4-0 and I did have a job for him. you see, in his day job he looks at hills for a living (or something like that). So here was the plan. Opposite the loco depot I have a hill sized hole.


With a vast knowledge of hills, it was but the work of an hour (or two) to make one out of bits of cardboard.


I was also busy soldering stuff to finish up the wiring (until it goes wrong again). I made at least 4 solder connections in this time (with a bit of gluing on the side or underneath).


With the hill formed, I remembered that I still had some of the German scenic mat. This was tested to see if it would conform to the land form. To our combined great surprise, it did.

'Well, just make a small incision here....'
 It was pointed out that this may be the first picture on the blog of me doing anything useful working on the layout.

'looks like a hill to me'
So in a few short hours we have another basic land form sorted. There was no resort to any forms of that new fangled static electricity stuff. the general consensus was that it looks good. I will now have to remember what the catalog number was (and who the manufacturer was...)

There was then a bit of train running up and down, and discussion of options for the fiddle yards. I'm now doing some research on cassettes.

Thursday, April 25, 2013

A day off

A quick trip out to the mansion today (well, it was an hour or so, but I tend to wind up thinking rather than doing at the moment). One job was the removal of the filler I have been using. Others might like it but the applications I have tried using it for have been epic fails. It just doesn't set hard (or set at all) under my delicate hands. So today I decided to remove it. I think I threw my DAS out, so I might have to buy some more tomorrow.


The other item on the thinking agenda was some additions to the layout.
Its been a long time since the completion of the main line track, but I have not started on the fiddle yards. A plan has now been hatched to rectify this.


 A stick illustrating how wide the loop will be at a 600mm minimum radius. I may have to go below this to get 2 (or 3, I've yet to decide) loops in. I might add some sidings in as well.

The other end presents a bit more of a quandary. There is not enough space in the Man-sion to get a second loop in, so I have to do something else.


The plan is to have a 600mm radius 90 degree turn and a fiddle yard on the top of the shelves on the left. Number of tracks also yet to be determined.
Apsrt from that all I did was cut 500 odd wood sleepers for the main line north. This will be the first section to be balasted.

Oh and this is post 1250.

Monday, April 22, 2013

To start the week

I've got the paint out and splashed some on the H. I tried photographing it, but black is hard to do well and I'm not in a position to weather the top yet.


And yes it is painted black. Must sort the mech out at some point. Maybe on my long weekend.

Saturday, April 20, 2013

And we're five

 And with it a cat picture.


Yes, its been 5 years since I sat down at a computer and signed up for an account on Blogspot. all that time later and here we are at 1249 posts (bugger, out by one). 250 posts a year. One post every 1.461 days. That's a lot of writing. I'd like to that all my unpaid flunkeys writers for continuing to contribute their thoughts and other items of interest. And you the reader for turning up to have a look to see what we are/have been  up to. Sort of like onlookers at a car crash.

I do occasionally look back at earlier blog posts, often to see just what I have written previously. My spelling seems to have improved somewhat, and most of it now is simply down to the speed that I type with 2 fingers while not looking at the screen. we don't seem to have as may philosophical discussions that we used to. Maybe that's because we got them all out of the way and just got on and did some modeling instead.

So (as I always ask) where do we go from here? As a scale things look bright. There are more entry level models available at a reasonable price. I look at the current crop of 3D prints available on Shapeways and think how far the scale has come from home made resin casting 30 years ago. Trackgang seems to be selling OK volumes of models (though not enough for Russell to retire on). The speed with which these guys can create a loco is astounding. As an example the H top went from a request (for a museum) to completion (apart from a few minor tweaks) in about 4 weeks. And its all square which is something I still don't seem to be capable of. The financial model is a bit different to that seen historically for model manufacturers. There doesn't have to be any stock held, the modeler just orders a model off the interweb and it arrives. This has the reverse effect that the models are hardly likely to appear in local shops (given the large markups on local model railway kits) and so you can't just head down to your local shop on a whim and buy something off the shelf. They are still based on overseas prototype mechanisms which are not quite right. At this point I'll step down off my previous short horse position and say I now don't have a huge problem with this. Case in point I've been wanting to do a K/Ka for 5 years now, and Paekakariki needs 4-5 large steam locos to look right'er'. Now I either have the choice to wait for me to build one, which could be 5 more years, or I can build some now which serve as place holders until I get off my ass and do something. Its a compromise I think I can live with now, and it gives me a chance to stop focusing on this road block and deal with some other ones.

 Now to the future.

Looking into my crystal ball I see 3D printing as a source for locos and maybe wagons (though the price seems to be a bit steep at the moment). White metal and resin for rolling stock. I can also see the opportunities for multimedia kits with largely RP bodies, brass etched details and cabs and metal castings for the rest.

Things I think need to be solved. Wheels. Wheels wheels wheels wheels wheels wheels wheels.
I have problems when new modelers come to me and ask 'so what wheels should I use'. The honest answer is that I don't know any more. I've used every wheels set available (I think) and its all be trial and error. Sorry i can't do better than that. Currently everything we have available to use has a drawback (and then there is trying to get a reliable supply). I can't get the wheels that I want and I think its now holding my rolling stock modeling back.

Maybe its time to see if we can't agree on a base wheel dimension that we like and get together and order a few. There would have to be compromises, but I'm sure we can work round it. Personally I'd like to see an NMRA standard N scale wheels solid wheels (even though I'm in the spoked wheel era) and a 13.5mm axle length. Finer scale modelers are already catered for by the 2mm association and there is always the good old 'buy overseas underframes and modify them' for those of you still into that sort of thing. The holy grail (or a cheap knockoff) would be loco wheels for those of us unhappy with the current commercial mechs.

And as always there is the cry for more layouts to be built, and more exposure in the mainstream modeling world. I know its hard to concentrate on building a layout when you do have to build everything. Aim to build something small that can be extended into a larger layout later, like an industry or loco depot. Build a mini module to have a play with things. It doesn't have to be huge. Build a wagon kit or 2 and scenic a short piece of track to run sit them on.

Finally a call to arms. The next convention is 11 months away. Get building now.
(go on, stop reading this and get back to the work bench...)

Monday, April 15, 2013

BP97 - Second Pass

Am_Fet slowly scribbles:

Long time readers of this blog will remember a little over a year ago the original BP97 bogie appeared on our shores from Brave Scotland.  MMW were the consulting engineers on the project and they did a sterling job with the prototype which was duly dispatched to DandruffVille for assembly.

The general consensus was that the bogie as provided was a tad too difficult to assemble with excessive etching "scolloping" marring the finish.


After last weekends visit into the hinterlands, I wandered home with an envelope containing all manner of etched goodness, including the MK II version of the BP97 bogie.  Now, for The Forks I'll need a fair few of these puppies to go under the S, T, Z, U and UGA wagons planned on the roster so I decided to take a personal interest.

So this is what I've got:


The big news here is that its now in 0.3mm Nickel Silver as opposed to brass, and it definitely shows.  The etching is crisp and straight with none of the "scalloping" in the earlier model.  The Nickel is slightly stiffer as well and should be able to hold fold directions better than the brass, which from all reports was a bit "loose".

So how did I get on?  Well....not too flash, actually......I had the beginnings of a cold and I couldn't find my tweezers...and to cap it all off once the iron had warmed up I found the bearing holes weren't big enough to accept the 2mm association bearings.  So rather than trying to butcher my way through while I wasn't feeling my best, I wisely put it back in its envelope and went back to running the KiwiRail radio system.

A visit to Cabbage is on the cards, I feel, to make use of his much better stocked tool box, which includes a tiny set of exquisite broaches.  Just the thing for getting bearings to behave.

Hopefully things can continue again later on in the week.

Sunday, April 14, 2013

Sunday morning

Well, its been far too long since we had a post covering guards vans on this blog. Some readers may disagree with this. However, since the recent release of an H class loco from the Kiwi models stable it is time to revisit one of my favorite topics.
The fell break van is the other important feature of rolling stock for any Rimutaka incline layout. there were 7 of these distinctive little vans originally built (plus a few later for braking on the inclines of the West coast. It has previously (just) been released in kit form by NZ Finescale for that funny non metric larger scale.
Obviously there is a requirement for a model to grace the layouts in the Fell museum, so without further ado the tame CAD monkeys were dispatched to fill the gap. It arrived last Sunday and I laminated the sides. as they were a bit warped i placed them under a piece of glass and left a weight on it.
Last night I get asked 'Have you had a chance to put the van together?'

Opps.

A quick dash out to the Man-sion and 5 minutes with the PVA and ta-dah.


It looks the part. I now have to see if I have an old Peco underframe to put under it.

UPDATE; and with a bit of paint thrown round we get


These colours are not NZR spec, but are a good approximation to the shade that they seem to have aquired over the years. Needs a bit of weathering yet.

Saturday, April 13, 2013

Out and about at Turakina

Am_Fet writes:

I've been spending quite a bit of time in Palmerston North at the moment as KiwiRail look to move the Traction Control room down to Wellington.  My part of the project was building some new server racks in the communications hub at the station while avoiding being blamed for everything else from link failures to lack of salt in tomato sandwiches by the local techs.

The chance came up one afternoon to change the channels on the tunnel radio system for Turakina, so I jumped at the chance to get away from punching Cat5 cable for a few hours and headed out into the hinterland.

Here is our destination, the radio hut above the eastern end of the Turakina tunnel (starring Ian's backside...)


The tunnel system works on what is called a "leaky coax" which is effectively an unshielded cable running the length of the tunnel that is used as an aerial for the VHF system (you can see it looping over the tunnel mouth in the photo above).


This is the tunnel mouth from track level showing the radio hut, the coax coming down into the tunnel mouth and the Track Warrant Loop sign for the Ruatangata crossing loop down the other end.  The pole beside the hut is the yagi antenna for the UHF link back to either Hunterville or Palmerston Nth (cant remember which).  And BTW, this was all taken from gated private land and I was "working"....so be warned!


This is the bridge over the Turakina river.  Drew wanted me to scope it out as a photo location, but I dont think its going to work as the sun will always be on the "wrong side" as shown by where the shadow as falling.

Anyway, what got me thinking about this is its worthiness as a "scene worth modelling".  The bridge makes a nice showpiece while view blocks are provided at each end by the lush trees and the tunnel mouth.  Could be just the thing for a set of the MMW module ends?

Wednesday, April 10, 2013

Take a letter, Miss Jones....

To:

The Proprietor,
Marks Model Works

Dear Sir,

Can you please redraw your 15' underframe (as designed to go under the J5) to 15'7" please.

I've tried lengthening it using manual means and I'm flummoxed.

Yours,

Cross-Eyed of Lower Hutt


Tuesday, April 09, 2013

Druff & Co. - Precision Engineers


No job too precise or delicate!  Accurate to 0.4 of a metre!


Let our trained staff help with your projects using tools from our extensive workshop!


Pizza Layouts a specialty!!


Druff & Co. - We put the "Ass" in "World Class".

Monday, April 08, 2013

Increase your length by 7 inches!


(Send all your money now!)

 Am_Fet actually upsets the balance of the universe and does the following:

One of the joys of completing the J5 project was getting my grubby mitts on Cabbages glorious etched brass underframe. And what a beauty it is.... The only problem I have is the J5 itself. At 15' over headstocks, its an incredibly weird-ass length as compared to the standard 15'7" underframe that appears under numerous other wagons.

SO....instead of getting Cabbage to re draw and resubmit to Scotland to account for those pesky 7", I started to wonder if the chassis could be stretched to account for the missing meterage without bothering his Royal CADness.....and although you might think that 1.5mm overall isnt worth worrying about, scribbles have shown (to my eye at least) the wagons look slightly truncated, meaning its more noticeable than you think.

After purloining a collection of 2mm wheels and bearings from Schloss Dandruff on Sunday, Monday afternoon found me in the lab at work with a hot soldering iron and lashings of Carrs solder paste.


Actually, the pic above shows me ahead of myself....at that stage I had already bent up the axleboxes in a fit of enthusiasm using only a Stanley knife and the engineers square shown. Another thing I did that Cabbage will castigate me for later is that I didnt remove the etch from the sheet as instructed. It made more sense to me to do it like this as I had more "handles" to hold it with. After this photo was taken I soldered in the bearings (losing the obligatory one on the floor) before folding the rest of the axlegaurds over the top of them; to my mind it helps with the alignment while folding and gives you a satisfying "Pop" as it all clicks into place. Another quick squidge of Carrs and its good to go.


So this is where I left it this afternoon with one solebar folded up as well as both coupler pockets. The fun bit from here will be to remove the headstocks and add in the extra 0.75mm at each end. One thought I had was putting two laminations of the 0.3mm etch material from the fret between the solebars and the headstocks, and thats what I might try next time I sit down with a warm iron.

I was really amazed at how easy this kit is going together (Well Done Cabbage!) and how easy Carrs soldering paste is to use. It really is a case of smear and heat. I'm sold!

Sunday, April 07, 2013

Sunday meet.

Well, open the door to the garage and it attracts all sorts of odd people.
'Officer, my garage is full of modelers'
 So, what happened on the day? New models were examined, the urine was taken , borax was poked, and my collection of tools were mocked (again). Business as usual really.

One thing that did get moved on was the Bush tram layout. I have not been overly happy with all of it for quite a while now, and today was the catalyst. The new blue plastic was put on the table, and some track was plonked down. The piece of track work from the abortive 'Grassmere' was returned from its 3rd owner. It has now become part of the layout on the NZR side. The main line will have the NZ120 Freemo modular face plates (of which another set was sold today to an unsuspecting S scale modeler). Wagons will be dropped off on the back shunt front center. They will then be transferred to the sawmill/ fiddle yard at the back. the bush tram locos will run on the separate loop.
I lie this plan a lot more as its much smaller (it fits in the back of the car) and it gives me a chance to have a second shot at bush scenery that I failed so dismally with on the first attempt.


As a final note, any other photos or videos that may appear on here in the next few days casting aspersions on my mechanical skills have obviously been faked on photo shop. You have been warned...

Saturday, April 06, 2013

Saturday morning

Just as a quick note, there is to be a gathering at Schloss Dandruff tomorrow. All the usual suspects will be on site from around 11 AM.
If anyone else local is interested then contact me by e-mail and I'll send you the address.

Friday, April 05, 2013

Tamiya Weathering Master: Enter the Dragon

DB filthily, and somewhat erratically conveys:

Product inspiration

While at a hobby shop the other day, this item caught my eye.

Ohayou Gozaimasu, Weathering Master.

A quick chalky aside: I've always loved browsing through the Aladdin's Caves that are art supply stores, and in one, about 25 years ago, I happened to spot some Faber-Castell coloured chalks that might suffice as the 'weathering chalks' that I kept reading about in the overseas model mags.

Did they ever! I sanded these down to a dust with fine paper (the dry chalky pastels, not the waxy crayony ones), applied them with a brush and was blown away by how good they looked on my models and although over the past few years I've tended to rely more on acrylic washes, chalks have always produced great dust and soot effects for those of us not licensed to use airbrushes.

A few challenges with chalks. Firstly, raw chalk doesn't stay put. If you put it on a matt surface it sticks fairly well straight away, but in time, fingers will leave prints and brush it off. So... you can seal it down with Dullcote or some other overspray, but that often makes your chalks either go many shades darker than you expected, or disappear completely.

Bragdon Enterprises came up with a clever mix of chalks and some sort of adhesive, so that when you brush their stuff on its stays put without an overspray which solves that problem if you can get the stuff. I stumbled into a set of black and three rusty shades about 10 years ago and I think that will last my lifetime.

The next challenge with chalks is how to apply it over a large surface without it going 'blotchy' where you dab with your paintbrush...

Slip this attractive compact into your wife's purse and let her inner beauty shine with our new Autumn colour range: Deathly White, Gothic Mist and Whiff of Faeces 
But be that as it may... Lets put that chalky aside aside now: for there were two things that caught my eye with this new Tamiya offering. One was that it said "semi-soft" on the back, which was intriguing and sounded like it might be a little smooshy and ideal for the sooty messes around exhaust stacks that my normal chalks seem too thin to do well. Secondly, it comes with a kind of a sponge on a stick to apply it with. Probably like the make-up sponges that weathering gurus and women use to create tasty models.

So how does it work? In a word: incredible.

Well this isn't NZ120 but if you stand further away from your screen, or stare through the wrong end of a pair of binoculars, it might look like it.

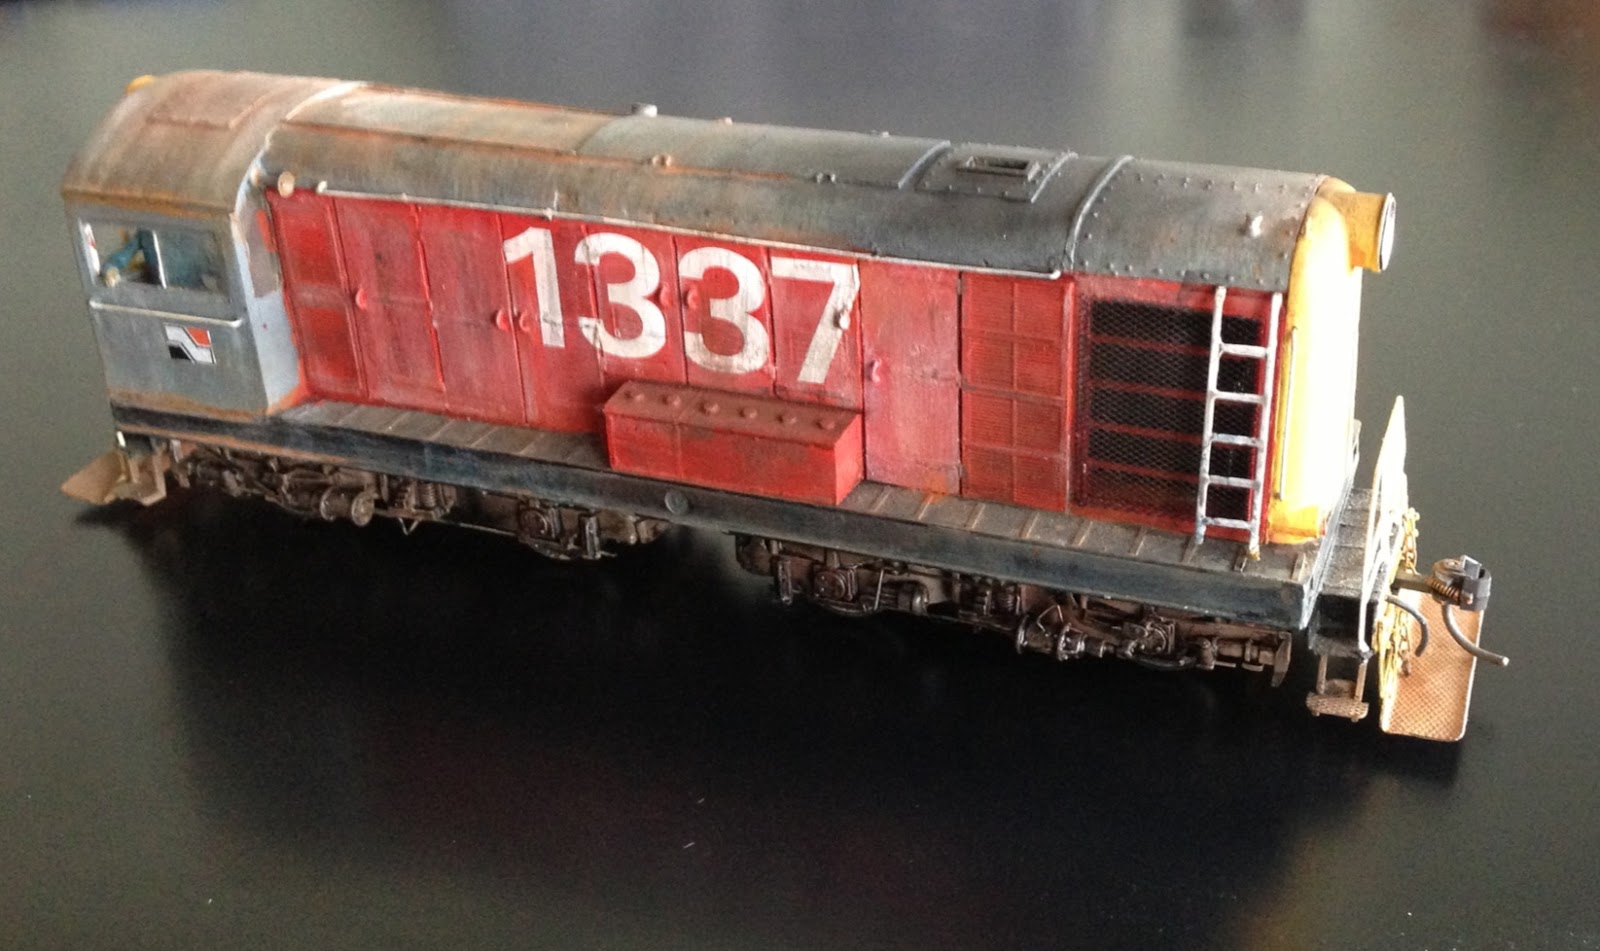
Calm down Gary, it's 1:64th. Never noticed that paint on the window before :(
They don't seem to require sealing and the shovel shaped applicator stick thingy works really well. You can pick up a light or heavy swipe of the stuff and use the pointy end for getting into tight spots or for thin streaks and the real bonus is the flatter faces, which are nicely shaped for covering larger areas with streaks or in a curricular motion with good control. I feel like I am reviewing a car. I think this will work well on things like NZ120 container roofs which are hard to do well without an airbrush.

Another aside: These have three colours per pack and there seem to be a few different packs. The one I selected has black, a milo-colored brown, and if you want those two useful colours, you'll also be lumbered with white. White? Who would ever use white to weather with?!

Just as I have been using 'Acrylic Gull Grey" as my go-to weathering wash for the past few years, look at what a sweet job the white did in 'sun bleaching' a few of the deep red side panels and roof of this ratty looking DE.


Phone camera adds 20 pounds

Tamiya Weathering Master. I think I'm in love.


p.s. just as I'm about to post this, I found this excellent product page on Tamiya's corner of the interweb. Anyone else use these products? I hadn't seen them before...

Thursday, April 04, 2013

Scenes

Time in the shed at the moment tends to involve periods of thinking at the moment, as there are far too many jobs to attack.


From the 'a bit of planning would have helped' files. I have to somehow fit a water filler stand between those 2 Da's. Another 5mm would have helped a lot.


 A view from the other side, with the foundation plate in for the Air rail shed.

 Sidewalks in for the main street of Paekakariki.

The sub frame for the north end return loop storage yard.

Tuesday, April 02, 2013

Passing Wind: Something for the Wellingtonians

DB finally reveals:

So you have a 12 foot long wall to spare huh?

Way back in 2008, I suggested the Ngauranga gorge might be a good subject for a stand-alone module or "as part of a larger Wellington Harbour layout (more on that later)". Well, "later" is finally here.

About 16 years ago I lived briefly in Sydney and for a short time was domiciled in a small house with a small spare room. It didn't take me long to begin thinking about what I should do with the unused wall of it, and having left NZ from Windy Wellington, that seemed like a logical choice of subject.

In due haste, two main 4x2 foot modules were whacked up from 1x2 pine plus a thin ply top; and a pair of (almost) 2x2 end pieces from less-hardy materials (foam board and balsa if I recall!) to support the return loopy tracks.

The track plan was quite clever if I might quite unhumbly say so, and although I considered several options, I 'think' (memories of 1997 being a little hazy at this point) I ended up with this pile-o-spaghetti mobius strip design. A train headed out from the yard track beside the loco depot and up the left hand rising main up to T1. It then came around and back from Petone and into the yard, then around out the passenger tracks to head out through Kaiwarra, under the bridge and out to the Hutt valley, it then climbed around and returned via tunnels 2 and 1 and back towards the station to emerge in the yard again. Genius.
Vague recollection of the track plan...
Omitted for clarity, so you could follow that journey, were a pair of crossovers (included in the plan  below in red, which gave more flexibility for mixing things up a bit. As would have replacing the diamond crossing with a double slip, but at the time I was worried about having to wire DCC reversing loops, which the clever-ish design here avoided. If the layout was a long termer, the end modules would have been replaced with separate loop/fiddle yards each for Hutt, Porrirua, Welly Station and Welly Yard. The intention was to have a 9vDC powered J'ville unit run up it's isolated track into a tunnel and then reverse back down to hide under the motorway on a timer.
I bought my Digitrax DCC set specifically for this wee layout and remember sending an email to Rhys (not knowing at the time of course that one day he would head the worldwide Motorised Dandruff media empire) to share the thrill of running my recently-decoderised DXR out of the yard and up the hill with a long train, only to have it stall on the sharp return curves while lugging its load up the grade to Tunnel 1. I pulled a couple of locos out of the depot and ran them up to the tail of the train, MU'd them with the DXR and successfully bought the train home via the Hutt 'in' track. At the time, that sort of operation was quite the novelty 'back in the day'!

Every few years I uncover a few blurry prints of the layout and say to myself "I must post that on the walls of Chateau Dandruff one of these days" and upon seeing a few pictures today I'm doing just that to clear my conscience. These are bad pics of crappy, blurry originals but they convey the gist of it I hope.
Overall view of the 'right hand end' as scenicking begins. I don't seem to have taken any pics of the yard end, which was never scenicked except for a removable card and balsawood motorway view block with blue sky board attached.  Catenary poles are sections of brass rod, soldered to a brass base. 
T1 and T2 portals are visible here, as is my feeble depiction of the motorway. That and the houses were necessarily in extra-small forced perspective scale and reduced scope.
A blurry pic of an almost-sharp pic taken at a later stage when the hills had been bushed up, the motorway had fine sandpaper added, there is a bridge over the Hutt rd and a pseudo-fascia was installed in the foreground to tidy things up. Note Ian Athfield's house up on the hill, and a green weatherboard number on the ludicrously steep road to Khandallah. I still have both those houses for some reason and enjoyed making Ian's especially.

While the layout was never finished, and only had a 9 month life, I always thought that with a bit more room (even four 4x2 sections would do in a pinch) that this would make a neat modular home layout that would be a real winner at Welly area exhibitions.

Although my Windy Wellington layout has long since passed, over the years I've not let this concept die, and one day it might rise, Phoenix-like (the mythical creature, not the rusting EE units), from the ashes:


So even if you only have a 12 foot wall, don't let that stop you using NZ120 to put a lot of action into a small space!

Monday, April 01, 2013

Finescale Peco (ROFL)

DB answers the question that nobody was asking:

I batted a query into the cheap seats at Stalag Dandruff the other day and was met with a crashing wall of silence.

I may be in a minority of one in my love of Peco chassis under NZ120 4 wheelers, but was won over a long time ago because they are pretty quick and easy to use, bulletproof in their running and 'close enough' to the NZR look with a few bits surgically removed.

Unfortunately the big fat wheel flanges are deep enough to do your lawn edges with. While you can get away with that on Peco code 55 track, on the Atlas code 55 at 'the club', they just bump along on the plastic molded spike heads until they fall off and everyone laughs at you.


Yet, given the massive output from the Peco factory over the last few decades, surely someone must make fine-ish scale replacements???

If you saw that DI video posted the other day you might have noticed that I've answered my own question: Peco do.

Yes I don't know what made me look into my treasure trove of dozens of Peco chassis that I bought in bulk from the UK a few years back, but indeed the newer ones actually have little flanges from the factory. So inadvertently, most of the 4 wheelers that I've made over the past few years have nice wheels and run well.
Coarse old flanges at right (discs on NC), less so at left (new spoked LA)

While the bad news is that all of my older wagons need their wheels replaced with the new ones, this is actually good news for me. A problem with a solution is better than a problem without one as I see it. Especially if you already own the solution.

A side effect being that after modeling and running only bogie stock for the past few years, the 4 wheelers look really neat.

Somehow I managed to run that train behind the DI for 10 minutes and nothing derailed even once on those multiple laps. The real surprise was the steamroller-esque wheels on that old 30 foot F van which somehow managed to drag themselves over the dozens of Atlas code 55 points on the layout!

Holy Rollers, Batman! And look at that back to back measurement...

Looks better from this angle