Friday, December 31, 2010

On Tour II; Southland sojourn pt I

Onto Southland, where the locals prefer their sunshine in the liquid form.

In between entertaining the nieces and nephews I managed to slip away to do a bit of touring. First up was a visit to Gorrre. The Station is on the main street and has been preserved with an art gallery and a cafe inside.

Wow I thought, I wonder what the platform side looks like?
'Hello, Police? I want to report a robbery.'

Across the track (singular) is the old 'Iconic' Cremota building complete with Sergent Dan on the side.


Also on the main street I came across this. Anywhere else in the country there would be a monument to the fallen in 2 world wars, or a statue to some politician. In Gorrre they value other things more highly....

'The places I could take this if it wasn't a family blog'

Thursday, December 23, 2010

On tour I; North otago

Right, back on front of the old pooter.

The trip for the inhabitants of Chateau Dandruff (minus the spiders) started off in driving torrential rain, with a side order of flood. Things calmed down on the Canterbury plains with just gale force winds to contend with. After a stop in Timaru we ventured into the back blocks of Otago on the way to the sprawling metropolis of Winton (who's main claim to fame is that the lady of the house came from there).

First up is Oamaru. this sleepy town has reinvented itself as the steam punk capital of New Zealand.We didn't look at this bit, but did visit the Whitstone cheese shop (mmmm, cheeeeseee).
just across the road was this Bumble bee Dc parked up for the holidays.


Our ongoing trip then took us over Danseys Pass. To get there from Oamaru its required to follow the old Ngapara branch starting at Weston. This is a nice drive and I would recommend it.
At Ngapara to most obvious relic is the old flour mill. This is still in very good condition.

Unfortunately the station site is long gone, replaced by a collection of trees. I think this is where the station sat, and is the opposite direction from the flour mill.

Into Central Otago and I had to stop for this photo......


Further adventures as they come to hand.

The Year That Was

Am_Fet writes:

Sitting here in a sweltering Nor'Wester at the Ancestral Home with the Laird and Lady Druff, it seems a perfect time to look back over the year that was and try and pick out the bits that made it special. And so, with alcoholic Beverage in hand (and a fair bit of input from the head druff despite his visiting the antipodes), here is my version of the year that was:

I think the overriding impression of the year for me was "Steady as She Goes". After last years big leap forward, it really was a year of consolidation and a year about people. The convention gave many a chance to meet up in Christchurch with kindred spirits, and the "Informal BBQ's" that were held seem to be a brilliant way forward....a chance for a social chinwag plus some train running on the side. A big "Congratulations" to all those involved, and may we see lots more of it in 2011.

Our scales web presence went from strength to strength. I still think we are the best organised of any of the current scales as far as how we present ourselves to the web world is concerned, and again Wes deserves a lot of the credit for the Nz120.org site. Others are also flying the flag with their own blogs and I can thoroughly recommend it as a way to improve the visibility of the scale.

Many fine models were shown to an appreciative public this year, with probably the most kudos being for DB's DXB.....for many of us, it really was that "breakthrough" moment were the scale could proudly foot it with the best that the S and 9mm crowd were able to achieve....as a model, it probably deserved a cover of the journal all of its own!


Wee Duggie was beavering away like a mad thing on the etched locomotive front, and I am really looking forward to his work bearing fruit in the new year. I would personally have loved to have seen the test etches soldered up to create a real buzz...but the prospect of an etched DS with lots of waggling bits under the footplate is a mouth watering prospect.

Rapid Prototyping (RP) is still the elusive "genie in a bottle" that not many seem willing or able to uncork. Some DX sideframes made it to limited production, but everything else either remains in development or hidden from view (why?). This could be the one tool that really lifts the scale to the realms of the "insanely achievable", maybe 2011 will be a bumper year?

Russell of Trackgang has continued to carry the scale with his continued work both with new kits and supplying of his current lines. The Fiat was a welcome re-introduction and the new Yd is a good choice for those wanting to model work trains from the 1950's right through to the present. So will a Yj be next, Russell??

So, nows your chance...what have I missed? What were your highlights of the year? And what are you expecting to see in 2011?

Personally, I'm really looking forward to that RP'd one piece DXB top....

A Merry Xmas to you all, and may the way to your door always be downhill with a wind at your back.

Tuesday, December 21, 2010

Snot Bonnets Ahoy!

Am_Fet writes:

I'm always glad when the "Prototype for Everything" department gets in touch....even more so when they fill my inbox with pics that get me thinking "I gotta get me one of those!"

Latest treasure; Two bona-fide South Island DXC's together on the milkies! And one's a Snot Bonnet to boot!


Just another little treasure I can choose to model to annoy the purists....

Again, thanks to Drew for the snaps.....read more on his ongoing blog at http://steelribbons.weebly.com.

I'm going to miss that boy when he flies the coop for Aussie come April...

Monday, December 20, 2010

On tour

Well, from today, things will become even more haphazard posting wise round here. The inhabitants of Chateau dandruff will be on the road for 2 weeks, terrorising inhabitants of small out of the way places. I also have a 1/2 hatched plan to do some railway archeology while on my travels, but it remains to be seen how that's going to pan out, given that the lady of the house might have other ideas.

Saturday, December 18, 2010

Wander lust

Time for a bit of an update here this morning.

Things in the real world here have been a bit up in the air over the last couple of months job wise. I've not been overly happy in my present position throughout this year, which I think has come through in some of the blog posts. To cut a long story short, I resigned my job a couple of weeks ago. It was one of those things which had been building for some time, and I just woke up one morning and thought 'today's the day'. As with any decision like this, once made, it was a load off my mind, and I was a completely new man (or back to the old me; take your pick).

Moving on from this, I've yesterday accepted a new job in a different location. Its a sensible career move and my new company is known in the industry as being an exceptionally good employer. I'll also be working for/with an old friend which I'm quite looking forward to. Unfortunately this will involve moving Chateau Dandruff (and all the packing that entails).


So, I guess that the one thing that you can expect is that things will continue to be rather haphazard over the next couple of months. I'm hoping that eventually this will sort itself out.

And as to where I'm moving? I'm not going to reveal it yet, but its a location that the best thing that can be said about it is that its close to a lot of other places...

Thursday, December 16, 2010

Trackmaking XXIII

After the weekends disaster, I decided to buckle down and sort out the problem of no gaps.
first up I poured water everywhere to soften up the PVA. after waiting for a couple of hours the track was carefully pealed off. the gaps were quickly added. Conductivity tests were rather inconclusive at the time (waters funny like that) so I just stuck the track back down and put all the heavy books on it again.

Last night I connected the power back up, and was relieved to find that there were no shorts.
5 minutes of testing ensured.

'All the locos really did start at the right hand end honest.'

What I found interesting was that the Da's (which I thought would be fine)did not negotiate the points at the south end of the yard particularly well (there are some gauge issues with the wheels I think). At least they are not supposed to run through this area in the real thing. The Ed's, which I was worried about due to the home made bogies, ran quite happily through everything, with a little lateral jerking around only at high speeds.

I'm quite happy now I can run trains for 7'

Wednesday, December 15, 2010

Son of DFT in a Day... maybe

Well some things are happening, even if it is slower than a snails pace.

I've finally got around to mounting the DFT sideframes onto a Kato SD40-2 bogie, notice I said "a bogie", the other one still has it's original N scale HTC sideframes.
See the photos below for a comparison of NZ120 and N scale sideframes, it makes you wonder how we suffered with the "N scale bogies are near enough" theory for so long.

N Scale HTC sideframe

NZ120 DFT sideframe

Hmmm, I think I need Z scale couplers, and yes I know the cab area needs some remedial work, buts that's not what we are here to see now is it?

I have also done the preliminary CAD work for the mark II version, the plan here is to add the "rodding" between the axleboxes to the sideframe. This will hopefully allow more of the N scale sideframe to be removed and let the DFT sideframe sit a little closer to the wheels.

With any luck, one day soon, work related study may not take up so much time and things may even accelerate to a turtle's pace...

Monday, December 13, 2010

Confession time

Last night, after a week of not really achieving much, I decided to have a crack at connecting up the 2 modules and at least see if I could run a loco the full length of both of them. So, after hooking all the wires up, of course I had a short didn't I. so, i go back and check everything, disconnecting as I go. Eventually I think I narrow it down to one of the frogs. It seems like the gap isn't wide enough to insulate the damn thing from the rail behind it. I then absentmindedly check the frog to the point blades.

Hello.....

A closer inspection reveals that I have neglected to cut a gap between the frog and the point blades.This is a bit of a bugger as I've glued most of it down haven't I. I then further examine my handwork (or lack of it). The affect total rises very quickly to 6. I decided to fire up 'El Homicido' the mini drill. Ahhhh, I seem to have no cutoff disks left. Bugger

So, this week there needs to be a trip to buy some more discs, or I have to undo the PVA (water works wonders) and cut the gaps using the good old saw.

The moral of the story here is 'check everything on the bench first you slack bastard'.

Friday, December 10, 2010

A Reader Writes:

"Dear MD,

I'm hoping you can help. I have a love of DA locomotives and Tank Wagons, but cant for the life of me make decent foliage (grass, trees, etc) that just screams "New Zealand Native Bush" to save myself. Can you help?

Signed,

Yellowed Thumbs"


Dear Yellowed Thumbs,

Youre modelling the wrong country. Can I suggest you try Chile?

Love,

MD.


Thursday, December 09, 2010

Aging Nicely

Am_Fet writes:

I was just looking at this pic while idly scrolling through “My Pictures” here at work, and it struck me how nicely the KR colours are aging. Sure, it’s the KR1 scheme…and it could just be the lighting…


But all the colours are starting to be evened out; the red is going darker, the grey is getting lighter, the yellow is getting that lovely “rust” look on the roof…

Yummy.

(Big thanks to Drew for his continued documenting of the South Taranaki Milk Scene)

Monday, December 06, 2010

Pick up line

At the monthly support group meeting I had a chat with teach about putting some more pickups on some of his S scale steam locos. Several of his locos have the archaic 'one side of loco, other side of tender' system, which I think was invented as a medieval form of torture.

So yesterday I sat down with the first victim, an Online J. A first examination revealed a split frame mech, which was a pleasant surprise pick up wise. However since I was there 'we' decided to fit some more pickups to the tender anyway.
The first step was to solder some phosphor bronze spring wire to some thin PCB strips (well OK, sleepers). I then through a series of origami moves managed to fit the damn things and get them to work (well, rub without seizing the wheels up). Unfortunately we didn't have any thin flexible wire on hand (it was at home) so a full test was out of the question.

I should have got a photo....

One thing I did notice was just how much space there is on an S scale model to fit these sort of things. They are absolutely huge. I'm now looking forward to have a crack at some of the other locos.

Saturday, December 04, 2010

Support group meeting

That time of the month again, and the last one for the year.
A good turn out again, but with 1/2 of the attendees not having done much. Still, summer isn't really good modeling time, its more 'try to get photos for modeling projects while convincing the wife that these locations are a good place to visit' time. This would be easier if the railways had put their yards in more scenic spots and not run down industrial estates.

Anyhoo. thanks to the chap I normally get a lift with, I was able to to take my first 2 modules out to show off my track making. Another chap brought along some pencil drawings that his father had done based on the photos of the Rimutaka incline in the October 2009 Observer. these are nothing short of stunning. The man is a true artist and I can't believe that he doesn't do prints.
Another local modeler/engineer had been reworking an S scale Ja Kit that had been assembled wrong. the model was well put together, but it wasn't 'straight'. There were also problems with the height of the cab. There were comments raise by another modeler that these faults had also been observed in a well known modelers assembled models, which had necessitated a lengthy and fiddly rebuilding process.

This sort of raises another question that I always ponder. what do we expect in a kit, and what are we prepared to 'live with'? From reading the British forums, the answers range from 'it must be perfect, but I'll never assemble it' to 'Its not even close, but if I toss away the chassis and most of the body and add a stack of other parts then it should be fine'. I've never really understood the second one, as surely a manufacturer who wants you to part with your hard earned cash should have done his homework up front.

the evening finished with a beer and some discussion on using servos to mechanise line side models ( A compressed air coaling crane was the intended target)

Thursday, December 02, 2010

Ballasted

I've reported a while ago about the new Yd kit from Trackgang. I've now had a chance to actually have a go with he bits. First up a reminder of how it all looked freshly unpacked.


The castings are crisp (as you would expect). There is a small amount of flash present. the only real problem is that the air cylinders are not quite square, due to an odd choice by the caster on how to put them in the mould. However its nothing that can't be solved by a bit of filing.

Assembly is by glue (I still can't master soldering anything that melts if i screw up. give me a brass etch any day). The only problem I encountered in the early stages was attaching the sides. They have a small pin that locates them under the floor. Unfortunately this means that they are about 1mm below the ends.

'I can read the paint label....'

I simply solved this problem by removing the pins and gluing the sides level with the top of the ends which is where they should sit. If I had taken clearer pictures at the time it would all make sense.

I altered the construction order slightly by attaching the 4 cylinders to the floor first. This then gave a reference point to fit the underframe spine. Due to some error along the way this piece has to be modified by removing some of the end platforms and adding 3mm into the center of the part. Its no big problem, just something to be aware of.

And so, what does it look like together?


The kit has captured the look of the prototype, which is all we really want at the end of the day. I've always had a soft spot for these wagons since Mr Bond built a couple 25 odd years ago in S ish scale. I may well acquire 2-3 more as they were never seen alone in the wild.

Monday, November 29, 2010

Wots up 'err then?

The weekends job continued on the Sabbath (I can't remember seeing anything about model railways in teh bible, so it must be OK). I did a final check on one of the sections just to make sure if I had gaped everything before the paint went on. Everything checked out except one of the brass sleepers between modules, and it was not a full short, just a partial one(ie the meter doesn't flick all the way over). I managed to isolate the piece of track. still there. I re cut the slit in the middle of the brass sleeper. Shorts still there, but a bit less. widen the gaps in all the PCB sleepers. short almost gone but I'm still getting a tweak in the needle. OK, cut a bigger gap out of the brass bar.
Needle still giving a tiny tweak. Bugger

At this point I decided to connect up the DCC box, and check out if there actually is a short, or is it just my imagination. OK, so it makes a funny sound when I short it out no purpose,. Now connect it to the track and.....its fine.
Must be time for a beer. And maybe I should consider investing in a new meter?


'It must be OK, its official and everything!'

Saturday, November 27, 2010

Saturday morning

Hmm, posting has got rather haphazard round here hasn't it. truth be told, I've actually not spent that much time at the modeling bench this week. I've been doing a bit of thinking around getting some practice scratchbuilding some steam loco chassis using the 2mm parts. the real problem is deciphering the product list down to what you actually need to do the job. I get rather lost looking at 64DP vs 100DP and which one will do the job best etc. I'm also tempted to actually make an English loco as a cover to get the groups help....

What I have been doing is slowly gluing down the track on the first 2 modules and soldering in the droppers. while its a necessary evil, its not made for great blogging material.

"Move along, nothing to see here"

At least its providing a use for all those old textbooks I've collected over the years.

Thursday, November 25, 2010

Boxed in...

Am_Fet scribbles:

And yet again some more ideas for the Box File competition bubble their way to the surface. No plan this time, just a photo...should be enough to go on...


The station is Khandallah (which apparently means "Resting Place of God") on the Johnsonville branch and the photo shows it in 1938, just around the time the main line was diverted through the 2 Tawa tunnels....but well before the 1500V DC overhead was installed for the units.

As a station to model, it would be perfect for those who hate track but love buildings and scenery...its possibly one of the simplest stations to have a signal box (24 levers according to R Heines book) and the trackwork would be nothing daunting at all....

For those questioning the operational aspects of a station, admittedly its not much...although electric hauled freights to JVille and the Raroa stock yards were an essential part of the line until the later half of the 20th century.

If you think this might be worth a look at, talk nicely to the Head Druff....I'm sure once he's perfected his stable of electric locomotive4s and units he'd be more than happy to share...

Sunday, November 21, 2010

Fresh meat

Foamers have been working themselves into a lather this weekend, and here's why.


The photographer is unknown, but was obviously either close to the action, or using the Hubble telescope from outside the port.
It shows just how big the new locos are. the Dx is far smaller. Judging from the size of the cab, they might be a bit more comfy for the drivers as well.

Friday, November 19, 2010

Chook Chasing

Am_Fet writes

Well, they are finally here…..Lets not say that KiwiRail is a backwards looking organization, we’ve now joined the likes of The Warehouse and Kmart by importing cheap goods from China. And if the current rumours are to be believed (and lets face it, the railfan community have built themselves up into such a lather over the impending arrival of the DL’s who knows what crap they’re talking) we may soon see 60 of the beasts wandering around.

Okay, so lets take a step back for a few seconds. What does that mean for the railways as we know them now? First off, KR have just announced the rebuild of 6 DFT’s with better engines. And the report finished by saying that roughly they are a better fit for branchline traffic than the DC’s. Reading between the lines: The DC’s are stuffed. Secondly, pretty soon everything we see will have a KR locomotive on the front…if not a new one, at least a recently overhauled one.

The fact that we are facing a major upheaval was bought home by Drew when he wrote in an email “I have shifted my foaming focus to the old and crusty as their days are numbered with the Chinese about to breach our borders.” And just to prove it he sent a photo of South Island interloper 7117 strolling through the Naki. Word on the street is that it is hanging around Welly waiting for a slot to be “ARTA-ised” (if that’s a word).

These “Old Chooks” as Drew calls them wont be around for much longer….and while everyone will be risking life and limb to catch a glimpse of the new DL’s (which is just stupid, as you wont be able to move without tripping over one in a few months time), I’ll be following Drews lead and scouting out the “Old Chooks” before they are gone forever.

Wednesday, November 17, 2010

Not trackmaking

Moving away from tracklaying, and given that my co authors seem to have gone into hibernation for winter (which only one of them an claim), I suppose its time for an opinion post.

Over at NZ120.org in the last couple of days there has been renewed interest in Freemo standards. There seems to be some movement towards a 'new' standard in Australia, with an article to be published in an upcoming Australian N gauge mag. I had thought that there already was a freemo standard in Oz, but reading up I'm now not sure. I guess its like here where we still don't really know just how many NZ120 layouts there actually are out there, though there is plenty of evidence that people are building them (or at least the rolling stock).

It will be interesting to see what will come out of it. The sounds that were being made (by 1 individual admittedly) suggest that it might be an all singing all dancing 'DCC with addons set up'. Now I've got no problems with DCC as such, but I'm definitely in the 'turn it on like a TV' camp. I have very little interest in whats going on under the hood (that's my day job) provided that it does what is says on the packet. Thus block occupancy ('land protest?'), transponding ('crossing puddles?') and accessory decoders ('what is that woman wearing?') are all rather obscure terms to me. Apparently its all something to do with knowing where your train is, which is a new problem with DCC, with cornfield meets a specialty for the unwary (own up if you have had one....Mr B). Computer control is another thing that I'm confused about. Where is the fun in operating a layout that you have built from scratch by pushing a collection of buttons, or even worse, the power switch? I guess I choose to be a Luddite in these matters, but I spend enough time in front of a computer for work to know that I don't want to have it more involved in my hobby time as well.

I want to be able to wander along watching my train run through the scenery, throwing points as I go, or operating a yard from a signal box as god intended. Sitting remotely watching from a distance just doesn't do it for me.

Getting back to freemo what will be interesting will be to see what sort of system emerges when the dust has cleared, and whether we in little old Godzone might have any input?

(and over to the peanut gallery....)

Monday, November 15, 2010

Trackmaking XXII

With some of the track in its final position it was time to start thinking about permanent power feeds. I was thinking of brass mini strip with the end bent at right angles and attached to the top of the sleepers, but I discovered that the mini strip I had purchased for the job was far too small. Well, too small compared to the buzz bars that seem to be advocated on the Internet (and if the currents were that high, we would be welding the locos to the track, or burning through motor wiring. I have yet to see any reports of this in the model press). Anyhoo, the next stop? Copper wire, and more specifically copper wire 1.6mm in diameter (whatever that is in imperial measure). Now as a not particularly well know fact outside of the esoteric industry around Hi-Fi systems, the best wire for carrying signals without degradation is single core. Most ideally it should be flat, but single core is much better than multi core wires. If you are going to have to use multi core wire, then it should have as few strands as possible.

Right, back to something outside of physics. I cut the copper wire into 50 odd mm bits. One end was squashed flat (about 2-3mm worth) and then folded at a 90 degree angle to arrive at something that looked like this.


I then bored a hole through the trackbed and inserted the device like so.


Lower the head down till it is below the bottom of the rail and then rotate 90 degrees, to arrive at something that is almost completely unobtrusive.


Then its just a wave of the soldering iron and its all done.

Saturday, November 13, 2010

Monthly meeting

Thursday night, and its that time of the month for the support group get together. I for once didn't have anything for show and tell. I should have brought along my scissors crossover but didn't want the Guru subjecting it to an intense 15 minutes of scrutiny. I should have as he was away cycling the Otago rail trail again (quick Q, how many of you have done it?).

Again some good discussions through the night. I got told that to build an H with its 2 unsyncronised engines might require 2 chips for the sound (I'm still not quite convinced, but...).
Someone asked about why Dj's got the chop (they were only 20 years old at the time of their demise), which was mainly because they could not be converted to single manning.
there was also a quick chat on bearings and getting hold of some of the mini ball bearings that are available from here.

So in the end not much to report (I think that modern living gets in the way far too much). One chap commented to me that he did want to do things, but he had too many hobbies. I tend to agree with that sort of thing. I have a few things that I do and starting to paint Russian cavalry is time I don't spend building locos or making track. I can't remember the last time I made a wagon...

Thursday, November 11, 2010

2011

From time to time In this position (blog ringleader) one finds oneself in possession of highly secret information that one has been passed on pain of death. However while I can't reveal specifics the photos I have seen reveal that there will be some excellent new models available for followers of the scale sooner rather than later.

And I guess we could again run the age old pole 'so what does everyone want for christmas?'
Personally I'd just like a break, and possibly the chance to finish tracklaying on the layout. Maybe a source of correct sized spoked wheels on short axles (that are not finescale. they look sexy, but I still have my doubts about building track well enough to run anything). Time to do some CAD work on etched wagon underframes (which really goes and in hand with the wheels).

So, anyone else?

(oh, and we haven't forgotten, happy birthday mum)

Tuesday, November 09, 2010

Trackmaking XXI

Further advances in the last couple of days. I've got round to gluing down the first baseboard joins. I had previously soldered a long brass bar across the 3 tracks. These were positioned on the board edges, and the tracks largely held down with double sided tape. I the put some 20mm brads into the wood close to the brass bar (I should probably have used screws, but the ones I tried split the ply which didn't help matters much. Once I had all the tracks lined up they were all soldered together. The last step was the application of 5 minute araldite which was liberally (and quickly) applied around to get everything stuck to the track bed. Hopefully this will hold everything in the correct orientation for a while. No doubt Mr Boul will have a better suggestion that I should have used :v). Now all I have to do is gap the brass bar, attach the droppers for the track power, and I'll be able to run locos for almost 6'!

(I would have a picture to show you, but I loaded it on this morning at home, and then managed to delete it while I was writing this at work, so you will just have to wait)

UPDATE;

Ok, so here it is then.


Not really sure if it was worth the wait....

Sunday, November 07, 2010

Pressies

Its always nice to find the wee box in the mailbox in the evening.
I had pre ordered this kit back when I didn't know what it was going to be (but did ask if it was going to fit into the 1960's time period). When it emerged that the subject was a Yd I was pleasantly surprised. These ballast wagons are quite possibly the oldest rolling stock still serving Kiwirail And can still be seen in sets of 3-4 wagons all over the place. They differ from all other ballast wagons locally in that as side tippers they can carry any old size bit of rock around which is probably why they have not faced the scrappers torch yet. And they look interesting as a wagon on the layout.

So, what does one get in the box?


The castings are all crisp (as we have come to expect from Trackgang). The instructions seem to suggest that it may have been one of Pats unreleased efforts? I'm just wondering if he had any thoughts on releasing the S scale electric locos that he did in TT. A few D/Dm sets would be nice....

Things of interest (well, for me) are the pin point bearings, which seem to be a different shape to the ones that I have (from Markits I think).
I'll be replacing the wheels as well, possibly with Badgerbits ones from here which are a bit narrower in the axle length department.
(As an aside, and before anyone asks, I've already checked about the bogie wheelbase, and they are 12.5mm, vs the 15mm that we would require for the 6' passenger bogies.

Friday, November 05, 2010

Neglected

I've noticed this last week, that we as a modeling scale are entirely ignoring the layout in a boxfile challenge. As my real life looks as though it might sort itself out a little bit next week, I might even have some time to devote to this. I already have the code 40 rail....

Wednesday, November 03, 2010

Zh Zh Top

DB waffles forth:

Interesting trivioids about ZZ Top that emerged yesterday: they formed in 1969 (which, if you aren't keeping count, was a long time ago) and there have always been the three of them, two have the trademark long beards, the third is ironically named Frank Beard.

That, of course, has nothing to do with the topic for today but it should push this post past the minimum length mandated by Herr Druffnstuff.

In our last exciting edition of the ZH saga, I might have inferred that while the laser cut ones build up to a nice model with a little fettling and repairing, I wondered if it might be faster to build one up as a master and then try casting them. I acquired about 6 of these ZHs so if I end up with 6 by casting 5 of them I won't feel too bad about copying The Fettler's intellectual property, especially with his full knowledge.

The body of the ZH should present no problems, but the ends are pretty finely detailed and I have a nagging fear that casting them may not work out too well, but we shall see, dear listener. So lets attempt those ends first, as without them there's no point in continuing...

So here we are with an end master made up from the laser etched bits plus a few pieces to replace any melty bits and a few other adornments, including a base to give the whole thing some strength and thickness. As you can see, the main body skeleton (appropriate for Halloween when I took the pic, no?) is coming along as well. Tonight I hope to get some time to pour in some rubber, and then with some freshly arrived resin, we'll soon see if this is a feasible approach to making ZHs.

Monday, November 01, 2010

Slow patch

I've noticed in the last couple of weeks that there seems to have been a general slow down on postings at the Z120 site. I can't help but wonder if its because its finally stopped raining for the moment and the warmer temperatures are forcing people into the outdoors more often (in my case, press-ganged into sorting out the weeds).

Things around here may also slow down as well. I've taken on a contract to help out an old friend (as opposed to a friend who is old) which is going to be taking up some time in the next few months. The offshoot is that there is enough money in it (well, more than enough, but the lady of the house is partial to overseas holidays you understand) to hopefully move some of the larger projects on my books into the solid development pipeline (as opposed to the deranged paper ramblings that they are currently).

Its not helped by my covetous designs on other prototypes like On30 or 2mm English either.

Saturday, October 30, 2010

Trackmaking XX

Further to my observations of the prototype last weekend, I have done some further experimenting.

On the left is Tamiya Nato brown, and on the right Vallejo leather brown. The Nato brown is not supposed to be that red, which is quite annoying as the colour on the lid that its supposed to be is pretty much what I wanted.


Its one of those annoying things that when you go into a model shop to buy paint, you are choosing based on colours that you can look at that are at best approximations of what in the tin/bottle, and you have to assume that exposure to light has not effected the display panel in any way. For this I am a fan of Humbrol who at least paint the tin lids so that you know what you are getting (well, mostly). Tamiya can be a bit hit and miss, Vallejo tend to be quite good 9but the paint does have adhesion problems which is another story), and Games Workshop will not be getting any money out of me until they ditch the printed colours on their displays, which just seem like they are asking for trouble.

And the answer? While its a bit dark, I prefer the leather colour and will probably stick with it. the Vallejo paint is also very easy to scrape of the rails.

Friday, October 29, 2010

West coast update

Following on from my trip down south, I have recieved the following information from a well known Chch modeler.
Saturday was lovely and we spent all day at Rewanui. No problem getting up
there at all. Although we walked, the road is passable to a standard car
for 99% of the way. There are one or two sections that have washed out and
been repaired a bit roughly. I'd get a car up there, but you'd want a bit
of clearance. Although the entrance is gated, I'm guessing you'd get
permission easily enough as there is no reason not to give it.

There's very little to see railway wise. Its just a nice walk. Of course
we wanted to get a scenic flavour for the layout and it was good for that.

For the record the following are left:

* Tunnels 1/2
* The formation with the odd bit of centre rail in the bush if you look
hard.
* bridge 20
* Up to the first pier of Bridge 18 - but largely buried.
* The pattern shop
* Another building on the hill I've never seen. The roof is obvious, but
there is no clear way to it and I always forget to look as you cannot see it
from up close.
* Some power poles
* Spark and Party bins
* lots of tubs
* Some bin steelwork.
* Stacks of sleeper and rail embedded in gorse.
* The station and yard proper has completely gone. If you look really hard
you can find some platform edging.

He also has some photos up here which as an added bonus show Barry Fitzgerald in his natural habitat.

Wednesday, October 27, 2010

Wots that colour then?

While on my travels, I had the presence of mind to take some track photos for possible 'in the future' detailing (assuming my inner fine scaler is an excellent escapologist and can escape from the chains hes locked up in).


I had been wondering about what colour to paint my rail, and this has not really helped much. the mainline is coloured with brakedust etc, wheile the loop behind it is the more common 'rust' colour. I'm also wondering if I should paint the sleepers a different colour (Hmm, he's better than I thought...)

Tuesday, October 26, 2010

Tagged: finishing that ZH

DB says: Its about time I finished off that ZH...

A while back I stumbled upon AA654's photostream on Flickr, which now that I type this, makes me wonder what we ever did before Al Gore invented the world wide internets. I never used to be able to pick up this sort of thing on the wireless.

AA654 (a modeler I'm betting) has some really neat side-on detail pics of wagons in 'real-life' rather than 'ex-works' condition, and I hope he (or she (but he looks like a he)) doesn't mind if I borrow a few of them for this blog post and a ZH or two. I know that most modelers refuse on principle (or principal if you are a headmaster) to graffiti up their stuff, preferring to support up-and-coming taggers by knifing them, but the unfortunate reality is that most of the ZHs seem to carry unofficial paint schemes, and that's what I had in mind for this one. Being open minded and all. And I left my bayonet in my other trousers.

A little copying and pasting later had me printing a few ZH sides out, figuring this would make finishing the model super easy with a single decal containing Tranz Link logos plus graffiti plus built-in weathering. Ta-da:


Well, that looks like shite doesn't it. While the ALPS printers are pretty good at printing vector-drawings of logos and things onto decals, they're not that good at doing full-colour bitmappy style prints (remember my Kiwirail logo on the front of DX5293?)

After a bit of internet sleuthing, it seems that this dotty pixelated gritty grottiness is just the way things are with this printer and/or the XP drivers. So plan B had me thinking about removing the weathering from the pictures (which was where the graininess was showing up most) and just hanging onto the graffiti/logos. And then later I could weather over the top of them.

So after an afternoon at a bar eating nachos, drinking mimosas, watching sports I don't understand ("Hey, that was a forward pass!") and playing in Photoshop I was left with:

Hmmm, that looks a bit more promising. Which is a good thing as I'm out of decal paper...

Straight outta the South Auckland paint booth


And a little weathering later:

Yes, I know, there are different wagon numbers on each side for variety. I washed some brown on the ends and dark browny/back on the underbits, including the very bottom of the doors and then sprayed some 'dirt' on the top and sides.

The sprayed stuff probably should be a little less red and a bit yellower next time; I need to get into the beautifully lasered handgrabs on the door sides with some dark wash; and I might reapply some of the graffiti decals over the weathering if I can be bothered, to make it look fresh.
So the rating still stands: the laser cut ZH, while being a little scary and requiring some post-melt remediation to ends and unders, builds up into a very nice model for those into the modern scene.

Now to crank out a few more...

Send Evan some money to get one in its current state. If I have any unused decals leftover, I'll offer them up on the blog and/or nz120.org classifieds.

Monday, October 25, 2010

On tour

I've been out and about this weekend, as I had to travel to Kaikoura for a work meeting (outside my normal job, so actually interesting). Again, I had access to 'train control' for live updates as to what was going on. Unfortunately I reported my original leaving time incorrectly, as so started receiving messages while I was still the wrong side of Havelock.

Thanks to the wonders of modern technology we can get an insite into the directed train chasing process.

'700/701 running, 734 heading north through Kaik about 1300, crossing 701 Parikawa. 700 due through Kaik about 10:00.'

'Both trains have their GPS switched on so should be able to give updates as required.'

'700 in Seddon'

'700 in Blenheim'

'700 Tuamarina, 734 Parnassus'

It was about this point I was able to reply. 'In Blenheim buying beer' ( In my defence I would point out that the Springlands fresh choice has possibly the best selection of beer in the south island. A pity its been sold to new owners).

Another slight technical hitch with this process is that when one receives a text message, one must pull off to the side of the road to read it, unless one has a left seat navigator type chappy. Thus I ignored these messages until I was actually in Blenheim. It seemed rather pointless to know the location of a train if one was 40km away from the railway line itself. I also feared getting stuck behind a camper van full of tourists on the hills. There is no worse road in the country to be stuck behind a camper van....

Back to the main story. Having missed the northbound express, the only other thing running was 734 heading towards me. I figured I'd meet it somewhere north of Kaikoura, but was not quite sure where. I then just headed south hoping to find a spot with a wee bit of planning.

'734 Oaro'

Hmmm, time to get out the map, where the hell is Oaru?
OK, way south of kaikoura, should be fine.

'701 away from Picton, 734 Kaikoura'.

At this point I'm between being actually able to see the railway line, and am starting to wonder if its all going to go pear shaped.

"701 Spring creek , 734 Hapuku crossing looks to be at Parikawa south of Clarence, and I'm off out for an hour...'

WTF? And where the hell is Hapuku? Ahh at least its on the map...
Hang on, Parikawa is north of Clarence. Does the Kiwirail map match the one sitting on the passenger seat?

Ok, so after all that, the most essential message was the first one...

Eventually I get to Parikawa, which is a nice circle on the map, but has no built up area of any sort. I still think they should hang cartographers. I 
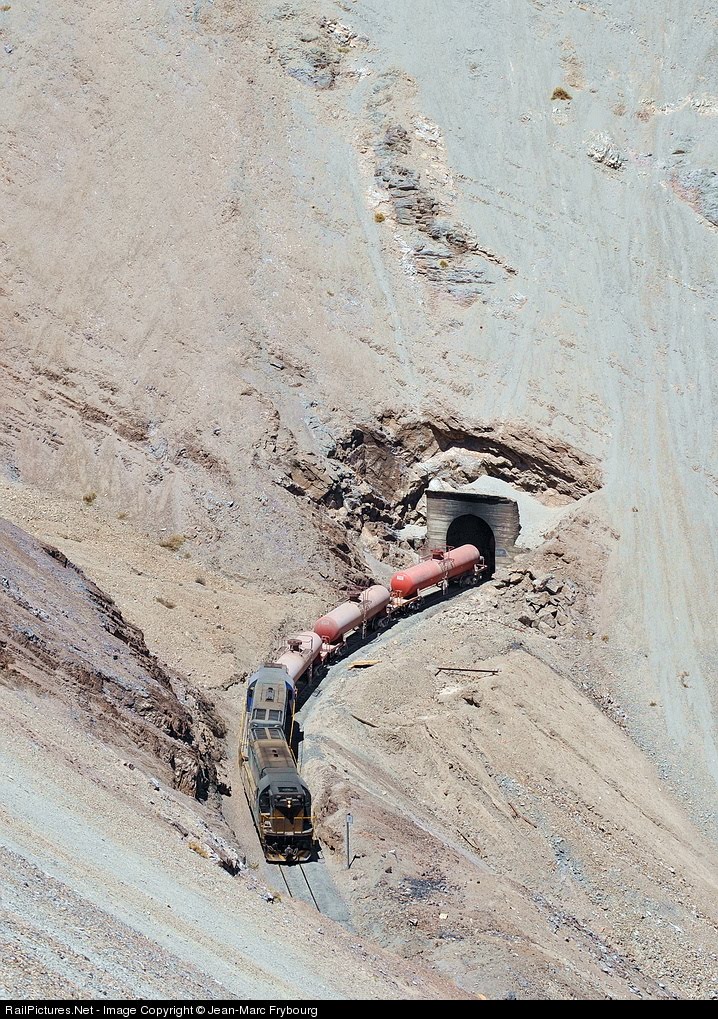
continue driving south until I spot a likely spot for a picture. this involves driving down a farmers track with no space to turn round.

Since its by a stream there are some mounds of earth to stand on to get the standard 3/4 front on shot
Not a great shot. I guess that the 'gun' photographers have those sub machine cameras taking 10 shots a second, and they get to pick the shot with every thing composed right. I can't even see the screen on a bright day.

However, since I'm trying to start a trend, here's my signature 'going away shot'. Remember you saw it here first.


(I am starting to wonder however, why Kiwirail drivers have the need for 2 home distilling units next to the locos?)


Unfortunately I don't think that the 'pictures of the FRED'will take off.

So after the train chasing for the day, and with nothing else to try to catch, I had to do a couple of hours work, oh and eat a crayfish dinner. Bugger...

Next morning on the way home.

'The view from the front of the YHA'


North end of Kaikoura yard. It sort of made sense at the time....

Sunday, October 24, 2010

Son of "DFT in a day" - part 2

Perhaps "DFT in a year" may be more appropriate.

And its not really the DFT this time either, well not the laser cut bits anyway.

After our Long Island branch kicked off with the impressive DX bogie sideframes, it was decided we had better follow suit with the DFT version (or DF if you prefer).
So after a bit of mucking around with CAD (and a few emails and some gold bullion later) we have some results.

I'm impressed...

And a closeup

These are designed to drop on top of the sideframes on the Kato SD40-2 using the same "file flat" method as Kiwibond's DX sideframe replacement.


Borrowed bogies, so I couldn't really butcher them, although I could
probably use sideframes as compensation


Comparison with the DX version.

As for cost we are potentially able to get it down to approximately $15-$18 per set if enough sets are ordered (I haven't done the exact maths as yet).

Anyone interested?

Saturday, October 23, 2010

DB Rejoins the Druids Guild

DB says: Well for what it's worth, I signed up for what might be my third stint at NZ Model Railway Guild membership this week using the new website (much easier than sending a cheque and all that nonsense) and am looking forward to receiving my journal with CE wagon plans in it.


It's pretty easy to sort out a login and join up, and once you're in, what else is inside? There is a list of upcoming events, a fledgling photo gallery, the ability to buy Guild stuff, including back orders of journals which is pretty nicely done, click on a cover pic to see the articles inside or use a searchable list of articles in excel or PDF format.

It's all a work in progress I assume but a very good and well presented refresh of the Guild's online presence. There is no forum on the site and I (also) think it needs one - firstly to give people a reason to visit more than once a year, and more importantly, to strengthen the 'brand' of the Guild by building a community around the isolationist modelers of the NZ railway scene in a way that a periodic magazine and conventions can never. Not that they don't have their own role to play, but they can't build that instant access to information and fellowship across distances that forums can.

At the moment, the internet for the modeler of railway things New Zealandy is very fragmented with NZ120.org, several blogs/sites, various Yahoo groups and mailing lists providing sustenance to the unwashed masses and I feel the Guild should try to be that centerpoint. Maybe Wes could extend the NZ120 forum with boards for the 'other' scales and that could be plugged in...?

Almost all the the site content seems accessible whether you are a member or not, so why join? Well the Journals I guess, discounts off purchases might be another. If they build a forum or a classified ads section they can't make that for members only - that's not the way the internet works. Still I'm sure someone will come up with value-added services the site could provide for members. There have been so many nice modern image plans in the journal over the last 20 years that maybe it's time for a low-cost, low-effort Cedric Green/Fred Lee style hardcopy planbook for those of us who don't model steaming lumps of iron and wood. Photocopied and stapled with a cheap cover will be fine.

Anyway, I'm in. For now anyway. You can be too at http://nzmrg.org.nz/

Friday, October 22, 2010

The Quarterly review pt II

Well, I've been a bit sidetracked in the last week, but finally tonight I get on to review the Railfan.

The Cover features the new Dl class locos. Opinion I currently divided in the peanut gallery on the looks. Personally I think its a 'butterface ( as in 'nice body,....). The addition of the superhero mask around the windows is an interesting touch.

Right, onto the features. First up (after the sizable 'whats happening' section) is another photo essay, This time round its the Otira bankers (featured here last week). I must admit that these are still growing on me. They do make interesting reading. I wonder if Drew should do one on the 'milkies'?

The best one (for me anyway) is a collection of photos of mostly Ka's in the North island in the 1960's. This has 3 good pictures of the loco depot area at Paekakariki (maybe I need to contact the photographer for more info).

Last up is the ongoing series on New Zealand carriages. This has been going on for quite a while now (or it seems like it) and we are now up to 1884 stock, so there might be a few more issues to run yet. I find these interesting looking at the historic photos and what else is in the photos is often more interesting than the subject.

I've just noticed that there are only 3 feature articles, but this is more than made up for by the sizable amount of modern railway info present.

Wednesday, October 20, 2010

Trackmaking XIX

Well, there hasn't been much progress on this in the recent past. this was due to my complete inability to drill holes in sleepers to make throwbars using my Spanish wobbly drill (its like its spent the evening drinking margaritas before I get to use it). However a visit to Teach's workbench on the weekend and the use of a far more reliable (and possibly bourbon sipping) model made things all better.
I could then turn my attention to completing the points on module no 2. First up was the scissors crossover.

After adding the throwbars in, I could then go about tweaking some of the rails to get the clearances right for NMRA standard wheels. I only had to make some minor adjustments until I could push an Ed backwards through the points.

The next problem arose when my 2 year old soldering iron decided it had been hot for just too long on Sunday night, and decided to move to permanently cooled mode. Even trying to trick it by trying to touch it with my hand failed. Thus I was forced to take a trip to Dick Smiths to purchase a replacement. I managed to replace my old 60W with a 40W and so far it seems to be doing fine (ie not charring stuff like the old on did)

'It was getting a bit tired'
I could then get on with adding the brass end of module pieces that will hold everything in place till hell freezes over.

I've also discovered that I'm going to have to fudge the location of the outside inspection pit somewhat as examining photos reveals that it would run across the baseboard join, which is not really that ideal.