
Wee duggie has written a reply of sorts to Saturdays post re the relative states of NZ and Australian modeling.
"Do we really suffer from an el cheapo mentality in this sphere too, (perhaps inherited from our Scots & Irish forebears?) as M Druff has posed, or is it the 'number 8 wire syndrome" coming to the fore again. or are we really a third world economy, on subsistence wages?"
I've been pondering this and I think its more possibly a historical artifact (or combination of such). Back in the day to buy anything from overseas one had to face the Spanish (or post office ) inquisition to do so. Australia had more of a manufacturing base (Triang). We got north yard and a range of kits, whereas they got more RTR stuff. Skip forward 30 years and while local modelers are just as inovative as anyone else on the planet, it just hasn't taken that next step, and its still chaps tinkering in sheds.
Oh, and I may be wrong and its just down to the fact that we are all cheapskates. maybe there needs to be aconcerted effort to start marketing local prototype models overseas?
Monday, May 31, 2010
Sunday, May 30, 2010
Slow weekend
Well, not much has happened this weekend. I have yet to feel winters call to the workbench. Tracklaying is a bit stalled until I get to have a chat with the guru next week about one or 2 finer points, and the less said about the Ew debacle the better.
What I have been up to is picking olives in the Chateau plantation (of one).
 Hopefully normal service will resume this week. I'll just have to pick a 1/2 finished project off the bench won't I.
What I have been up to is picking olives in the Chateau plantation (of one).
 Hopefully normal service will resume this week. I'll just have to pick a 1/2 finished project off the bench won't I.
Saturday, May 29, 2010
Saturday morning
So whats kicking around in my head today. I've been chatting to a well known S scale modeler (who is welcome to come out of the woodwork if he can come up with a 1/2 way decent nickname for himself) and its got me thinking off on some tangents. Currently the UK market supports quite a bit of short run modeling, ranging from kits of obscure prototypes right up to RTR models commissioned by model shops, made by one of the big manufacturers. The US market has been catered to by Japanese/Korean brass model makers for 60 odd years now. Even the Australian market has RTR models available off the shelf, and now short run RTR made in China. So, why has this never taken off in this country. There were the Clerestory F guards van and Ka from Korea, which quite honestly were a slightly odd selection of prototype (possibly a normal 30' van and maybe an Ab might have made more sense) but this was 20 years ago, and the experiment was never repeated. There is normally the option to by locos made by the manufacturers but this can be very hit and miss depending on who is assembling them, and also quite expensive on top of an already expensive loco kit. The only RTR models that are currently available are the Frateschi line, and these are made overseas, Ho scale and 'look alike' models, though they are managing to keep up with the colour schemes.
So, why has New Zealand not been able to support an RTR line? you can point out that there are not that many modelers in this country, but we are comparable in size to the larger Australian markets (NSW and Vic/SA), and much larger that various English groups that follow obscure prototypes. Maybe its because we don't have a collector modeler, or its the lower levels of disposable income?
So, why has New Zealand not been able to support an RTR line? you can point out that there are not that many modelers in this country, but we are comparable in size to the larger Australian markets (NSW and Vic/SA), and much larger that various English groups that follow obscure prototypes. Maybe its because we don't have a collector modeler, or its the lower levels of disposable income?
Friday, May 28, 2010

Thursday, May 27, 2010
A package on the doorstep
Oh good its finally arrived. A quick check and everything seems to be there. good. the frames out first and hold the bogies up to them. Hmm, doesn't quite seem to fit. Thats odd, maybe its a newer model. The replacement gear tower has the wrong wheelbase. Maybe they have screwed up the order? Never mind, I'll just order the right bits. Onto the Atlas website. Find the exploded diagram. hmm, the top of the bogies doesn't seem right. Back to the loco list. Maybe I was after RSD-4 bits. No, they don't look right either. hang on, from the bowels of my memory I recall it was an RSC-2 or something. Hmm. not on the loco list anywhere. I wonder....
"tap tap tap"
Hmm, its made by Kato.....
Bugger.
And there don't have the spares that I want....
Bugger.
Maybe its back to plan A then. At least I've got all the worm drives.
(This brought to you by Mr Cockup, demonstrating that no matter how many letters you assemble behind your name, you can still completely bollox things up)
Wednesday, May 26, 2010
Era or Error
Mr Druff has mentioned in the past that Newmarket Junction would make an interesting layout, something I have also thought about on and off.
So given it's decades of existance the first thing to do is pick an era to base a layout on.
Of course this assumes you haven't already got, or started building a collection of models... oops.
So with a bit of hunting I have tracked down some Aerial Photos showing Newmarket in a few different years.
These have all come from the Auckland City Council website, so of course we need the useage statement as follows (then you can see the pretty pictures).
“Data contained in this product is provided courtesy of ALGGi who makes no claims as to it’s reliability, accuracy or adequacy for any particular purpose.”
So with that out of the way we have:
 Newmarket Junction in 1940
 1959
1959
Not a lot of change between 1940 and 1959.
I haven't as yet tracked down anything between 1959 and 2001, which is a pity given that as we can see a lot of change happened between these two dates.
 2001
2001
 2006
2006
 and finally 2008
Also available on the council website are other datasets including contour data so you could even get accurate terrain information if you wanted to go that far.
Incidentally the colour images are orthophotos, I can't vouch for the older images but they look to be as well. What that means is that the photos have had the distortions removed and can be measured off just like a map.
A number of other councils around the country also have Imagery and data online, so depending on where you wish to model you may well find information to help.
So what era would I pick.
Well I like the idea of the diesel to electric transition due in a few years time, think of the mix of rolling stock you could run on the layout.
Guess that makes everything I've just mentioned irrelevant in the meantime...
So given it's decades of existance the first thing to do is pick an era to base a layout on.
Of course this assumes you haven't already got, or started building a collection of models... oops.
So with a bit of hunting I have tracked down some Aerial Photos showing Newmarket in a few different years.
These have all come from the Auckland City Council website, so of course we need the useage statement as follows (then you can see the pretty pictures).
“Data contained in this product is provided courtesy of ALGGi who makes no claims as to it’s reliability, accuracy or adequacy for any particular purpose.”
So with that out of the way we have:
 Newmarket Junction in 1940
 1959
1959Not a lot of change between 1940 and 1959.
I haven't as yet tracked down anything between 1959 and 2001, which is a pity given that as we can see a lot of change happened between these two dates.
 2001
2001 2006
2006 and finally 2008
Also available on the council website are other datasets including contour data so you could even get accurate terrain information if you wanted to go that far.
Incidentally the colour images are orthophotos, I can't vouch for the older images but they look to be as well. What that means is that the photos have had the distortions removed and can be measured off just like a map.
A number of other councils around the country also have Imagery and data online, so depending on where you wish to model you may well find information to help.
So what era would I pick.
Well I like the idea of the diesel to electric transition due in a few years time, think of the mix of rolling stock you could run on the layout.
Guess that makes everything I've just mentioned irrelevant in the meantime...
Tuesday, May 25, 2010
Undead rising
Theres another discussion raging on the NZ120 forum currently about RTR Nz120 models.
(forgive me now, as I think I've said all this before...)
Again its that old chicken and egg chat about how much people are actually prepared to pay for models in the scale. Its one of those things that seems to surface every year or so. Again I don't know what the answer is in such a small market. The local kit manufacturers in any scale are not getting rich quick ( I tend to compare it to being a monk) so they aren't in it for the money. I can only applaud the guys who actually get out and do it, and I look forward to some of the upcoming offerings.
Another comment got me thinking too. Wee Duggie commented that the local model assemblers are flat out and can't keep up (or can't give a timeline or budget). This is interesting on quite a few levels. Is it that the recession has had no effect on the guys who normally pay for kit assembly? Or is it that the old generation of kits are just that hard to get to go right (certainly the steam locos are). Or is it that the newer generation of kits frighten people that much (the AFK masterpieces) that they feel forced into getting someone else to make them for fear of making an error that marks then as somehow a lesser mortal for actually having a go oneself. In any case the kit assemblers are obviously making enough money to actually keep going at it, and not toss it in, regardless of the speed that they actually work at.
I do often wonder if it would be nice to go back to those carefree times of the 80's when not quite square models circled aimlessly between Otaki and Cass. maybe todays increased drive for higher and higher standards has actually lead to a decrease in modeling, as more and more people are scared off. Some times you just have to accept that its not going to be a great model, and that the only true waste of modeling time is when you don't learn anything new in a project.
(Helmet on and hunkering down behind a nice fire-proof rock)
Monday, May 24, 2010
Tracklaying pt V
As I'm adapting a method primarily designed for S scale track, there is a bit of a feeling of one step forward, one step back at the moment, as I try to feel out just how to do things in a smaller scale.
Having a check yesterday, I discovered that there was a tight spot on one of the crossover frogs (badly circled area 1 in the picture). This was that bad that a Da wouldn't run through it. This is mainly due to my badly made 'knuckle' (the place where the blade rails bend). To fix this, I just unsoldered the old rails and then made some new ones with some corrections made. these went in and worked much better.
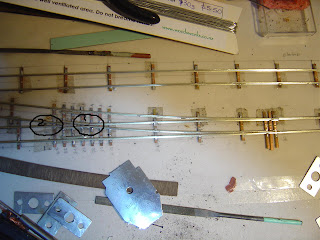 I'm also not very happy about the way that the frogs go in and their relation to the running rails that head off rearwards (circled area 2). I seem to always have gaps or poor alignments. I think what I will try in the next point is a much longer frog that extends back to the next single sleeper. After everything is in place I can then gap this with a fretsaw at the correct spot, but it will have the correct curvature. It seems like a good idea for now....
(Oh, and the correct answer was not looking just where all the baseboard supports were before drawing the track plan. What a meathead!)
Saturday, May 22, 2010
Opening it up
I've been on the lookout for some small coils to try out my DCC uncoupling idea for a few months now. I'm looking for a coil thats about 5mm long and up to 6-7mm in diameter. Last week I discovered something promising; A relay in a 14 pin integrated circuit box. I ordered some and they arrived today.
 Well, the size looked good, but how to find out just how big it is? Using my most delicate hammer I then attempted to prise the coil out of its plastic coffin.

 Well, the size looked good, but how to find out just how big it is? Using my most delicate hammer I then attempted to prise the coil out of its plastic coffin.
"It looks like its going to be a bit long..."
Friday, May 21, 2010
Tracklaying part IV
Today we report a bit of success here and there. I spent the day with 'Teach' (not sure if you are allowed to choose your nicknames, but it suits him) finishing up my crossover. I had to add the throw bars to complete the workings, and that was it. This involves drilling holes in the throw bar to match the blade rails and also allow the wheels to roll pass unhindered. After a bit of a play with the NMRA track gauge it seemed that the magic dimension between the holes is 7mm (that's a conveniently round number I thought). The holes were drilled with a 0.6mm drill and then countersunk with a 1.2mm drill to allow the pins to sit in without rubbing on the trackbed. I then positioned everything and soldered away. Note to self for future;its probably best for the PCB copperclad to be facing AWAY from the soldering and it might not stick quite so badly. Still, to total throw is just over 1mm and it seems to be OK (the reasonably random measurement for the throw bar indeed was correct). I was going so well I promptly started on the 3rd point for this bit of track work. This sailed along quite well, marred only by complaints about the filing noise coming from the lady of the house (she REALLY doesn't like it, but its OK and she has been shoe shopping today :v). So, how do they measure up?

The first one looks visually OK. There is a bit of banging round at frog with the new PECO wheels though the NMRA US ones that I have seem to be quite happy with it, and pushing the locos through the points works OK.

The second just doesn't look right (too fat in the point blades I think) but again it works.

The 3rd has built on the things I have learned from the first 2. However I still can't seem to solve the problem around the frog with Peco wheels (and this is the ones that do work with the NMRA track gauge. I'm sure that there is a solution somewhere and I'll have to consult with the local maestro as to what it might be.
And Finally, here it is in rough position on the module before I start laying the rest of the track. Can anyone point out the mistake I've made?

(And its sodding hard modeling in a remote part of the country. I wanted a bit of PECO code 55 flexitrack to use at the module joins as its far tougher than the hand laid stuff. the only model shop didn't have any, so I guess its brass screws to hold it all in place, which I was going to do anyway, but with the track solidly anchored into a couple of millimetres of good Devon plastic.
Thursday, May 20, 2010
Round and Round
After a number of email discussions we wondered if there was a viable alternative to "near enough is good enough" when it came to loco wheels.
Kato's SD90Mac has N scale 44 inch wheels (in theory), which in NZ120 scale out to 839mm, somewhat short of the 940mm needed for loco wheels (excluding the DA/DB/DBR/DC). Although of course the massive flanges help the illusion.
So after some research on the Northwest Shortline website I came up with the following options:
HO scale 28" wheels scale out to 991mm in NZ120, oversize by 0.46mm at scale size.
The closest size to ideal would be 27" (HO), 946mm in NZ120 which don't exist.
26" (HO) works out to 914mm in NZ120, undersized by 0.18mm at scale size.
The 26" wheels were the closest option, but only available with 2mm shouldered axles in /64 finescale.
I ordered some 28" /64 wheels which according to the ordering page had 1.5mm pointed axles, quite crucial for what I wanted.
However when they turned up they had 2mm axles, so I probably should have ordered the 26" wheels after all.
I also ordered a set of Kato SD90Mac wheelsets.
Briefly, the Kato wheels were disassembled and the plastic gear was modified to take the NWSL wheels. Since the gear has an outside diameter of only 2.4mm it was first given an "outer" of brass tube to give it a bit of strength and then drilled out to 2mm. Had I got wheels with 1.5mm axles I may not have needed to strengthen it first.
The NWSL wheels were intended as wagon wheels, so one wheel on each axle is insulated. This was removed, then the axle was cut short to make it a "half axle", these were then "pushed" into the modified Kato gear. Two wheelsets are needed to make one replacement loco wheelset so it's not an overly cheap option.


Some points we have discussed since doing this include:
The flanges look great but track work will have to be perfect if /64 is to be practical, it may be that we need to move to /72 for reliability.
We need to see if NWSL will sell us wheels in kitset form, that is with no insulated wheels included.
The pinpoints are obviously somewhat larger than the N scale originals and may not fit into existing N scale bogies easily. However following the close enough doesn't have to be good enough theory, that is not the intention...
Wednesday, May 19, 2010
The starting line
t was "bloody cold" here at Chateau Dandruf this morning, which means that with winter having arrived (judging by the amount of water that feel out of the sky over the weekend its late but keen to make up for it) its time to hide away at the work bench and get started on all those models that have been stored up during the summer shopping spree.
I've been looking at the track plan of Paekakariki (every night) and might just about have the drive to start making a decent assault on it. There's also some more wagons I want to build/complete,and maybe a loco project or 2(or 3 or 4).
whats everyone else got lined up?
Off on another tangent today, I'm wondering if we (as a group) need to start compiling a list of locomotive chassis with a collection of things like overall wheelbase, bogie wheelbase and wheel size for all the N scale mechs out there, and also maybe a similar thing for all the NZR prototypes.
Tuesday, May 18, 2010
Not quite heating stuff
In the latest care package from Woodworks as well as the 179C solder I ordered, were also samples of 145C and 100C. Now in the vast collection of tools here at Chateau Dandruff (counted by a local careless saw miller on the fingers of one hand), one of the ones I'm missing is a temperature controlled soldering iron. Now, not wanting to waste money on something that I probably won't use enough to justify the cost ( A set of files might even be pushing it), I came up with the following dodge based on something I had seen a long time ago.

The heat at the iron end is still enough to melt the run of the mill electronic solder, at the other end it just gets hot enough to melt the 100C stuff, with the 145C melting 2-3cm back. By contrast, Trackgang metal melts about 3cm from the right end (total length of the device is abut 10cm).
Now, you are all going to tell me its rubbish and I should buy a proper temperature controlled unit, but I simply can't afford it. This seems like a reasonable compromise. It won't be as easy to use, but it will work.
Monday, May 17, 2010
Boxing On...
Or what you can do with a friendly Laser Man.
After years of individually wrapping NZ120 models in paper towels and storing in makeshift cardboard boxes I decided it was time to create some storage boxes that were a bit more versatile without getting too complicated.
Now I must admit I stole the basic idea from one of Kiwibond's old posts - keyboard boxes.
So after a hunt around the IT department at work I acquired half a dozen to use.
I then bought some cardboard from the local stationery shop, however the thought about cutting up a lot dividers by hand stalled the project for a couple of weeks.
So, enter the laser man.
Cardboard is one of the easier materials to laser cut, so half an hour with CAD and we have a laser CAD file ready to go.
 This was dropped off with the cardboard for lasering and a few days later and a lot of dividers, all exactly to size with no missing fingers or bloody finger prints are ready to go.

Pretty obvious from here, assemble a criss-cross thing and drop it in the box, by the way the cat is an optional extra.

Line the box with bubble wrap, I have the bubbles facing inward, it seems to provide a bit of "grab" on the model and stops the models moving about.

Add a couple of strips of self adhesive Velcro to hold the box securely closed and it's done.
And of course if you watch the right TV programs you will know these things take time to do, so here's one I prepared earlier...

After years of individually wrapping NZ120 models in paper towels and storing in makeshift cardboard boxes I decided it was time to create some storage boxes that were a bit more versatile without getting too complicated.
Now I must admit I stole the basic idea from one of Kiwibond's old posts - keyboard boxes.
So after a hunt around the IT department at work I acquired half a dozen to use.
I then bought some cardboard from the local stationery shop, however the thought about cutting up a lot dividers by hand stalled the project for a couple of weeks.
So, enter the laser man.
Cardboard is one of the easier materials to laser cut, so half an hour with CAD and we have a laser CAD file ready to go.
 This was dropped off with the cardboard for lasering and a few days later and a lot of dividers, all exactly to size with no missing fingers or bloody finger prints are ready to go.
Pretty obvious from here, assemble a criss-cross thing and drop it in the box, by the way the cat is an optional extra.

Line the box with bubble wrap, I have the bubbles facing inward, it seems to provide a bit of "grab" on the model and stops the models moving about.

Add a couple of strips of self adhesive Velcro to hold the box securely closed and it's done.
And of course if you watch the right TV programs you will know these things take time to do, so here's one I prepared earlier...

Sunday, May 16, 2010
Doh!
I spent a bit of time at the workbench Friday morning, building a gear tower for my Ew project. I had the worm drive left over from the first attempt at this project (the bogies of which wound up under the twinset railcar) along with the associated bearing blocks. My plan was to build a brass box to sit on top of the bogie holding the worm drive in the correct orientation and also provide a mounting point for the top of the bogie to the frame. the first job was to add guides to a piece of sheet brass that would hold the worm drive in place horizontally). This was a couple of bits of brass square tube soldered into the correct place on the brass sheet.

I then cut the brass sheet in 1/2 (as there needs to be 2 sides) and found that the locating bars were too deep for the sides of the tower to sit on the bogie as i had intended. No matter I thought, I'll just file them down.
 Well, it was sort of working, but I suddenly realised something else. I had been aware that I would have to cut some parts away from the brass strip in order to clear some parts of the bogie mounting that I couldn't remove (something about holding the drive train on or some such rubbish). This suddenly become a lot of work,and my brain desperately tried to find a simpler way around this so it could go back to a nap. The solution was very simple. Why not use the designed mountings which would set up the worm drives correctly (remember that I orginally purchased the bogies from Atlas as spares).

10 minutes on the Atlas website, and I had all the bits I needed ordered and on the way. I'm now wondering why the hell I didn't think of this before. Its so sodding obvious. All I will have to do is cut the frames up and set up the new universal drives in the right locations.

I then cut the brass sheet in 1/2 (as there needs to be 2 sides) and found that the locating bars were too deep for the sides of the tower to sit on the bogie as i had intended. No matter I thought, I'll just file them down.
 Well, it was sort of working, but I suddenly realised something else. I had been aware that I would have to cut some parts away from the brass strip in order to clear some parts of the bogie mounting that I couldn't remove (something about holding the drive train on or some such rubbish). This suddenly become a lot of work,and my brain desperately tried to find a simpler way around this so it could go back to a nap. The solution was very simple. Why not use the designed mountings which would set up the worm drives correctly (remember that I orginally purchased the bogies from Atlas as spares).
'SD-9 mech to show what I mean'
10 minutes on the Atlas website, and I had all the bits I needed ordered and on the way. I'm now wondering why the hell I didn't think of this before. Its so sodding obvious. All I will have to do is cut the frames up and set up the new universal drives in the right locations.
Saturday, May 15, 2010
Mmmm....Salty....
Am_Fet, having enjoyed the chance for sibling embarrassment, ponders:
While wandering through the depths of my hard drive last night looking for something else (a now quite frequent pastime, unfortunately), I came across this photo:

The place is Lake Grassmere (Marlborough) looking north. Grassmere is famous, of course for Salt....tonnes of it, in fact. And it seems like KiwiRail play their part in railing it out to the Unfit and Obese masses as the yard here (referred to as "Lake Grassmere Siding" on the relevant S&I diagrams) is quite extensive.

So, Once again it was back to every researchers friend, Google Earth....and the realisation that this wee operational nugget would make a great shunting layout.

Personally, I would model it as it is on the aerial photo in an L shape curling around the proud owner and his cohorts. That would place the main loading area to the right of the operator while the main line and sidings went across the shelf in front.
 Sure, the hills are on the wrong side, but a well done photo backdrop of the salt pans and distant hills around Cape Campbell (similar to KiwiBonds sterling effort on Moana) would really help to "locate" the layout. I would even curl the main line in behind the salt pile at one end for the hidden fiddle yard, while at the northern end it could quietly meander up into the hills. On a larger layout it would make quite a nice shunting puzzle for someone to take refuge in for an hour or so quietly shuffling wagons around while trains thunder past on the main.

Wagons seem to be a mix of containers and ZH wagons (an IA is shown here, luckily enough), but a detailed study would show exactly what would be needed....and would be a lot of fun as well.
And just for an operational bonus, here is the aforementioned S&I:

Particularly interesting is the use of key locked points in a Track Warrant area, and is a feature that could be simulated for operational interest....an area I'm definitely exploring for my own layout (and somehow I've got the full wiring diagrams for a TWC Loop...now that would be cool to get going!)
So there you have it...a specific heavy industry, in the middle of nowhere yet still instant recognisable with constant traffic, operational interest for both local shunts and pickup/set downs from the main and some stimulating modeling to boot....Very Tempting....
While wandering through the depths of my hard drive last night looking for something else (a now quite frequent pastime, unfortunately), I came across this photo:

The place is Lake Grassmere (Marlborough) looking north. Grassmere is famous, of course for Salt....tonnes of it, in fact. And it seems like KiwiRail play their part in railing it out to the Unfit and Obese masses as the yard here (referred to as "Lake Grassmere Siding" on the relevant S&I diagrams) is quite extensive.

So, Once again it was back to every researchers friend, Google Earth....and the realisation that this wee operational nugget would make a great shunting layout.

Personally, I would model it as it is on the aerial photo in an L shape curling around the proud owner and his cohorts. That would place the main loading area to the right of the operator while the main line and sidings went across the shelf in front.
 Sure, the hills are on the wrong side, but a well done photo backdrop of the salt pans and distant hills around Cape Campbell (similar to KiwiBonds sterling effort on Moana) would really help to "locate" the layout. I would even curl the main line in behind the salt pile at one end for the hidden fiddle yard, while at the northern end it could quietly meander up into the hills. On a larger layout it would make quite a nice shunting puzzle for someone to take refuge in for an hour or so quietly shuffling wagons around while trains thunder past on the main.
Wagons seem to be a mix of containers and ZH wagons (an IA is shown here, luckily enough), but a detailed study would show exactly what would be needed....and would be a lot of fun as well.
And just for an operational bonus, here is the aforementioned S&I:

Particularly interesting is the use of key locked points in a Track Warrant area, and is a feature that could be simulated for operational interest....an area I'm definitely exploring for my own layout (and somehow I've got the full wiring diagrams for a TWC Loop...now that would be cool to get going!)
So there you have it...a specific heavy industry, in the middle of nowhere yet still instant recognisable with constant traffic, operational interest for both local shunts and pickup/set downs from the main and some stimulating modeling to boot....Very Tempting....
Friday, May 14, 2010
Embarrassing Birthday Post
Yep, The Head Druff celebrates another one of those yearly milestones today. And to put the photo below in context, here is a txt conversation from last night:
DruffsMum: If I get you the bucket photos, can you put them on the Blog?
Am_Fet: Of course I can!
DruffsMum: Have sent photos, let me know if you get them
Am_Fet: Mwahahahahahaha

Happy Birthday!!!!!!
Love from the family....(who he will probably excommunicate after this blog post, as well as remove my authoring priviliges!)
Thursday, May 13, 2010
Plan time pt 2
And here is my take on a layout that's just a wee bit larger than the one Mr Bond proposed last year, and should knock the plagiarism accusations on the head, as there is no way that this baby's going to fit on a shelf!

I've always been interested in a layout shaped like this, and I think it really works for this. its also a completely different way to view a layout, looking along the track, rather than across it. The operation would be done from behind the bins and at the top end by the station. Trains would be completely dwarfed by the surrounding hills as they rightly should be. Operation seemed to be quite intense with a variety of locos running on the branch during its years in operation. the miners trains are a chance to put some tatty old style carriages on, and then there are short rakes of Q's and La's to run as well. I'm not overly sure what the length on a side should be, but probably 10-12'.
(I really don't do small layouts well do I?)
Wednesday, May 12, 2010
Plan time
Not much as been going on at the workbench of late. I've found a couple of interesting chemistry books as PDF's (warning they are each about 4 MB) on the net that I've been reading. The first is 'Excuse me sir, would you like to buy a kilo of isopropyl bromide' which is about a startup chemical supply firm and its trials and tribulations which put my company to shame. The other more amusing one is 'Ignition' which is a history of the early rocket propellant research. For those of you who want to know if there is a fire that you can't put out, there is, and it burns concrete quite happily. The way to stop it is wait till it gets tired. I'm not sure I would have made it as far in my chosen profession in those far off heady days when researchers would merrily work in clouds of horribly toxic materials until they started seeing angels singing at which time it was off to the hospital or a nice safe desk job. How any of then survived long enough to finish anything is beyond me
Anyway, back to the real stuff. After a discussion with a Friend yesterday I looked up a plan I've been thinking about for a while now, but with a bit of a different slant to it. Yes, its the good old standby for modelers of all things west coast, Rewanui.

Most of the time this gets shrunk as its modeled by S scalers who don't have large enough rooms, and they normally only model the station. however as you can see the yard by the bins was much larger, and must have resulted in a fair few trains up and down the incline. I've come up with a differnet take on this which I'll sketch out tomorrow and post.
Monday, May 10, 2010
Back on the work bench
At the weekend I had a sudden urge to butcher something, and so I grabbed the first thing that came to hand that required butchering; The Ew bogies. As I had done with the Twinset railcar bogies, these were cut back so that I could add the detail to them. Again, due to the general design its possible for one to remove almost all the plastic while the brass pickups hold the wheels together.
I'm currently in the early stages of working on the gear towers for the end bogies, which have so far involved soldering bits of brass together. I'll have to wait till later in the week to do the cutting and filing bits.

I'm currently in the early stages of working on the gear towers for the end bogies, which have so far involved soldering bits of brass together. I'll have to wait till later in the week to do the cutting and filing bits.
Sunday, May 09, 2010
Sunday morning
Well, there was going to be a post about me completing some wagons and making progress on my Ew here this morning, but I got nailed by a lack of glue in the house.
So, instead here is a link to a guy who has built a portableish modeling bench. Personally I think he owns way too many tools, but then maybe I don't own enough?
So, instead here is a link to a guy who has built a portableish modeling bench. Personally I think he owns way too many tools, but then maybe I don't own enough?
Saturday, May 08, 2010
Operation
As part of the whole Paekakariki saga, which will slowly play out over an increasing amount of time hopefully if I get more work, I've been doing a bit of thinking about the operation of the whole shebang. While at home its fine, as I can just potter to my hearts content while having a few brews, if/when its in an exhibition situation things will be entirely different. Doing the numbers reveals that to run the system properly there would have to be at least 3 operators who knew exactly what was going on. Doing that all day is pretty full on and its normally hard enough to round up a group of people to allow you to have 2 people operating at once. I was therefore interested to come across this yesterday on RMWeb.
Reading pre-war accounts of Maybank, the first serious terminus to fiddle yard layout, it seems that at exhibitions Bill Banwell and Frank Applegate ran a twenty minute sequence timetable at set times every hour "The next demonstration will be at...." possibly with a break for lunch. In between runs they were free to discuss their 0 gauge layout with visitors and maybe that's not a bad idea. Most modern exhibition layouts are run as burlesques with performers on stage all the time but no particular narrative but there are other ways of doing it.
Personally I like the idea of having a period (maybe an hour or so) of intense operation, followed by a break time where maybe you would leave a railcar running on the roundy roundy, or people have a play around with things in no particular order. Its quite hard to keep running trains for several hours, let alone a full day unless you are flush with warm bodies to man the trenches.
Friday, May 07, 2010
Monthly support group meeting
That time of the month again, and due to a variety of circumstances I only found out it was on 30 minutes before I had to head out the door to get a lift. Mmmm, peanut butter on toast for dinner. I know how to live!
I took along my first bit of trackwork and had a chance to discuss the various problems I had faced adjusting an S scale technique to NZ120. This then lead to a wide ranging discussion on the various techniques that could possibly be deployed in making ones own track. True to form there was then a question that should people who don't have any practical experience in the area being discussed be able to have an opinion on what was being discussed. I had to point out that if this was enforced that there would be far fewer wide ranging discussions. Maybe it was a ploy to get to the cakes at supper time faster?
The other local NZ120 modeler brought along a trackgang Dx kit. He's been having a bit of trouble assembling a flat wagon kit as well, and one of the (far) more experienced modelers had been giving him a hand with it. The S scale modelers comment were 'its a bit crude isn't it'. I did point out that the kits themselves are 15 years old.
Further to this, and on inspecting the Dx kit I came up with an easier way to put the handrails on the long hood. take the top and turn it upside down. Mark out where the handrails are on the hood, then take a fretsaw and cut into the whitemetal a short distance (it might pay to either have a block of wood to stop cutting or a line to show where to stop) then fold up a handrail to fit it. then solder in. I think it sounds a lot easier than a stack of drilled holes which are a complete bugger to get right.
Also, in discussion on other bits of the model while answering some of the questions I was struck by a thought or 2. Do modelers nowadays brought up on a diet of high tech kits expect a great deal from the kits that they buy? Someone made the comment last night (having purchases an 009 Backwoods K1 Garratt kit)that the British are streets ahead of us in etched kit design. I just thought (and didn't say) 'yes that seems to be the case, but there is a stack of badly designed kits out there'. Also the British modeler tends to fix bits that are incorrect, or buy in detail parts,and rather than complain, accepts that this is part of the process. I also realised that a lot of the things I just 'do' and take for granted are skills that I've picked up over 25 odd years of doing my own thing, making mistakes and learning from them. This is really easy to forget when you get asked questions by a beginner (well, at assembling kits) and suddenly realise that what is common sense for you is not necessarily for others.
Thursday, May 06, 2010
Steady progress on the southern front
Well, not being quite so encumbered with work (anyone with a part time job that they want filled in Nelson just give me a ring, I could do with the work) at the moment, but suffering with the general malaise I have also struggled to move forward on the various projects. I think its just the onset of winter that's doing it (in this hemisphere anyway).
About the only thing I've done in the last coupe of days is to sort out the track alignment in the Paekakariki loco depot. The main problem I was having was to get the tracks round the back of the fueling point to meet up with the turntable in line with the access track from the other end, while not dipping below my self imposed minimum radius of 600mm. This had proved impossible in my previous attempts, but for some odd reason in the last couple of nights its all come together.

The number of points in this layout still frightens me a bit especially when my last layout (Cass) had 4, and 2 of those were only to provide a rear track for a fiddle yard. I've always been a firm believer in the KISS method of building layouts, so this is well out of my comfort zone. for actuating them I'm seriously considering memory wire, which expands when its heated and can be set up to use this property to actuate points and signals. it also appeals to the scientist in me.
Wednesday, May 05, 2010
All quiet on the Northern Front
DB says (after some time) (warning, no NZ120 content):
It's been quite a while since I've trodden on the blog and quite a while since I made something in NZ120 now. I did get my backdrop painted on the new module last week but that hardly warrants a post.
So let me waffle pointlessly upon irrelevancies.
I spent last weekend at a trainpiccytakers conference (there's a gathering for every obscure fascination it would seem) and one of my favourite lines from the whole thing was from a prolific photographer from the 70s who has returned to the hobby after an absence of twenty years. He said "When we were young there were all these guys who had great pictures in Trains magazine and then suddenly they stopped getting published. What happened?. Now I know. Life. Life happened"
And so with me. I've gone from working zero hours a week to working 60-70 hours a week (I think I'd make a higher hourly wage at McDonalds). Its spring. The garden requires constant tending. The car needs constant cleaning. The house needs bits painted. There are some train bits in the shed I should really clean up. The list goes on.
But I'd better get onto making some more NZ120 stuff soon. My resin and rubber expires this month and I've only got three more months of usable weather left before things get all hot and humid and awful. And then they'll get all snowy and cold again.
I was blown away by the responses to my previous concerns about NZ's most fragile scale. This blog was originally intended to foster a sense of community, to share and to inspire. I think we all feel a little less alone when we know there are others out there struck with the same afflictions, even if they be as silly as making little models of trains. Great to see more people giving NZ120 a go - on NZ120.org, Earwicker's blog and at the convention
Maybe we're witnessing the second coming (or is it the third?) of NZ120!
Tuesday, May 04, 2010
All Quiet on the Western Front
Am_Fet writes:
Like Chateau Druff, things seem to be very quiet also in the Waihaorunga Creek Workshops. Not too sure the reason why....maybe its the long cold winter nights that are starting to close in, or the fact the work has just got 33% busier than it was. CAD time and enthusiasm seem to both be MIA at the moment, but at least a few things have been stirring in the South of the North over the last few weeks:
- In a fit of absolute madness, Cabbage has sent away for a 1:7 point kit and accessories from fasttracks (http://www.handlaidtrack.com). His rational? "I wasnt too sure if their products would be useful for Sn3½, so I ordered the N one to see what it was like as I know the Waihaorunga Creek boys could use it". So in preparation for the arrival of this piece of Code 55 goodness, I drew up an overlay of the template available on the website with the sleeper spacings of a standard 1:7½ turnout from the guild plans

I'm not too sure how we are going to marry it together, as the PCB sleepers (in red) are an integral part of the assembly jig and holds everything in place while it is removed and placed on the layout. Maybe we need to replace them one at a time after the wooden laser etched sleeper pack is glued on...who knows. With a 6-8 week shipping time, we wont be finding out the answer anytime soon.
- Production times are creeping up on us again, and in reality its because we dont want to overload our Mr Laser with meaningless trivialities when he could be making lots more money from those more wealthy (Despite him trying to get the well paying stuff out of the way quickly so he can get to our "fun" projects). However, we've pitched an idea to him that he has leaped at: Namely us "renting" the business for a day one weekend and having him and all 4 of his lasers at our disposal - might finally mean the ZH and ZG finally get finished, I can get stuff to those who are waiting and I can start on another project, namely:
- After the J was finally finished and the shell shock wore off, I started casting about for the next "impossible" project....so I'm now toying with either a 44' Car or a 43' Birdcage carriage. Initial drawings in 0.4mm ply with 0.25 mylar strapping for the fine moldings show it might be possible:

In idle moments at work I'm designing the celestory roof in my head and how to make it part of the structure....
But thats not all....we're also playing with Code 64 and 72 wheels (on order from the States), CNC axles (in discussions with a lathe owner), Type 18 bogie frames (Drawings care of KiwiBonds to complete), 2mm Acrylic locomotive frames (prototype on my workbench)....but it really is all still in the "Suck it and see" phase. When will any of it be finished? Who knows....None of us are in love with the hobby enough at the moment to want to push it. Most of these projects are just noodling along, especially the wheels and track one....we want to make sure we can do the undergubbins accurately first before starting on the matching tops. BTW, this is what a /64 wheel on a CNC shouldered axle (perfect back to back) would look like in a scale Type 18 bogie...

There is a lot more really, but again, we arent pushing these things....its just not the season for that sort of carry on....
Monday, May 03, 2010
Monday blues
Its a slow day here at Chateau dandruff. a weekend spent driving others round wine tasting (followed by evenings of catching up) has left things feeling a bit flat here this morning.
About the only thing I did manage was to sort out the track alignment on the last of the Paekakariki modules. However, its now extremely daunting looking at all that trackwork that I have to build, maybe I shouldn't be looking at it late at night.
As an aside, does anyone else have pictures of track that they have made that they would like to share? I'd be interested to see how others methods compare.
Sunday, May 02, 2010
Interesting site (but beware)
Forwarded to me by amateur fetler.
This website takes a look at some 'ghost' railways in the lower/middle South Island using google maps.
having said this, we are aware of a few 'errors' in the trackbed that are howlers quite honestly (certainly on our old stamping ground the Waimate branch) so you may want to take it with a grain of salt.
Saturday, May 01, 2010
forward planning.
To get away from trackwork, and while Woodsworks slaves away over a hot saw making my next order of PCB sleepers, I will now reveal where my planning is up to for the all important center module.
 Busy isn't it....
The top is the south end, and the platform fits in the big empty space between the 2 sets of loops. That's the easy bit. The bottom becomes a real mishmash of track. going from right to left we have the main line with a very sexy crossover (Hmm, must get out a bit more). The next 2 lines run into the loco depot, then the next 2 run past the refueling area (coal and oil), and then subsequently join and run onto the turntable. The 2 after that are for the backside of the refueling area, which is where the Loco fuel tankers were shunted, plus another turntable lead. These 2 tracks also join up. The final area is the yard tracks for the Air-rail shed.
From my count there are 10 points plus the previously mentioned crossover. Now, normally at this point (haha, they don't come much older than this, I'll stop when I get onto building scenery)) I would be scratching my head wondering how I was going to fit the trackplan into the commercially available points. I would also be wondering which kidney to sell to afford it. Fortunately since I'm making my own track, these problems vanish, to be confronted by other ones like 'man, I have to make all this stuff by hand...'.
The next problem will be sorting out point motors to actuate them all, as I'm not going to be using manual control. The layout is designed to be operated from either side, so the old 'wire in the tube' method wouldn't cut it. Plus I have visions of a nice signal box style central control unit which will either work, or be a complete disaster...
(If anyone knows of an Internet location for making your own point motors, can they pass it on?)
Subscribe to:
Posts (Atom)