Showing posts with label Elmer Lane. Show all posts

Saturday, August 30, 2025

Elmer Lane 29 - Sanding tower and bits

DB returns to shoo away the tumbleweeds:

A few projects have been quietly ticking away in the background over the last few weeks, so here is an update on a few.

I've been threatening to add a sanding tower to Elmer Lane for some time now, and I was under the misapprehension this could be knocked off quite quickly.

There was a bit of pondering of course. This is a fiddly structure, and being in the thick of the action, would be prone to being knocked. Styrene is my go to, so a top was assembled quickly, but this wouldn't be ideal for the legs.  I considered brass, and then finally settled on the steel wire I'd been using as point rodding. I was going to face this with some styrene H sections, but that made the legs look too chunky. 

The legs are splayed in both dimensions:


The real thing serves three through tracks off the turntable, but as I figured there would be all sorts of clearance issues around it, I decided to minimise the impact of this and make the third road a new dummy stub out of some ancient Micro Engineering code 40 track.


Installed. While there is plenty of clearance for a DM and SpaceRacer next door, not much will fit underneath it because of the legs on a curve. This may prove to be a pain. But then again, I'm not sure how much the turntable will be used in the real world, and besides, there are still the 'original' three roads that can be used, and steam locos can be sanded from one of them if they want to be. I could have moved it further from the table onto a straighter bit of track, but that would encroach on the 'diesels' end of the module. 


I need a sand cooking shed next.

In other news, as you can see from the two photo above, the crew quarters now has some crew chatting out the front. They seem to have shiny polyester suits from the 80s on here, so they might expect a rain of dullcote soon.

And some recycled (about 4 times) Atlas N scale poles have been planted beside the Hoki line.

Sunday, June 22, 2025

Elmer Lane 28 - Coal Bin

DB says:

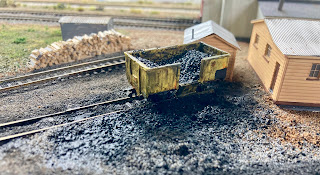
Elmer Lane always seemed to have an old yellow La with coal on the stub tracks outside the Supervisor's office.

So mine does now too. This was one of a dozen La castings I got from someone (Rod Murgatroyd? Cross Creek?) that were the start of an undisclosed (and inelegant) Stone Train that I started putting together when I built the DI all those years ago. 

One of the wagons was de-limestoned (and what a surprise to find I'd buried a lead slug under there), its door was cut open, filled with coal and repainted. I suppose I expended about ten minutes on this. It's now permanently attached to Elmer Lane. 

Obviously needs more rust and fading, but that might look unprototypical...


Sunday, June 15, 2025

Elmer Lane 27 - Officer's Mess

 DB raises another building.

The last major building to be installed at the depot is labelled '32/33' at the bottom left of this previously-featured cropped image taken by Ian Coates from the Steam Inclined book. This was the loco crew's amenity block, with lunch room, lockers, lavs and showers. The building was extended over its life and survived into the 1980s.

The building was made using the methods previously detailed that have been employed with the others on the module, being an evergreen clapboard shell with chunky strips for eves, and (modified) brass etched Ratio British N scale windows, which are obviously a tad small. But the effect is OK I reckon.

The roof going on below. This is the same ancient but lovely Fidelis N scale corrugated iron used on the yellower-coloured office block on the other side of the depot. This time I scored a midline and chopped this into skinnier verticals and glued the sections on, rather than using one solid sheet. I'm not sure even I can tell the difference.

A test fitting, yes, the building should be located on a different angle, but this was intended to partially hide the shadow sidings behind:


Despite the orangey look in the picture above, the door and windows are a similar shade to the roundhouse windows. The next morning, the crew block and the larger stores building beside it had some weathering applied:


Odd angles mainly due to the wide angle phone lens. The crew building has an open back and hides the Digitrax autoreverser module featured in a previous entry, so this building will probably be glued down, whereas the roundhouse, stores and railcar shed are still removable. The Stores shed may lose the unprototypical lean-to out the back, or at least its roof, for better access to the Kato turntable controller underneath it. 

Thursday, June 12, 2025

Elmer Lane 26 - Autoreverser test

 DB plugs onwards.

A return was made to the basement to see if I could get the remaining bits of the module any closer to finished.

The 'shadow' storage tracks out the back were laid in a fairly ugly manner. I used up some old code 80 points and track here, and lazily did not power the frogs (relying on the electrofrog wipers). Seems OK so far.  All rails were extended towards the 'north (the station) and a piece of PC board applied under them and wired up. I've also decided to extend the depot track at the 'back' (closest to the red fence) towards the camera so that it can be accessed from the rest of the layout. Previously it was only accessible from the turntable, which meant you couldn't store pairs of diesels there easily.  Its yet to ballasted at this end until the point is located just this side of the next module.


A Digitrax AR1 autoreverser was added onto the balloon loop to deal with the unfortunate physics of the "red wire becoming the black wire" as you go around the loop and back in the direction from whence you came. 


This works by having an isolated section in the loop that is powered from this device, which is (seemingly unsophisticatedly) a relay that works like a reversing switch.  As a train enters or departs this from either end of the isolated bit,  if a short is detected it tries flipping the polarity. This seems to work, and gets good reviews online. I picked it up when Acorn models in Christchurch had a sale on a while back. 

My original plan had a one metre length of flex track on the Hoki line (in front of the railcar shed) that would be powered by the autoreverser, but I recently decided to isolate the entire lump between the points at the far end of the storage sidings through to the points at what will be the Greymouth Station. This should be long enough to take the longest train (about three metres), and avoid the tiny probability that both ends of a one metre section could be bridged by metal wheels at the front and back of the train at once. Very unlikely given that most of my wheels are plastic anyway, but having said that, most of my vans have metal wheels, as does the Tranz, and that is longer than a metre. 

So, with that installed, it was time for a test. Out with the Multimeter and... shorts everywhere. I took off the remaining locos, checked for exposed wires touching underneath, isolated the autoreverser... Nope. 

Finally I decided I'd have to snip some wires to isolate a few segments to track down the error. Either on the new shadow tracks, which look fine, or on the roundhouse roads, which also look fine, or on the small bit of Greymouth platform/loop, which looked OK, but was now covered in light ballast, so I couldn't really tell. Snip. Action stations! I'll have to re-feed those two tracks later. I knew I should have been testing this all along....

Anyway, the module works, the turntable still works, and you can spin a loco or drive one onto the powered roundhouse tracks.

Saturday, May 03, 2025

Elmer Lane 25 - Module End

 DB returns:


A little progress has been made in recent days at the north end of Elmer Lane. I finally made the decision to install the 'Greymouth platform-to-loop' turnout here. The original thought was to have this on the next module, thus keeping the 'Hokitika line' track, which runs in front of the depot and then circles around behind it, clean and clear of complications.

After a bit of measuring of my current, and extrapolating out to my 'desired' TranzAlpine, I reckon it might have been a bit tight. Moving the turnout onto this module probably gives me two extra car lengths if required. You can never have enough storage space.

Installing a turnout at this late stage also requires putting in a control rod after all the other tracks are well in place and ballasted. The rod runs just beneath the surface of the baseboard in a plastic tube and seems to work fine in tests, although I haven't attached the spdt switch to power the frog yet.

But I did cut a strip of copper-clad PCB, scored and drilled it in the right places, and attached it to the edge of the module. The platform road, loop and depot access track were then soldered down to it, and some feeder wires put in place. With the extra track, the track spacings are a little tighter than I like, but there is plenty of room in tests with my largest vehicles (SpaceRacer, GT, DM)

With that done, and the last of that track paint squeezed out to cover the new sections of rail, the last of the visible tracks could be ballasted.

The day ended with me 'pottering in the garden' to the west of the Hokitika line, planting a few trees, bushes and grasses.  While a few of us have bemoaned the closure of various 'local hobby shops', it seems that a slight salvation seems to have come with a resurgence in wargaming and kitmaking. There are now three or four gaming or art shops in Dunedin that now carry paints, glues, decalling supplies, tools and scenic materials. I've picked up a few packs of 'Gamer's Grass' recently. Its like the old Silflor tuft stuff, (I still have about 80% of that Silflor left) and Gamer's Grass available in a reasonable variety of realistic, plus a few fantasy shades, and different lengths too. Its a lot cheaper than Silflor used to be too, at between $12-15 Pacific Pesos for a section a little less than 20x10cm.

I like being able to mix the various shades and lengths in a given area. I believe you can make these blobby grasses yourself on a piece of wax paper if you have a static grass machine, but for the rest of us, the occasional visit to the hobby shop can't be beat.

I like using these tufts to make cabbage trees too, using old twigs, or in this case, bits of a Woodland Scenics brown plastic tree armature with bits of blobbygrass attached to the ends. As was learned on Moana many years ago. Four little cabbage trees were added, and here's the worst of them:

Saturday, April 26, 2025

Elmer Lane 24 - Ssssssmokin! Topping the roundhouse with some stacks.

 DB puffs:

Ever since the roundhouse roof started to come together, I've been fearing making the smokestacks. It was always going to be tough to make 20 'matching' and relatively convincing stacks.  Hence they have been rightly left until last.  

The first lightbulb moment was procuring some square styrene while I was last in the big smoke. I settled on Evergreen 255 Styrene Square Tubing, which is almost 8mm across the outside faces. Looking at pictures and plans, the real stacks were 3-6, or track-guage wide, and with my roundhouse being slightly underscale, I figured this would be OK. 

The next thing that I wanted to do was to have an elevated square 'hat' on top, like the real thing. The next slightly dim bulb that went off was to use staples as supports. I suppose in hindsight I could/should have used a smaller square tube inside the grey outer, and painted it flat black. 

I managed to find some thin-crown staples at the Tool Shed (about a 7mm crown) that did the business. The wire gauge is a bit chunky, but when painted black it doesn't really matter. Although with a discount they cost me $13, the small packet contains 5000 staples. I used 40 here, so I can make another 124 roundhouses with my investment should I choose to. They will probably end up at a local op shop to give someone else an economic way to build roundhouse stacks. 

The first five test stacks went together pretty quickly. I cut one stack out of pre-painted square tubing (marked with black dots as 'the master') and used that to cut the base angles for the others. The staples were contact glued inside, with little sticks of styrene to keep a consistent height and approximate level-ness to the staple-tops. After the first dry run (below) it seems that not all my roundhouse roof sections are of even gradient (of course not!), and none were as steep as the plan I had originally built the roundhouse too!

So the laid-back five (above) had their bottoms filed down to make them stand a little more vertical and the master was similarly treated. 

The production line then started up. It took a few hours over a few visits last week, but eventually I had enough bits made up.

And painted, and weathered.

The flat caps on the real Elmer Lane were originally planned to be curved, and it has also gone through iterations of stacks over the years as they wore out and a few obviously burned out. 

If I divide the roundhouse into two halves, a 'front' end facing the turntable and a 'back' facing outwards, the plans and early pictures show two stacks per track out the back end, and two at the 'front' side for the first ten roads (counting from the shed boiler (left) end). This means a total of four stacks per track for the left ten tracks.

The other 8 roads had a single stack out he back, these were used for tender engines, with their smokeboxes facing the rear glass wall, as has been seen in most of the pictures taken inside the shed. The left ten tracks often had tank engines with their snouts facing the turntable, but these tracks were used for any engine type. The workshop extension had no stacks and troughs, fair enough, as locos out there would be cold.

Sometime after the 1950s, the ten 'left' tracks had their two front stacks reduced to one per track. When the roundhouse was largely demolished in the early 80s, four stalls were kept and these remained through the 1980s with no stacks.

This is a long-winded way for me to attempt to justify making as few stacks as possible. Despite owning no steam locos, my roundhouse is set in the late-steam era, so it will have one stack per road out the back, and five roads will have front stacks out front - the two washout roads next to the donkey boiler, and the three workshop tracks. I will probably relent and make three more for the front tracks, but this looks moderately convincing so far. 

Stack locations were measured (more or less), and marked with a dot of a Sharpie marker. The roof was then subtly weathered around the dots with a smudge of black from my old Tamiya Weathering Master. I've had these for 17 years now, and use bulk double-ended makeup applicators from the dollar shop to replace the original spongey thing that eventually rips itself up.

A few streaks of white and brown were also added, and the eaves had some weathering applied as well, while I was here. The painted and weathered stacks were then placed on the dots and arranged so the most 'vertical' and better looking examples were closer to the front, and any skewiff weirdos were further away from the viewing side.

The bottoms were then gently dabbed into a thin puddle of some PVA-like glue and placed on the roof. This certainly could have turned out worse.


Wednesday, April 23, 2025

Elmer Lane 23 - A little scenery...

DB exhales:

I've been working on a couple of model trainy things over the past week or so, but one relatively quick task that has been a long time coming, was to ballast the loopy track that does a short cameo as 'the Hokitika Branch' between Greymouth station and the roundhouse. This has now been done, as well as some basic scenicking either side of it.


I've ballasted back to where the truncated workshop sticks out the back of the roundhouse:


And now with a few more shrubs and grasses planted:


Some blobs of grassy stuff are still drying (hence the patches of light gluey colour) and there will likely be further plantings as the scenery progresses. At the moment, greenery and ballast have made it past the railcar shed. Soon I'll have to decide on putting a point in just beyond where the ballast ends to service the Greymouth platform. I fear if I leave it until the next module a loooong TranzAlpine won't be able to sit at the station. But that's a story for another day.

In the second pic you might have noticed there has been some prep work done on the 'staging/workshops' tracks behind the fence, and the preview of an upcoming post on some trial roundhouse smokestacks...

In the last two pictures are some coal wagons that have featured in posts over the past few months, and recently on the NZ Model Railway Guild website 

Thursday, April 17, 2025

Elmer Lane 22 - More Roundhouse Doors

DB concludes the door odyssey:

Another hour in the basement today and I had finished the other 16 doors and assembled them into pairs. I made my own .040 x .010 strip out of sheet - it was a bit curvy and of variable width, but a bit of glue straightened it out. Nothing that a galloping racehorse would notice. 

And then some paint, and weathering and glue....


While the roundhouse was on the deck, it received the final hidden wall segment at the back of the workshop, a little reinforcement between the segments, and I painted the bottom centimetre of the interior legs a shade of light grey too, so the employees can see them in the dark. 

Monday, April 14, 2025

Elmer Lane 21 - Roundhouse doors

DB excretes the following words: 

Roundhouse doors, what a pain. There are so many of them. Why did nobody tell me this before?!

It seems the wooden doors on the real thing were re-clad with galvanised corrugated iron around 1959-60. Moisture between the wooden framing and wooden cladding had rotted out the covering, and it was felt the corrugations would allow more air to circulate and dry things out. It was noted in that particular paper that the doors were almost always kept open, and that jives with every photo that I have seen of the roundhouse. Maybe they were closed up in big storms.  

In going through my styrene library, I found some cheap(er) JTT sheets that I bought quite a while ago to do the roundhouse... before I forgot I'd bought them. Out they came and became doors, of which I need about thirty.


I started framing these out as I had done for the Railcar Shed, referring to prototype pics of the roundhouse. I thought I had ample .010x.060 styrene strip for the framing, but before I knew it, I'd run out at the halfway mark. Dammit.

And yes, EB, that is the same gunked up styrene glue that you failed to extract anything from. It has since made the store shed, railcar shed, and all those other little offices and sheds.... And its still going strong on the doors! 

The two colour pictures of the depot that I keep looking at (Steam Inclined and 


xxxx

)  both have the doors that faded/pinked shade of red oxide that matches the window casement frames, so I attempted to mix up a batch of that, and my natural impatience had the doors that I had made painted, weathered and installed within about an hour, rather than doing the more sensible option of waiting until the other doors were built and doing them all in one go. 


The 'weathering' consisted of Tamiya panel line detail (a product that I'm falling out of love with) and a cool bottle of AK 'Starship wash' that I picked up while shopping on Paraparaumu's Rodeo Drive with the Head Druff last week. I used this on some of my recent batch of LCs and like it a lot. I have another of their 'interior washes' (for plane models) that I have used on a lot of things, including the roundhouse, but its a bit green-tinted for general use. On the plus side, it has all these little blobs of grit and mess in it that sit wonderfully on models. The starship wash is more a thin sooty wash, but I'm starting to like it. I wish these Mig/Ammo/AK products were more readily available in the provinces. Some flat varnish should have been applied to these doors, but I'd glued them in place before the weathering had completely set.


In other news, with the roundhouse lifted off the depot module and up to my eyes to attach the doors, I finally got around to filling in a few gaps between the casement windows on the outside segment walls with pre-painted reddy-pink styrene strip. 

And touching up a few missing bits of paint. I pre-painted a lot of that stripwood, cut it and glued it together to make the roundhouse, so there were a few imperfect joins that have just received a few blobs of paint. I also painted under the eaves of the raised top-hat roof at the end closest to the public, not that many people will get down that low, and if they do they'll see all sorts of other flaws.

'Soot' was applied above each stall door (weathering powder), and then the whole front of the shed was Dullcoted to keep that all in place.  I was careful not to get any Dullcote on the roof, or any more on the windows. 

The vertical strips were weathered and then the pairs of doors attached to them.

You might also (barely) see the results of using some black 'Vallejo Pigment FX', which is basically finely ground 'pastels/chalk', on the roundhouse tracks and around the donkey boiler room to represent coal dust, oil, grease and other miscellaneous black stuff. I've put that around the main loco in/out/storage tracks as well and reckon it looks ok as a first cut. On the roundhouse tracks I've gone the further step of 'fixing' it in place with Isopropyl alcohol. I suppose we will see tomorrow if it has stuck! * Without fixin's, it will eventually fall off or blow away, as its an incredibly fine powder and doesn't seem to have any adhesive properties, unlike the old Bragdon weathering powders used above the doors.


Presumably the next blog post will be the big reveal as to whether I waited to procure more strip of the matching size to finish the other doors, or just went ahead with the wrong size. Oooo! Cliffhanger ending!  **


* it did!

** spoiler alert, yes I did figure out the obvious alternative....

Thursday, March 06, 2025

Elmer Lane 20 - Misc buildings

 DB builds onwards:


Today I a added quick and dirty (not an ideal descriptor for a loo?) toilet/bike shed (for when you are really in a rush) and one of the buildings to the south of the foreman's office. There were really two here, one being a clerical store, and one being the EFCA/Loco Engineer's Assn recreation room. Who knew. I've only got room for one anyway. 

These specimens were made the same way as the Loco Foreman's office, even using some offcuts painted for such an occasion. Of course I'd forgotten that the window cutouts, corners, roof edges and so forth would have to be touched up anyway. 


Still no downpipes, but the other expelair has been used, and there is a toilet vent pipe on the loo roof, and a potbelly stove chimney on the other one.