Showing posts with label Scenes. Show all posts

Sunday, September 10, 2023

Resurrecting the dead

Yesterday afternoon with the help of Mr Hamblyn I extracted paekakarki from its resting place of 10 years. Setup only took about 15 minutes (some spent looking for tools).


Astonishingly the track seems to have survived its sourjourn with only 1 obvious repair needed (though nothing has been run yet) plus what feels like (running fingers along the track) a slight board missalignment on one edge. This afternoons job will be to measure up the area for the railway housing so that I can build a scale model of it to see what will fit.

My imediate impression is that there is more than enough space for a decent collection of houses. Down the other end at Beach rd there's not that much space (far less than I remembered) which does that the bonus that I don't have to build quite so many shops.

Saturday, August 26, 2023

Outside the fence

Unlike the larger scales, the one thing you can't avoid when modeling in NZ120 is that life exists well outside the normal railway boundaries. In fact, its what sets us apart from the neanderthals larger scales. With a renewed interest in Paekakariki I have been looking at the surrounding town to see what I need to  add.

Fortunately (again) there is a good White's avation photo (these guys should have been knighted) of the wider area. My interest is the sea-side of town. 

While I'm not planning to model all of it, the block of houses on the railway side of Tilley Rd are an obvious choice. And that means we need to take a closer look at the houses themselves.

So, from left to right we have:

-The single mens compound.

-Several W&MR cottages (they are present in photos from 1909).

-A group of 3 NZR railway houses.

-What looks like a stationmasters house (though I'm now leaning towards a double bay villa which still seems to be in position today)

-Another railway house

-2 small cottages

-The signal and traction depot

-A bowling green. I'm pretty sure no-one has modeled one of these before.

Moving just south we come to the buildings on Beach road.

- The pub

- The Holtam buildings, and possibly the buildings next to it (of a similar vintage) depending on just how long the road on the baseboard is.

As always the buildings that make it into the scene will be a juggling act between the footprint of the buildins and the shrunken space on the layout. In addition I've made a rod for my own back a long time ago by choosing to have the layout viewed from both sides which doubles the amount of modeling and research required.

Monday, June 17, 2013

Patea Way Back When

(No idea where everyone else has gone....might as well put up more rubbish)

A big thanks to Drew for finding these pics online while sitting at home on the company dime (ARSH says the roster...whatever that means).


Patea in 1958 was a really busy place with both the freezing works and the wharf going full noise.

Heres an enlargement of the enlargement showing strings of what look like Kc, Xa and Xc wagons under the awnings of the Cheese Store loading bays.  That saw-tooth roofed building on the right interests me as its no longer there.....I might revisit my photos to see if there are any remnants of it.  Also a stand out is that wonderful signwriting on the facade.  If you look carefully you can still see it under the grot, but unfortunately it hasnt come out in any of my photos. 


Some photoshop trickery may be needed.....

Saturday, April 27, 2013

Work day

I received a text on Friday afternoon, asking what my modeling plans were today. A good question, and I wasn't sure who had sent it. Was I going to have to find a modeling job for a one armed paper hanger?
Fortunately it was B 0-4-4-0 and I did have a job for him. you see, in his day job he looks at hills for a living (or something like that). So here was the plan. Opposite the loco depot I have a hill sized hole.


With a vast knowledge of hills, it was but the work of an hour (or two) to make one out of bits of cardboard.


I was also busy soldering stuff to finish up the wiring (until it goes wrong again). I made at least 4 solder connections in this time (with a bit of gluing on the side or underneath).


With the hill formed, I remembered that I still had some of the German scenic mat. This was tested to see if it would conform to the land form. To our combined great surprise, it did.

'Well, just make a small incision here....'
 It was pointed out that this may be the first picture on the blog of me doing anything useful working on the layout.

'looks like a hill to me'
So in a few short hours we have another basic land form sorted. There was no resort to any forms of that new fangled static electricity stuff. the general consensus was that it looks good. I will now have to remember what the catalog number was (and who the manufacturer was...)

There was then a bit of train running up and down, and discussion of options for the fiddle yards. I'm now doing some research on cassettes.

Thursday, April 04, 2013

Scenes

Time in the shed at the moment tends to involve periods of thinking at the moment, as there are far too many jobs to attack.


From the 'a bit of planning would have helped' files. I have to somehow fit a water filler stand between those 2 Da's. Another 5mm would have helped a lot.


 A view from the other side, with the foundation plate in for the Air rail shed.

 Sidewalks in for the main street of Paekakariki.

The sub frame for the north end return loop storage yard.

Wednesday, March 20, 2013

Meanwhile, manually.

With all this Caddy goodness its time to remind ourselves that it is possible to build models using not much more than a knife, ruler and glue. I finally managed to get my hands on a plan for a compressed air coaling crane.

After an hour of sweat and not a lot of swearing, we are at this point.

It is square but doesn't seem to be sitting right....

Sunday, January 13, 2013

Aims for the year

Right, back on deck here at Schloss Dandruff and today was the first day I had ventured back out to the Man-sion. This was just a cursory 'where the hell is everything' trip, but went downhill from there. A bit of a tidy up lead to putting every wagon I could find into the passing loops and sidings. For some odd reason this then lead to gluing some microtrains couplers onto wagons. This very quickly went downhill with springs flying everywhere. after a 10 minute search, and only finding one of three springs, I then proceeded to jump up and down on the carpet in the rough search area to kill the remaining 2 for all time (as I didn't think I should be throwing heavy objects at walls in frustration). Maybe I should look at a different coupler for my wagons....

So, after a bit of time spent thinking (while stroking the hillside, its very soft), I started to compile a list of tasks for the layout. never really a fun thing to do, but I thought I should probably have some aims for the year. This time last year I was gearing up for the convention and so a lot of the work was cosmetic. Actually, reading back through shows me just how much (read sod all) things I got done last year. Having a real job does suck modeling time...

There needs to be some work done under the hood with the wiring. The DCC set up needs to be properly sorted with all the various bits fitted in. I also need to bomb proof the track droppers. The track work needs to be complete with the track joins between the loco depot boards sorted. I would also like to get the end modules built as well. The north  one to be a loop and the south end a fiddle yard.

I think that the most progress needs to be made in the scenes. First up will be to mock up some more buildings (Paekakariki township) and complete some more hillsides. Then start replacing the mockups with real models.

Well, its a start I guess. Maybe it will be done by the next convention. Oh, that's only the plans for the large layout......

Saturday, December 15, 2012

Bugger

Well, its a fine sunny day here, so its obviously too hot to do anything outside. Off to the train room.
I was not happy with the colour of the coal stage, so a trip back to the work bench for some black was in order. Now normally I just give models a wash with my smoke mix. However this time round it just wasn't adding enough grime for my liking. In a flash of inspiration I got out the black and dry brushed the whole thing. And it worked really well. At this point I would normally offer you a picture but......

I replaced the scene on the layout and suddenly wondered 'will a loco run past it?'. Onto the track with 1431 and the answer is (drum roll)

'Someone has blundered'
 Hmmm, what to do. The main problem was that the Da would not fit round the curve as the fuel tank was rubbing on the horizontal beam. At first I thought 'I'll just pare it back, that will fix it'


 It did almost fix the problem, but I knew I was not going to be happy with it. And what if those big 4-8-4's didn't fit past? There was nothing for it but to cut 2mm off and move the side in. Sounds quite scary, but in practice it took 10 minutes and was a piece of cake. The end result?

'Daylight!'
 So, after a bit of as touch up, the almost finished article looks like this.

Maybe still not grubby enough, but better than it was, and waiting for a heavy covering of coal.

Monday, December 10, 2012

Wearing it out

Having a bit more spare time after the previous post, I did the painting and weathering on the coaling area. We left this project last post looking like this.


 Out with the Valejo Brown leather ( my preferred dark brown for just about everything from track to brake dust) and a good coat. make sure not to miss any bits.


 Then its out with the old crappy large brush and dry brushing with Valejo Iraqi sand, which if you are careful builds up the highlights.


 The last touch prior to lots of washes of thinned out Tamiya smoke is the white around the bracing board, to scream out to the cream of the NZR crews that 'There's a honking great coal yard here, don't walk into/off it!'


After the Tamiya wash it will be time for the piles of coal to go on, plus one or 2 detail bits. I must dig out the plan of the NZR compressed air crane and buckets.

Sunday, December 09, 2012

One bored at a time

 After feeling like I had been in a 'Model Railway Craftsman' article (A magazine where it almost seemed to be obligatory to make the raw materials before you started), I have a Coaling area that will hold coal when I get round to putting it in.

Number of bits of wood cut;                        heaps and heaps
Number of bits of wood pinging off into the ether;    dozens
Nuber of bits of wood going into boots;                         2
Number of bits of wood glued to fingers;                       0
Numer of spare bits of wood left at the end;                   5

What it looks like at the end.

 'Taken from the same angle as this.'

Tatty and uneven. Who knew that the prototype could match my modeling skills so closely.

Oh, and 1200th post up for anyone thats still counting. Yah us....

Tuesday, November 06, 2012

Back to the shed

I finally made it out to the man-sion tonight, the first time in a week or so. I must sit down at some point and make a list of potential projects to work on the get some momentum on this project. I did a bit of pottering on the road crossing filling in some of the gaps where the DAS had shrunk. I'm not sure how to use this stuff. Theres plenty of people on RMweb that seem to make it work, maybe it needs PVA mixed with it.

While I was working on this, I noticed a purchase from Railex that I have neglected to mention. Found in a box under a table was a collection of TT scale cars. Sifting out the convertibles, I found these 2 models which fit for my 1960's time frame.


 These look like 1960's vintage European cars, possibly of an eastern bloc persuasion. The one on the right is fortunately too long to be a Trabant, but does bear a passing similarity to British cars of the period as well. The one on the left has more of an American look. It reminds me of this shot from the Western Langford collection.

This however looks like a Fiat of some sort (I have no idea, I just make things up as I go. Both a good thing and a bad thing in my profession). It does give me some ideas for a group of photographers on the layout, though the hairstyles will be hard to model


I brought 4 at $5 a pop (which is OK I thought). I'll paint the tires black, and give them a wash of Tamiya smoke and a matt varnish, which will tone them down nicely.


Monday, July 23, 2012

Better the second time around?

I didn't make it to paekakariki. a few too many other things to do

I did make it out to the shed for a bit. More fixing the track between the module joins.
I swapped from PVA to No more nails. This is very messy, but sets quicker in cold temperatures and should provide a stronger bond to the track.

It looks like a dogs dinner but it should hold.

And just as a addition to the scenes. I can't find photos taken from close to this spot, but there must be some out there. Probably buried in an NZRLS box.


I'm now looking at the track and thinking just how huge code 55 looks. Still, I'm not tempted to change things now.

Thursday, May 10, 2012

Mid week

Bit of a slow patch here. I can't seem to find my modeling mojo at the moment. the last week has been confined to building up an etched J underframe, painting some ww2 Russian cavalry, and starting some scenic work on the main street of Paekakariki.


This was a piece of thick card that I shaped and then glued 800 wet and dry sandpaper to it. It was then sanded. I need to sort the colour out, but the texture is about right.

I've got a stack of ideas of track plans for the freemo layout, but have yet to commit these to paper, and do wonder if there is any interest out there in the 'penny dreadfuls'.

Saturday, January 14, 2012

Knocking things up

Well, with Convention just round the corner, things layout wise have taken a turn towards scenics. I've spent a bit of time in the last couple of days looking at building plans and working out just how I'm going to fit things in to areas that seemed perfectly fine, but are now just a bit small (the water tank area being one). Further to this, today I chopped up some perfectly good cardboard boxes to make some tatty landforms.


Its just there to give visitors next weekend a rough idea of what it will eventually look like. its only sitting there and will not be the final article. I'm not overly impressed with it as I now have nowhere to lean on the layout at the front when I'm working.

I'm tossing up whether or not to build some mock up buildings out of card to see how it looks, and what will fit into some of the areas which are a bit tight.

Ok, so a few beers later and we have a couple of buildings up.

First the goods shed opposite the station. Comments from the peanut galley have said that its not that important. However its one of the few buildings in this area and so it gets made. I followed the guild plans for the standard 20' by 30' shed, and the result was...

Too tall by quite a bit. knocking 5 feet off the bottom and its a much better fit.


Also for a first attempt, here is the loco shed in place. It will be useful to size and place the other buildings in the area relative to it.

So, we have a start on the pretty bits.
(sorry about the lighting, the lady of the house has borrowed the movable lighting for other more important jobs inside.)

Friday, December 09, 2011

Getting on with it

Pushing forward with the fuel oil tanks I made a trip to Mitre 10 midweek (power cut at work meant that I couldn't do anything), and came away with a piece of dowel which I guessed was the right size. Getting it home and cutting it into bits of the 'right' length I then plonked it on the layout in roughly the right spot.

From this angle they look a bit big, but the area is slowly coming together

From this angle the size looks about right. More importantly it looks good which is usually enough to get me back into a project.

If only I could find some better photos of the area. I may have to stage a break in to the NZRLS archives.

Thursday, December 08, 2011

The research hunt.

How does one catalog all the many bits of modeling research that they have?

Case in point. the other night I was trying to force myself to get started on at least one of the scenes on the layout. I looked at the area round the water tower. and thought that's not a bad place to start. I dug out a reject la casting for one part of it, then thought 'I remember a photo of this area'. But where to look. Unfortunately I don't have a 'photographic memory' (haha) for these things like my brother (He would probably say something like 'oh that's on page 34 of the March 1976 'Railways of Oureggostan' or something similar)

First up I trawled through the photo collection on the computer. No luck. Next I thought 'maybe its in one of my hard cover books.' I also recalled it being a black and white photo and so grabbed the ones that just had black and white pictures. No luck again, though I did spend some time looking at 1950's west coast photos and thinking again of that large layout.

Right, next thought. Maybe its in a Railfan, but again which one. Well, its going to be something about wellington, so its either in the EW article (oh, hang on, there were 2), the one on the Baker valve gear Ka's or one of the ones on banking with the section on out of the capital. back out to the Man-sion .

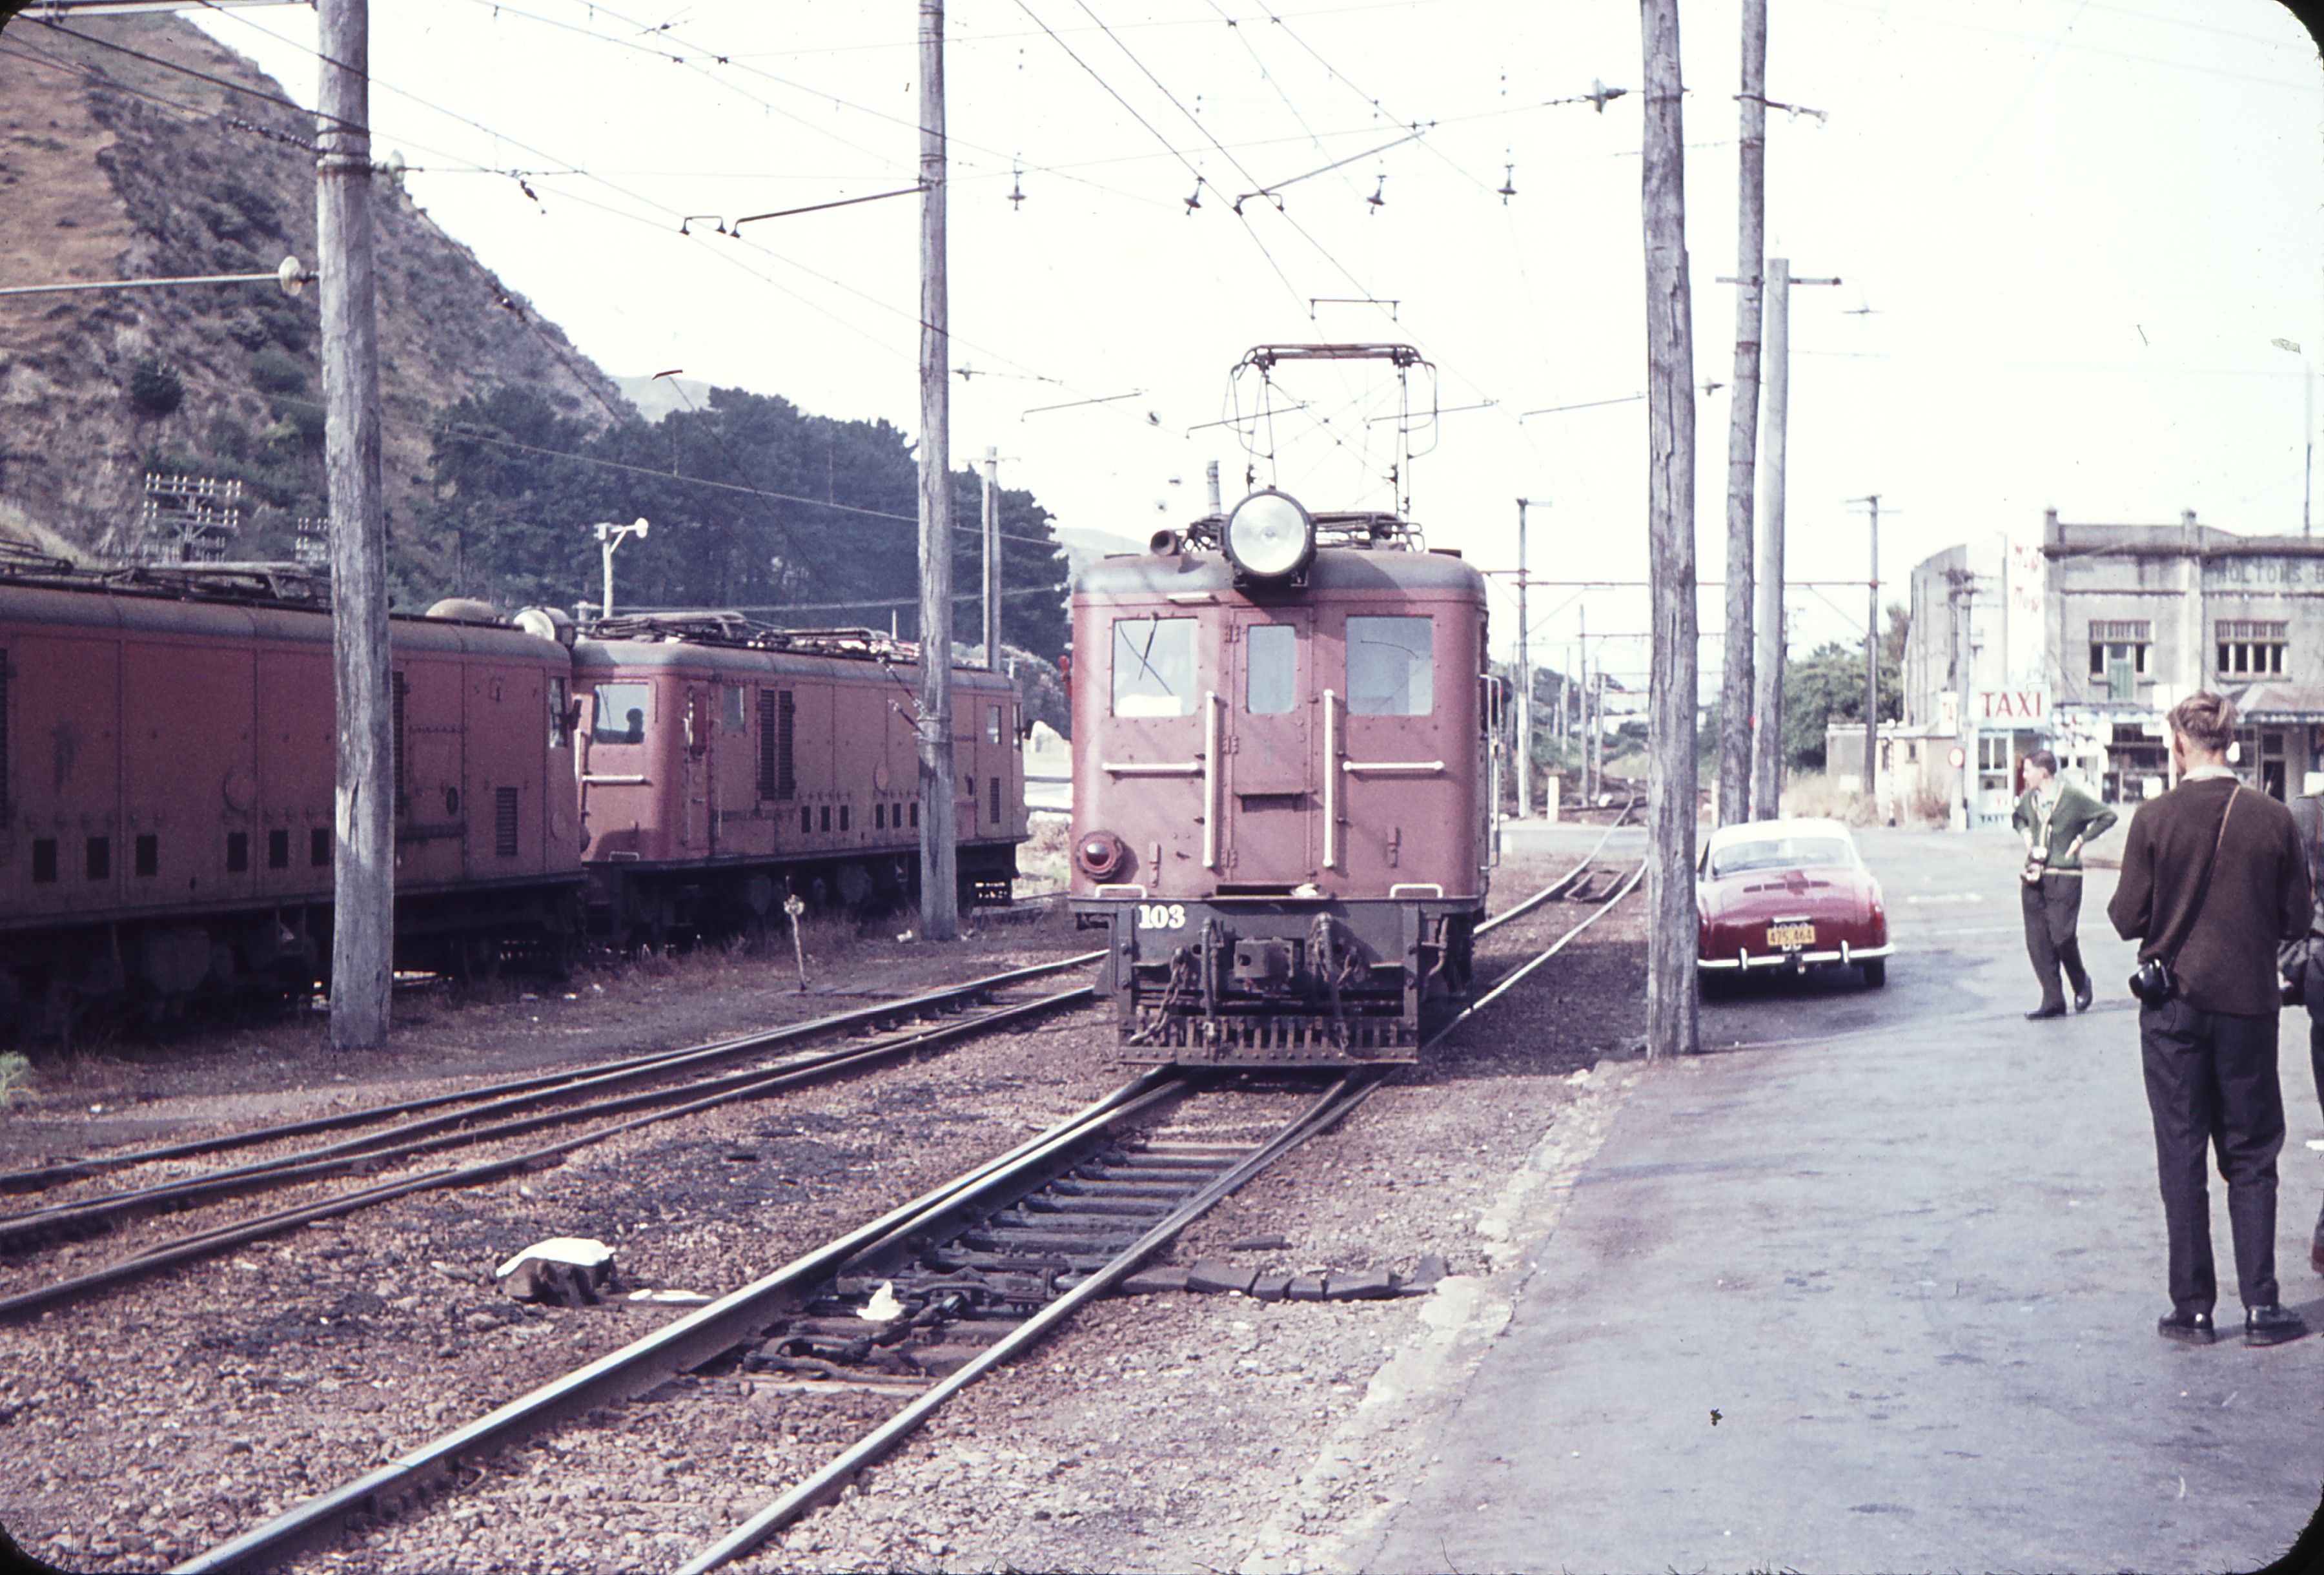
Hmm, Railfan doesn't have any index on the cover, so I consult the Railfan that I use to keep track of which ones I own and which ones I need to buy to get a complete set. Right, December 1999 and March 200 for the banker articles. No luck. The 958/959 article also yields no photo, and I get to the first Ew one. Finally there it is. Search time 2 hrs (with sidetracking).

Now I know that the more organised would say that you need an index to catalog all o this stuff, but what would I file the picture under? Its got an Ew in it, there's the south end of the loco depot and then the one wee bit of the scene that I want to use. Its really down to the old grey cell at the end of it (who is feeling very put upon).

Oh, and I can't do anything as I don't have any red oxide paint so it was all rather a mute point anyway.

Wednesday, December 07, 2011

Fill er up.

Pottering in the Man-sion on the weekend I forced myself to make a start on at least doing some more scenic planning. I stuck with the loco depot area and more exactly the fueling points. Paekakariki in the 1960's had 2 separate oil storage tanks and a large coal stage on the south side of the engine shed. This all had to be compressed into a length of 350mm.

I figured out that the easiest thing was to divide the area in 1/2. This makes each 175mm which is about the same length as a Ka or Ja. Its much shorter than the real area, but will still give me the same feel I hope. I was worried that the fuel tanks would look too short (I know the coaling stage does, but I'll have to live with it) but a quick test using 2 30' guards vans as length proxies gave me about the right look. I'll also need to build a compressed air coaling crane and a couple of wagons being unloaded.

Wednesday, October 26, 2011

Platform 1

Ive been thinking for a while now about how to do the station platform. Most of this has centered around getting the base material. I've been thinking about getting some 5mm MDF for a while now, but have not had the chance to get out to a hardware shop in the last couple of weeks. The other night I was looking for something else I suddenly noticed that my new stock of foam core board was 5mm think. out with the knife and away we cut. It took an extra 5mm off the width (35 scale feet) to allow to add for a more precise top surface later. I also struggled to cut the foam core as it has a harder outer surface than the material that I'm use to. very good stuff though. I must raid Kiwirail for some more. Anyway, here is the photo.


Stuck down with no more nails. If it wasn't so sodding hard to get off fingers I would be in love with it.

Wednesday, September 07, 2011

Starting the scenic modeling.


Well, with the track all but done (and admittedly, that turntable is a pretty big 'but') its time to look at some of the small scenes that I can start working on to get back into the scenery side of things. Another consideration is that the terra forming arts have taken a few leaps forward while I've been off playing with toy soldiers, so I've got a few things to catch up on. Apparently sanded pinex spray painted with a light brown colour no longer cuts it.

So, first area to be selected is the loco depot water tank and surrounds. This had a couple of grounded wagon bodies and a collection of oil drums lying round. I have cut out the foam rubber at this site and will be cutting out a piece of MDF so that I can work on the detailing away from the layout at the bench.


The van body is supposed to be an Xa, but I have yet to make any of those just yet, so for the moment the W will have to do.