Saturday, June 29, 2013

Saturday morning

Well, it seems that I have not written a post in 3 weeks. A combination of factors (work, a lack of modeling drive, its cold out in the Man-sion etc ) have contributed to this, but the fort has been held well by everyone else.

Hopefully I can get this to change in the next week or so, but I now have a stack of reading to do for work. I really thought I was done learning new stuff.

Anyhoo, I think this weekend I'll have to  make a visit outside. There are a few projects that need to be re started. AmFet is visiting in the not too distance future so I can get some input on where to go next.

Where to begin....


Thursday, June 27, 2013

Meanwhile, back in the lab.....

Am_Fet writes:

Its been a bit of a crap day at the factory.  The upgraded Tunnel Radio system for the Manawatu Gorge was installed and lit up.....then refused to work.  Hurried phone conferences between the workers and the boffins finally sorted it, but it took a big chunk out of my day.

As I was determined to have a break, I pulled out the bits and pieces for a quick wee project....

With Cabbage threatening to take the Patea layout to next weeks club meeting, I thought I had better make an effort and mock up some of the Cheese Store so the critics could envisage how things would end up.  I sat down and numbered all the different buildings of the complex like so:


Because I'm a weirdly methodical kind of guy, I made the earth shattering decision to start work on building one.  A quick CAD session last night with photos from a previous visit gave me some estimated dimensions to make a start with:


And so, after looting the office stationary for cardboard and sellotape a start was made.  All cutting was courtesy of the NTCC paper guilotine which made short work of keeping everything square....if only the operator was as efficient!  I seem to recall a school age DB using the same tool to great effect back in the days when the Batchelor and Bond Empire Railways ran from Maungatui to Opanaki....

So this is what I ended up with after about 15 minutes work....its as ugly as sin, but its not sposed to be pretty....its all about working out the final look.


Now to get it to Cabbage to see how it looks.  Next up:  Buildings 2 (Cool Store) and 3 (Engine House).  And negotiations are well advance for a field trip to the area on the 10th involving 2 passenger trains and 3 freight trains to get me to New Plymouth and back over a 40 hour period.

Tuesday, June 25, 2013

Patea in the Round: Dropping a Back On.

Am_Fet spurns writing reports for work and instead:

Another 3 hours in the top secret Stokes Valley Layout Building Facility has completed the structural elements of the Patea layout ready for the pretty bits.

So here are the photos:


You may remember this is where we left our intrepid heroes last week.  Surprise guest in the shape of young Tims DF.


All clamped up and no place to go.  The MDF backdrop has been screwed into side pillars and joined at the back.  The seam will be hidden by a photographic backdrop.


Cabbage investigates building Shrodingers layout (Is there really a train in there?).  In reality, marking out the proscenium arch for cutting.


Yes Virginia, Kilroy was definitely here.  The Arch glued and clamped on with 2" by 1"'s to hold it straight.  An exceptionally rough mock up of the Cheese Store is in place showing where it will sit and its height (not as tall as I'd thought!)


Viewed from the correct height (eyes level with the bottom of the arch) and the correct distance (600mm correct to at least 7 decimal places)


Viewed from behind showing the backdrop supports made from old layout legs and some excessive glue on the back of the arch.  I'm thinking we will need side wings to hide the ugliness from anyone approaching from an oblique angle.

An overall view showing how the wings make an attempt to hide the holes in the backdrop.

Cabbage and I also played with train lengths.  I had in mind the train I wanted to recreate (Train 528 consisting of Blue 7239, Black 4398 and a collection of 8 UK's, 2 CF's and a ZH) while Cabbage advocated that the train should have just disappeared by the time the loco arrived back on the scene.  By some weird quirk of fate, we found the length of the hidden trackage was an exact match for my chosen consist....score!


So that was it.....apparently its getting unveiled at next weeks modellers night, which could be a laugh.  Plus I'm making plans for a visit to play trains with Drew on the 10th, so if the weather behaves I should be able to get all the photos I need of the Cheese Store and environs.

Monday, June 24, 2013

Inspiration

Am_Fet writes:

I've always had a bit of a soft spot for the B 4-8-0 family, and this photo came to light while I was perusing the Rail Observers in the company library last week.

From the camera of Stan Rockliff,  Ba 498 has been caught propelling a bunch of empties up the grade to the Makareo Lime Works from Inch Valley in 1945.

It another example of the use of the B and Ba locomotives on the branchlines of Canterbury and Otago during the 1940's.  With the availability of a top from Shapeways, I feel its a period well worth a look and one I plan to explore with "The Forks" (One of three projects currently "on the go").

Wednesday, June 19, 2013

DJ extreme makeovers pt2

DB Resumes:

Over the past few days I got around to putting DJ 3067 back together after its initial DCC test. At the start of this I'd expected to trash a fair bit of the old dog and rebuild it to a better standard, but after trawling around in the rubbish, I found that almost everything I had discarded was actually fairly usable except for the old balsa nose.

So the rear radiators and front dynamics panel were were straightened out and reinstalled, a new nose front and top made from plastic (the new miracle product), and a few details added back on. Including ALL the original handrails (including the nose ones) that had miraculously survived.

A dab of paint here and there and she is pretty much ready to go. I see she needs a bit of gray paint on the back of the hood where I went mad with ATSF blue - strangely enough I only noticed this massive whoopsie in the photo.


While the plan was to build a better DJ, I like that 3067 has retained her character and history as one of my original NZ120 efforts. I've even made the nose details a bit crooked to honour that ;)

...

DJ 3021 is another kettle of fish. Built for the final "Otaki to Cass" exhibition in Christchurch, this one is surprisingly well detailed:


Note the little thin plastic step on the cab front wall so the crew can clean the middle windows, the front wipers made from wire strands, the correct profile to the front edge of the cab roof (notches in above the nearest window wiper), the horns (connected by fine wire), the roof details, the handrails. Hell, the thing is even straight and square in places!

Sure the handrails, grilles, N scale aryan loco assistant and scribed-in panel details are pretty twenty-years-old-coarse when viewed up close, but this isn't a bad model even by today's standards and breaking it apart will be harder on the heartstrings than doing 3067.

The first stroke of luck was being able to pop the back off cleanly and then somehow being able to surgically remove the rear radiator section in one piece (below) to access the screws that fasten the Kato frame halves together. I guess I made this as one piece of thin plastic glued to the frame sides and curved over the top.


From here I carefully removed the nose front and the port side dynamics fan to get to the screw at this end. With some careful levering witha screwdriver between the frame halves, the bogies drop out. A few more careful incisions and we have our two halves.


I did a nice job of making this cab I must say - hopefully it can all be saved during this process!


Above you can see how the outer sides of the widebody Kato shell were milled right down so the motor actually touches an outer skin of super thin plastic.

Note I've also graduated from balsa to stripwood for the structural pieces! This was in the days before todays plethora of plastruct shapes were available in NZ. Interestingly I have a light in 3021, complete with a brass tube directing the light forward. Interesting, because that's the same thing I just installed in 3067!

Monday, June 17, 2013

Patea Way Back When

(No idea where everyone else has gone....might as well put up more rubbish)

A big thanks to Drew for finding these pics online while sitting at home on the company dime (ARSH says the roster...whatever that means).


Patea in 1958 was a really busy place with both the freezing works and the wharf going full noise.

Heres an enlargement of the enlargement showing strings of what look like Kc, Xa and Xc wagons under the awnings of the Cheese Store loading bays.  That saw-tooth roofed building on the right interests me as its no longer there.....I might revisit my photos to see if there are any remnants of it.  Also a stand out is that wonderful signwriting on the facade.  If you look carefully you can still see it under the grot, but unfortunately it hasnt come out in any of my photos. 


Some photoshop trickery may be needed.....

Sunday, June 16, 2013

More 4' by 2' Madness

Am_Fet writes (again):

Over the few days since the last work session with Cabbage I have been using idle moments in between work (Switching the KiwiRail Radio Network to narrow band) and home life to work out the dreaded "What to do next" list.  It looks like the next move will be to get the backdrop in and maybe mock up the cheese store in cardboard to see how it all fits in visually.  Plus I've been looking at the loco and wagon list and plotting where each piece is coming from.

Interestingly enough, I came across a PDF I had squirrelled away from MR of a 4' by 2' layout and I think its worthwhile sharing here:


When I first saw this, it screamed "West Coast Coal".....so I went hunting around Drews blog for some inspiration:


Cor, that will do!  Drews pic of DBR 1213 shunting some HLC coal containers at Reefton in the rain would make a great start, maybe adding in the old coal loader at Rapahoe:


....although the Reefton loadout might also be "adequate " for a small layout:


So, what do we need?  A DBR would be something out of the ordinary and an interesting kitbashing project (although a DC would do just as well).  UK wagons are readily available and I think there are some HLC molds around somewhere (I know DB has a few).  Would it be worth investigating how to make everything "wet" by using a light misting of glosscote on everything?  SOme white lighting instead of warmer yellow?  Muted colours? Handling just coal could be a bit boring as well, so maybe some Ub wagons with some interesting mining equipment onboard?  Or some general container traffic could be put in as well?

Or maybe Peters Wb and some Q wagons.....Hmmmm....Did I mention I had another 3 of these modules to use for something?


Thursday, June 13, 2013

Patea in the Round

Am_Fet surprises everyone and writes:

I have been the benefactor lately of stars aligning and items being thrown up by the eddy currents that hide things in my house.  In this case, the items made it virtually impossible to not make a start on a simple layout designed primarily to beat the inertia this time of the year can bring.

The item that fell immediately to hand was an old 1200 x 600 module built by a friend but passed on to me when he forsook modelling NZR for the joys of North American Gargantuans.  Thanks to Cabbage and his magical work van (layout moving a specialty), 3 of these modules were soon tucked away in the mysterious layout building facility located deep in darkest Stokes Valley.  Secondly, the Taranaki Mystery Box (on its second region wide tour) divulged a complete circle of well battered but passable setrack curves set to some astonishing radius and enough MicroTrains bogies to run an entire OM fleet (once the designer finishes the etch.....breath is bated as we speak).

So what to do.....obviously a simple loop on the board was the way to go, but what story to tell?

Scribbling quickly came up with the answer;  Using the photo on plastic shell techniques described previously, how about a model of (wait for it) The old Patea Cheese Store?  (I know!  Colour me surprised....).  Model it fromthe station side rather than the river and I could recreate this pic of Drews which fired my imagination a few years ago:


So, the goal was decided:  Model the building as the centerpiece with the train looping around it in an almost incidental style....put some pretty photo backdrops on, maybe a full proscenium arch, populate it with accurate train consists and it would be enough to keep the interest going for quite a while methinks.


SO......despite an impending overnight outage at work that had me finally crawling into bed at 0430, Wednesday night was set aside for the MMW/Batchbuilt layout building machine to meander into action.  Armed with a scale printout care of the KR CAD gurus and their lithograph machine (which disappointingly printed out slightly too small) we quickly laid out the track and held an impromptu planning meeting:


Track laying was slower than anticipated due to endless wrestling with the track geometry, fishplates and a soldering iron, often all at the same time (KIDS:  DONT TRY THIS AT HOME).

Once completed, Cabbage pulled his masterstroke;  several rolls of double-sided foam tape bought for an incredibly low price from TradeMe.  And is this stuff great for tracklaying?  Does the Pope s**t in the woods?


Highly flexible it is to, and works a treat in going around even the sharpest of bends.


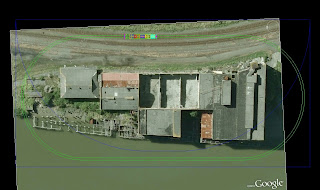
So here we are at the end of the evening (GoogleEarth style view?)....track all stuck down and immovable with nary a nail in sight.


Thanks to a handy car battery, the first locomotive has circled the track....admittedly with a little smoking, but it looked prototypical.  Pity about that SD9 that melted a wheel (gulp).

So there we have it.  An evenings work with the result being a quick easy plaything to keep your modelling mojo warm during winter.  I can remember back when we both had more hair, I handed Magikan a piece of 10mm chipboard with similar dimensions.  He responded by quickly putting down a loop to run his LPA wagons around.  At the time I think I dismissed it as not worth pursuing, but having played with this idea for a week now I'm suddenly not so sure.....could this be the quick and dirty way into Nz120 modelling for those who like things "In The Round"?

Saturday, June 08, 2013

Saturday morning

Well, nothing particularly exciting happening here, well, not compared to the DCC-ing of old models.

One thing that arrived in the post during the week was a new addition to the DCC system.


Testing the Digitrax DCC panels I picked up cheap last year was successful,which was a relief. I may have a rethink about their positioning simply due to the way that Digitrax does things with the system.

With the NZ dollar going downhill I must order another one before the currency collapses completely (thus making my company far more profitable. Its a horrible two edged sword).

Thursday, June 06, 2013

DJ Jazzy Jeff gets another spin - now with DCC - Pt 1

DB burbles: Hey Jeff: the early 90s called and they want all their Direct Current locos back. ...And weren't you famous for 5 mins back then?


DJ 3067 was the second real NZ120 loco I ever built and it's held up well given that it's more than 20 years old now. That's about the time Will Smith became a megastar, leaving DJ JJ at the figurative alter. 3021 is not a lot newer, but it is considerably straighter and squarer.

It's been more than 15 years since this pair turned a wheel in anger because they're built on straight DC chassis (although I've used them once as analog locos running on DCC). Not only would the Kato EF6x Japanese Electric chassis be called "non-DCC friendly" in todays terminology, but with my DJ loco sides and ends glued directly to the thinned metal frames, "unfriendly" is too kind an adjective for my DJs. The would be like saying Hitler was "unfriendly" toward a certain religion whose name begins with a J.

Its a Catch 22.  DCC was the wave of the future 15 years ago, so if these babies are ever going to be useful again, they are going to need to be decoderized somehow - even if that requires blowing them up and starting again.
Boom
So that's what they look like inside.

I started with 3067 because it was in the worst cosmetic shape - on account of having been previously opened up way back in the dark ages to fix something or other. The construction methods seem a bit laughable compared to DX5293. Way back then, the frame halves were filed down as thin as possible and balsa was contact glued on top to extend the long hood "walls" up higher, provide a roof, and even for side sills.

Attached to this was paper (LOL) for the external hood sides with doors made of scribed plasticard. The cab is balsa with paper cab side cutouts added and the roof is plastic. It's hokey, but as I say, it worked.


To atttach a decoder we're obviously going to need somewhere to put it. Up in the top/rear seems like as good a place as any so we'll remove a little tab of metal to make some more room with Mr Dremel, who will also make a hole to run wires down to the motor which will have to be electrically isolated. This vaguely shown above.

So with that surgery complete the decoder was then wired to the motor (orange and grey wires) and to the frame (red/black - I drilled holes for some small screws to attach them to the frame - fancy schmancy), and while I was in there I soldered in a light up as well:


After testing it on a track, it seemed that the nice surface mount LED shown above (stolen from an Intermountain SD40-2W) was dead, so I replaced it with one a nice bright-white LED previously removed from a Digitrax decoder.

Note that I made extensive use of Kapton tape (that thin orange tape that comes in abundance when you buy most Digitrax decoders) to isolate the motor from the frame and also any exposed wires and solder.

On the programming track
Crikey. After screwing it all together, it seems to work! This loco was pretty popular in the Otaki to Cass era, so it must have quite a few miles on the odo - I was amazed at the amount of fluff in the bogies.

But after blowing the cobwebs out, it still runs well, and at a surprisingly 'scale' speed...and even the light works! And as you can see, the body is still pretty much intact. Yay. Victory for the common stupid man. In an upcoming edition we'll do some cosmetic tidying up.

Wednesday, June 05, 2013

Power to the People


DB returns with a video confessional.

Although I've posted quite a few pictures of my locos here on Motorised Blogdruff over the years, I'm embarrassed to admit that most of them don't do anything other than collect dust and occasionally pose for pictures.

I was as surprised as you, dear reader, to learn today that my two Kiwirail phase 1 painted DXCs didn't even have decoders in them. I've had the decoders for absolutely ages, but never got around to installing them.

So, I did. And man, is that process a pain in the rectum.

The light board on Atlas locos is sandwiched between the frame halves - unlike the Kato ones which you can clip out and slip in the DCC board in seconds. Not so on Atlas models, where the frame halves need to be unscrewed quite a lot to release the old board. This makes the trucks/bogies fall onto the floor. Then you use your third hand to detach the motor from one or both frame halves to allow them to separate. Then the plastic hex nuts that match the loosened screws fall onto the floor also as you prise out the light board (like a contortionist entering a small car through a barely open window while carrying a large suitcase)  while carefully ensuring that the loco frame halves don't disembowel themselves and spill motors, gears and bearings onto your increasingly cluttered carpet.

But that's just the start of your trek, dear viewer, for these clever geniuses at Atlas are always thinking ahead and have now placed 4 microscopic copper detachable "frame clips" on the corners of their light board to ensure the highest levels of electrical conductivity. These are attached to the board itself and go on the inner corners of the board (while the clips are not shown in this stolen picture, you can see on the lower board the silvered contacts with the holes that the clips clip into)  :


Standard installation procedure is to prise the four tiny clips (which have a little indentation that fits that hole) off the old board with a knife blade, watch several of them ping off into space, scour the carpet. Find all but one. Install the three you have onto the corners of the new decoder board. Swear a little as another drops on the floor. Find both of them. Get all four installed on board. Try to lever new board back into carefully separated frame halves while somehow getting the two motor contacts to line up and slip through their contact holes. Knock two clips off board and onto table during this step. Watch helplessly as they bounce off table and out of view onto floor. Swear some more. Repeat about three times.

Nevertheless, within an hour later I had quietly exhausted my supply of curse words and shortly thereafter had two DXs with decoders installed. With frame clips. Aiyaaa...


So finally a review - the Atlas Dash-8 powered chassis runs extremely well.

The DXCs, the DFT  and the DI are my favourite locos at the mo. My DCs, DBR and DA all run horribly fast and with some erraticism (and no eroticism). I may need to get some slow speed Atlas motors. My DGs barely run at all (weird as they are new Kato PA1 chassis with new decoders), my old DFs run ok, but look tired, my DJs... have never had decoders. Until today, but that's another story.

Monday, June 03, 2013

Live from Dandruff Labs....

I think we need to demand a new judging category....


(Apologies for the blurriness)

Sunday, June 02, 2013

Gaining a New Perspective...

Am_Fet screams "Eureka!" and blogs:

Over the last week or so I've been reading a lot of Lance Mindheims writings in his blog and thinking about trying out some of his techniques.

The one that most intrigues is the idea of using photographs of buildings to make models.....simply get a decent photo, print, and paste on to the side of a styrene "shell" the correct size.  Voila, insta-building!

The biggest problem with this, of course, is trying to get usable pictures, which usually means those taken pretty much side on to the subject, a lot like this series I did in the industrial back roads of the Timaru Harbour Board area:

(Checkout here for the full flickr set, feel free to download what you need and use.)

So what if you cant get a decent side on picture?  What if you are forced (through reasons of geography) to use Google Street View?

Well, gentle reader, there is a way using electronic trickery, just as Uncle Lance said there would be.

Exhibit A is this picture from Google of the NMACo warehouse featured earlier:


Hmmm, not very straight at all.....the trick is to use a tool like Paintshop Pro X that features a (wait for it) Perspective tool.  I opened the above photo , pressed the corresponding buttons and before I could squeak Salvadore Dali it was done.  A quick burst with the crop tool left me with this exceptionally usable pic:

A bit of quick work with copy and paste would remove those pesky wires, but apart from thats its ready to go.  Simply print and paste.  Look a bit flat?  Print 2, cutout the columns and laminate the layers, of course.

If I can convince Drew to get me some nice pickys from his office window the next time he rolls through Patea, I 'd quite like to give yon olde cheese store a go as well....


 Verdict?  Exciting in its possibilities, and well worth a look.