
Yesterday the package from the 2mm association turned up. It took several high alcohol Belgian beers to calm the inner finescaler. Theres a stack of info to work through, and a private Yahoo group as well that I'l have to digest. Theres even some people on it who are working in US and European N gauge fine scale. I now just have to sort through the lists and come up with an initial order for wheels and underframes.
Just to comment further on the modules post earlier in the week. There seems to be some questions of hand laid track vs commercially available mass produced items in terms of reliability. There is a sizable amount of evidence from the English exhibition circuit that this is not the case. Well made track should not have any reliability problems worse than that of commercial items, and most running problems tend to stem from the rolling stock. That said I'm also well aware that poorly laid track will kill any project deader than a dead thing. I think that the experience I've had helping make S scale trackwork will help quite a lot, as I've seen some of the pitfalls that can possibly turn up.
I'm either going to be right or wrong with this.
Saturday, January 30, 2010
Layout ideas
Its been a while since the last layout/station idea. Todays is Ranfurly.
 This station was approximately 1/2 way between Dunedin and Cromwell on the Otago central branch, and was a crossing point, as well as having a small locomotive depot. It was also the main station for the Maniototo plain with a sizable amount of farm traffic in and out. The loco depot was novel in that it had a coal loading ramp, which dominated the surrounding area (being quite flat).
 This station was approximately 1/2 way between Dunedin and Cromwell on the Otago central branch, and was a crossing point, as well as having a small locomotive depot. It was also the main station for the Maniototo plain with a sizable amount of farm traffic in and out. The loco depot was novel in that it had a coal loading ramp, which dominated the surrounding area (being quite flat).
Friday, January 29, 2010
Railfanning Moana
DB says: I was passing Moana in the Mini a few months back when the scanner blurted into life. Whoa Nellie! 180 time!
Approaching the station, the light was glinting nicely off a slowing train's HLC tarpaulins so I thought I'd stop at the southern end of town and take a shot. As often happens, I didn't manage to catch what I'd hoped for (but we can file that away for another expedition), and instead managed to snap a couple of other decent shots.
Here old DX 5448, which has been waiting for a year or more to get a Tranz Rail logo, and DC4939 head eastwards away from Moana with their train, carrying primarily the produce of Reefton.
That train ended up crossing another at Jacksons, so I scooted into another position up on the goods shed to record westbound DCP 4559 and DFT 7132 for posterity. The real 4559 has since been KiwiRailed. There's nothing like a nice day out in the sun and scenery chasing trains eh?
p.s. I'm sure you know this already, but clicking on the pictures in this blog will open them up full-size. These two are 1024 pixels wide, ideal for most computer wallpapers.
Approaching the station, the light was glinting nicely off a slowing train's HLC tarpaulins so I thought I'd stop at the southern end of town and take a shot. As often happens, I didn't manage to catch what I'd hoped for (but we can file that away for another expedition), and instead managed to snap a couple of other decent shots.
Here old DX 5448, which has been waiting for a year or more to get a Tranz Rail logo, and DC4939 head eastwards away from Moana with their train, carrying primarily the produce of Reefton.

That train ended up crossing another at Jacksons, so I scooted into another position up on the goods shed to record westbound DCP 4559 and DFT 7132 for posterity. The real 4559 has since been KiwiRailed.
 There's nothing like a nice day out in the sun and scenery chasing trains eh?
p.s. I'm sure you know this already, but clicking on the pictures in this blog will open them up full-size. These two are 1024 pixels wide, ideal for most computer wallpapers.
Thursday, January 28, 2010
Hmmm
As I've said before with hand laying track, one can't just go approaching it willy-nilly as one would when one is using Peco track and points. Suddenly you have to think about things like centerlines and radii and track spacings until your head hurts and you have to have a lie down. The main problem is that I keep looking at the loco depot and wonder how it will all work/fit in. The southern and eastern sides/ends of the station are fine as they are just straight lines mostly with some connecting curves, and only have the station platform to dodge. I'm going to have to mock up the engine depot bits (coaling/oil stage, shed, water tower etc) and see just what I can get to fit in once they are down.
 "How long is this going to be in my living room?"
On the plus side, I was reading an old copy of Railfan last night, and it appears that it was reasonably common for steam locos to bank trains south ' under the wires' to Pukerua bay. More 'quirky' operational interest.
 "How long is this going to be in my living room?"
On the plus side, I was reading an old copy of Railfan last night, and it appears that it was reasonably common for steam locos to bank trains south ' under the wires' to Pukerua bay. More 'quirky' operational interest.
Wednesday, January 27, 2010
Stuck in the Middle with You: finishing off a Trackgang UK
DB says: I try to avoid the spectacularly unusual in my modeling - no Tasman or Kiwi Lager DCs here, or Ravensdown fertilizer wagons that jump out at you every time they circle the track yelling "you just saw me thirty seconds ago, this must be a model!" On the whole, I prefer more mundane rolling stock so you don't notice that I only have one UR wagon, even though it appears on every train you see.
From time to time though, the odd oddity does catch my eye and beg to be modeled. Such was the case with this poor example of wagon utilization seen at Stillwater in 2009: (Now of course in the Beard-era TranzRail days, you'd be surprised to see this many containers on a whole train of container flats, but I digress).
The UK above has a partially open deck and I'd wanted to stick one of my cast shorty GSW containers on an open decked IA to show off the nice laser cut underframe detail, but the only one that I've so far built in far-too-thin styrene isn't really capable of taking a load, and may be consigned to the rubbish bin when some new cuts in the proper thickness arrive from Lower Hutt Phasers in the not too distant future.
So what to do. Unlike Captain Druff'n'Stuff, I like to have just one or two projects actively 'on the go', and hammer through them so I can move on to the next exciting thing. But something that has been hanging around like a bad smell for about six months is this Trackgang UK. I've never been that happy with it, and so it has sat in the corner untouched, like Helen Clark at the Last Woman Left on Earth Dance.
This week I gave up on the IA idea and decided to plop the container on the festering UK instead. So a coat of paint was slapped on, the container added, the location of my randomly attached twistlocks repositioned under it, and suddenly it was starting to look a little better. Adding MicroTrains couplers became a headache as I had to dremel off the cast mounting bits for the included couplers, but with that done it was all plain sailing. Just a quick note on making container wagons look more detailed: I use white paint to represent twistlock handles (run a blob down the left edge of a twistlock if you're right handed) and a yellow blob for the ferry tiedown hooks. I have these cast onto my resin wagons, but an appropriately placed blob on the Trackganger does the trick. I should also add the wee reflectorised rectangles above the bogies as well. These wee touches only take a minute, but make the wagons look quite nice from the other side of a dark smoky room, and now that I see the prototype picture again, I must do the same with the blue container itself. See my previous post on HLCs for more photographic evidence of this targeted paint splattering.
 Despite my constant moaning about these kits, the see-through look of this from down low does look pretty hawt.
From time to time though, the odd oddity does catch my eye and beg to be modeled. Such was the case with this poor example of wagon utilization seen at Stillwater in 2009:
 (Now of course in the Beard-era TranzRail days, you'd be surprised to see this many containers on a whole train of container flats, but I digress).
The UK above has a partially open deck and I'd wanted to stick one of my cast shorty GSW containers on an open decked IA to show off the nice laser cut underframe detail, but the only one that I've so far built in far-too-thin styrene isn't really capable of taking a load, and may be consigned to the rubbish bin when some new cuts in the proper thickness arrive from Lower Hutt Phasers in the not too distant future.
So what to do. Unlike Captain Druff'n'Stuff, I like to have just one or two projects actively 'on the go', and hammer through them so I can move on to the next exciting thing. But something that has been hanging around like a bad smell for about six months is this Trackgang UK. I've never been that happy with it, and so it has sat in the corner untouched, like Helen Clark at the Last Woman Left on Earth Dance.
This week I gave up on the IA idea and decided to plop the container on the festering UK instead. So a coat of paint was slapped on, the container added, the location of my randomly attached twistlocks repositioned under it, and suddenly it was starting to look a little better. Adding MicroTrains couplers became a headache as I had to dremel off the cast mounting bits for the included couplers, but with that done it was all plain sailing.
 Just a quick note on making container wagons look more detailed: I use white paint to represent twistlock handles (run a blob down the left edge of a twistlock if you're right handed) and a yellow blob for the ferry tiedown hooks. I have these cast onto my resin wagons, but an appropriately placed blob on the Trackganger does the trick. I should also add the wee reflectorised rectangles above the bogies as well. These wee touches only take a minute, but make the wagons look quite nice from the other side of a dark smoky room, and now that I see the prototype picture again, I must do the same with the blue container itself. See my previous post on HLCs for more photographic evidence of this targeted paint splattering.
 Despite my constant moaning about these kits, the see-through look of this from down low does look pretty hawt.
Tuesday, January 26, 2010
Into the chop shop
Today the Life like GP 18 made the first stage of its journey towards being turned into something more useful. I arrived home to find that the lady of the house had been opening my packages again (Hands up all those here who have made special trips home to intercept the mail, or just get 'items' sent to their work address?).

I had a quick look at the plastic chassis and decided that yes, it could be altered, and we could make some space for another bogie height wise under the motor. I also noticed it was one of the early lifelike mechs with a spring drive, and so I could make these a bit longer. The faint hearted may want to look away at this point. "Aftermath of the Nelson chassis massacre"
The bogie ends were left as is, but the motor mount had the bottom sanded off, and some material removed from the upper side of each end.
I then cut out a 1mm plasticard mount with holes cut in the correct locations, and fixed the bits in place with 5 minute araldite. This will have to be backed by something as there's one thing that araldite doesn't like, and its heat (like from a small electric motor). The drive springs were carefully stretched to fit. I still have to solder the wires back in place, and buy a center bogie from Atlas.
Monday, January 25, 2010
Coal Range: weathering the coal container saga
DB says: From the About Bloody Time file, here is the final installment of the HLC series. The assembled vehicles were tarped, ghetto-decaled with wee black squares and yellow panels. Weathering on the containers was washes of Model Master matte acrylics. For my first year or so of NZR scratchbuilding in S scale, I never weathered anything. Then I went through a phase of attacking my pristinely awful models with Humbrol Black paint thinned with turps. Hi Tech I know. About five years in I discovered Faber Castell chalks at a Dunedin art shop (the dry ones, not the greasy ones) and sandings of these applied with a stubbly paint brush gave things a nice sooty or dusty look until you sealed it with matte varnish or touched it with your greasy paws.
Over the past few years in American N and now NZ120, I've gone back almost exclusively to washes, but this time using a wider range of acrylic colours thinned with alcohol (the rubbing kind, not the drinking kind). Strangely enough, I've never used an airbrush to weather anything, but I'm sure that time will come. These HLCs mainly used Gull Gray (this has to be my real find of the last few years) on the tarps, a bit of Black here and there in the corners to represent coal dust and Desert Sand as brake dust on the sides. Sometimes I'll mix the colours, sometimes I thin them more, sometimes less, sometimes I apply rust dots unthinned and smear them down with a finger to represent rust streaks, sometimes I'll apply the thinned wash and wipe most of it off with a cotton bud. Sometimes I'll drybrush with a lighter version of the base colour. Often I'll wash the underbits darker than the upper bits. When you start to look closely at prototypes, the weathering is rarely black, so don't be afraid to experiment with other colours. Usually, the more the merrier. On an upcoming UK wagon post I used a really bluey gray wash on bits and this worked out surprisingly well. As Mao's Little Red Book of Huoche Weathering states: once you go black, you'll always come back.
Weathering is quite an art and there is some amazing work being showcased on a number of websites. Here's one to get you started.

On the first pair of HLCs from a few weeks back, I used thin styrene as the metal bars used to roll the tarps from one side to the other, but these stuck out like the proverbial dog's testes, so today I found some very old, very fine steel piano wire instead and contact glued it onto the tarps (between the corner posts). This has some rust spots on it as well. For added authenticity.
 Weathering on the containers was washes of Model Master matte acrylics. For my first year or so of NZR scratchbuilding in S scale, I never weathered anything. Then I went through a phase of attacking my pristinely awful models with Humbrol Black paint thinned with turps. Hi Tech I know. About five years in I discovered Faber Castell chalks at a Dunedin art shop (the dry ones, not the greasy ones) and sandings of these applied with a stubbly paint brush gave things a nice sooty or dusty look until you sealed it with matte varnish or touched it with your greasy paws.
Over the past few years in American N and now NZ120, I've gone back almost exclusively to washes, but this time using a wider range of acrylic colours thinned with alcohol (the rubbing kind, not the drinking kind). Strangely enough, I've never used an airbrush to weather anything, but I'm sure that time will come.
 These HLCs mainly used Gull Gray (this has to be my real find of the last few years) on the tarps, a bit of Black here and there in the corners to represent coal dust and Desert Sand as brake dust on the sides. Sometimes I'll mix the colours, sometimes I thin them more, sometimes less, sometimes I apply rust dots unthinned and smear them down with a finger to represent rust streaks, sometimes I'll apply the thinned wash and wipe most of it off with a cotton bud. Sometimes I'll drybrush with a lighter version of the base colour. Often I'll wash the underbits darker than the upper bits. When you start to look closely at prototypes, the weathering is rarely black, so don't be afraid to experiment with other colours. Usually, the more the merrier. On an upcoming UK wagon post I used a really bluey gray wash on bits and this worked out surprisingly well. As Mao's Little Red Book of Huoche Weathering states: once you go black, you'll always come back.
Weathering is quite an art and there is some amazing work being showcased on a number of websites. Here's one to get you started.

On the first pair of HLCs from a few weeks back, I used thin styrene as the metal bars used to roll the tarps from one side to the other, but these stuck out like the proverbial dog's testes, so today I found some very old, very fine steel piano wire instead and contact glued it onto the tarps (between the corner posts). This has some rust spots on it as well. For added authenticity.
Sunday, January 24, 2010
Doing the numbers
(Backwards this is srebmunehtgniod, which may mean something in a long dead language, but I doubt it.)
I've been looking at some numbers and measurements for track and wheels. From the NMRA web site comes the following measurements for different weights of rail in TT scale (in thousandths of an inch. I still can't understand why you would make the 1/2 arsed step of decimalising an imperial measure)
Rail weight height
40 pound 0.029
55 pound 0.034
70 pound 0.039
90 pound 0.047
110 pound 0.055
What this boils down to is that code 40 rail is roughly equivalent to 70 pound rail, and code 55 is equivalent to 110 pound.
I've also been taking a look at driving wheel diameters from the 2mm society.
wheel diameter real equivalent loco classes
7.5mm 3 F
8mm 3'2" W, Wa, Wb, Wd
9mm 3'6" B, Ba, Bb
9.5mm 3'9" Wf, X
10mm 4' Ww, Aa, Q, U, Ub, Uc
11mm 4'4" A, Ab, Wab, K, Ka, Kb, J, Ja, Jb
12mm 4'9" G
(This only counts steam loco classes that survived into the 1950's. A slightly narrower wheel is required for the 4'6" locos to fit into the correct 5' + 5' wheelbase).
From this we can see that its possible to 'accurately' model the wheels for all the steam loco's from the 50's and 60's. I'll follow his up in the next few posts.
Saturday, January 23, 2010
A Man, a Waffle, a Pterodactyl
 I never was any good at English at school, although I'm a bit better now (except for palindromes and aerodromes).
 It's been a slow week over here at Dandruff International as well, but some progress was made on the HLC coalies. Still in need of a bit of finishing, more brake-dust-browny weathering, and decaling...
 ...but I feel I've got a good mix going on here with the different container types on the different wagon types - almost like the real thing.
Friday, January 22, 2010
A Man, A Plan, a canal.....
(And now I've got "Panama" by Van Halen in my head)
Am_Fet writes: Sorry for the cryptic heading, but this post is all thoeretical at the moment....or at least until the Nelson Branch of the WCW get involved.
One of my benefactors recently passed onto me a Red Cross Care Parcel with an SD9 locomotive chassis in it (I am very grateful for that kindness). Needless to say, its currently earmarked for a DC...or that DAR.... "Oh, and see if you have a use for this", he said, tossing in a Life Like GP18. Fat Chance, I thought to myself, then thought of maybe doing a Lehigh Valley / Conrail patched unit (my other love):

However, while cogitating in the shower one morning (Just like the Head Druff...maybe its a genetic thing? We do share the same parents...), the idea of redesigning a stillborn Sn3½ branch layout I drew up ages ago for Nz120 came to mind....all well and good, but it needed a small branchline locomotive to serve it...A Wf would be superb, but the running qualities of the Head Druff's Wf-a-building was still unproven....A DJ would be good.....I wonder....GP 18 chassis....knock of the fuel tank....Hmmmm....
Although not quite running through the house naked yelling Eureka, I did sit down quite smartly at my work table with the GP18 and a ruler.
First (Ladies and Gentlemen), Exhibit A: A DJ drawing.

The important dimensions for me were the overall wheelbase, followed by the bogie wheelbase. These scale out to 66.7mm overall and 18.4mm bogie. So (tentatively), I measured the model....And got 59mm overall and 18mm bogie....CLOSE ENOUGH!!! When you think the overall is only missing 3.5mm from the centre each side, it aint all that bad at all.

The Brains Trust were duly consulted, and all agreed I might be onto something. Highlights were the availibility (not great, but better than the Kato Japanese Bo-Bo Bo chassis), ease of getting parts, plus those ultra thin hoods...a Dj would fit most snuggly over it....plus the Head Druff pointed out you could probably stretch the overall wheelbase out if you were anal enough...I dont think I'll bother.
However, as in most things the Waihaorunga Creek Workshops gets involved in, its already turning into an international affair; Last time I looked, the chassis was to be rebuilt by the Underframe Wonks in Nelson (removal of the fuel tank which luckily unscrews and addition of another bogie), the footplate was being done in Lower Hutt by photon laser while the hoods and cab were being designed in Long Island, NY by imperial stormtroopers. With any luck, the bits may even go together with a minimal amount of fettling.

Postscript: The heading..."A man, a plan, a canal...Panama".....Its a Palindrome....Google it if you arent sure....
Am_Fet writes: Sorry for the cryptic heading, but this post is all thoeretical at the moment....or at least until the Nelson Branch of the WCW get involved.
One of my benefactors recently passed onto me a Red Cross Care Parcel with an SD9 locomotive chassis in it (I am very grateful for that kindness). Needless to say, its currently earmarked for a DC...or that DAR.... "Oh, and see if you have a use for this", he said, tossing in a Life Like GP18. Fat Chance, I thought to myself, then thought of maybe doing a Lehigh Valley / Conrail patched unit (my other love):

However, while cogitating in the shower one morning (Just like the Head Druff...maybe its a genetic thing? We do share the same parents...), the idea of redesigning a stillborn Sn3½ branch layout I drew up ages ago for Nz120 came to mind....all well and good, but it needed a small branchline locomotive to serve it...A Wf would be superb, but the running qualities of the Head Druff's Wf-a-building was still unproven....A DJ would be good.....I wonder....GP 18 chassis....knock of the fuel tank....Hmmmm....
Although not quite running through the house naked yelling Eureka, I did sit down quite smartly at my work table with the GP18 and a ruler.
First (Ladies and Gentlemen), Exhibit A: A DJ drawing.

The important dimensions for me were the overall wheelbase, followed by the bogie wheelbase. These scale out to 66.7mm overall and 18.4mm bogie. So (tentatively), I measured the model....And got 59mm overall and 18mm bogie....CLOSE ENOUGH!!! When you think the overall is only missing 3.5mm from the centre each side, it aint all that bad at all.

The Brains Trust were duly consulted, and all agreed I might be onto something. Highlights were the availibility (not great, but better than the Kato Japanese Bo-Bo Bo chassis), ease of getting parts, plus those ultra thin hoods...a Dj would fit most snuggly over it....plus the Head Druff pointed out you could probably stretch the overall wheelbase out if you were anal enough...I dont think I'll bother.
However, as in most things the Waihaorunga Creek Workshops gets involved in, its already turning into an international affair; Last time I looked, the chassis was to be rebuilt by the Underframe Wonks in Nelson (removal of the fuel tank which luckily unscrews and addition of another bogie), the footplate was being done in Lower Hutt by photon laser while the hoods and cab were being designed in Long Island, NY by imperial stormtroopers. With any luck, the bits may even go together with a minimal amount of fettling.

Hmmm.....DJ's.....
Postscript: The heading..."A man, a plan, a canal...Panama".....Its a Palindrome....Google it if you arent sure....
Thursday, January 21, 2010
Slow week
Its been a bit of a quiet period here at Chateau Dandruff. My enthusiasm seems to be waiting on the 2mm association stuff to turn up, and I can't seem to drag myself to do anything wagon wise as it would only add to the pile of stuff without chassis. Even work on the signal boxes has ground to a halt. I did contemplate photocopying off the Paekakariki station plans yesterday and having a crack at that this weekend, but someone actually expected me to do a bit of work yesterday, which astounded me greatly.
Hopefully this malaise will pass in a couple of days. Untill then I'm painting a Russian cavalry army, which doesn't require any working bits to be done.
Hopefully this malaise will pass in a couple of days. Untill then I'm painting a Russian cavalry army, which doesn't require any working bits to be done.
Tuesday, January 19, 2010
The Coal-ition of the Willing: Looking for more HLCs
Aha! I knew there were Weapons of Mass Production lurking in the trainroom.
The HLC series 2 coal container mold didn't last long at all however. By the second or third casting, the top-corners where the curvy bit meets the overhanging beam along the top had begun to rip away.
Still, I managed to get 5 good containers, plus one slightly sticky (eeeuw) prototype which we're still awaiting the verdict on, and could probably manage more as the increasingly messy corner undercuts will probably be under the tarps anyway. There were a few air bubbles in the end details from time to time, but probing around the mold with a tiny bit of brass wire/rod after the resin was poured scared most of them up to the 'surface' (which is actually the bottom of the container where nobody can see them). This tactic was so successful, that after the initial sticky first one, all the top corner posts came out perfectly, so I must remember to do this with future tricky castings. While I was in a duplicitous mood I ran off another HLC3 (the tall HCC) and some more UKs and PKs. These molds are just starting to show the first signs of small tears, but while not producing the most spectacular NZ120 models you'll ever see, they have been extremely good value, contributing bases for more than forty wagons and thus quite a number of blog entries over the past year or so.
A little paint, glue and weathering later, the enriched HLC raw materials are ready for tarping with magic tinfoil. And they're certainly looking decent (by NZ120 standards anyway), so while the paint is setting I've hidden them on my workbench so Hans Blix can't nick off with them.
The HLC series 2 coal container mold didn't last long at all however. By the second or third casting, the top-corners where the curvy bit meets the overhanging beam along the top had begun to rip away.
Still, I managed to get 5 good containers, plus one slightly sticky (eeeuw) prototype which we're still awaiting the verdict on, and could probably manage more as the increasingly messy corner undercuts will probably be under the tarps anyway. There were a few air bubbles in the end details from time to time, but probing around the mold with a tiny bit of brass wire/rod after the resin was poured scared most of them up to the 'surface' (which is actually the bottom of the container where nobody can see them). This tactic was so successful, that after the initial sticky first one, all the top corner posts came out perfectly, so I must remember to do this with future tricky castings.
 While I was in a duplicitous mood I ran off another HLC3 (the tall HCC) and some more UKs and PKs. These molds are just starting to show the first signs of small tears, but while not producing the most spectacular NZ120 models you'll ever see, they have been extremely good value, contributing bases for more than forty wagons and thus quite a number of blog entries over the past year or so.
A little paint, glue and weathering later, the enriched HLC raw materials are ready for tarping with magic tinfoil. And they're certainly looking decent (by NZ120 standards anyway), so while the paint is setting I've hidden them on my workbench so Hans Blix can't nick off with them.
Monday, January 18, 2010
A lick of paint.
After perusing the various options for colours at Resenes last week, I came away with a colour that proved to be far too light. Shows what happens when you trust the colour charts doesn't it. A second attempt may prove to be a bit dark, but I think I can fix that. Stay tuned....
(Hmm,, no picture. The camera isn't talking to the computer. Funny, I didn't hear an argument last night.)
Update, well, I come home tonight and everything seems to be fine. must have just been too early for it this morning.

(Hmm,, no picture. The camera isn't talking to the computer. Funny, I didn't hear an argument last night.)
Update, well, I come home tonight and everything seems to be fine. must have just been too early for it this morning.

Sunday, January 17, 2010
Coal containers I have known
 Carrying on from the last installment of coal container madness, 'proper' HLC curved-side coal containers were next on my 'little projects for rainy days' list. Again, the Dec 03 Journal has a nice set of NZ120 plans for both series 1 and 2 of these containers - the most obvious spotting difference these days being the shape of the forklift pocket surrounds on the base. Series 1 has chevronny HCC types, whereas series 2 has plainer - and easier to make - bevelled ones. Bet that made no sense at all. The above series 2 was snapped from down low at Oamaru in July while I was either sitting on the ground or in the Mighty Green Mini - a difference of only a few centimetres.
So today I spent about two hours making this series 2 master with the intention of trying to cast a few:
 It's not too fancy and a little chunky in places, but they should look the part when viewed from a few feet away through dirty spectacles. The master was built entirely from plasticard bits except for the curved sides, which came from the same small squeeze bottle of about 5cm dia from the 99 cent store that provided the CW sides last year. It's perhaps a smidge too curvy for this, but that's hardly noticeable.
It will be interesting to see how these will cast up given their complexity. I only got a handful of HCCs out of that mold before it gave up. This time I'm casting it upside down and have included the tarpaulin bars to save time later. I squeezed squadron toxic modelling putty under the bars to make removal from the rubber easier/possible. If I get time I'll make the mold tonight.
Saturday, January 16, 2010
Vegies on the door-step
I arrived home from a BBQ last night to find cabbage on my door step. Not the vegetable, but Mark Andrews of Marks Model Works (in)fame. Now I must admit that I'm always unsure about meeting other modelers for the first time, as for some unknown reason the hobby does tend to attract its sizable share of 'odd' characters. This wasn't the case this time round fortunately. While I can't report/remember specifics, we did have a wide ranging discussion on modeling topics in general, and some NZ120 might have sneaked in (maybe I should start an interview section and ask hard hitting questions of local modelers?). He only broke one headstock on an la so i think I escaped lightly.
It has made me a bit more interested in learning CAD (it is a bit frustrating personally to rely on others for stuff that you would like to have done), but I'll still have to get a faster computer to do it. Apparently this 9 year old model doesn't seem to cut it...
I spent another day yesterday being trained to lay track. Unfortunately its S scale, but I do get fed so it sort of balances out. The process is not overly difficult provided that the right tools are available and the preliminary work has been done. I did do some thinking while heating my fingers with the soldering iron about some various devices to make the job a bit easier. My friend is not laying the track 'in situ' due to his desires for quietness from his trains (Maybe its something to do with being a retired school teacher?), and I think that for my purposes the process could be somewhat simplified. I'll have to do a bit more thinking, which as I'm going fishing today I'll have plenty of uninterrupted time for. How? Because there are Bedouin tribesmen in the Arabian desert who would have more luck fishing than I do...
Thursday, January 14, 2010
Wheres everyone else?
I notice that ECMT has done a bit of modeling over at Nz120.org. a very nice model of an Hc. I'm wondering if I should buy a couple, and once I have a set of J sheep wagons I'll start thinking about it.
As something for everyone to do, I'd encourage all of you to start a workbench thread on the NZ120 site. It doesn't have to be updated often. Start a project that you think you will be able to complete, and just plug away at it. Getting going is the hardest step (I should know, I'm in a bit of a rut at the moment).
Also for breaking news Trackgang have up on their website that a new batch of 88 seat railcars will be available before the end of the month. As I said at the end of my build I'd buy one again, except I don't need 2.
Wednesday, January 13, 2010
DX in Half a Day 5: Warning: takes more than half a day
 DB says (yes I'm still alive): I was far too busy running a B&B service for visiting members of the Diesel Traction Group and their wives this weekend to do much modelling. I could have inserted a bunch of other excuses in there to cover the lull since my last post, but that is by far and away the most exotic sounding.
The prototype insta-DX has been making slow and occasional, yet steady strides towards completion and has now received some tentative dabs of paint in anticipation of handrails. Putting my awful painting aside, actually lets not, as this KR1 scheme is a tricky one for us luddite brushpainters... I score a subtle horizontal line with a knife along the longish stretch of long hood using a plasticard 'ruler' (the colour separation is also luckily at the top of the rear grills at the back of the long hood) and then 'paint by numbers' using that, and an eyeball, as a guide. Hard to avoid brush marks with the short brush runs and unfortunately if you thin the paint much it will run up the panel lines.
 Using laser-assisted bits, or 'scratch-aids', is definitely the way to go when building a diesel (or a 44 foot car, or a Z wagon, and the list goes on). Its hard to beat the panel detail - straighter and squarer than Michael Cera yet orders-of-magnitude more convincing. And look at the cab windows. And you can glue it and cut it and drill it and paint it just like styrene: because it's styrene. The nose came out fairly well too - this was resin cast from a plasticard master as were the ducts, headlights, roof sandboxes and rear end.
 More as time permits...
Tuesday, January 12, 2010
Looking forward
(Should have done this a couple of weeks ago but...)
While dining with the Hamblyns last weekend Drew asked me what my modeling plans for the year were. This started the old brain ticking over in the shower of a morning (its my thinking spot). So what did I want to achieve in 12 months. A running Ka? Get the layout up and running?
 " Is there a larger collection of unfinished projects?"
Looking at the workbench suggested a more immediate problem. A tally tonight reveals that I have 44 wagons in various stages of completion. Of those I am probably happy with the running qualities of 2 of them (the ones with Kato bogies). The rest are either Peco underframes, Trackgang or are still waiting for the undergubbins. They either don't run that smoothly or have details that are incorrect for the prototype. On top of all this, the English wheels that I use (they have spokes and are pretty) have axles that are too long to give prototype distances between solebars if pin point bearings are to be used (which I think is the way to go in this scale). So, what to do about it? The seem to be 2 options. the first is to join the British 2mm association, and use all their goodies. The problem is that their finescale wheelsets probably will not work with coarser scale track that I need to run the NMRA wheelsets on the various diesel mechanisms that I use. The other is to investigate wheels to NMRA standards made on shore by local firms.
The same goes for trackwork. I've basically committed myself to a mental institution/ hand laying track so theres a set of skills that I need to acquire, though I think its mostly (like anything else) a matter of confidence.
So, aims for the year.
-Hand lay track on the layout.
-Better undergubbins for wagons.
( Oh, and work towards a running Ka, but thats a long shot)
Monday, January 11, 2010
“Why, this is very midsummer madness.”.....
(William Shakespeare)
Am_Fet chugs another Prozac and scribbles:
If I ever find the person that put the idea of hand-laying N gauge track and points into my brain, we are going to have stern words over a cider or 7. The idea of attaching Code 40 rail onto individual 1mm sleepers is crazy, No?
Never mind....They say that Madness takes its Toll, and here I am with the exact change. For those of you who are unaware of them, a firm in the States called Fasttracks have developed a range of tools that allow you to build track and points in all scales. The most useful devices look to be tools for filing frog and point blade angles, as well as a full range of "turnout" (sic) templates to aid construction.
The coolest thing however is a complete set of laser cut point sleepers.....built to American spacings obviously, but what an idea! So, take that general idea, grab a guild plan or three, have a general scribble....and this is what we get:

Exhibit A is a set of sleepers for a 1:6.69 turnout/point/switch/lane changer. Below it is a sleeper set for a straight length of track. The idea here is that these are laser cut in 1mm ply, attached to the rodbed on your module and then the rail is added on (either Code 40 or 55), either by spikes or glue. By cutting out some of the webs in the straight track you could even curve it (I think). The genius behind this is you get track with the correct sleeper spacing.....
But is this genius verging into madness? I think its a good idea, but would anyone else out there be interested? Or are we just turning into a bunch of fringe looneys that no one wants to talk to at partys?
Thoughts?
Sunday, January 10, 2010
LA Story

Something you don't see too much on the railways these days are good-ol four wheeled wagons; and of all of the varieties, was there anything more straight-up than the hard working highsider?
 I just finished off this LA (above in the middle) on a shorty Peco chassis with spoked wheels and Rapidio couplers (oh the shame) and some coal ballasted in as a load. I don't know where I got the resin top - possibly off Mr Murgatroyd in the late 90s. I have a pair of LAs and a pair of LC tops from that transaction and they're very nicely made - quite straight and square. Especially when compared to the LCs flanking it above.
These were my very first casting attempts. Some quite tough reddy-brown RTV rubber and some flashfix fibreglass car bog were purchased from somewhere, and a master was made of plastic and stripwood.Twenty years ago we didn't seem to have the abundance of styrene shapes that make scratchbuilding much easier today.
They weren't pretty, but I churned out about twenty of them in pretty short order (many on the more-readily available 'short' Peco chassis which was cut down the middle and the ends split to get the longer wheelbase) and they were effective when seen from a distance in a long string. Rhys applied his previous experience and made a much better master and mold, so he had about twenty as well, and the full set looked mighty fine on the old Otaki to Cass layout with a KP and a van bobbing along at the back.
 Although my own modeling abilities have (hopefully) moved ahead since those early days, I still have about 15 of my old battered LCs that I hope to run if I ever get this layout done. I've said it before and I'll say it again: things don't have to be perfect in NZ120, its the effect, not the details that matter.
That's one of the reasons NZ120 appeals to me. Its also why our crowd barriers were further away from the layout than most...
Thursday, January 07, 2010
The future pt 2
I've spent this evening adding the doors, side bracing and the roof bits. These are going to be sorted for the Mk3 version. Its not overly easy to put together (I would describe it as a very good scratch aid, but the result has surprised an NZ120 modeler who thought he had seen it all).
Blow it up full sized and be amazed. I was when I did.

Blow it up full sized and be amazed. I was when I did.

"Do you know how hard it is to make a fake ruler?"
I now need to find a short haired cat to add in the wires.
The future just arrived on my workbench.
Just a quick post today as my parents are visiting. So before we have the morning pill taking ritual (its sort of like a Japanese tea making ceremony) and load the wheelchairs into the car for a trip somewhere...
The goodies they arrived with were; a set of Ed wheel overlays, a J sheep wagon and Ia etches.
The Ed bits were unfortunately the wrong size ( who would have guessed that the diameter over the tread was different from the front diameter...) so I'll have to wait for another set.
The J sheep wagon was a sight to behold. Looking at it on its sheet I was impressed by all the spider webby stuff (plus it smells of burnt wood, which I find quite pleasant. Future models in an aromatic plywood please). Getting it off the backing paper was a bit of a chore, but only took 5 minutes. I had to have a quick check with Amateur Fetler to see just how it all went together. I'm happy to report that there were no major drama's (well, none that can't be fixed in the mk 3 version). It is fiddly and delicate, but its still quite strong.

Now I guess I'm forced to sort out a chassis worthy of it.
Wednesday, January 06, 2010
Ever Decreasing Circles...
Am_Fet writes: Before I made the great leap downwards and moved from Sn3½ to Nz120, most of my layout planning revolved around simple shelf layouts designed for shunting....lets face it, in a small house, it was all there was room for. Now I can design on pieces of paper that only need to be half the size, I'm really wondering what has really changed? And why am I always trying to fit ovals into my plans?
Historically, of course, it was what the tiddlers did best; set them to run at warp factor 7 and then stand like a member of the slip cordon waiting for an edge to stop the beasts hurtling to the floor. Slow running was non-existent, and trying to shunt with those couplers? It was like trying to tie a knot in pasta using only chopsticks. And so an oval of track was the only way to effectively play trains using the N gauge mechanisms.
However, times have changed; The best of Kato and Atlas chassis crawl at slow speeds, and the Kadee/Micro Trains couplers are brill.....So why do we still think of ovals? All the ingredients are there for a perfect shelf shunting layout in only 1/5th of the size of an oval layout.
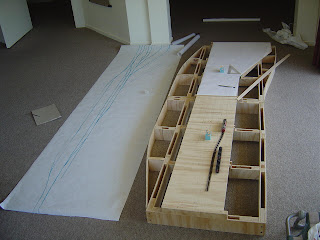
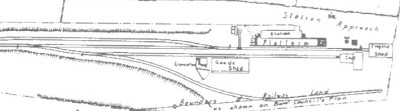
Exhibit A: Outram.

Here was a small branch terminus just south of Dunedin (inland from Mosgiel, if you didnt know) that has everything you could ever want to model in a station....Station, Engine shed, water tanks, good shed, 3 legged crane, stockyard....and only using 4 points.
However, I wouldnt do it like that. Firstly, I'd model it full size (and really stick it in the eye of the bigger scales!)....then lose the two points to the left and replace them with a sector plate, reducing the number of points needed. Then, I'd fold the baseboard in the middle....populate it with a Wf (similar to the one the Head Druff is building) and a selection of 1950's 4 wheel wagons, and THAT would (in my opinion) make a great wee portable layout, good for a test track and learning about building and operation. And it wouldnt break the budget.

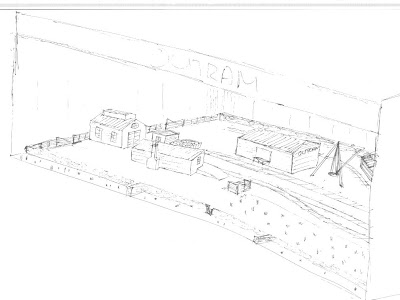
And in 3rd Planit it looks like this....

And because I cant draw, it would look significantly better than this:
So...Todays message is Free yourself from the Tyranny of the Oval, and find your inner shelf layout....
Historically, of course, it was what the tiddlers did best; set them to run at warp factor 7 and then stand like a member of the slip cordon waiting for an edge to stop the beasts hurtling to the floor. Slow running was non-existent, and trying to shunt with those couplers? It was like trying to tie a knot in pasta using only chopsticks. And so an oval of track was the only way to effectively play trains using the N gauge mechanisms.
However, times have changed; The best of Kato and Atlas chassis crawl at slow speeds, and the Kadee/Micro Trains couplers are brill.....So why do we still think of ovals? All the ingredients are there for a perfect shelf shunting layout in only 1/5th of the size of an oval layout.
Exhibit A: Outram.

Here was a small branch terminus just south of Dunedin (inland from Mosgiel, if you didnt know) that has everything you could ever want to model in a station....Station, Engine shed, water tanks, good shed, 3 legged crane, stockyard....and only using 4 points.

However, I wouldnt do it like that. Firstly, I'd model it full size (and really stick it in the eye of the bigger scales!)....then lose the two points to the left and replace them with a sector plate, reducing the number of points needed. Then, I'd fold the baseboard in the middle....populate it with a Wf (similar to the one the Head Druff is building) and a selection of 1950's 4 wheel wagons, and THAT would (in my opinion) make a great wee portable layout, good for a test track and learning about building and operation. And it wouldnt break the budget.

And in 3rd Planit it looks like this....

And because I cant draw, it would look significantly better than this:

So...Todays message is Free yourself from the Tyranny of the Oval, and find your inner shelf layout....
Tuesday, January 05, 2010
Coal Containers, Metal Tarps and Mr Impatient
DB says: Of the personalities that inhabit the United States of Darryl, Mr Thoughtful, Mr Careful and Mr Analytical have been tied up for the past few weeks making DX bits, and today Mr Impatient popped his persona into the trainroom for a look about.
You may recall that I made a few unspectacular HCC first-generation coal containers a while back. Then a short while after that, bored with HCCs, I turned a few castings into HEC urea containers.
Scholars of West Coast goods trains will note that you don't see either of those about on the Midland in the current millenia. The Dec 2003 Journal does have a good article though (including NZ120 plans) covering the newer HLC containers that currently ply the Coal Route carting black diamonds over the hill to domestic markets. The third 'series' of HLCs supposedly recycled the bases of HCCs or HECs with vertical side extensions added on top, so knocking a few up from my existing castings might be a good addition to the fleet as well as completing the 'three things you can do with coal containers' series. In the quite awful picture above, three of these ribbed containers can be seen as well as a curved-sided series 2 HLC near the middle of this appalling picture.
 Some tarp bars were made up out of round styrene, raised in the centre, on top of the extended castings as above.
More interestingly, earlier in the day, I spotted a bit of half-used tinfoil in a kitchen drawer, which made me think about tarpaulins. As of course it would. Lo and behold, it turns out that tinfoil makes quite good tarps - showing detail, but not being as flimsy as my previous favourite material: Glad Wrap. Just call me Gordon Ramsay.
I gently ruffled it up a bit, flattened it out, contact glued it and the bars, stuck it on and then applied a finger to carefully push it down to bring out the ridgepole detail. Noice. A bit of over-weathering later and we're done. Not bad for a couple of hour's work. I'll mellow out the weathering and finish the PK in some future sitting.
 Tarp Detail:
You may recall that I made a few unspectacular HCC first-generation coal containers a while back. Then a short while after that, bored with HCCs, I turned a few castings into HEC urea containers.
Scholars of West Coast goods trains will note that you don't see either of those about on the Midland in the current millenia. The Dec 2003 Journal does have a good article though (including NZ120 plans) covering the newer HLC containers that currently ply the Coal Route carting black diamonds over the hill to domestic markets.
 The third 'series' of HLCs supposedly recycled the bases of HCCs or HECs with vertical side extensions added on top, so knocking a few up from my existing castings might be a good addition to the fleet as well as completing the 'three things you can do with coal containers' series. In the quite awful picture above, three of these ribbed containers can be seen as well as a curved-sided series 2 HLC near the middle of this appalling picture.
 Some tarp bars were made up out of round styrene, raised in the centre, on top of the extended castings as above.
More interestingly, earlier in the day, I spotted a bit of half-used tinfoil in a kitchen drawer, which made me think about tarpaulins. As of course it would. Lo and behold, it turns out that tinfoil makes quite good tarps - showing detail, but not being as flimsy as my previous favourite material: Glad Wrap. Just call me Gordon Ramsay.
I gently ruffled it up a bit, flattened it out, contact glued it and the bars, stuck it on and then applied a finger to carefully push it down to bring out the ridgepole detail. Noice.
 A bit of over-weathering later and we're done. Not bad for a couple of hour's work. I'll mellow out the weathering and finish the PK in some future sitting.
 Tarp Detail:
Monday, January 04, 2010
Nelson calling
The comments section on my journal magazine review raised some interesting questions, namely 'why doesn't someone write some articles on the scale'. I submitted an article on the history of Nz120 about 5-6 months ago now, with pictures and have yet to see it in print (2 issues). I have even considered updating it over the break with all that's been happening in the last 6 months. It was also suggested that this be published on line at Nz120.org.
I'm rather reluctant to do this, as we need to start casting the net a bit wider searching for converts. From what I can tell we maybe have 20 active modelers in the scale (if the comments sections here and the users at Nz120.org are correct) plus another 60-70 odd lurkers. The guild has a membership of 500 ish ( I think its remained reasonably static over the last 10 years or so) plus whoever picks it up in shops. the real unknown is Internet searches. My stats tell me I'm getting about 30 hints a day from first time visitors. I'm not sure if we are attracting any of these people or if they were expecting to be somewhere else (I must try to create a title containing 'red', 'hot' and 'throbbing' in the title). I'm also not sure if the scale has ever shaken off its 'toy train' tag, where people were quite happy repainting foreign locos etc. It might also have a historical bent (I've had discussions with people who believe that Athearn locos are better than Kato)
So, apart from shows, how does one attract new blood to the scale (or to NZR modeling for that matter)
Sunday, January 03, 2010
remote DCC coupler idea unveiled.
Not much on today. Had a very nice lunch with Drew and his wife Maggie who were passing through, then did some domestic stuff.
I've posted up a rough description of what I've done to test out my idea for a remote DCC uncoupling system here. I think its probably a better location to have the discussion.
I've posted up a rough description of what I've done to test out my idea for a remote DCC uncoupling system here. I think its probably a better location to have the discussion.
Saturday, January 02, 2010
A tale of two mag's
well, having had the chance to digest the contents of the 2 local magazines I buy, I can sit back and produce some digestive rumblings.
Railfan: A nice picture of a mock up of the New Wellington electric units. these do look cool. Theres a large collection of pictures of various preserved locos and railcars running on the otago cnetral. some excellent landscape stuff that does inspire one to attempt to model the area (which in some places looks like a moon scape). A great colour section on 88 seat railcars which has almost tempted me to get another one (rumours I've heard suggest this may be avalaible again sooner rather than later) apart from the fact I have no money (well, its already pre spoken for).
John Agnew continues what seems to be a comprehensive discussion on NZR passenger cars. I wasn't sure about this series to start with, but I can see now that its building into a fantastic modelers research tool. I can't wait to get to the more modern cars and I can start building some of them.
Finally theres a bit on bridge buildng which has tempted me to start thinking about craven 40 ton cranes with acompanying wagons. this would look cool sitting on a siding or as part of a special work train.
The Journal; Hmmm, what to say. I'm still not sure about the current content here. 9 pages are devoted to a bush tramway layout which is OK, but not mind shattering (I've seen it at a couple of exhibitions and it is a nice layout, but...). A plan or overview would have been nice. a plan page thingy for a ZAT and an archbar bogie. The various anoying moderlers group pages, which seem to be getting even more waffly (and could soon rival this blog). Theres a 2 page write up on Ian rice coming to the convention and a book review, but this could have been 1/2 a page without a stack of waffle again. theres aalso an article on another method of steam locomotive suspension which took me 3 readinsg to sort out. A diagram would have made everything so clear (and sending me to the original article from a now defunt magazine thats 20 years old is rather usless quite honestly).
The one thing that did get the creative juices flowing was graham Dredges article on building a shunting donkey with DCC operated kadee couplers. I just looked at it and thought, 'my that is an odd way of doing it' (being polite of course). I've done some bench tests today and think I can make a version that just uses magnets rather than a solenoid/spring direct drive. If I can find some small coils I should be able to fit it behind the headstock of a locomotive and do the same job on a modified microtrains coupler. More news of this as it comes to hand.
Subscribe to:
Posts (Atom)