
Its odd how Darryl and I seem to be working on similar projects at the same time.
Again, mine is a guards van, but we have to move back a small matter of 120 years or so. After adapting the Trackgang 5' carriage bogies a bit, I had to decide what to put them under. I have always liked the old clerestory style coach stock, but very little of it survived into the 60's. Several of the vans did however, and so I decided to make one. I started off with a piece of 2mm plasticard cut to size for the underframe. Holes to take the axle pivots were drilled in the plastic, and I also hollowed out areas under the bogie wheels, as they would rub on the underframe when installed. I fixed the bogies with woodscrews (M2 I think). These had the heads filed flat, and the bogie mounting holes were drilled out to take this. The bogies were shimmed up to the correct height with plasticard and washers.
I then cut out the sides and ends from some scribed sheet plasticard (no idea which one as it was purchased 2 years ago and has long lost the packet), and glued them together. The ends had holes cut in for the doorways. I braced the sides 1/2 way along with an internal spacer. This assembly was then mated with the chassis.

Being the middle of the afternoon at the time, I had not yet had a beer, and so my inner finescaler was awake and making horrible suggestions (bastard). Having decided to put the doors in, I then had to do the paneling didn't I. Fortunately it wasn't too difficult.
 I even think that the effort was worth it...
 My attentions then turned to the roof. Following Darryls tribulations I considered making the roof from brass as well. However that would mean some sort of fettling effort and I just couldn't be bothered. Having selected thin plasticard as the medium of choice, I then had to have some method of bracing it. I decided on a longitudinal brace rather than cross braces, as I was concerned that the plasticard would sag between cross members (and also that a single rectangle is far easier to cut out than a set of arched spacers).
 At this point I also decided to glue in some lead shot for weight.
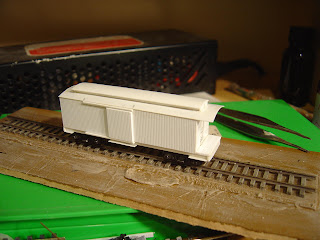
The roof was added in 2 parts. First up I cut out a piece of thin plasticard to the correct size and shaped it by rolling it on my leg with a paintbrush handle. Fortunately I didn't have to get too much of a curve in it. This was glued into position.
To make the clerestory section I cut out 2 lengths of 2mm think plasticard, these were then glued into position to make the sides. I then roughly shaped the ends and glued them into position, followed by filing and cutting down to the correct size and cross section. The roof was again cut from thin plasticard, shaped on the leg and glued into place.
 Ugg, now down to detail time. First up, the doors. OK I guess that this is a reasonably important detail. I first made the top door slides, then cut out the doors to size and glued them in. I had to trim up the bottoms a wee bit. Note that if you look carefully you can see that the doors are thicker than the guides at the top. Oh well. I then added the lower door guides and the foot boards. when first fitted they were full length but were later cut down. There's a completely useless piece of information for you.
 At this point It was time to move on to the undergubbins. I angsted over how to do the bracing for a while (about 5 minutes). I did contemplate soldering up a set of queenposts and bracing wires, but several beers soon nailed that idea dead. I then feel back on the old method of cutting a plasticard rectangle and gluing it across the underframe. It then gets painted black, and you can't see it from 2' away. I notched the ends so that the bracing wires would sit neatly on the ends, and also added some cylinders as well (one of my paintbrush handles is now an inch shorter)
 Back on its feet again, and I also added the guards lookouts at some point. These were based on a piece of 1mm plasticard with think plasticard overlays to get the top and bottom metal sheathing and also the window surrounds.

Next up will be dog boxes and the end platform railings (hmm, time to get the soldering iron out)
Again, mine is a guards van, but we have to move back a small matter of 120 years or so. After adapting the Trackgang 5' carriage bogies a bit, I had to decide what to put them under. I have always liked the old clerestory style coach stock, but very little of it survived into the 60's. Several of the vans did however, and so I decided to make one. I started off with a piece of 2mm plasticard cut to size for the underframe. Holes to take the axle pivots were drilled in the plastic, and I also hollowed out areas under the bogie wheels, as they would rub on the underframe when installed. I fixed the bogies with woodscrews (M2 I think). These had the heads filed flat, and the bogie mounting holes were drilled out to take this. The bogies were shimmed up to the correct height with plasticard and washers.
I then cut out the sides and ends from some scribed sheet plasticard (no idea which one as it was purchased 2 years ago and has long lost the packet), and glued them together. The ends had holes cut in for the doorways. I braced the sides 1/2 way along with an internal spacer. This assembly was then mated with the chassis.

Being the middle of the afternoon at the time, I had not yet had a beer, and so my inner finescaler was awake and making horrible suggestions (bastard). Having decided to put the doors in, I then had to do the paneling didn't I. Fortunately it wasn't too difficult.
 I even think that the effort was worth it...
 My attentions then turned to the roof. Following Darryls tribulations I considered making the roof from brass as well. However that would mean some sort of fettling effort and I just couldn't be bothered. Having selected thin plasticard as the medium of choice, I then had to have some method of bracing it. I decided on a longitudinal brace rather than cross braces, as I was concerned that the plasticard would sag between cross members (and also that a single rectangle is far easier to cut out than a set of arched spacers).
 At this point I also decided to glue in some lead shot for weight.
The roof was added in 2 parts. First up I cut out a piece of thin plasticard to the correct size and shaped it by rolling it on my leg with a paintbrush handle. Fortunately I didn't have to get too much of a curve in it. This was glued into position.
To make the clerestory section I cut out 2 lengths of 2mm think plasticard, these were then glued into position to make the sides. I then roughly shaped the ends and glued them into position, followed by filing and cutting down to the correct size and cross section. The roof was again cut from thin plasticard, shaped on the leg and glued into place.
 Ugg, now down to detail time. First up, the doors. OK I guess that this is a reasonably important detail. I first made the top door slides, then cut out the doors to size and glued them in. I had to trim up the bottoms a wee bit. Note that if you look carefully you can see that the doors are thicker than the guides at the top. Oh well. I then added the lower door guides and the foot boards. when first fitted they were full length but were later cut down. There's a completely useless piece of information for you.
 At this point It was time to move on to the undergubbins. I angsted over how to do the bracing for a while (about 5 minutes). I did contemplate soldering up a set of queenposts and bracing wires, but several beers soon nailed that idea dead. I then feel back on the old method of cutting a plasticard rectangle and gluing it across the underframe. It then gets painted black, and you can't see it from 2' away. I notched the ends so that the bracing wires would sit neatly on the ends, and also added some cylinders as well (one of my paintbrush handles is now an inch shorter)
 Back on its feet again, and I also added the guards lookouts at some point. These were based on a piece of 1mm plasticard with think plasticard overlays to get the top and bottom metal sheathing and also the window surrounds.
Next up will be dog boxes and the end platform railings (hmm, time to get the soldering iron out)
4 comments:
HA the Odd Couple! Thats a completely unqualified statement as I've never met either of you :-)
Anyway.... amazing what you can do with a couple of spare hours, several offcuts of plastic card, and a few beers.
Great looking van so far, can't wait for the paint job to go on!
Tres cool. I clearly need to switch eras. "on the knee" - a new entry for the NZ120 phrasebook
The odd couple.
Hmm,, My Tony Curtis to Darryls Walter Mathau. The only problem is that we have never flatted together.
Grumpy old men then??? :-)
Post a Comment