

DB follows up to this first piccytaking post, since he isn't doing a lot of modeling at the moment:
Macro
I had a query or two about 'macro' settings on a camera. The term in the old days referred to close-up photography - specifically being able to magnify the subject such that the image recorded on film was close to the size of the subject itself. There are many techniques that can be used but the most common these days is the 'macro' setting on your point and shoot cameras or on lenses - both of these allow you to focus on something really, really, really close to the camera.
There are three things to bear in mind when you get up really, really, really close and personal to your models (four if you count that all its flaws will be magnified!)
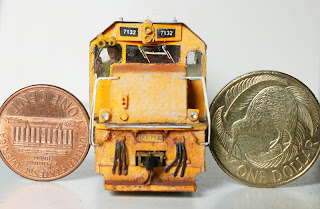
Firstly, you will recall from the previous discussion on depth of field that the closer you get to the subject, the distance in focus fore and aft of it will be greatly diminished. When you are really (really, really) close, you need the smallest aperture hole (biggest f-number on the lens or camera settings) you can get to keep this distance as deep as you can. Luckily, in the above pic, only a small depth of field is needed (from the coupler to the cab face). In fact up that close, there may not have been much more DOF on offer, even with the lens closed down to f32.
Secondly, the small aperture means you have a longish shutter speed, and this, coupled with the 'macro' effect magnifying your camera-shake, might lead you to consider sitting your camera on a tripod (or a book or something else solid). And possibly a cable release as well to stop you moving the camera as you push the shutter. The poor man's cable release - which you can use for night shots of real trains as well - is to use the self timer to fire the shot. This gives a few seconds for the camera to stop wobbling (even on tripods a camera can sometimes move a little) before the shutter fires.
Thirdly, if you are really close to your subject, a camera flash may blow out everything up close into a nice shade of glaring white, or then again, it might shoot right over the subject, or you may have nasty shadow problems. See that previous post for some diffused lighting ideas.
Going Wide
Zooming in using a telephoto lens often creates drama in train photography, but this rarely works so well in model space because you lose precious depth of field with tele lenses as we saw in the last edition.
We also saw that wide angle lenses have the opposite effect, and that bonus DOF holds in model pictures as well, so more of your shot will be nice and sharp. It also gives a 'different' view from the normal 50mm lens look that you usually see in model pictures.
Getting Low
Getting down low, close to - or even sitting your camera on - the tracks or scenery also produces 'different' and more appealing pictures than those taken from up in the sky by the Camera of God. Be careful to shoot around foreground items/trees that would be out of focus.
Advanced Class: Extending depth of field by combining multiple images
Although the small-aperture trick will keep most of your regular model shots acceptably sharp, it won't if you need things to be in focus right up close to the lens and also a metre or two away.
Something you can try in that situation is to take a few pictures each with different distances in focus and then blend the bits that are sharp from each picture in Photoshop or a specialist focus-stacking program like Helicon.
The picture at the top of this post covers about five feet of module with a mild telephoto lens - a depth of field challenge even with the lens stopped down. So using a tripod, I took four pictures from the same spot but with a different focus point for each - foreground, loco nose (top left - note the background is a little fuzzy), middle distance and background (bottom left).

These were blended as four Photoshop 'layers' (below) where the fuzzy areas I didn't want to show in the completed picture were masked out or erased from that layer, leaving just the four charp areas to show through as the final image.

Techy Note: Colour Temperature and White Balance
In this day and age, the fact that different lighting sources give off different colours isn't such a problem. It was with film (anyone remember that film stuff?), of which most types usually expect light from our friend Mr Sun. If you took a shot with film inside an office (without a flash), the fluorescent lights made things look greeny. Inside a home lit by those old illegal incandescent light, things looks yellowy/orangy. Light from camera flashes is usually quite blue. Etc Etc.
Modern digital cameras try to deal with that using a 'white balance' sensor, which adjusts the colour balance to make all the pictures look 'daylighty' - which is what we're used to seeing in pictures. Usually this works fairly well, even with mixed lighting. When taking model pictures, I usually have an incandescent light on so I can see what I'm doing, but I use a flash for the main or fill lighting. But you wouldn't know that because the camera corrects for it.
For film cameras loaded with daylight balanced film, you need to put filters on the lens (or the light source) in the inverse of the light temperature. For example a yellow filter takes the blueness out of a camera flash.
The only time this is a problem for us is if we mix light sources in different areas of a picture. For example a layout is lit in the background by a strong incandescent light and a flash is used on part of the foreground. That could be fixed by putting a see-through yellow plastic 'gel' over the flash or more trickily fixed in Photoshop.
I'm not sure that even I understand what I just wrote there...
2 comments:
Cool thanks for all that info . Now just have to work out how to turn this camera on
try CRTL-ALT-DEL, that always works for me.
Or is that the lawnmower...
Post a Comment