
One of the wonderful things about the items from Shapeways is that they obviously let you spit out a model much neater and faster than making something completely from scratch. Throw some bogies, couplers and paint on this thing and you could be done.
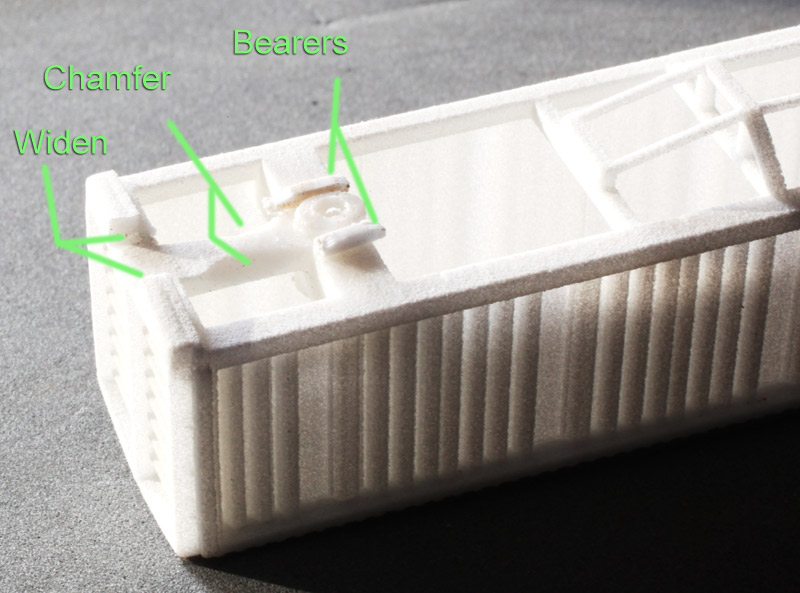
I started by pondering the bogies and couplers situation, firstly finding some Kato bogies as reviewed way back here. The WSF material is easy to drill out using the pre-marked bolster holes as guides. I chamfered the reinforcing strut linking the bolster to the coupler pocket so that there was plenty of clearance for swiveling wheels and also widened the coupler pocket to take a pair of MicroTrains couplers. The Kato bogies have a pretty big bolster hole so I added a set of bearers 'just in case' before attaching them with screws and the couplers with carefully applied contact glue.
With the hard lifting done, it was time to turn ones delicate thoughts towards the pretty bits. After staring at a few ZM pics on the web, things that stood out as candidates for some additional detailing were the big steps under where the centre doors join, the lifting door handles themselves and a small horizontal strip near the top of each door. The latter items are tiny slivers of plasticard attached with white glue - the door handles look ok, but the plasticard is a bit big for the horizontal strips, but no dramas when viewed from the federally mandated distance. The steps were cut off an N scale wagon top which also furnished corner steps which were added as an afterthought. All those steps were attached with my ancient contact glue. A few rectangles of paper for number and chalk boards completed the effort (although those hadn't been added when the pic below was taken).


You can see some of that seepage in the above pic which also shows my tacky attempts to weight the lighter-than-air model using steel nuts and washers contact-glued in at strategic locations above the bolsters and bracing.
A little weathering with some acrylic washes (rust, brown, black and gray) together with some yellow to pick out steps and door handles and things are starting to look close to finished.

Although the appearance of these wagons has changed over the years -and especially so since spraypaint vandalism has became so popular - the one remaining step for me will be to put the yellow stripes on the doors, but that can wait till the rest of the paint has dried! Actual working time getting the wagon to this condition was less than two hours. Prototype pic from Ken Lankshear's NZ Wagons Flickr set.
Overall I'd not hesitate to recommend this model of a hard-to-build prototype. I must take a pic of it beside my 20 year old resin cast ZAs...
4 comments:
Very very nice! Well done, the extra attention to detail really does make a huge difference!
Please don't compare it with the resin ones. We might not be able to stand it!
Well done, a good look into what is needed to get one of Peters beauties on the track.
Can I suggest this goes onto Nz120 as an article for future reference?
Very nice work. Makes me tempted to try and design a module and get some wagons. Now to figure out what to base a module on.
Post a Comment