Monday, February 23, 2015

Is the show draging?

If things are getting a bit slow at the train show  (just after lunch on Sunday) then here is something to keep the operators awake. ( From Alan Cox via the 2mm mailing list. apologies Alan)

There is always shunting scrabble (usually played at shows to avoid
boredom)

Wagons have a letter tacked on the non public visible side. Trains of
wagons arrive and the goal is to send back completed words with the
highest score. Wagons are also arranged so that common wagons have common
letters while Z, Q etc are unusual one offs.

I'm sure that there would need to be a few more rules than this (I've been informed that this is about it). Maybe the scrabble set to draw the letters out for the incoming train.


Sunday, February 22, 2015

Wharf part II

Well, a bit of progress this week.

I've decided to add a 3rd track to the wharf as it just didn't look busy enough. this was just in the form of a long siding with the extra point laid in front of the ones that were already there.

'From the dry end'
'From the wet end'
This looks much better than what was previously there. I will use at least part of the new siding to model so activity scenes with wagons being unloaded etc. maybe even a couple of small steam cranes.

Thursday, February 12, 2015

A start on a wharf

(And we are back. Work and summer got in the way).

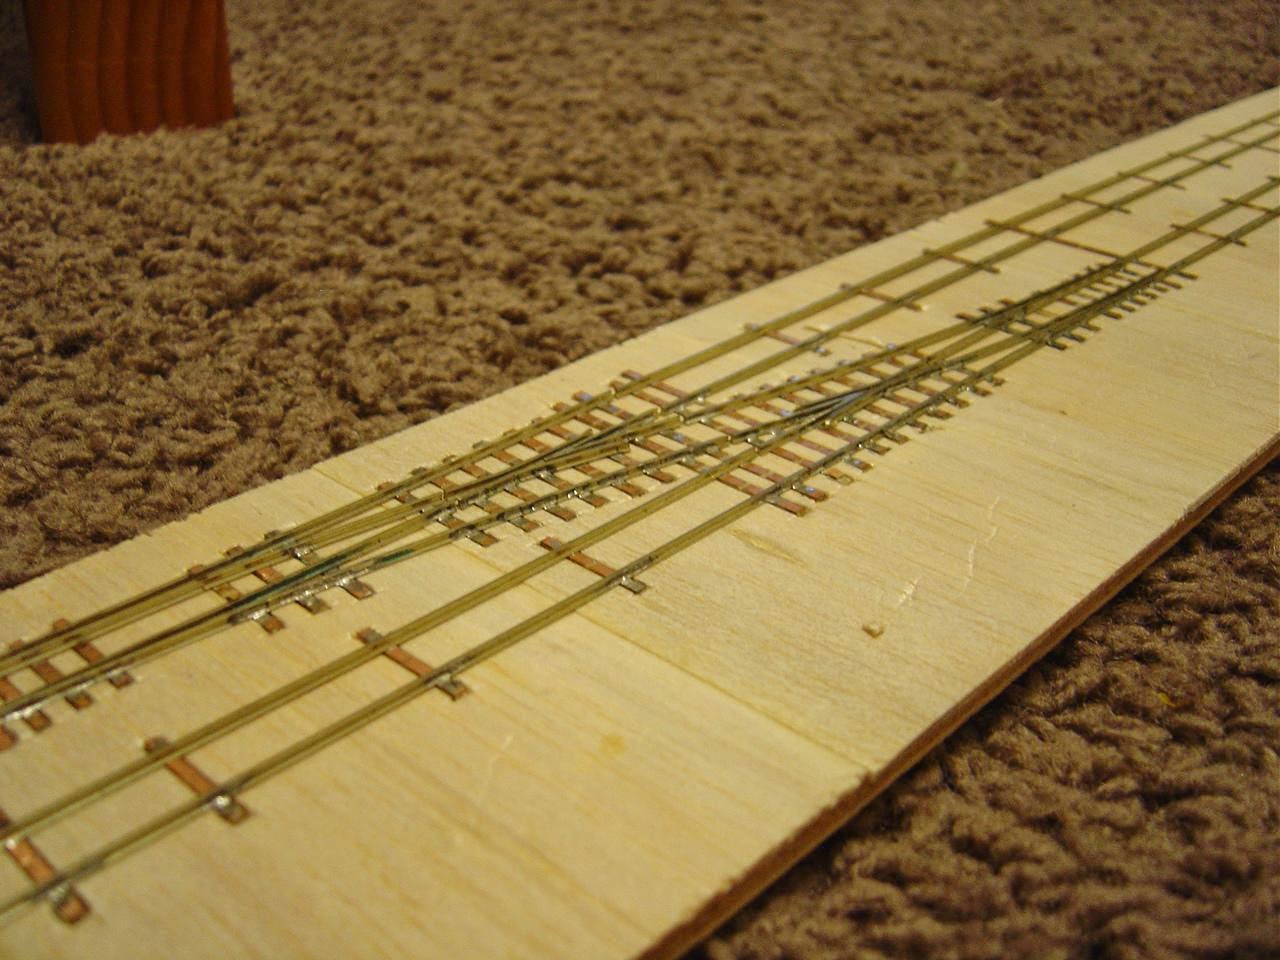
I've made a start on the wharf. The base is a bit of 6mm ply 100mm wide and about 4' long. 2mm thick balsa wood sheet has been laid across this so that I can scribe the planks in. The track has come from my aborted layout in a box file (one of may bits of track I've 1/2 built over the years)


The extra width of the wharf has meant that I can lay another siding to add another shunting track and provide some more space for a scene or 2.
To get it inlaid was a bit of a mission. I've decide to model an old style wharf (pre-WW2) with the rails on top of the planking.
The balsa wood sheet was glued at the sides of the ply sheet. I then traced out the positions of all the sleepers and cut them out. It really didn't take that long, honest.


The track was then positioned to check that everything sat in the right places.


Once I make sure everything is running OK and I come up with a point throwing system that I can hide (and after I have scribed the planks) then I'll glue everything down.

Sunday, November 23, 2014

The remains of the day

A while ago this came back into my possession after a stretch of time.


This model was the original plastic master for my resin cast Df/Dft models. Obviously it has seen better days.
A cursory look reveals that most of the bits are there, or I can fabricate replacements. One thing that I can't remake is a Bachmann SD40-2 bogie from the second incarnation of the model. The first incarnation (from the id 1980's) was a good mech. However its weak spot was the worm gear, which after a lot of running, would wear out the plastic end bearings.

So, does anyone out there have a Bachmann SD40-2 bogie that I can buy off them?

Saturday, November 15, 2014

Boating part II

(No we are not turning into a boat blog)
A knock playing social football on Wednesday night meant I was not keen to drive 4 hrs to Railex today. Instead I got some modeling in (quite honestly a first for a long time).

I started assembling one of the card ships I had purchased last week. These models are not for everyone. a steady hand and a sharp knife is required to cut the bits out. The instructions are pretty basic ('Assemble the model in part number order' is all well and good, but it would be nice to know that tehre are a,b anc c parts without me having to hunt all the sheets for them) and the pictures leave a lot to be desired. Having said that, it takes me back to building Superquick buildings in the early 80's, as well as doing a few castles for wargaming last century
The main frame is laminated onto thicker card (possibly too thick) and then assembled. The rest of the bits are then added (in order. Very german)


The bits are supplied to buld a full hull model, or a waterline model. I will probably add a slice of the red hull just to add a bit of colour and height to the front of the scene. The is to have the ship at the front, then the wharf and then a warehouse of some description.

Only a progress shot.......
Its not perfect, but it looks the part, and size wise its spot on compared to the W wagons I've posed in front. Did I say the price was excellent as well?

Tuesday, November 04, 2014

Down to the sea....

Well, after the posts from our roving international reporter (unpaid) its back to the blogsphere for me too.
I've been looking into TT scale models from overseas for use. Others have concentrated on plastic and metal models, but these tend to be on the small and expensive side. However there is a sizable range of models avaliable in the ancient medium of card. My interest was raised by a selection of model ships avalaible from Schreiber-Bogen. I've had some previous experience with this companies products in that they do a range of european castles which build into very nice models. A few clicks and a week later the package arrived in my mailbox. 3 models and postage for 40 euros.


 The scale for the first 2 is 1;100 (close enough) and the bark (sailing ship) is 1:200, which we will get back too. So what do the insides look like.


3 Pages of instructions and 8 A4 pages of parts, all nicely printed and coloured. The models can be made as full hull or waterline models.. The instructions are not overly clear (but workable) and some considerable dexterity with a knife is required. The overall size of the Sirius is 51cm long, 7.5cm wide and 22 cm high, all for the princely sum of 13 euros. A model in any other medium that size would set you back 5 to 10 times that. the detail is a bit flat in places, but 3D details can easily be added.

The bark in 1;200 scale I will scan and get printed out at a larger scale on A3 (1:160) or A2 (1:100) sheets. They will need to be laminated onto thicker cardbefore assembly. There are also more modern models for those of you with different tastes.

One of the problems I have just thought of is that having large delicate models on a layout will provide the operators with quite a few chances to damage them. Not sure how I will get round this, unless the masts are made from sharp stainless steel needles.

Wednesday, October 29, 2014

Eurospoor 3

DB concludes with his two favorite layouts from Eurospoor

Gipsbahn

This layout is another octopus, with the center leg actually a small Y, and although this is a wide-angle shot, the two outer legs are at less than 90 degrees. Quite interactive being able to walk all around it, and it was set nice and high too, so you could enjoy it. One downside was that if "oo, a train at the quarry", you had to figure out how to get out of the maze to get to the quarry!


The thing I liked most about this layout was that it had a purpose. Empty gypsum trucks would head to the quarry, be "filled" and taken up to a kiln/factory to be turned into plaster or something I guess and then the final product shipped out. Another thread had tubs of clay going somewhere else, and I think a third thread was log traffic

Gypsum Mine
"Loading" the wagons with squares of "load"
At the junction
 Another eye-catching feature of the layout was a working incline - a-la Denniston.

The locos would position wagons at the top and the bottom, a 'rope' would be hooked over the couplers, and away they'd go. In this hemisphere, as gravity is upside down, the loaded wagons going up drag the empties downhill.

Positioning wagons
So inclined
Long tweezers are used for uncoupling and to slip the 'rope' over the couplings
Up top, a 'stop board' is inserted into a hole between the rails to stop wagons rolling downhill until the loco fetches them 

The last third of this video shows the incline, complete with some lovely noises from the little shunting tractors (one below)

Narrow gauge meets standard at the top, where the plaster products are trans-shipped
A nice wee transfer table makes a compact staging yard with runaround facility...

Warren Lane

The final mesmerising layout. I could have spent hours watching this, in fact I spent so much time watching, I hardly took any pictures. Not that that matters, because pictures don't do it justice.

Warren Lane is simply a container yard, with a mainline behind. 

They run trains along the mainline of course.

They run trains into the yard and shunt them, picking up trains with arriving locos and so on, as you would expect.

The killer thing about this layout is that the container cranes WORK. 


Note the dangling silver Maersk container under the far/top of the near container crane, and the green one in the top pic is being loaded onto that truck...
Yes, as well as an operator at the front of the layout working the yard from this end, another operator picks up containers from trains and puts them on trucks, or into storage and vice versa. The remote controlled cranes made by Heljan are pricey (about a thou NZD) and no longer produced, but are bloody impressive. They run along the yard on single tracks, the top piece traverses, and the container-liftey-bit, raises/lowers, picks up and releases containers by electromagnets and can rotate (if you want to place a container on a truck that's not exactly parallel for example.

Its all gorgeously detailed, the rolling stock is superbly weathered and the sound is extremely noice too. Check out the work paint on that EWS loco above.

As I say, pictures don't do it justice, so here's some Youtube. I'm sure you can find more. I haven't seen OO scale since I was a Hornby/Triang lad, and was reminded what a nice scale it is for modeling countries with more confined loading gauges - a bit more beefy than HO, but perhaps a bit more useful than S.

Well that's Eurospoor. There's certainly some neat modeling going on in Europe.

So it's good night from me, and goodnight from him.