Sunday, May 31, 2009

Great Workbenches of the World: An Ongoing Series

While reading through the latest installment of Kiwibonds informative casting series (a trilogy in 4 parts, to quote Douglas Adams), it struck me in the photos how..."unruly" his workbench looked. This got me thinking about the size of the respective workbenches used by our two paragons of the scale (Head Druff and KiwiBonds)....and the high output these two are turning out in what I think are very modest spaces....

Firstly, The Head Druff:


Seeing this workbench brings to mind a line from "The Cyberpunk Fakebook" (essential reading for anyone in my line of work with a hacker alias) where one one of the most reverred hackers ever ("D00dz") did his most impressive work with a Commodore 64....be impressed...be very impressed.

The Head Druff here shows scant regard for heavy machinery while having a good size functional workbench, well under the size most would expect him of having when seeing the calibre of his work. Point to note: GOOD LIGHTING. Worth its weight in gold. Also note his tools are all within easy reach on the floor (usually where they've been put).

Next up: KiwiBonds.

Friday, May 29, 2009

Dandruff Product Testing Labs: Graham Farish Freight Bogies


DB Says: Unfortunately, I used up all my nose-mining one liners in the first "bogie alternatives" posting, so its going to be ‘slim pickings’ as far as amusement goes tonight.

I revisited that first post the other day and saw a few comments had been added recently. In one of them, Ben Scaro pointed out some new Graham Farish wheels and bogies from the UK that might be of interest. So, fool that I am, I sent off a few precious quiddage foodstamps for one of these Grafar BRA Steel Strip Carriers a few days ago. Mainly because I was intrigued to see if there is anything Freudian behind the English wagon class lettering system (which, coincidentally, is called TOPS).

The beast arrived and was peeled open. I was disappointed to find no bra-steel load inside. But on the outside were some nice looking bogies.
Farish, Microtrains and Kato

They have a 12.5mm wheelbase. Still shy of the NZR's 14.5-15mm, but considerably better than the 10.5mm Microtrains ones and not dissimilar to the Katos I looked at last time.

Kato, Farish and Microtrains. Mixin it up.

The real boon is that the wheels are a nice size, which is what makes them look more realistic than the similarly sized Katos, as is the coil springing for those with good eyesight. They have Rapido couplers, set at a 'good-to-slightly-long' length for must NZR applications.
Until today, the Microtrains equipped UKs (right) looked pretty good, but perhaps not so when harshly compared to the Farish examples (dummied up above on the left). Might be able to lower those UKs afterall...Next day... Ooooo yeah. They look good. Real good. Because these close ups are cruel, I dulled down the wheels with a permanent marker. Yep, I like em.

(RB: I've contacted Bachmann UK about buying these as separate items, and received this reply
" Thank you for your inquiry. Unfortunately we are unable to help you on this occasion as bogies for these wagons are not kept as spares. It's possible that they may become available as packaged accessories in the furture if it is considered that there is enough demand".
Bastards.)

Friday night news

300th post here. No NZ120 stuff tonight, but will report that Amateur Fettler has added to his brood with Eleanor, born this morning. Mother and daughter both doing well (I assume, as I've heard nothing else).

So whats everyone else been making ;v)

Postscript:


Bwahahahahaha.......

Thursday, May 28, 2009

Resin Casting 101: Part 4 - Castaway

Once you have your mold, it’s pretty straightforward to start pouring some resin into it to make your castings.

Check your room has ventilation, use rubber gloves and put some paper or old magazine pages (finally, a use for the Model Railroader!) down under the mold as you'll inevitably dribble a few drops of this araldite-like substance. I also recommend covering the floor if you care about it, in case you have a spillage incident. You will not get this stuff out of carpet...

Use the right resin. You have a choice between fast cure and slow cure resins. I have a quick resin that sets in about 10 minutes which is great for making lots of simple castings in a short timeframe, for example, I find it OK for containers. However I've surprised myself by becoming a fan of the slower overnight resins for most of my stuff. They are much stronger, making them perfect for for thin container wagons and for more complex castings. But their real benefit, is that you can take your time as they have a longer 'pot time' (mixing time). The fast cure resin just doesn't give me enough working time to ensure that mold corners are filled and air bubbles are exorcised from complex details before it starts setting.

[NZ content as required by the Commerce Commission: I can recommend the Procast resin from Topmark. its a slow cure resin but sets very hard. I had previously been using easycast which runs like water, but doesn't set hard enough, sets very fast and can deform over time leading to droopy wagons]

Mix WELL. If you don’t do this, you may end up with nasty, sticky, uncured resin seeping out of your otherwise perfect casting forever, even after ou paint it. This is a real heartbreaker and will probably consign that item to the rubbish bin. Mix WELL! I use disposable plastic cups and spoons, and get 3-4 pours from each before they get totally encrusted in layers of resin. Did I mention MIX WELL!

BUT - avoid mixing in air bubbles!

Ensure your rubber mold is sitting flat (yes I have accidentally had a lump of plastic sitting under a PK mold and made a bent wagon) and has any support it might need. The mold in the picture below had a too-small mold box and needs to be supported in the wooden frame behind it to prevent the production of overweight KPs and containers.


Scrunching the mold while half full of resin. Then it will be relocated into the wooden support behind for the final pour. Position of little fingers optional.

After pouring the mould about half-way, I usually scrunch, flex and stretch the mold rubber walls (above pic) to ensure that the resin flows into all the details. I also use a toothpick or stick of plastic to get resin into the corners and pop any visible air bubbles. Then I pour in the rest and use the bubble popper again.

For my flat container wagons, I apply the slow-cure, strong resin with the handle of a disposable mixing spoon a few drops at a time. This lets the resin flow naturally into all the crevices without trapping air. I add shotgun pellets and folded lead (from dental x-rays) to add weight to my container flat castings.


Making a UK one drop at a time. You can just see the dark shotgun pellets in the poured resin. The dental x-ray lead (foreground right and sets of folded sheets to the left) are about to go in as well. This is how they really made UKs at Hillside.

I often place a flat rubber surface (another mold) on top after most of the air bubbles have come to the surface for popping to get a nice flat top to the casting. This saves a dusty mess of sanding off any excess resin later on.


Using another mold (stuffed with containers!) to provide a flat surface on top of the container wagon casting

Wait till the resin has cured per the instructions and then carefully pinch the rubber to break any vacuums and free the casting.

Peeling Out - note the 'flash'

If you placed flat rubber on top, you may have some flash spewage (as in the above pic) that can be cleaned up with scissors and a knife. Do this sooner rather than later because after the prescribed demolding time, the resin will normally continue to harden – the slow cure stuff will do so for up to 2 days, so set aside the casting on a flat surface, or it could bend before it hardens completely.

All done!

And here are some results. It may not be clear in the pic below but the painted UK has a few air bubbles on top - most of these will be hidden by containers, but I have filled the ones that would be visible that the paint didn't. The KP is a good example of a careful, steady pour with very few imperfections to be fixed (or ignored!). The GSX containers show a quick straight pour (at left), and a slow careful pour with scrunching of the mold (in the centre). Note the considerable difference in the rendering of the side rodding detail. This only comes out well when you get the resin into all the nooks and crannies by scrunching.

Wednesday, May 27, 2009

In all the dark places

I've just been on to Etch cetera today about a 3rd Da kit to build a phase 3 Da, and it sort of got the thinking cells going. Just how many people have actually assembled an etched Da kit. I'm sure there's been a few sold over the years, but has their destination been to the bottom of the dead kits draw? I quick mental tally up gives about 6 that I can remember seeing (my 2, David Weedons 2, Rod and Darryl). Any more examples out there, and if you do have a kit in teh draw, whats holding you back from putting it together?

You're Nicked, Me Little Beauty....

(Time for more non-modelling drivel with Amy Fet (Thanks ECMT))

Ever since deciding to forego the larger scale and an historical mindset for the joys of planning for Nz120 in the modern day, my enthusiasm levels have increased no end. I think it really is a case of a change being as good etc etc. When before the "Eureka!" moments were usually found hunched over books, photos or plans, I've grown to appreciate over the last few months the joy of the eureka moments being out in the real world.

The part of my "research" that is giving me the most pleasure is the locomotive research. For my planned MNPL layout (Thats Marton - New Plymouth Line for those following along at home), I have drawn up a list of locomotives I would eventually like to see populating the place:

DFB: 7348 (Green), 7241 (TR Blue)
DXB: 5074 (Green), 5108 (KR Phase II), 5137 (KR Phase I), 5120 (TR Blue), 5520 (Black), 5143 (KR Phase I)
DC: 4110 (TR Blue), 4191 (NZRC Blue), 4409 (FS) 4438 (Black)

This really strikes me as being a good representation of the many schemes currently populating our network.

The fun bit is trying to track down each loco in turn to capture it on film (or pixels). The thing is I reckon I've got only a short period of time (maybe 6 months to a year) to get some of these locos the way I want them before they disappear for repaints or rebuilds, so I've really got to act now.

And so to the saga this week. The Target: 7241. The little minx had been skittishly staying well away from my intentions in Palmy, and even when it did make an appearance in WGTN, it was promptly pushed straight back out the next day. Cue Monday, the morning commute into town....and there she was! Sitting in the paddock at the depot, looking quite relaxed. Will probably go north on 220, or maybe an overnight freight I mused.....But she was still there in the evening (so had missed 220), and so with baited breath I waited for the next morning....

Woohoo! Still there. With 7348 and 5074 to boot! Plus the camera was in the bag this time. At work I furiously updated Amicus every few minutes to try and confirm what would be on the front of 220 at 1100...please no, please no....Soddit, just go! A quick phone call to maintenance ("Can I please come and play with your trains?"), absconding with the company car and driving like a maniac down Thorndon Quay...Got to the office to sign in....and theres the sound of a turbo whine on the main departure road outside the window!! NNNNOOOOOO!!!!!!!!!!!!!!

ITS GREEN! THE %#@%^&% DEPARTING LOCO IS GREEN!!! PHEW!!!!!!!!! I've never loved 7348 as much as I did at that moment...it means I will need to hunt her at a later date, but I can wait (I know how to wait...!). So with the boss in tow, its out to finally capture 7241 on film, as well as getting 5074 as we walk back in the drizzle.


Sigh....I dont think I can cope which much more of this...luckily the DC's have mostly been got, as well as the DXB's.
Right, so whos next? 4438....HAMILTON?? Oooo, come to me, my precious.....come to me....

Tuesday, May 26, 2009

Cattle class

This weekend I received some more resin, so the casting here at Chateau Dandruff is back in full swing. One mold I did find was one that's nearly 20 years old, an H class cattle wagon. This consists of a side and an end casting plus a floor. The sides are way too thick, the bits don't fit together that well and the purists will recoil in horror, but it will still look the part on the layout. Judging from the photo my eyesight was a lot better many moons ago. You will also note that I'm still struggling with the air bubble problem.

'expand this at your own risk'

Theres still a few wagon posts to go yet from this neck of the woods, so everyone better sit back and make themselves comfortable. none of you have submitted any layout ideas so I'm having to come up with my own.

Monday, May 25, 2009

Resin Casting 101: Part 3 - Growing Mold

As two-piece molds are more complex, we'll start things easy with a simple one piece rubber mold for our container flat. First up, you need to make some sort of 'box' around the master to contain your rubber which you will pour in on top. Being lazy, I often use Kato/Atlas rollingstock boxes for my boxing, being careful to glue the master down well - if rubber gets under the master, strange things might happen. As for the size of your boxing, I like to keep at least 1 cm around the sides of the master and half a cm on top of it. A slightly thinner top allows you to push in and squeeze your master/casting out of the completed mold.


The rubber used is RTV, or Room Temperature Vulcanising, which simply means it sets without any pressure cooking. I'm using Micro Mark RTV rubber but the best source of RTV rubber in NZ is Topmark.
Different rubbers vary in their properties along a stiffness/strechyness spectrum. If you have a softer/strechier rubber, making the mold box larger to let more rubber mass lie around the master will ensure the mold holds itself in shape better when you're casting as the mold walls will be thicker and stiffer (preventing bent wagons), but this may make it harder to get larger castings out without tearing the mold. If your rubber is stiff, you may want thinner walls, but a large item (a 4w box wagon or larger) with thin rubber walls will need support against the weight of the resin or you’ll end up with bulging sides in your castings. You'll figure out pretty quickly what works for the rubber you have. Stretchier rubber tends to last longer than the tougher stuff which tears easier.

(Here at the Waihaorunga Creek workshops we are using the blue stuff which also goes by the name Ultrasil®. It appears to be a stretchy type rubber which has not given me any trouble yet)


Painting a thin layer of rubber into all the crevices to banish air

Once you thoroughly mix up your rubber and let it settle briefly to remove air bubbles, the key to getting a good mold free of air bubbles is to brush a thin layer of rubber all over the master with a paintbrush (and not your Sunday best paintbrush that you save for special occasions either), ensuring you get a thin coating in all the nooks and crannies. Once this is done you can carefully pour the rubber on top slowly. Once you’re done, it is common practice to slap the mold box on the table a few times to dislodge any remaining air and scare away the air bubble spirits.

(At this point I tend to spend 10-15 minutes slapping my rubber. Its to get the air bubbles out, honest!)

As the bit that's currently facing up will eventually be on the bottom (when you turn it upside down to pour resin in it), you want it to be as flat as possible, especially if it is a thin mold like this UK. If the rubber is not settling flat, check your mold box is sitting nice and level - you might prop up a corner with some plasticard. If the rubber is lumpy and not sitting flat, you could drop in some stiff thick plasticard on top and apply a light weight (you don't want it sinking under the rubber, and you do want it flat and level). As a last resort to avoid risking progress so far, mix and pour more rubber in either now or once this batch has set.

A cured rubber mold removed from the box successfully (UK) and with neccessary destruction of the box to avoid tearing the mold (XP)

Give the rubber plenty of time to cure per the instructions that you probably threw away without reading them, and then carefully remove the set flubby (blue in my case) blob. Magic isn’t it? Sometimes destroying the mold box is a good idea so that you can flex the rubber and carefully extract your master. Hang onto that precious master as you might want to make a second mold later - either to speed mass production, or as a replacement - all molds fail and tear eventually.

You should be able to get your master out without tearing the rubber mold, if not, you will struggle to get the castings out as well! There will probably be a thin meniscus where the rubber meets the mold box and in the interests of getting a nice flat mold bottom, you can carefully cut this off with scissors as a final step.

Sunday, May 24, 2009

Chillin on Sunday; W wagons

(Title suggested by Darryl, just so you know where the blame should lie)

Spent a quiet afternoon/evening doing the detail work on 4 W wagons. The biggest job was making the door latches. These were soldered up from 1/2mm brass wire, with small diameter fuse wire wrapped around the main upright and then soldered into place. Making 8 of these took about 2 hours with a bit of quiet swearing thrown in, as well as the standard searching for tiny bits in the carpet.
The results are as follows.


W5 wagon. The easiest of the lot


W6 wagon. The only one in the seven types to have a double door.


W7 wagon. Again quite simple


W8 wagon. WTF? Suddenly the wagon designers decide that they need outside bracing up the wazoo, and its not overly easy to get the bits on the corners to match up properly. I'm now really not looking forward to the W9-11 which are next on the list.

Saturday, May 23, 2009

Finding a Flat – Trackside UR

DB Says: Although I’ve not been overly kind to some of the Trackside kits on these pages, one of my favourite NZ120 wagons is this UR (or US or UN or whatever it is) from them. Imagine my surprise when I found another one hiding amongst my dusty boxes of CB parts today. “I knew I ordered two…”

Bobby, meet your new brother...

Castings are up to the usual high standard and a good smattering of detail parts are provided. After dremeling out the bolsters and coupler box as I did with the CF from the other day, I assembled it pretty much per the unsupplied instructions using contact and/or superglue. Plastic stanchions were again used instead of the supplied metal ones and lead weight was added underfloor to help with tracking - this is one metal kit that’s actually a bit light .

This time I eschewed my normal Microtrains bogies for a pair of those Rapido couplered Kato bogies so I can run the new UR amongst my 4w Peco chassis wagons. I don't mind those couplers on the 4 wheelers - I'm not into shunting in NZ120 and when a train goes by, you don't notice them. Oh and they're effectively free.

Other than my standard aversion to the trackside bogies and couplers, this kit builds up quickly into a nice model of a nice prototype.

Friday, May 22, 2009

Dun Manifestin'

A few years back while living through an enforced break in modelling, I took the chance to sit down and seriously think about what it was I was trying to achieve in this hobby. The points I have come up with I have referred to as my "manifesto" (I thought a "creedo" sounded a tad...w@nky). So, in no particular order, they are:

- Modelling an actual location adds enjoyment to me and the people seeing the layout that know the area.

The areas that really draw me as a modeller each have their own special something that gives it character; whether its the train makeup, the scenery, the operational aspects....each has an appeal that I think I would be hard pressed to put into a fictional railway. For those viewing, the recognition factor gets huge brownie points: "Hey, thats...!"

- Modelling an actual time frame makes choices easier not harder.

Cant decide what to put in / leave out? Look at the photos!

- Foreshortening distances more than 1/3 is verbotten!

Railways in the real world are long and thin, why aren't ours? And following on from that:

- Large radius points are your friend

And if you've seen a DX go around a number 4 point you'll understand what I'm talking about. Also, they just look better!

- I will choose a scene and worry about the scale to model it in second.

Funny how we decide we model in Nz120, or Sn3½ and then look for something to model. Shouldn't we be looking at what really excites us in the railway hobby, then choosing the scale that allows us to compromise the least? Modern unit trains are made for Nz120, Bucolic 1950's branches are best done in Sn3½ and single business industrial sidings are the domain of 9mm.

- I will model things how they are/were, not how I think they are/were.

Look! You've got eyes, use them! Don't guess!

- Recreating operational roles is an important part of any railway.

The most fun I ever had on an operational railway was when I took the role of a signalman/station master. All I had control of was a crossing loop and an isolating section, but trying to stop trains running into each other (when they all ran at different speeds) kept me occupied for hours. Following on from this:

- Sometimes driving isn't the best job!

I know that if I don't have a specified task on a layout rather than just running A to B, I get bored very quickly.

- I will model the spaces in between.

Sometimes the most convincing modeling is of ordinary scenes. The real world isn't jam-packed with interest every 3 feet, so I cant see why we cant model the ordinary as well.

Okay, so that's my list, and its serving me well as I start hareing off into the undergrowth to pursue modelling in Nz120. So, has anyone else done a similar thought exercise?

Thursday, May 21, 2009

Resin Casting 101: Part 2 - Masters of the Universe

A master is merely a term for the model that you want to reproduce. Thus can be made up from anything you desire and be as detailed (or not) as you like.


GSW, KP and UK masters

A few random things to think about with masters:
  • Put as much detail as you can squeeze into the master and avoid having to add it to your castings many times later. A casting can reproduce very fine details, both good and bad - even messy blobs of glue and accidental scratches - so go buy some modeling putty and fine sandpaper!

  • You will have determined from your 'design' thinking in the previous step whether you will build the master in one or many pieces. If you are making a multi-part kitset style casting - for example because of the deep undercuts in the ends, you may chose to make a KS wagon with the core as one piece and the two ends as seperate castings - you might assemble the end masters on a large piece of stiff plasticard (or in a Kato box like the UK above!) to keep things flat.

  • Resin may have trouble finding its way into very narrow crevices, leaving air bubbles or partially formed details - can you compromise by widening that detail on the master.
  • The variety of preformed plastic shapes and ease with which styrene can be worked make it the material of choice for many modelers.

  • Sizeable undercuts may cause your rubber mold to tear when you remove the master or resin castings. Can the undercuts be minimised? Can you bevel the edges? Should you go multipart?

  • If adding fine wire details – e.g. handrails, container door rodding etc, ensure there is a good solid join by coating it with thin glue. Otherwise, if there are gaps, the rubber will seep under the wire and the detail may not show consistently in your castings. An alternative for handrails is to put locating dimples into the master and then later drill out the casting for freestanding wire handrails.

  • Undercuts , horizontal ribbing and things that will form holes in the mold (XP roof vents)may trap air during later casting, leading to air bubbles. Can these features be minimised?
For the next few posts we'll put aside the more complex forms of molds and use simple one piece examples for the creation of container flat wagons and box wagons.


A few comments on 'Design' decisions made for the masters presented here. The XP has a roof overhang that would be deep in the mold (when upside down) where it was likely to cause problems - I placed a superthin strip of unprototypical (and crooked) plasticard under the lip and beveled it slightly by dragging the edge of a knife blade along it with the hope of making the master and castings more easily removeable from the mold. Alternatively I could have made it flusher with the walls (as I did on the ends). As feared, the roof vents are a source of air bubbles that need to be eradicated during casting, but there's not much that can be done about that.

The only challenge with the GSW and GSX was the fine wire - see the handrails comment above. It has no air bubble problems at all, however the KP gets loads of bubbles in the horizontal door ribs unless you're careful when pouring the resin. Both use 'roofing styrene' as a big part of their construction (Kp ends)

The UK is a pretty simple master made up of flat and rectangular styrene sections. Details such as handbrake supports and ferry fie down hooks were simulated and these look nice on the castings - they don't take too long to do on the master and once they're done you can enjoy them on every subsequent casting. I spent a lot of time during the 'Design' phase weighing up the pros and cons of making a multipiece mold for the prototypical steletonal see-through underframe with lots of angle bracing. In the end I made mine 'solid' to enable a nice stiff one-piece casting to be easily removed from a mold. The solid box section also allows me to embed weight into the castings. More on that in a later episode. On the finished models I paint everything black and then pick out the angles in a lighter colour, and even when your eye is trackside, I don't think the solid look detracts from the models. Life is full of compromises!

Various lumps of styrene, wire and plastic assembled into a master


Legal disclaimer: Obviously you shouldn’t make straight copies of commercial kits or the models of others.

Wednesday, May 20, 2009

Decals? Wee don neeed no steenkin Decals!

Seen at Wellington Station Wednesday, especially for the "Prototype for everything" department:


Brilliant excuse to get the brush out when doing cab side numbering, but I somehow have this feeling KiwiBonds would want to decal it anyway to reproduce the crapness with fidelity...

Wagony again

Just for something different.....


I managed to get hold of some W meat wagon plans early this week. These were a reasonably common sight moving through Paekakariki going either to or from further north to the Wellington docks. I was lucky enough to get plans for W5-W11 and instead of trying to choose I figured I'd build one of each for variety. I cut all the sides to shape in one hit, while being careful to record which ones were going to be which.

First up were W's 5 and 6. These had a gabled roof that looks like its a separate piece plonked on the top of the body. This sounded like a bit much filing on a flat piece of plastic to get the slopes right so I instead did the following. The sides and ends were cut from pre-scribed evergreen styrene. the ends had the roof contour cut into them, and then the roof was applied using 1/2mm plasticard. I then glued some very thin plasticard at the correct level to create the overhang.

After the glue had set this was then filed back to the roof line to get it right.


Two down, 7 to go.

Tuesday, May 19, 2009

Its the little things

Things here at Chateau Dandruff have been getting just a wee bit wagonsy lately, so I thought I had better try to redress the balance (before I nip back to the workbench to start work on some W wagons).

It's occurred to me in the last week or so that apart from making locos and wagons, my layout has not actually progressed that much. Its odd but this didn't bother me too much as Cass had most of the trains built for it long before I started cutting wood. However it is sometimes hard to retain the focus, especially when there's a string of pretty modern wagons being built 1/2 way round the globe, tempting use with their seductive curves and colourful paint.

I've spent so time looking at the plans and pictures of Paekakariki lately trying to work out different ways of operating it. During these I noticed that there are several smallish groups of buildings that could be modeled as diorama's for inclusion in the layout at a later date. I picked these 5 areas for special attention.


1) The large white building is apparently a telephone exchange. There are a few smaller hut's, what looks like a jigger shed and a stack of sleepers. What is very interesting is that the large red object appears to be a grounded carriage of some type, possibly with a clestory roof. I'm very tempted to make it an old WMR guardsvan just for something different. Sods law will show that just after I finish it, a picture will come to light that's its a rusty tin shed or a film processing error.
2) Fueling point. I would probably split this into Cola and oil areas. The coal area will require a pneumatic coaling crane plus a row of old wagons being unloaded, and the oil tanks will need all the pipes and valves etc.
3) Sand shed. I've seen pictures of Lc's being unloaded at this point, and there is sand everywhere. Another nice wee scene.
4) Water vat. These are popular subjects for some odd reason. I've included the sheds next to it, being I think a lamp/drying shed and the crew shed. not shown, but just this side of the water vat is a grounded Xa van body, and a pile of old drums.
5) The single men's quarters. There are 2 rows of small simple huts (possibly easy to cast) plus an ablution block of some sort. the modeling in here could be quite interesting, with motorbikes, bicycles, cars and groups of men up to no good in between shifts.

There's a selection of small projects that would be worth a look at if I ever get bored with making wagons.

Monday, May 18, 2009

Some thing not quite right

I was going to write another post tonight, but came across this instead and thought I should share it with the group.

Cut from a larger photo of an exhibition in England (if you see this and its your photo, please contact me and I'll credit you properly). As you can see the visible part of the layout on the right is a very nicely made model even from this range. What I don't understand is the fiddle yard at least 3 times the size of the rest of the layout.


I guess the logical conclusion to this would be; 'Can you build a layout which is one large fiddle yard?'

Resin Casting 101: Part 1

The ability for the layman to make multiple cast copies of things in rubber molds on the kitchen table was a massive advance for NZ modeling when pioneered by Brian Cross in the 1970s.


Casting is especially useful in our NZ120 scale because the small sizes and levels of detail required to make a convincing model are such that we can often cast complete wagons in one piece – even bogie wagons. We’ve talked about casting and used it to produce models often on this blog, but without really showing the basics - this series of posts are intended to do that.


Casting can be broken down into four stages that we’ll cover in detail over the next few weeks:

  1. Designing the model

  2. Making a master to reproduce

  3. Making a mold in rubber of the master

  4. Casting from your mold in resin

Design

'Design' in this context refers to figuring out how to cast your model, which will determine how you make your master(s). Can you cast the entire subject in one piece or will you need to make multiple castings that are assembled like a kitset after casting? To answer this, you need to understand what casting can and cannot do.

The simplest casting employs a detailed mold that has resin or some other material poured into it. After it sets you pull it straight out. There is detail on the face of the rubber mold of course, but obviously not on the topside of the casting (in the picture below) which is open to the air, causing the resin to set flat after it levels off, like the surface of a cup of really really stiff coffee (Turkish, plain, no froth, marshmellows or cocktail umbrellas). Another nice thing about these simple molds is that the inevitable air bubbles caught up in your in the resin (which make your models look like tiny Swiss cheeses) will nauturally rise up through the heavier resin and sit on the surface where they can burst (or be burst). Although simple in concept, you can do a lot with these molds, for example we will see shortly how one can make an entire wagon top in one go as a simple one part mold - as long as there is a flat surface that is the 'topside' exposed to the air (for example the base of a four wheel wagon that could be glued to a Peco chassis).

The challenge comes when you either need detail on both sides of the casting or if you have such large undercut details that would render your casting landlocked and unable to be extracted from such a mold, as below.( OK, that's a really bad drawing, because the rubber is obviously flexible, but if those steps stuck out further you would have problems, especially if they are close to the bottom corners).

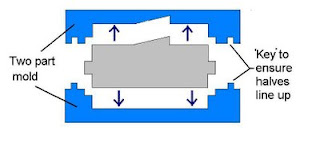
There are two things you can do to solve these challenges, firstly you could make multiple simple molds and glue them together like a kitset, as below. You could for example make four sides and the roof of a box wagon and glue them together. The other alternative, and the more complex kind of casting, is the 2 part mold below, in which several pieces of mold provide detail on all sides of a single casting. These are of course more tricky than the above because you need to ensure that the two mold halves line up properly, that you can then get resin into the mold, and any air bubbles out.
You can mix methods of course - for example, many of the resin NZ120 diesel loco tops that were produced for sale were made from a combination of one and two part molds stuck together. The subject's shape and your casting skills determine which way you go!

More in subsequent posts under this 'Casting' category...

Sunday, May 17, 2009

It's time again

Discussions around the e-mail table this weekend have prompted me to ask tonight "we have not seen anyone else's photo's lately". There have been some very nice ones posted to the group (as well as a stack of 3/16th container wagon pics that should be tossed) that I would love to put up. Others must be doing something, even if its just musing on a project (as we all do).

So put finger to keyboard and send me some stuff.

How long is a piece of string

Asked on the group yesterday was the question about length of trains given loading schedules for various locomotives on a given piece of railway. Its an interesting question, but a very hard one to answer.

I think that the best way to look at it is how much space do you have on the layout. There's not much point running trains that are longer than your largest passing loop, or more importantly storage siding. In this respect we are far less limited by space than people who model in those odd larger scales.

I'll use as an example My long planned (and seemingly quite distant) Paikakakriki layout. Here the limiting factor is going to be the the loops at each end. I have figured on 3 trains for the layout when its operating, so the limit on train length has to be 1/2 of the circle. At a minimum radius of 18" this is (using some math that I have not used for a while, but then who doesn't know Pi to 7 decimal places?) 113", or 2.8m. 1/2 of this is 1.4m. Subtract a bit for the loco and we get about 1.2m. given that a 4 wheeled wagon (la) is 5cm including the couplers, we get a total train length of 24 4 wheeled wagon equivalents. This is visually quite a good sized train on a layout, and about right for one loco to pull, especially if you have a few trackside whitemetal kits in the consist. The express train that I am planning will be about 6 cars long which assuming these are about 15cm each will be 90cm long and again will be visually right.

The old Otaki/Cass layout was a bit different in that we could run a longer train than the passing loop at Cass as long as the second train would fit. This was normally a train of 2 Dc's and 7Cbs, which would do the dash between stations while the gargantuan Lc train just rumbled on in its own time.

To sum up, Space and station loop size will dictate train size, not what a loco could theoretically pull on a given stretch of railway (which is actually just like the real thing).

Saturday, May 16, 2009

Keep Cool 'til After School: XC Ventilated Van

DB says: I’ve always liked these wee things - the little white box wagons looked nice in a sea of red oxide, and they survived through the 80s so I figured I could do with a few. As they’re so fiddly, I figured I’d make one and cast it.

The master was made from wood-look plasticard with a few holes cut out for the ventilation slots. These were layered on top of a thicker plasticard backing to keep everything straight and some home-scribed vent pieces stuck in. The door and other details were layered on from various shapes of plasticard.

Based on the straightness and squareness of this, I may have been inhaling a few too many resin fumes this week. A few castings were made (more on that in some future episode), and here’s the finished result (below) on a Peco chassis. Remember these pics are several times life size and it looks a little grander from the formally legislated viewing distance.


Friday, May 15, 2009

Thrown for a Curve

Forgive me, for I have sinned....its been 13 days since my last blog post...

While looking for something else within the bowels of my computer the other day, I came across the online edition of the Model Railroad Hobbyist (MRH for short) and found an interesting article about the minimum radius to use when designing your next layout. The article itself (by Joe Fugate) came out of several online discussions from the Layout Design SIG.

The main points that came out was that minimum radius shouldnt be a number set in stone, but should instead be a ratio, with the most important element being the actual length of the longest item of rolling stock you intend to run. The table published looked something like this:


So what does this all mean? Well, lets look at this weeks favourite prototype, Milk Trains in South Taranaki. The main stars are the OM tankers, which are about 116mm long (4½"). Looking at the table above, we can see that they will run fine on 290mm radius curves (11½", or 2½ times their length), but wont really start hitting their straps until 464mm radius curves (18½" or 4x their length). Of course, I am planning to run VRB's on the layout, which are 142mm long (5½"). Suddenly, the "Look Good" curve radius (at 4x) is 568mm, or 23".

Of course, note in the table that if I am viewing the train from the inside, I can drop down to 3.5 x the length and save some precious space.

The thing to note is that this doesnt seem to work with 4 wheelers, of which the US railroads had few (if any), but then again I dont think anyone would have a layout without some bogie wagons or carriages on it....and seeing as we are calculating with the longest item, we can arrive at a curve suitable for the layout.

And here is some visual proof, courtesy of Kiwibonds, showing Nz and US stock on the same 18" curve. Despite the difference in viewing angle, I hope you can appreciate that the shorter American stock looks better tracking around the curve than its large NZ counterparts.


Question for the peanut gallery

Can anyone out in the penny dreadfuls there tell me the driving wheel diameter of the Bachmann J class 4-8-4? I've heard others comment its a good match for a Ka, but the pictures I have seen (plus the fact that the version I have has wheels that are too small) makes me wonder....

Sorry

Apologies for no post yesterday, but the management was busy emptying beer bottles to celebrate turning 21 yet again. I can report that while I have had a few years practise to get it right, I still feel I'll need a few more for perfection, and I can then move on to turning 30.

Just a short comment on the recent discussions on the list. My choices for a loco, passenger coach and wagon would be
1) A Ka (just to be different as the Ab was on most lists I saw)
2) 471/2' car (I would like to make a master, but the Windows just put me off)
3) J sheep wagon. I actually made a master and cast a few of these 15 years ago, but for some odd reason made it too tall to the point where they towered over loco's. I have no idea how this happened and can possibly only blame a dodgy photocopier.

What would everyone else like?

Still no layout plans in, which is OK as I've still not got around to buying the wood yet.

Wednesday, May 13, 2009

Layoutitis

Its been noticed in the Waihaorunga workshops that there is a severe lack of a test track to check that the flood of models emanating from its benches actually run well (or at all). The current testing zone allows for a quick run up and back on poorly laid track round a 12" radius curve, which the more prototypically correct models do not like at all.


I've come up with a cunning plan (well, I think its cunning at least) to build a test layout from 2' sections to see if the mini module system will work in real life. By some simple cutting and rearranging using some maths from 30 odd years ago I've come up with a way to make a round layout without too much pain (I'll report on the number of fingers I have after this exercise).


As part of this whole design thingy, I'll like to throw open to the peanut galley a chance to come up with a track plan for the layout. Stipulations are;
-Minimum 20" radius (thanks for the spellcheck Luke).
-As its a modular layout. the track crossing between boards should be on the centerline of each module. However, 2-3 modules may be combined for a scene or station.
-Not too many points as I'm going to attempt hand laying track in code 55.
-If possible a simple sketch of what you think it might look like.
-Submission date 31st of May


So, gentlemen (and gentlewomen), start your crayons. I'm not promissing to build the best, but I would like to see your ideas.

UPDATE: I seem to have neglected the size information. The initial board is 2' by 1', which means that each of the baby modules is about 2' long (give or take a wee bit) The first design was very nice, but would have been a bit tight in places.

Tuesday, May 12, 2009

Compact Flash : NZ120 CF

You are in a maze of twisty little passages, all alike
> North
You are in twisting maze of little passages, all alike
> West
There is a Shiny Brass Lamp nearby
There is food here
There are 8 unopened Trackside CB kits here

That’s unlikely to make any sense unless you remember computers that could only display only one colour (and that was with some effort). Nevertheless, its what I feel like while delving into the recesses of my NZ120 junkbox. Back in headier times, I’d not given those CBs much thought since I buried them at the bottom almost 10 years ago, but now that there’s a recession on, they have weighed lightly on my mind.

They’d look good behind a pair of DXs, but I’ve carried a decade’s worth of worry about the weight of the Trackside kits, the flexy bogies with no bearings, the misplaced bogie centers and the couplers. And I can’t lo-temp solder anyway, so I’m not likely to dive into 8 of them today. Maybe one… as a trial… Where are those pictures of a big smelly grass feeder from the Armature Fettlee?
First up, I’ll deal with the fixable concerns by plopping on some bulletproof Microtrains bogies in the right place. After buzzing some metal off the floor castings with a Dremel drum sander tip, a new plastic bolster can be attached just outboard of the former cast-in one.

Despite my moaning, the kit castings and detail levels really are superb, and even without instructions, it was straightforward to assemble, although having three hands (or opposable toes) would have helped. I stuck the body together with large dollops of contact glue and mild dollops of swearing, but eventually everything sat nice and square.
The obvious difference between the CB and the CF is those end platforms. After staring at Evan’s pictures, I mounted the angled shields just below where the kit pieces implied they should go – maybe they are lower on a CF – and added side ladders, walkways from mesh, handrails and a frame to support the canvas top to complete the illusion of a competently assembled model.

It certainly looks the part. The model is heavier than I’d like, but other than casting replacement resin sides I’m not sure what to do about that. The kit bogies certainly look great (better than the Microtrains) but I’ll stick to the MT bogies - I’d rather have it run perfect than look perfect.

I was going to make up a Ravensdown decal, but thought it might look a bit over the top, but if I make another wagon I might do that and weather it heavily. Elapsed time from unopened kit to painted: less than three hours...

Monday, May 11, 2009

Wagons Ho

Among other things at the weekend I decided to get out some of the old Peco chassis I have stored for a rainy day (not that we have many in Nelson) and do something useful with the la and Lc castings I have. The 13 foot underframes had the brake gear removed and the detail filed back to flat with the inner surface of the underframe. No other detail as yet, I'll have to cast some more brake levers from my mold at some point.


For a bit of variation I did the La's as an La-6 with an 8'6" underframe, and an La-8 with a 10' underframe. For the La-8 the brake gear was removed and again the chassis filed back flat. The 10' underframe was simply cut in 1/2 and glued into position on the resin top. I then added the plasticard strips as solebars to cover the gap in the center and some brass U girder of the right size for the headstocks. The La-6 had the couplers removed and the detail filed off as before. After adding the plasticard solebars and the brass headstocks, the couplers were then glued into position. Again, brake gear is still to come.


I guess I'll have to do some black tarpaulins as well.

Sunday, May 10, 2009

Sunday cruising

Just a wee bit done today. I added some plasticard side rails to the bogies, and also the brake rodding. I'm a bit worried about this attention to detail. Its a habit I must try to break at some point.


So thats the mechanisms basically finished. I now have to get hold of some thick plasticard to start the tops, as I'm planning to start with the roof and work my way down.