Thursday, December 28, 2023

A 3 Foot 6 Interlude - 3d Printed bits

DB ponders and then stirs...

Two things NZ120 needed twenty years ago, were a simple module standard (done!) and some quick, cheap, quality wagon tops. Maybe nothing too fancy, but something to give those less comfortable with scratchbuilding the ability to easily make a train that looked 'right and proper'. At the time I wondered if this might have to be a run of injection molded LC tops, but time has moved on, so technology and the efforts of a few CAD designers has solved the problem.

While we made some initial forays into CAD and 3d printing/laser cutting 10-15 years ago, it was Peter Bryant and his KiwiTrains blog who really got the ball rolling big time. Designing a wide range of models quickly for NZ120 and other scales, he made them available on Shapeways. Soon other designers joined in, and I bought a few Shapeways prints more than ten years ago. 

Shapeways items always had challenges - expensive, variable quality of finishes, plenty of print strata, and of course they had to be mailed from abroad, so they were not the solution for the impatient or thrifty. 

In the intervening years, initially expensive DIY home filament printers that spat out plastic spaghetti have given way to higher quality 4k and better resin printers.

Lewis Holden decided to bypass the Shapeways issues by licensing the designs that have already been drawn, adding a few of his own, and printing them domestically as 3 Foot 6 Models.  So you can now get good quality 3D printed NZR models in NZ120 (and other scales) with a much faster turnaround time and low cost shipping.

Sunday, December 24, 2023

Studholme 5 - Finishing off topping it off.

DB finally finishes off the top. 

Having had a broken and oddly shaped leftover piece of dark coloured hardboard(?) lying around, which happened to be the same depth as the 3mm MDF, and was 1200 long, I decided to use that to deck the centre module. Yes, that stuff is even worse than MDF and will be impossible to staple into, and almost impossible to bang things into, but it will do. And I had it already. So I cut a side straight and used the table saw to make a 400mm-wide piece.

The areas at one end that will be fields then had to be cut away, to leave a raised trackbed (to match the North module), so this was measured up and the tracks were laid out to see what needed to be removed. The southern end of this is a full width yard, to match the South module, so nothing had to be cut there.


And a final test to check things line up along all three modules: 

Now that the glued-and-screwed top deck has dried, I can work on mating the module set together. There have also been ongoing experiments with legs, points and other details, and these will be reported on in the upcoming week or so. 

The next modules after this will be constructed in a more logical build order: frame, decking, undercoating, mating, legs, track, electrics!

p.s. Merry Christmas!

Thursday, December 21, 2023

Studholme 4 - Live Wires Below

In which DB still can't weld wires to save himself.

While you were sleeping, I have been undertaking a few other experiments, but they can wait for another episode. Some tracks were stuck down with contact glue and the odd staple, and the next step was to attach some wires to the tracks and see if the thing works. 

I like to generally use red and black wires for my 'bus' wires under the layout ("blacken and read out" is how I remember the colour for inside and outside rails). But prefer brown (it's a shade of red!) and black for the droppers attached to the tracks. This is because in the past, red wires have show up like dogs proverbials above the tracks. Yes you can paint them later, but this is my shortcut. 

To further make things easier underneath, all the inner rail brown droppers were placed about 5cm from all the outer rail black ones. This makes it easy to link them up to bus wires and also eliminates any risks of shorts since I was too lazy to use that shrink insulation. I stapled the bus pair in the correct orientation, and once confident with the operation of the whole schemozzle, I will put some dollops of hot glue to fasten them to the boards.

When soldering, as you can see, I come from the "the more the merrier" school of solder dolloping.


That didn't take as long as I feared. The switches on the bottom edge are for powering the Peco electrofrogs, which I'll save for another episode. I have also decided to isolate the 'island platform loop and branch, and will have a DPDT switch so this set of tracks can be powered by the main power bus, or by a separate controller (which could be another DCC booster or straight DC).

OMG!! It works. And even before a dusting with the Peco track rubber, the DF ran incredibly smoothly at super slow speeds over all the points. By the way, all this track has been recycled from previous layouts, so all is likely between 15 and 25 years old, that monty-sized bus wire was underneath Tehachapi until about 2008, and of course that Digitrax dates from about 1996.

A little shunting was even possible, very little, given the very limited backshunt available!

I followed Darryl P's advice and put a coat of primer on the south end yesterday!

Wednesday, December 13, 2023

Studholme 3 - Topping it Off

 In which DB attempts to catch up with himself:

So with the three Studholme Junction module frames completed in exquisitely-cut plywood, the next step was to put a top on them. 

While I'm not wedded to the idea, the Fremo120 standard suggests a 3mm thin layer of wood be placed between the track and the 'base' as a solid subroadbed to provide at least a minimalist amount of scenery relief even if nothing else was attempted, such as is likely here on the vast flat plains of Studholmeland. No yawning gulches or tunnelled mountains here.

I still have bad memories from decades ago of MDF and chipboard turning into spongecake when water is applied, so I might not be able to face gluing the ballast down... But be that as it may, I headed down to the local Mitre 10. Only to find they don't carry 3mm MDF. 

However there was a 1200x600 sheet of 3mm MDF next to some thicker MDFs. "How much is this 3mm sheet, its just what I need for my model railway and, there doesn't seem to be a SKU or barcode nearby?"  The reply was "No, we don't stock 3mm, that's a bit of packer to protect the sizes we do stock during shipping. You can have that."

So, problem solved, and economically at that. Especially as this was listed at 1200mm long and my modules are ostensibly 1200mm long, and this might be wide enough to deck the 'north' and 'south' modules. This is because while the south module's track with the Foley's road crossing needs a bit 400mm wide, the the north module is just a few tracks wide. 

I laid the tracks out for the south module on the MDF sheet and pencilled around things ...

...then got to work with a skillsaw and jigsaw, and was pleasantly surprised at how tidy it came out. 

I used a mouse sander to bevel the top corners of the cuts to give some shape for the ballast/mini embankment profile (otherwise I would have a sharp edge to these raised pieces that might more obviously show through the ballast... plus it gave me a chance to straighten out any imperfections). I did the same thing with more gusto to provide a little camber on the top of Foley's Road.

The MDF was then glued in place on the frame and weighted down. This is the 'south' module again in the pic below, the single track from the south coming in from the right, crossing Foley's Road (the 'T' running from side to side) and then expanding into loops either side of the mainline etc etc. Under the bright purple bottle centre-bottom you can see the trackbed for the Waimate Branch curving away from the island platform:


With two cross pieces of ply in the frame underneath, I thought the MDF would be strong enough on its lonesome. It is on the wide (more fully decked) areas, but under that single thin bit of mainline (and any other bits that seemed to move under an applied finger) I glued a stiffening piece of scrap thin wood underneath (I know N scale mechs don't weigh anything near the weight of a finger with me leaning on it, but better safe than sorry):


I filled the holes with spare foamboard. These sit at the height of the frame, 3mm below the trackbed, and this will all be painted and covered in scenery representing farm fields later. Second awesome purchase this month was a builder's 90 degree square thingy. What a great device for all sorts of things (including as a straight edge to cut foamboard rectangles. 

The centre 'station' module, with the station, goods shed and several sidings out both sides, will be almost fully decked, so I will have to go see if I can locate another packing piece in another Mitre 10 wood bin and then go and find that helpful staff member again with my lost and bewildered face on...  

Apparently the two 1200mm's referred to earlier on the 'south' end module were not quite the same length, so I will need a thin strip of MDF (or more likely stripwood) as a filler at the inboard end. I don't think this will be a problem at all.  For the 'north' end module, I learned my lesson and buzzed the MDF in half at an unimportant place (not under any points or rail joints but on top of a piece of ply), so I could push the MDF right out to the endplate edges of the module. In the pic below, the end closest is being glued, and the bit at the top is just sitting randomly, awaiting its turn to be moved in and glued down. This is where the mainline from the north splits into the loop, and then two points spawn the island platform loop and the goods shed/loading bank loop, with those four tracks running towards centre 'station' module.  The small gap between these two halves of MDF will be filled with a bit of balsa or even ballast later.

In the pic below, the three Studholme modules meet for the first time. Why hello there. The centre station module still yet to be decked, several weeks after these pics were taken!


Thursday, November 30, 2023

Studholme 2 - Bored.

In which DB acquires a table saw.

I've always wanted such a weapon, and there have been a few outstanding jobs around the house for a few years that could use a bit more precision... but who of the hack-carpenters amongst us can justify spending a grand on such a luxury. So when Mitre 10 had a Black and Decker one on sale (including legs) for $299 recently, I snuck out and got one. 

Which is a good job, as I didn't really know how else I was going to cut up bits of wood into modules now that I'm in the mood to make something. And I've already ticked off some of those outstanding projects around the house too.

Mr Druff warned against using the old, warped, treated plywood in my stash, but our local hardware stores don't stock 18mm ply. After a few weeks of anxious pondering I found myself at Bunnings in Dunedin and picked up a small sheet of 18mm that fitted in the boot of the car, along with a few other little pieces of microlumber. 

After another anxious week, I mustered the courage to try out the saw on the plywood. Wow. What a revelation. So easy. Square, flat, strong, straight, consistently sized and uniformly rectangular module pieces. the 'spacers and ends' are 38cm wide, plus two 1cm sides to make 40cm wide modules.


Glued together with some proper wood glue (I normally use the stuff from the $2 store that falls apart after a few minutes. This post not sponsored by Selleys wood glue. 


And with countersunk screws. Mr Birch, our well-named woodwork teacher would have been impressed. And surprised.

Crikey, that almost looks the part. It's light, its a proper rectangle, it's flat and it's not torsionally twisty. And the top is yet to go on. Seen here with the top down on a flat bit of concrete while the glue sets.


The observant among you will note that this is slightly unorthodox in shape. It has a 10cm deep endplate where it will mate to other peoples' modules, but 6cm deep side sills. This is because Bunnings happened to have 6cm x 1cm pieces of wood that were 1.2m long and really straight. So I figured that would work well with minimal effort. After all, you can do what you like in the middle as long as your module (or module set in this case) mates up at the ends with the holes in the right places. I'm not sure the end plates really need to be 10cm deep, but I suppose I should adhere to at least one of the rules. In between my three modules, I am not, instead using 6cm deep endplates cut from the 18mm thick ply. Rebel without a cause. 

Wednesday, November 29, 2023

More Thoughts on Fremo120, and Welcome to Studholme.

DB returns:  I have always felt that NZ120 needed a modular standard to take off. 

Contributing a module makes you feel a part of something larger. Building a module is more achievable than building a big home layout. A module can still be used as part of a home layout, even if you model other prototypes on 9mm gauge track, or just to display your NZ120 wares. Getting a layout together can be an inspiration and a driver to get things done. A module is a project that doesn’t have to be expensive, or time consuming, or take up a lot of space. It could be put in a bag and live under a bed or in a wardrobe or in the garage. It’s all positive stuff really.

There have been NZ120 modular standards before, but this is different. Mainly because there are almost no rules, so that makes it really easy to participate.

The only important rules are the locations of the holes in the faceplate in relation to the track, the height above the floor, and the electrical plugs. Obviously at home you can set the thing up at any height you want. And if you don’t have holes in your module, you could simply bust out a drill on the day. There are plenty of recommendations and suggestions in the Fremo120 standard, but there are few real rules.

So since my grand plans for other projects have yet to bear any fruit, and my Z scale adventures are running out of steam, why not start an NZ120 module? When Mr Dandruff visited last week, we blew the dust off some boxes of NZ120 stuff that hadn’t been opened for ten years, and it seems I have a lot more rolling stock than I remember. Despite some items being more than 30 years old, some of it even still looks half decent (from the mandated viewing distances). So this might be an easy way of getting back into modelling.

A simple Fremo120 module could  :

  • Be used as part of my home layout.
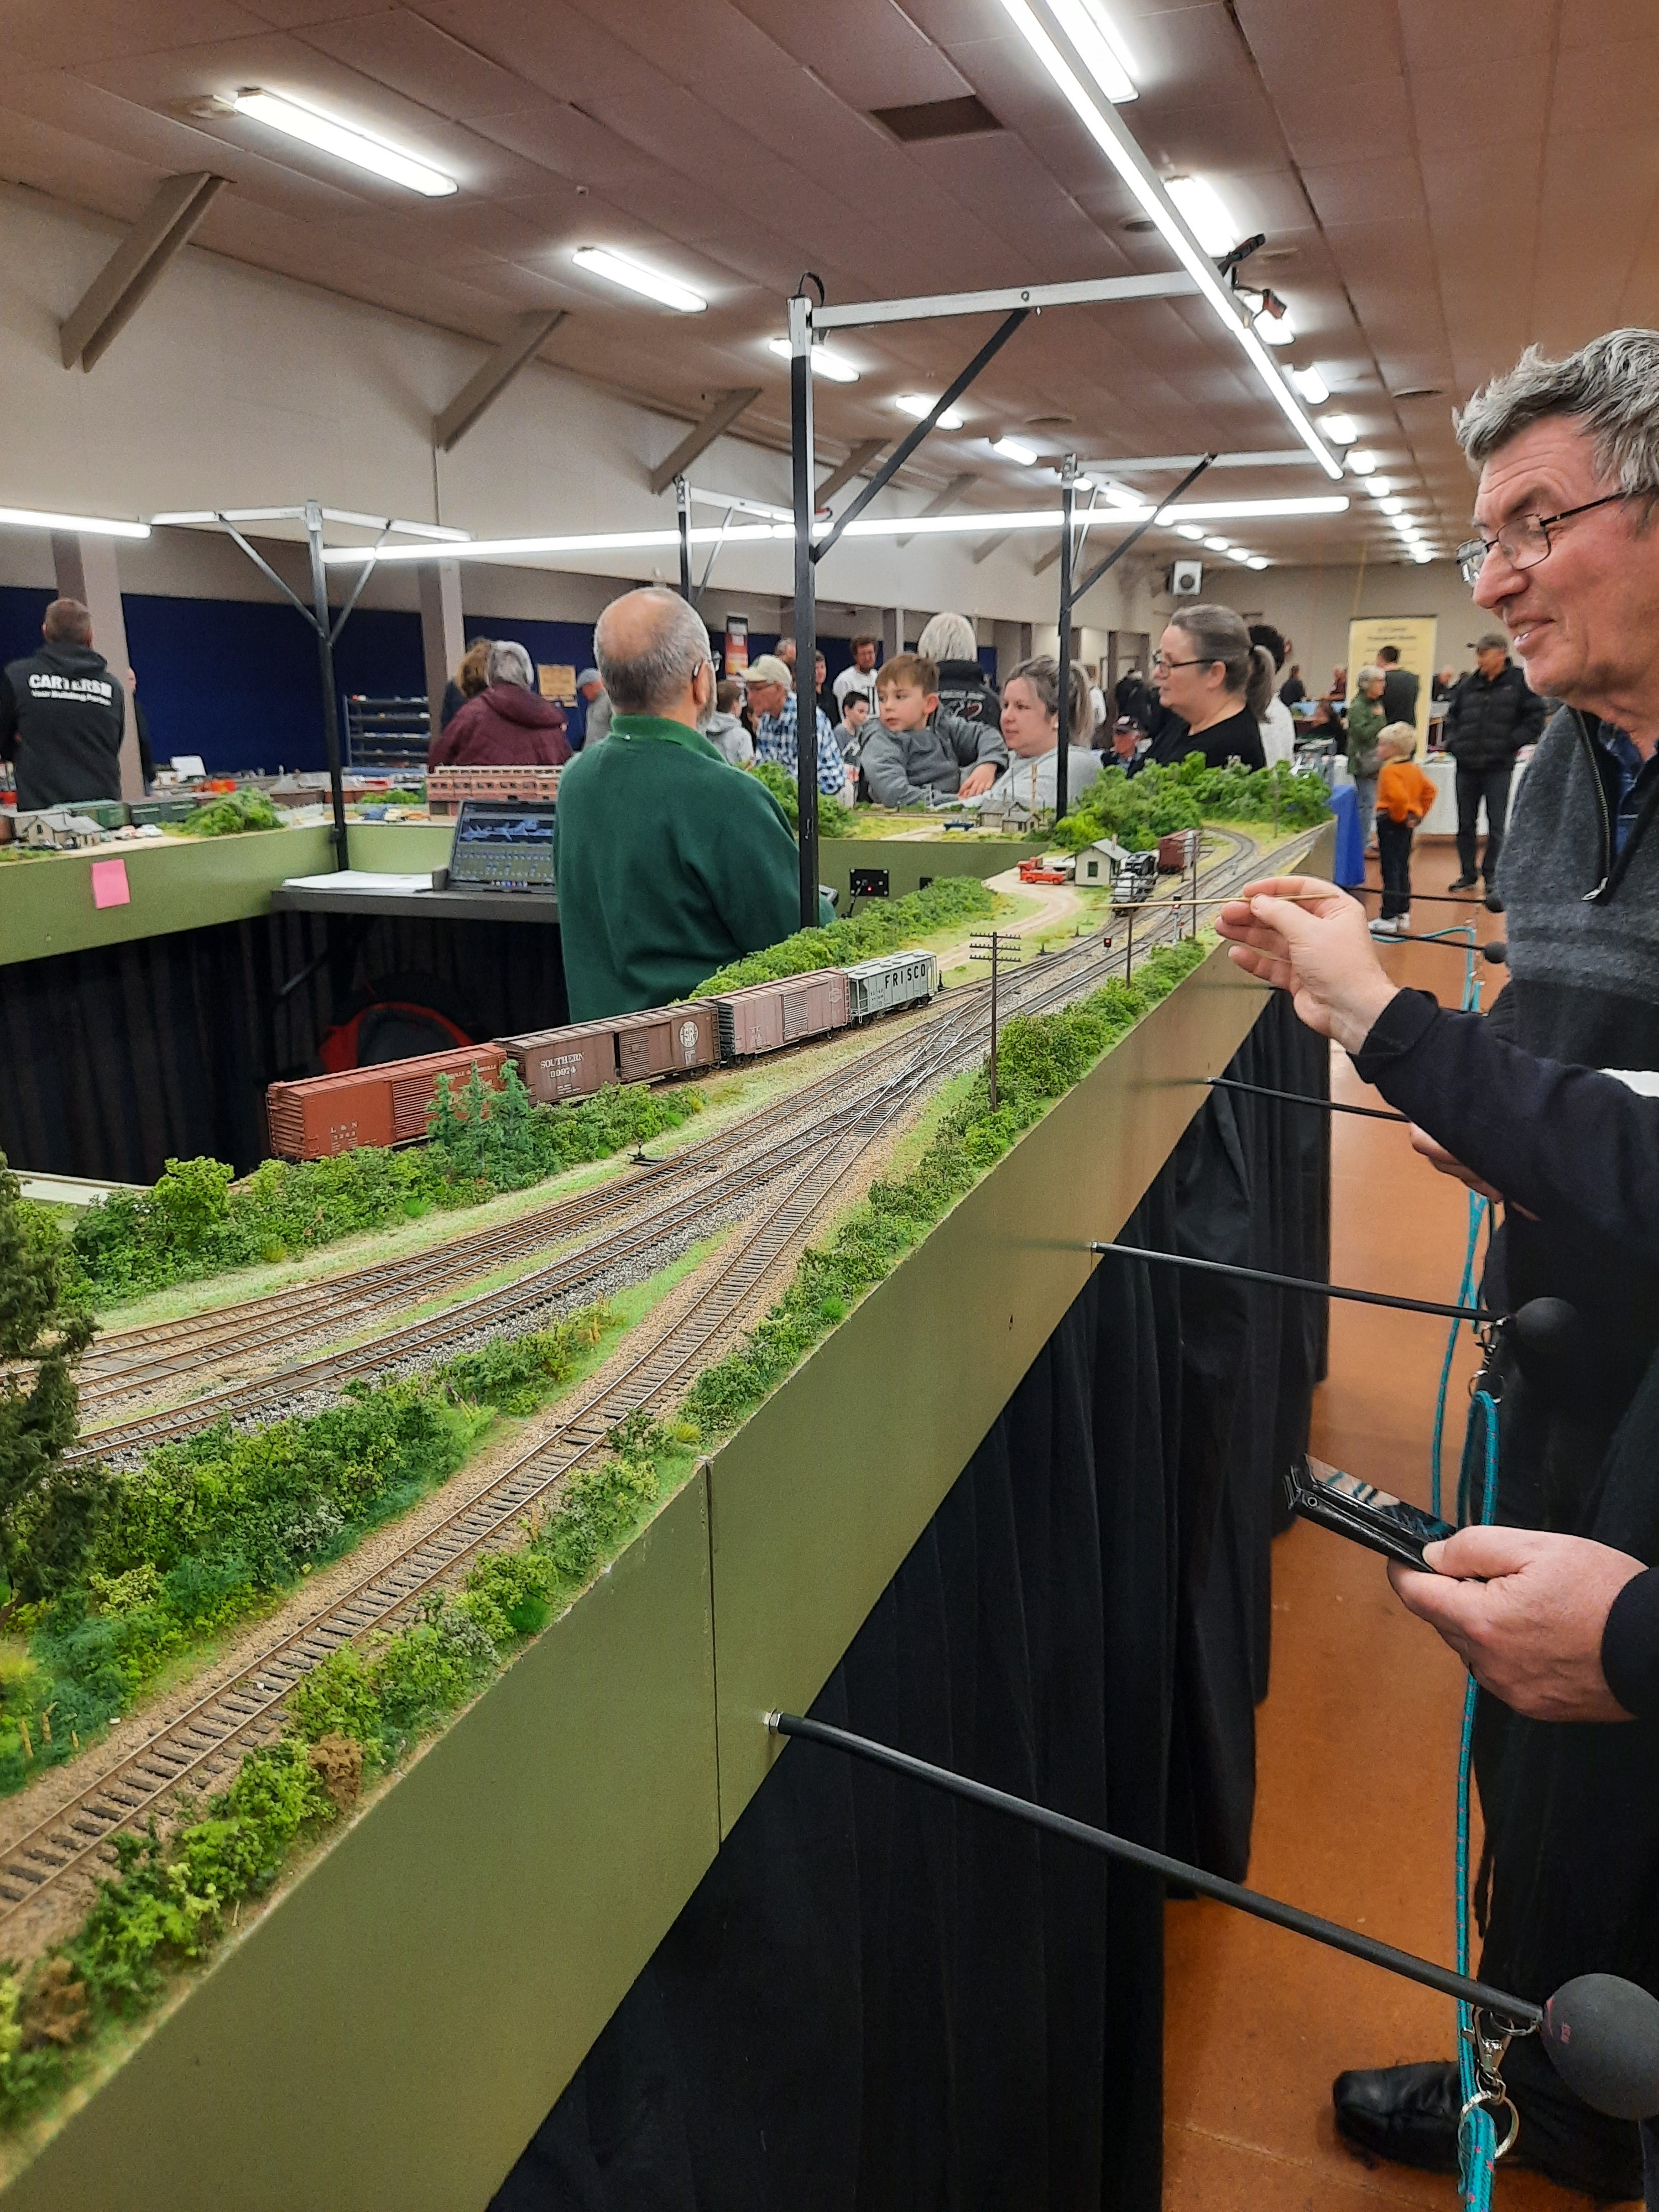
  • Form part of an exhibition layout (typically a round-round layout with train crossings like Otaki to Cass was, with operators inside, backdrops to make proper scenes, etc.
  • Form part of the more traditional ‘Fremo style’ gathering, which is typically more for layout operators than the public, is usually 'operations-focussed' (rather than simply running trains around in circles), typically with modules set up in a long end-to-end mainline (sometimes with turn back loops at the ends), usually with no backdrops, usually operated from both sides.

I don’t see why my module can’t do all three. 

I intend have this module set up at home, where it might see an NZ120 coal train pass across it one minute, a long SP oil train with mid-train helpers the next, only to be followed by a jaunty RhB Allegra railcar leading the Bernina Express. It will be portable enough to travel to exhibitions, whether they be public shows or private Fremo operator sessions. My personal preference is to have backdrops, but these might be removable for true Fremo-style operating sessions.  

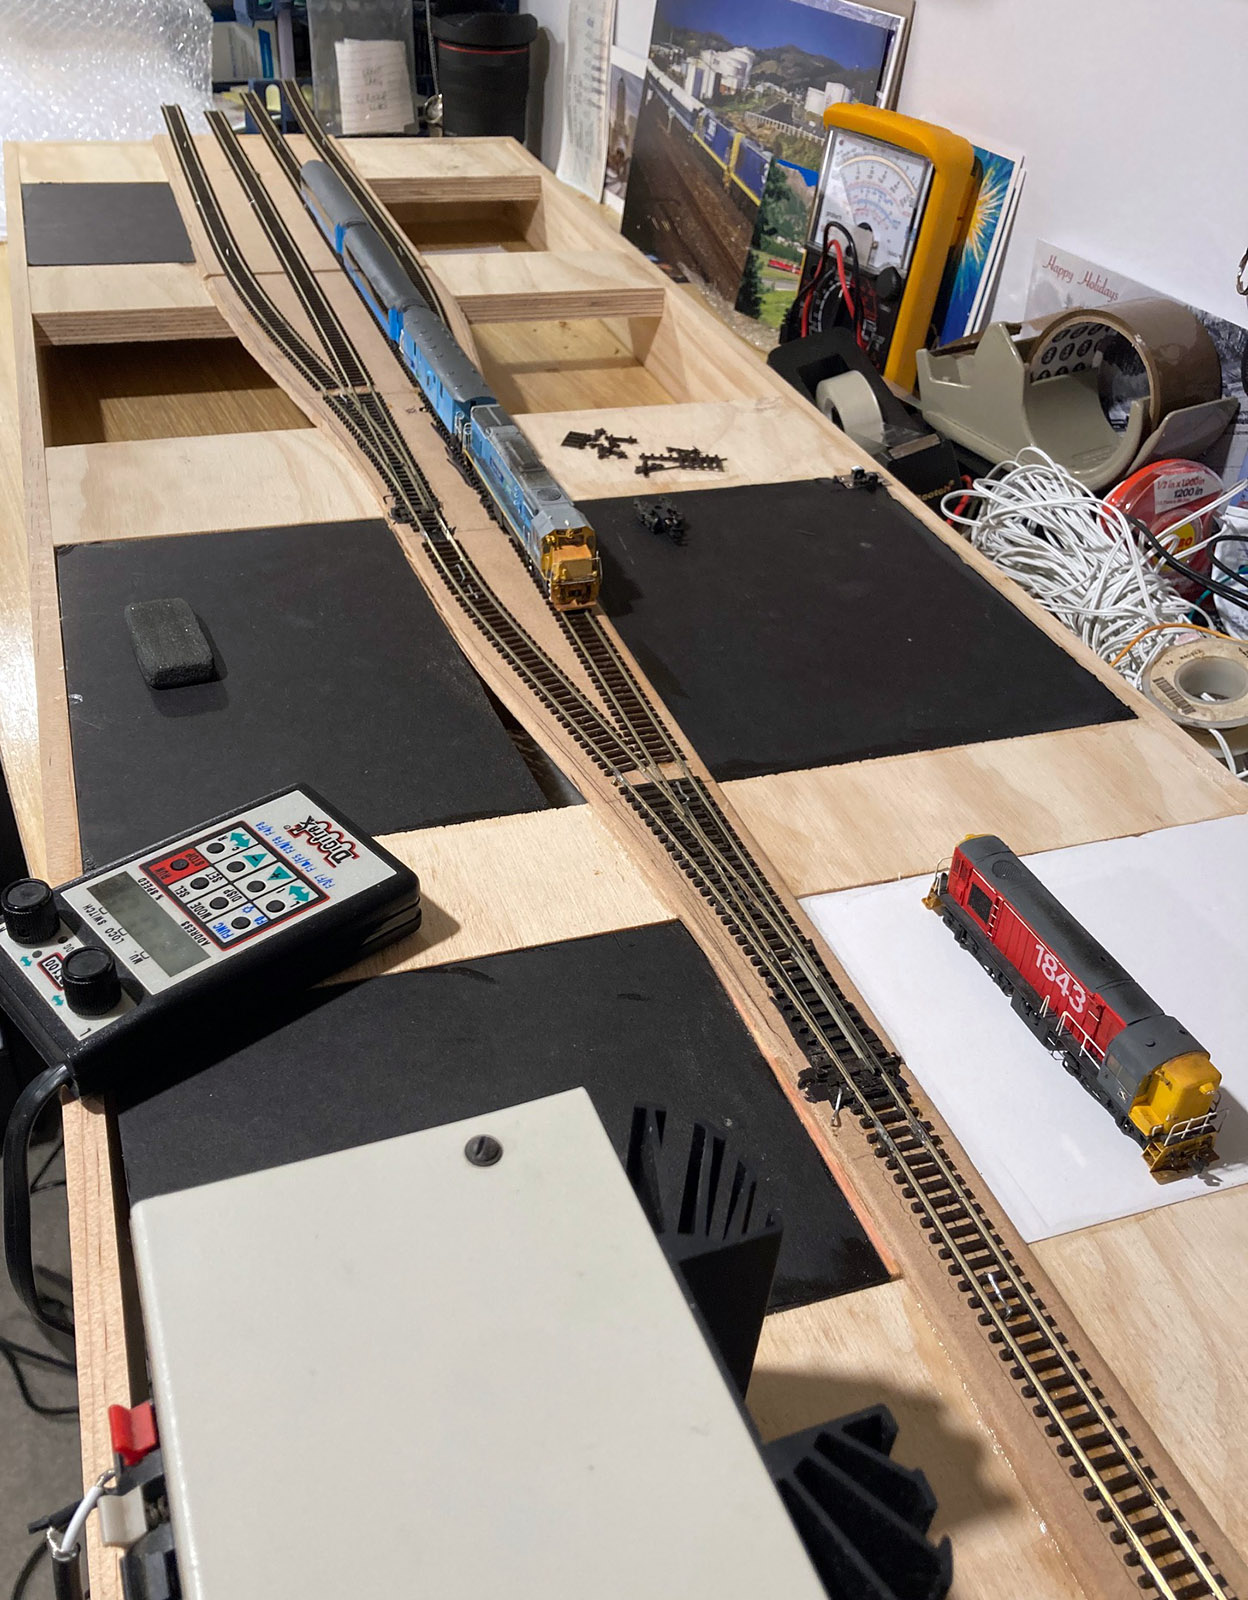
So in my usual all-or-nothing style, I have decided to build a module. Well three actually. I had my sights set on a west coasty bridge of some sort, Waimangaroa north of Westport, or Aratuna on the Hokitika branch. Probably on a curved module, because if nobody makes curved modules, eventually you run out of straight-line room in your room. Or your hall. 

(Insert sound of needle being scratched across a record.) Instead, I have decided to make three modules representing Studholme (or Studholme Junction if you are a little older). 

Huh? A flatland station? Isn’t that a little unspectacular? Why yes it is. Some reasoning please?

While the wide open spaces and broad curves of Cass were clearly the highlight of the Otaki to Cass exhibition layout (with the Makatote viaduct as an unsubtle exclamation point), Otaki was the straight man, the dependable sidekick, the right hand man who holds things together while the hero runs amok. “Behind every Cass there’s an Otaki” as the old saying goes.

Any layout, at home or exhibited, needs somewhere to stage trains.  When you get sick of running one, or the loco is getting tired and its wheels need cleaning, you pull that train off and put another on show. For operational interest, given that NZ120 isn’t really a ‘shunting’ scale, it’s also nice to have somewhere to cross trains. A station is also a place you can have models on display (especially if they don’t run that well!) which provides visual interest for punters and operators. 

If you get really enthusiastic, you can shunt or shuffle things around in a yard. Otaki, being blocked-DC, had two mainline controllers, but the 4th track plus goods shed loop road and the ballast pit sidings were another block that could optionally be run with a third controller.  This meant you could test things or shuffle stuff around without impacting core mainline operations. 

Otaki worked well because :

  • It had space for four decent sized trains (plus the goods shed loop and ballast sidings that could house smaller trains).
  • The loops were long enough to take our longest trains - it could stable 20 bogie wagon or 35+ 4w wagon trains.
  • It worked well. It’s modules were located together with dowels and bolted together, rails were soldered to PCB at the joins, tracks crossed module joins at 90 degrees, the layout was mainly straight, it was flat, and it had smooth radius points (only the goods shed road points were a bit finicky).

So... as you can see, I’ve talked myself into building Studholme, or basically Otaki II. 


Studholme was the prototype inspiration because: 

  • It had an interesting yard layout for a small station in the middle of nowhere.
  • It had two big loops that could store long trains (one strung out around a bulbous island platform), plus a goods shed road, and several other tracks. Someone who worked there told me that because of track work and the need to cross several trains together at Studholme, that they once had to put the Southerner through the goods shed… so there is precedent for using all the tracks for trains!
  • It was formerly a junction for the Waimate Branch, so in a Fremo-120 layout, it could be a useful puzzle-piece spawning a little branchline or third mainline leg.
  • It had a coal merchant that received LAs and LCs,  two large grain and seed warehouses, a goods shed, a gantry crane, stockyards, a large high level loading bank, a smaller low-level one that often received new cars, and a track around the back of the goods shed with another long low level loading back where berryfruit and produce were loaded into Z wagons. In my fantasy world, I’d base a DSC or DSG there to shuffle all this local traffic about, even in NZ120.
  • As for structures, depending on the era chosen, it had either an unusual transverse wooden station, or an unusual modern station. It had a signal box(!) until about 1980, and jigger sheds until the early 90s. The traditional goods shed was replaced before steam ended by a large steel one that went on to become Mainline Steam’s Christchurch shed. Concrete supports for one of the water vats are still visible. The seed stores still remain, as does an interesting pub over the west fence, which was once accessed by a wooden overbridge.
  • So you could run many eras of equipment through here without it looking awkward.
  • Scenically, the area is pretty featureless, so should be easy to build.
  • Because the scenery is flat, three 1.2m sections should be able to be stacked together to fit across the back seat of a car, making it easy to transport to gatherings.
  • Studholme is where I used to watch trains as a young 'un.

So this is my plan. 

Three 1.2 metre modules will give ample length for crossing trains, yet fit in the back seat of a car. The fairly plain modules will be 40cm wide. I like what Rhys did with flowing sides at Paekok, and this might have worked well with the central module here to give more depth for another track (or more open space), but the goal is to have it compact enough to fit in a back seat, so practicality trumps prettiness, and these will be straight sided blando-rectangles.  

Hopefully, more to come.....

South end looks doable on a 40cm x 1.2m module

Train 180 drops off coal in the early 1980s


Saturday, November 25, 2023

Free the Mo

 The local group I've become involved with in Palmy is currently between layouts after they sold their big NZR layout. The current plan is to become involved with the New Zealand Freemo movement in 16.5mm guage and build up a stock of modules. The club will build the 2 return loop ends and the base module will have double track.

This got the brains trust talking about an NZ120 freemo setup. Now I know this has been tried in the past but all the others have been more "modular" in their setup. Having a look overseas the Freemo movement is much more free form and has no side to any module.

I've just uploaded the doc to my google drive, have a read and see what you think. They are based on the European Freemo N rules (as they are in metric, you can't convert anything american as you can't get the correct dimensions on supplies). theres been a fair bit stripped back. And don't forget that anything that you do have can be used as long as there is a Freemo endplate (and associated connections) on the ends ie it doesn't have to be between every board, just at the ends of a scene with anything else going joiining wise internally.

Tuesday, October 31, 2023

Ready to plant

 A hunt for a cream colour I liked lead me to a range of paints I had never heard of before, Americana. Like all things American they are larger than the rest (about twice the size) for a similar price. They are acrylics and cover nicely. Onto the houses.


 2 of the three get red-ish houses and the 3rd a silver grey roof (prototype pictures can be a pain). I assume this was replaced but had not been repainted. The window frames are white, again as thats the impression I get from the colour images I have. They have then had a coat of my favorite thined out Tamiya smoke and a light drybrush with Valejo Iraqi sand.

I'm not going to lose any sleep over it..

Thursday, October 26, 2023

Whats in the box?

Last night at the local weekly geek meet Q handed me a box.

Inside was something both fascinating and terrifying.

Things mortal man was not ment to see.

 He had scaled down one of his early guards vans from S to NZ120. laying the parts out...

Everything has come out nicely including the brake gear and the detail on the solebars.

To cap it off, this is printed in PLA, no resin to be seen. Its not quite as good detail wise as a resin print, but awfully close, and its not brittle. 

Now, I wonder if he can do me a pair of jam trouses and a big hat that turns into a Subbuteo table.

Tuesday, October 24, 2023

Dropped off

A flying visit from the Cabbage flying circus this morning (at 7am) dropped off the part complete Waihao Downs from its slumber in a Wellington shed.

It seems to be in OK nik, though the track at the ends has seen better days.


 I'll also include a shot of the hardest piece of track I have even made, a crossover in code 40. Much swearing, sweat and blood was spilt during its soldering.


On another note, I'm currently looking to divest myself of most of my On30 collection if anyone is interested...


 I need the space to move Paekakariki out of the garage

Sunday, October 15, 2023

Upgrading

 A couple of nights work adding corugated iron to the railway houses, as well as the front porches.

Again, they are a great base to start from and tart up quick. Now all I have to do is find a pale cream paint.

Tuesday, October 10, 2023

Banging them out.

Tonight I made a start on the 3 railway houses. In total less than an hour for a quick cleanup with a knife and file. Then I painted the floors a mid-brown, and the walls Tamiya buff (a dark beige...). The base got a coat of light grey. I then glued the walls onto the base.

The roofs are a bit more work to add the corrugated iron. I might cut the chimneys off this time to make a job a bit easier.

Again, they are not superdetailed and a bit rough, but they are a timesaver

Monday, October 09, 2023

A bit scattergun

This post is going to be a bit all over the place as I keep thinking about writing a post and then put it off.

So, in no particular order:

-I needed another 3 railway houses and picked them up on Trademe.

Again, they are a bit rough but a very good base and saves me quite a bit of work. Once I've got the Medieval Russians for DBA off the bench they will be next.

-Theres been a chat on the emails about some sort of Freemo setup for NZ120. There is a vibrant Ho Freemo movement in New Zealand now (certainly in the North island) and something that I could be talked into. Theres also interest locally on buiding S scale NZR modules to the same standard. Is there anything similar in country for N scale?

Thursday, September 14, 2023

Pure gold

 A chance discovery this week. While on the hunt for a bit more info on Uc tank wagons, I stumbled on a description of building a model of Woburn station. Not that interesting you would think, but there were a couple of very hi-res aerial photos and a website Retrolens. You pick a location of interest and it pulls up all the aerial pictures of it with dates (starting in the early 1940's). There's 2 options (medium resolution and hi resolution) with hi-res in some cases really being something else. Heres a medium res picture of Paekakariki from 26th October 1963.

But as they say, you ain't seen nothing yet. Heres the hi-res version.

Looking at this I got a bit misty eyed, as it has answered so many of my questions. The Tilley Rd houses, the homes behind the single mens compound, the oil tanks arrangment, the plan view of the pub...

So, plenty to be getting on with, but I now finally have a solid over view of all the bits and can start fitting the details in.

Sunday, September 10, 2023

Resurrecting the dead

Yesterday afternoon with the help of Mr Hamblyn I extracted paekakarki from its resting place of 10 years. Setup only took about 15 minutes (some spent looking for tools).


Astonishingly the track seems to have survived its sourjourn with only 1 obvious repair needed (though nothing has been run yet) plus what feels like (running fingers along the track) a slight board missalignment on one edge. This afternoons job will be to measure up the area for the railway housing so that I can build a scale model of it to see what will fit.

My imediate impression is that there is more than enough space for a decent collection of houses. Down the other end at Beach rd there's not that much space (far less than I remembered) which does that the bonus that I don't have to build quite so many shops.

Saturday, August 26, 2023

Outside the fence

Unlike the larger scales, the one thing you can't avoid when modeling in NZ120 is that life exists well outside the normal railway boundaries. In fact, its what sets us apart from the neanderthals larger scales. With a renewed interest in Paekakariki I have been looking at the surrounding town to see what I need to  add.

Fortunately (again) there is a good White's avation photo (these guys should have been knighted) of the wider area. My interest is the sea-side of town. 

While I'm not planning to model all of it, the block of houses on the railway side of Tilley Rd are an obvious choice. And that means we need to take a closer look at the houses themselves.

So, from left to right we have:

-The single mens compound.

-Several W&MR cottages (they are present in photos from 1909).

-A group of 3 NZR railway houses.

-What looks like a stationmasters house (though I'm now leaning towards a double bay villa which still seems to be in position today)

-Another railway house

-2 small cottages

-The signal and traction depot

-A bowling green. I'm pretty sure no-one has modeled one of these before.

Moving just south we come to the buildings on Beach road.

- The pub

- The Holtam buildings, and possibly the buildings next to it (of a similar vintage) depending on just how long the road on the baseboard is.

As always the buildings that make it into the scene will be a juggling act between the footprint of the buildins and the shrunken space on the layout. In addition I've made a rod for my own back a long time ago by choosing to have the layout viewed from both sides which doubles the amount of modeling and research required.

Sunday, August 20, 2023

Touring around


So, as part of my "get out more you hermit" drive, yesterday afternoon I found myself on a Layout tour round Palmy. Quinten also turned up so we have a good chat between stops (ranging from 3D printing to the latest advances in car fuel systems and climate change).
I was surprised at the standard of modeling during the day (and also that other people somehow manage to keep their garages clean). All but one were US Ho scale layouts, and I must admit That US prototype just leaves me cold. With that said, there were still bits I liked.
 
Could do with a bit of weathering but I like the overall look

 There was a truely enormous setup, with stunning woodworking and lighting. both photos taken from teh same spot, and it continued round to the left.


It also had some nicely detailed industries, with a bit of dirt.


The last layout on the tour was possibly (to my mind) the most impresive of the lot. UK prototype Southern railway prior to nationalisation. The station is almost to scale and is a model of the town where the builder was born and grew up. His father was a signalman there.
There were some really nice wee scenes including the house he was born in. When he pointed out which one a voice at the far end of the room says "and I can see inside and you haven't cleaned your room".

The signal box was re-created using PECO switches.


As well as the points, all the signals worked as well, driven by servos. One think I did find interesting was that the OO scale locos and wagons looked really small. 

On another layout I found a very clever way to set up a helix using threaded rods.
Takes some of the issues out of the engineering of construction.

Friday, July 14, 2023

Turning things around

Right, an attempt to start writing semi regular Saturday morning posts that requires me to A) haul my ass out of bed early and B) evade brunch making duties (this morning at La Casa Dandruf its pancakes and maple syryp) untill 11am.

Even since Paekakariki has had a full completement of mainline track, I've pondered just how to get the trains back onstage once they head off North or South. Now mostly I'd just say a return loup with storage sidings but then I got to thinking, why not something better? I had kicked around in my head (theres plenty of free space) modeling more of the area south to Pukerua bay to let the electrics stretch their legs but I could not figure out how to do it. 

My initial thought was just to use the outer storage loop as a sceniced mainline section. The immediate issues are that you can't park a train on the bank (well, not quite true but I don't think they have signal failures/derailments that regularly on the real thing). I then hopped out of the box and came up with a separate mainline and storage setup.

Now this has 3 storage loops plus a couple of lines for the EE units to sit between jobs. Its all rather complex though. The other issue is that trains leave Paekakariki and immediately head north along the Pukerua bank. Not overly ideal (though its just occured to me that if it was reversed it would work fine). the whole thing folds in 1/2 for transport and storage. Theres an access hole in the middle as well.

I then considered having a diamond crossing that swaped the north and south mains so that it would work and trains would run into the storage yards and then out onto the main line. 

Trains head into the storage yard then do a circuit of the mainline before arriving at Paekakariki. Aagin if I simply reversed the first plan we wouldn't need to be here. Mr Bond then pointed out that the rail crossings of the baseboard joins were not square, and the track was awfully complex and what about maintanance.

A couple of minutes of looking/thinking last night and I realised I could strip 1/2 the points out and it would still work and I would only have square track crossings of edges.

I think its a bit more elegant, you don't loss anything by simplifiying the points layout, and its also easy to operate and maintain.

The only real issue  (damn you prototypical modeler in my head) is that the electric locos will reverse on every trip. Not an issue for the Ew's but it is for the Ed's and Dm's. The only alternative to fix this involves a lot of loco handeling/shunting off stage which I don't think is a good idea at all (unless someone can convincement me otherwise).

Wednesday, July 12, 2023

RailX pt 2

 As I said in pt 1 I had a few conversations over the weekend.

I was asked up to a TTrak layout for an opinion on something. This was repainted and re-decaled N scale US models. I was asked to be honest. I thought the colours were good and then it was all downhill...I don't think I will be invited back. At least Fretesch are the correct makers models (and I can tell the difference between a U26C and a C630).

I then had a chat with a gent who had been a member of the Otago Model Engineers (OMES) after I had been there in the early 1990's. One thing interesting that I did learn that the model of Dunedin Railway station I built is to be moved to a display cabinet downstairs. Now, this might not sound like much, but the live steam guys defend the spots in these cabinets with a similar fevour to that last seen in Japanese soldiers in late WW2. Apparently its on facebook (which I'm not, I'm very picky about where I get my disinformation). Oh and before I came forward they thought it was built by an Asian exchange student...

Last up was Brian Roulston of Scenic Textures. We both cut our early serious modeling teeth at the OMES in the early 1990's. From him I learned that another old member of the Otago NZ120 modular group had passed a month ago. I think this leaves me as the last man standing from the original group in the early 1990's. We reminised about some of the characters and stories which quite honestly has brought a tear to my eye as I write this.  My memories of this time are not only about the huge layout that we assembled, but also that I don't recall any arguments in the group, just a shared vision for a layout. I've been lucky enough to (so far) do that twice in my life so far. Hoopefully I get another chance yet.

The only thing we can do as modelers to honor our friends memories is to pay it forward ourselves.

Tuesday, July 11, 2023

RailX done pt 1

So another RailX has come and gone. 2 days of modeling, talking and borax poking. As usual I was part of the Cabbage Flying Circus, and I spent the first day making track. This time round it was the trackwork for the landing on the Huia tramway. I was working with code 40 rail, which I really hate doing as its just too small. To cap it all off I had forgotten my glasses and I was essentially working by feel. Strangely enough this seemed to work fine and things just rattled along. I must try it more often. The Sunday was a bit of tidying up the soldering, and then a fair bit of chatting to old friends (again, because I couldn't see anything).

 Micheal Gee had brought another 3D print, this one for a phase I Da. Comparing it with the 25 year old Etch Cetera Da's...


We immediately noticed it was a bit taller in the car body, but below the footplate the height is about right. The long hood could also do with a bit of chamfering between the roof and sides. Good enough for me to plan to order a phase III Da. 

There was an American layout just across from us. Now normally I have about as much interest in US prototype as the GDP of Kazakstan. However I can apreciate a well observed layout. The lighting rig drew some apreciative comment as well.

The lighting rig was very nice too.
It was also setup with a JMRI interface and was controlled by cellphone app. It was nice too see the system work live though I don't see the point of being able to throw the switches from the handset.