Depth of Field
The basic rule of model photography, which has been done to death elsewhere, is to set your camera to 'aperture priority' or 'manual' and use the smallest aperture (large f-number) to get as much depth of field as possible. DOF refers to the area both before and beyond the thing you've set your focus on, which appears acceptably sharp in an image.
 As an aside, if you ever made a pinhole camera at school from a shoebox, perhaps to watch an eclipse with, you'll know that with a really tiny aperture, the size of the pinhole, you don't need to focus at all - everything's nice and sharp! Alas few lenses have apertures that stop down that small.
Although the problem is compounded with model shots, even in the Real World it's an issue: the above picture presents a shallow depth of field: the lead loco is sharp, but most of the train is a little out of focus and the back is very soft...

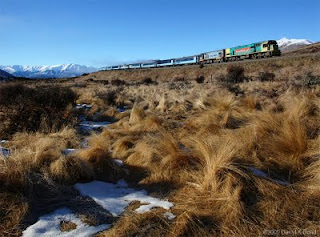
...whereas in this shot, the entire scene, from the near grasses to the distant mountains is in focus. So that's some nice DOF there.
The depth of field will be longer/deeper/bigger the further the focus point is away from the camera, so if you're taking a pic of something quite close to the camera, say for example, a model, then DOF becomes quite a problem and you're often buggered when it comes to keeping foregrounds and backgrounds sharp. Now that even cameraphones are equipped with one zillion megapixel sensors though, you might consider taking the shot from further away than you intended to (in order to get more depth of field) and crop the picture down to the proper view on the computer. Or, for those still shooting film, have an 8x12 print done and get out the scissors...
The distance that is acceptably sharp is also longer behind the point of focus than before it (the side closer to the camera). This is why I often focus on a diesel cab front (or steamer's dome in the elaborate illustration above) rather than the nose: I assume that the DOF will render the nose and the rear end reasonably sharp even if nothing else outside that. And afterall, that's usually what you want - the 'subject' to be acceptably sharp. In the big telephoto shot of the DXs above, it doesn't matter that the back of the train is soft, because that's not what you were looking at (unless you are in the process of making some coal wagons).
The depth of field is also 'better' when you use a wide angle lens rather than 'zooming in'. Interestingly (or perhaps not so) the two prototype pictures above were actually taken at similar apertures with vastly different results. The 24mm wide angle is sharp throughout, whereas the big tele shot, at around 800mm isn't.
Backgrounds
With all due respect to The Big Druff Rainbow and other forms of abstract modern art... just as when you're snapping the real thing, you want to think about what distractions lie behind your main subject. A bit of cardboard or a portable blue-sky backdrop can do wonders.
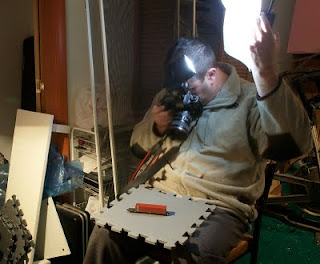
While that is more important in 'scenic' shots than 'construction' shots, this is how I take most of my static "builder's picture" subjects - on a piece of gray foam rubber matting. I try to position the subject on the mat so that I can crop any distracting background out. Not usually on my knee of course, but my workbench is full at the moment. Note the bouncing of the flash lighting off a piece of photocopied paper per the instructions below:

Nice Even Lighting
Good lighting makes good model shots.
Photography at its most basic, is simply the recording of light coming in through the lens. A measurable amount of light is required to expose an image correctly, and you, or more commonly your camera, fiddles with three levers to get that amount just right. One of these levers we can't do much about: as discussed above, we need to set the aperture to the biggest f-number (smallest hole) we can for sharpness purposes. To make up for the few bleams of light that can squeeze through that small lens hole, requires either an increase in sensitivity of the film/sensor (ISO rating) or using a longer shutter speed (usually with a tripod) to let the light come in for longer.
The alternative beyond that equation is to artificially increase the amount of light available. With digital cameras it's easier than ever to experiment with extra incandescent lights or something more powerful from Mitre Ten. Or you could use a camera flash.
The problem with the camera flash is that it throws a lot of harsh light on things, and that intense power often turns foreground subjects white but it drops off quickly to a dark background.
The shadows can also be annoying. Not Cliff Richard's ones, but the "shadow of someone's head on the wall behind them that makes them appear as if they have an afro" look.
There are two things you can do to minimise nasty flashing. If the flash is built-in to the camera, you can try flashing through some tissue paper (ideally unused) to diffuse the light a little. The camera should punch out more light to make up for the obstruction, but the lighting should be more even and less shadowy. You might try holding the tissue paper out from the flash a little without getting it in the picture. This diffusion of light also helps when your subject is up close, and thus probably below where the beam of the flash is pointing
If you are using an external (clip on/big) flash attached to your camera, you can sometimes swivel the flash heads of these off to the side, up or even backwards and bounce the light off a sheet of paper or some foamboard.
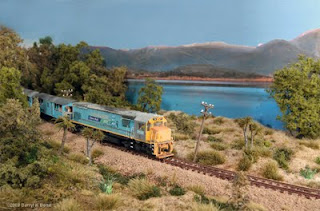
Doing the latter will light a scene surprisingly evenly from right up close on a layout to the back scene, as you can see in the following shot, and also remove the 'afro effect' shadows behind the subject:
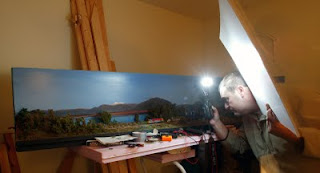
 That shot was taken using a piece of foamboard to bounce the light off, a similar setup to this cheesy re-enactment:
Tripod, Jimmy!
A final tip: because the shutter needs to stay open longer (to let enough light in with our small aperture to expose the image correctly), I always use a tripod for 'scenic' model shots. As you can see, I couldn't here because the camera that was taking the picture was hogging it.
More camera stuff in an upcoming installment. Same Bat-Time, same Bat-Channel.


3 comments:
Nice one DB ! A topic that sorely needed covering. Some info on macro shooting would be handy (if applicable to shooting models).
Excellent illumination Darryl on a subject that needed exposure with focus on the subject!
A recent Model Railroader (Sept 2009 pages 36-41) had a good treatise on the subject of model rail photography, but I find your description more succinct and to the point.
I agree with ECMT re macro shooting, although this mode can really put undue scrutiny on our models !
Leaving puns aside (even I'm not going to try to follow that!), I'll add any additional Qs and thoughts onto the next half-finished post rather than respond here.
Post a Comment