Monday, April 02, 2012

Some rambling thoughts on Micro Modules....

It all started out with a random email from the head druff which sparked a discussion between Am fet, Cabbage, and 0-4-4-0T at the Tuesday night special interest group in the Lower Hutt club rooms for the Hutt valley model railway club which got the creative juices bubbling away.

Cabbage woke with an epiphany at some ungodly hour, not wanting to incur the roth of the rest of the family on a Saturday morn, went straight to the computer to get the ideas into cyber space.
The first iteration went out some crazy time of the morn for comment, which started the furious discuss over the hours between second breakfast and elevenses.

Between Cabbage, Am fets, 0-4-4-0T and the head druff the ideas flew around.
We could all agree on a standard 300mm wide end board with a centrally located single track in free-mo style and no legs just setup on tables

By lunch a workable design was pretty much there and by second lunch Saturday Am fet wrote "Okay, enough pontificating….I say lets cut a couple and see what works and what doesn’t in real life."

Monday rolled around.... on the way home from work Cabbage stopped off at Bunnings got a 1200 square of 17mm ply to drop in to Orrsum Lasers services. A quick chat to Paul Orr who was happy to check over the drawing and chop up the sheet of ply during the week

By Friday Cabbage had a pile of cut end and a bag of ready made dowels to play with over the weekend
Amazing just how many bits came out of the sheet
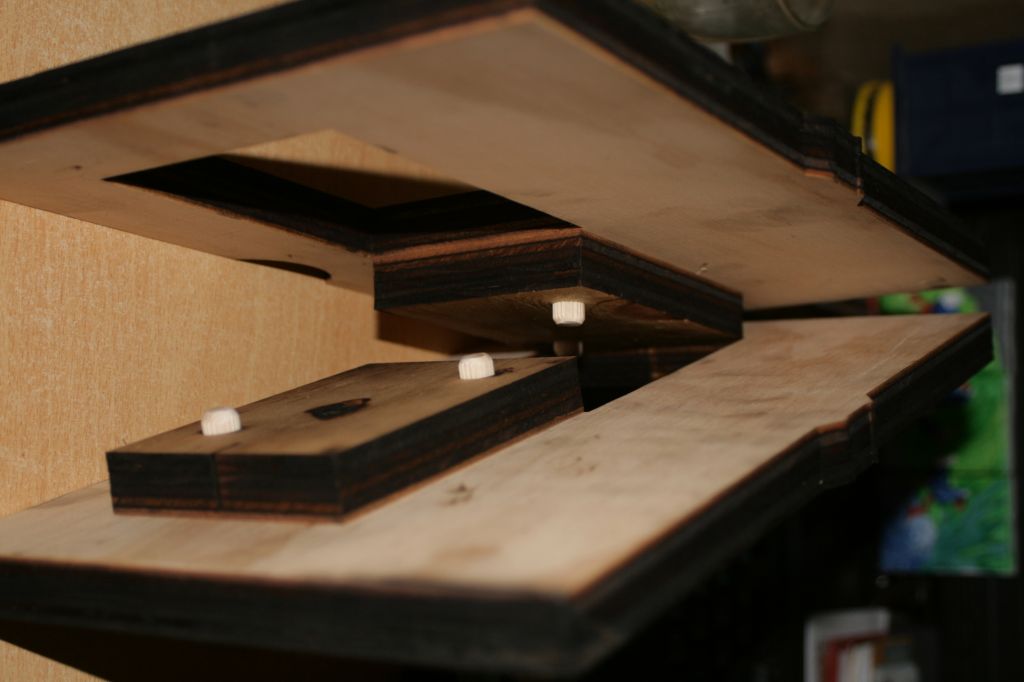
Bash in the dowels to locate the keys.... idiot proof
Evan a one handed man could do it

The ends slot together with the keys
the bit missing here is the locking toggle
which turns about the hole in the centre of the key
locking the module ends together

Track locating slots to align things between modules

Add some blue foam and vela..... Micro Modules
Interestingly enough if we scale these up to 64th
they are the same size as one track minds

And by sheer fluke the cut out in the foot allows for easy stacking

The modules Cabbage knocked up over the weekend were 300x600mm but the idea is the length and shape is entirely up to the modeller, the laser cut ends are supplied and you go nuts in between.
The first track layout design out of Cabbage's head was Whareroa, again, made up of two sections and ending up as 4x1.

Sunday, April 01, 2012

Sunday Morning

Well, it was a day and a bit yesterday. First up was the ceremonial loading of the car with the layout. I managed to get 2/3 of it in and the rest will head down next Thursday night. First stop on the way south was Paekakariki. Time to get the camera out for some shots. As I didn't pan really it was just point and shoot, though there were some buildings that I concentrated on.

This is a relay shed of some sort that was there in the time period I am modeling, though it was then painted white ish. Also the ex ORB Drewry DSB (near equivalent) shunting wagons at Steam Inc. Closer to the camera, the balasting is 'interesting' No sleepers visible, but not up to the tops of the rails, and there are 2-3 different grades and shades I can see. Will be 'fun' to model.

The station itself. most of the ray track on this side has been removed.

Looking North, and the area of interest here is the hill on the left, and how tall and what shape it is. I've looked at other old photos and this one just adds to the confusion (which I though I had unconfused). Maybe I need a GPS reading from the loco shed and the top to work out just how tall it should be.


The Air-rail shed. With the building of the new rolling stock shed you can no longer easily (at all?) get to the other side, so I will have to go off old photos that I have.

After this wander round, I paid a visit to the home of Scenic textures (well, technically, its a shed and a cupboard). A cuppa and a chat with the proprietors was very enlightening thanks to the local knowledge, and hopefully I'll have some better leads on some of the important buildings on the main street ie the old Pub (and I'm happy to reward in wine if they pass on their preference). Looking at the hills from the coffee table also reminded me that google maps does not do 'ups' at all well, and I may need to rethink that side of the layout. A major plus is that when i need to do the scenicking, I'll be able to order with instructions 'Oh, just what you see out the window will be fine...'
While I do wish I could have stopped for longer, I was on a deadline and so next it was off further south...

A wide ranging discussion was had, but we can't discuss some of it, though the opinions expressed about the scale with the largest following in this country were a surprise to me. Skepticism was also expressed about the chances of getting my competition models done in time for the convention, to which my reply was 'Well, I better start writing that clinic as well...' And while photos may make it look like I was holding court, I was meerly the only one sitting on that side of the table. Also of note in that photo sitting on the table to the right of me. This is something that Cabbage Industries has come up with based on a brainstorming session a few weeks ago, and which he may like to post comment on.

Saturday, March 31, 2012

Saturday Afternoon....

First stop for the Druffmeister: Holding court in Pukerua Bay...


(From left: Brabs, Cabbage, Mish and Goobah. Front and Center Herr Druff. Photo Am_Fet).

Saturday Morning

Can't stop, places to be with 2/3 of the layout...


Next time I build a layout it will fit in the damn car in one load!

Thursday, March 29, 2012

Messy nights

Well, messy progress. Now I know that it is possible to make a hot wire cutter to cut polystyrene (and yes, I know it gives off toxic gas when heated), I don't have one. I do have a wood saw.....
(And you don't want to see the floor at all). Its slow progress as I have to glue the bits of polystyrene together and wait a aday to cut them. Plus I have discovered that no more nails is abit more solventy than I had thought (though the smell should have given it away).

So, with just the hills to go, things are coming together in that the layout looks like I've been working on it for over 2 years.

It was at this point that I suddenly thought 'I can't remember ever taking pictures from the other side of the layout'. So, without further ado, I climbed behind the layout and took another historical comparison shot.

Compared with this...

Monday, March 26, 2012

Productive weekend

So, as of 8PM last night, here is the extent of progress. First up, aping an historic photo here

Its amazing the difference that adding in the flat areas makes even if there are no hills behind it . The colour isn't great but its not finished is it!


Looking the other way. The retail area of town to be at the left, and the railway settlement on the right.

Finally, here is a first 'ground level' shot of the yard. Just visible past the Z wagon with no detail on the ends is 1431.

So, its coming along, and it will look tidy come convention time if nothing else. I'm not looking forward to cutting out the hills as its cheap crap polystyrene (but not permanent) and just thinking about it is giving me goosebumps down my spine. maybe I'll use a pair of earmuffs and it will be not as bad. Tonight should see the flat areas and road added on the other side of the layout. Strangely enough this is actually the punters viewing side

Sunday, March 25, 2012

Countdown

Well, things seem to be finally moving forward. The MDF facings are all up, and attention has finally turned to putting on some sort of terrain above the baseboard.

Apparently you are supposed to go through some rigmarole to protect the surface of the MDF. Taking the bolt gun to that sacred cow I've painted one of the panels black to see what happens. You will never know how much restraint it took me not to do the rest.

So, its going to be a bit of a race, but hopefully today breaks the back of the hard work, and I'll be able to finish some of the competition entries.