Saturday, March 30, 2013

So, how do we get it to move then?

 Right, Peter has supplied us with a lid, so how do we get it to run. I'm not a fan of the Farish 0-6-0 method (for a variety of reasons). So, whats my plan?

Based on an extensive collection of worthless information that resides in my fat head (I'm quite popular at morning tea for the daily newspaper quiz), I have discovered that the Atlas GP XX bogies have the correct wheelbase (17mm). On top of this all the gear meshing is done for us. The photo does not convey this very well due to parallax issues. You will just have to trust me its right.


 The wheels at 6mm are a wee bit on the small size. However, a simple swap with SD-70 wheels (I think they are from Kato) and it looks a bit better. I've also removed part of the bogie side frames while keeping enough to hold everything together


OK its not quite that simple. You have to swap the 1/2 wheel sets on the gear muffs as the gears are offset on the Atlas drive. I also purchased some worm drives. I'll knock the shaft outs and mount it directly on the motor. The invoice tells me that the princely sum for this so far is $7.20 US (not counting the optional SD-70 wheels)
So, how does it fit onto the top?


 OK, so at the moment the wheels are a bit wide and outside the inner side of the cylinders. For some odd reason I'm not overly bothered about this at the moment. Maybe my inner finescaler has decided to cut his losses on this project already. The frames will be plasticard. I'll find a spoked wheel from somewhere (I wonder if Trackgang sells them?) for the trailing axle. And what about a motor?
In the boxes from Long ago, I found what I recall to be an open frame lashima 916. There are a few motors that seem to all be the same size made by other people as well.
 Comparing the motor to the plan, it was obvious that it would not fit in the side tanks, however if I cut some unnecessary plastic I could angle it slightly and it would fit nicely


The worm gear was hammered of the axle it came on (very delicately you understand) and then pushed back on. I also cut the back drive shaft off so that it would not intrude into the cab.
If I was planning ahead I would go for a Nigel Lawson 8mm can motor instead, as this would fit.

On to the top and some alterations were then made based on discussions with the peanut gallery. I added larger air tanks. The ones on the model just felt a bit small. Increasing to 2.5mm gave a better 'heft'. I've also removed the roof hatch and replaced it with part of an etched ladder, to which I'll add a lid. I have had a go at cutting the hole in the roof under the hatch, but this has been less than successful so far. I need to find a tube with a diameter of 3.5mm for the tank filler hatches.


And during a fact finding trip last weekend to get more detail photos....


Friday, March 29, 2013

DI 1843 Lives!

DB gives perennial fave Strictly Ballroom two thumbs up.

You may recall a long time ago that I finished off my DI. Not a bad wee model to look at if I might say so myself. Perhaps the best one I've ever made.

But that was some time ago but this loco had never really moved under its own electrons until 2 weeks ago when I took it to the Long Island branch of TrainPlayers Anonymous' layout with a bunch of other locos. Most of which didn't work either.  However after some prodding the DI lurched and wobbled down the track - if you see how the chassis was built, you'd be surprised that it could even lurch under its own power.

After some wheel cleaning and blowing the cobwebs off it, it turned out to be a really impressive performer. It's relatively slow but super reliable. The speed issue is probably due to a mismatch of gearing between the GP30 motor/worms and the Kato SD truck gearing so I'll probably have a fiddle with the decoder CVs to crank up the speed at lower settings in an attempt to speed match it with my DGs

I didn't have my phone with me then, but luckily I did this week, because, you know, "nowadays its all video, video, video" :


Golly its fun running trains around and around.

Thursday, March 28, 2013

Earning your Stripes - ZM postscript

DB belatedly reports on an experiment that went well (for once) :

The last thing to do to my ZM was to add the diagonal 'hey dummy, you didn't shut the six side doors right' stripes, lacking the raw materials at the time.

I seem to remember that painting these on straight was a pain 20 years ago.... You can pencil in a line and paint yellow blobs over it, or...

Since the Shapeways ZM has a subtly gritty finish, perhaps a yellow coloured pencil would be faster and neater. After about 10 seconds work, voila!


And that pic shall be a sneak preview of my next post...

p.s. to this p.s. - are these lines too thin?

Wednesday, March 27, 2013

The "Last Layout" game....

Am_Fet's mind wanders again....

I had the grave misfortune the other week to be in the same room as a TV. And rather than playing an enthralling test match between us and the mother country, it was assaulting us with one of those inane cooking shows that relies more on camera angles and incidental music to build tension. I mean, honestly, its cooking....and to quote Hamish Rutherford, "Its not like we're saving babies".

But I digress....the reason this came to mind was the contestants on said show were told to play the "Last Supper" game. Its your last meal, and you can have anything you want, served wherever you want, and with whoever you want to be with.

So lets play the train geeks version; The "Last Layout", as it were.

You've got an army of skilled artisans, as big a space as you need and an unlimited budget. So what do you do? NZ, or somewhere else? Nz120 or 9mm? The whole of the NIMT or a bucolic branch? Modern or Historic? And even more importantly, unlike the poor contestants we wont expect you to actually build it for the judges to say foul things about.

Herr Druff is knee deep in Paekok in Nz120, but would he be seduced by 1:24th scale GWR Broad Gauge? Will KiwiBonds go back to his love of American N and model the entire area around Mojave and Bakersfield in scale? And would my brain explode with the pressure of choosing between all the different ideas in my head, leaving me a mere husk of a man weeping gently in a corner (of a very large, empty space)?

The comments section is open below....go to it!

Monday, March 25, 2013

Starting and Finishing the Shapeways ZM

DB concludes:

One of the wonderful things about the items from Shapeways is that they obviously let you spit out a model much neater and faster than making something completely from scratch. Throw some bogies, couplers and paint on this thing and you could be done.

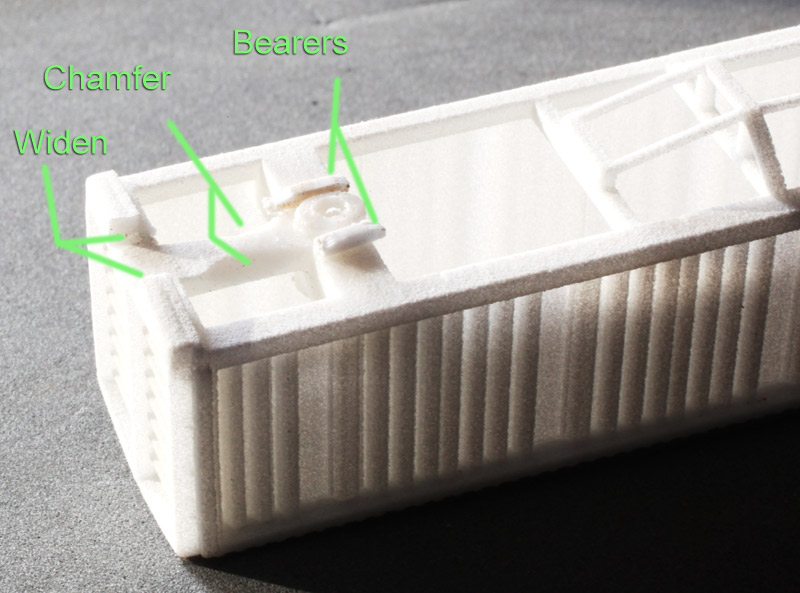
I started by pondering the bogies and couplers situation, firstly finding some Kato bogies as reviewed way back here. The WSF material is easy to drill out using the pre-marked bolster holes as guides. I chamfered the reinforcing strut linking the bolster to the coupler pocket so that there was plenty of clearance for swiveling wheels and also widened the coupler pocket to take a pair of MicroTrains couplers. The Kato bogies have a pretty big bolster hole so I added a set of bearers 'just in case' before attaching them with screws and the couplers with carefully applied contact glue.

With the hard lifting done, it was time to turn ones delicate thoughts towards the pretty bits. After staring at a few ZM pics on the web, things that stood out as candidates for some additional detailing were the big steps under where the centre doors join, the lifting door handles themselves and a small horizontal strip near the top of each door. The latter items are tiny slivers of plasticard attached with white glue - the door handles look ok, but the plasticard is a bit big for the horizontal strips, but no dramas when viewed from the federally mandated distance. The steps were cut off an N scale wagon top which also furnished corner steps which were added as an afterthought. All those steps were  attached with my ancient contact glue. A few rectangles of paper for number and chalk boards completed the effort (although those hadn't been added when the pic below was taken).

At this stage, as tradition dictates, rather than letting all this dry, I slathered on some paint to see how things looked. Those more experienced with Shapeways models over on NZ120.org spray some primer on as a first step before doing anything else, and that's probably a good idea, as I found this WSF material sucks up paint like a sponge. I brushed on Humbrol Matt 160 (German Red Brown) if you're keeping score. The next morning the paint had dried except for a few tacky bits where I glued with the wood glue, so I wonder if something strange is going on there although it all seems set now. I'm sure one of our resident chemists can offer an opinion on that. Interestingly, the paint seeped through on the inside through what are probably minute joins between the doors and a few other places. I hope these won't be weak points in future.


You can see some of that seepage in the above pic which also shows my tacky attempts to weight the lighter-than-air model using steel nuts and washers contact-glued in at strategic locations above the bolsters and bracing.

A little weathering with some acrylic washes (rust, brown, black and gray) together with some yellow to pick out steps and door handles and things are starting to look close to finished.


Although the appearance of these wagons has changed over the years -and especially so since spraypaint vandalism has became so popular - the one remaining step for me will be to put the yellow stripes on the doors, but that can wait till the rest of the paint has dried! Actual working time getting the wagon to this condition was less than two hours. Prototype pic from Ken Lankshear's NZ Wagons Flickr set.

Overall I'd not hesitate to recommend this model of a hard-to-build prototype. I must take a pic of it beside my 20 year old resin cast ZAs...

Saturday, March 23, 2013

Rimutaka layout ideas

Posted earlier on in the week in the peanut gallery comments section.

'There's not that much scenery on the Rimutaka Incline, just a steep piece of track cut into a gorse covered hillside for 5 km or so. Unless one wants only to play shunt the yard at Summit (almost no scenery there either) or Cross Creek (a little bit of scenery) and never run a train on an incline.'

Now, this is an interesting interpretation of the word scenery. To say that there is not much is a bit steep. Its like saying there's no scenery on the Cass bank (just tussock) or on the central plateau (only a volcano there). Lets not forget the west coast. There is plenty of scenery there, but its mostly hidden by trees (as pointed out by a national party cabinet minister several years ago). Oh and its not easy modeling gorse covered hillsides either.

OK, with that little rant out of the way (I keep resisting writing letters to the editor for the regional newspaper, but its getting hard some days) what sort of options are there for building a layout based on the railway line between Upper Hutt and Featherston. I must sketch some of these out. The track plans will have to be condensed of course, but carefully to preserve the operational aspects of the prototype.

1) The easiest (!) is simply to model a section of incline, and have trains run up and dawn. Sounds a bit boring, but with DCC and 4 locos you could have a groups of guys driving. Add in sound (and some random wheel slip noises) and it would be a stunner. Space required (ideally) 8' by 8' in the corner of a room with an L shaped layout. It would need a helix at the back to get the trains to change levels and a fiddle yard as the composition of the trains was different depending on if it was going up or down the hill.

2) Cross creek. This was the main loco depot for the southern Wairarapa as well, so didn't just have 5-6 Fell locos.There would also be a couple of A's or Ab's and possibly a Wf for the Greytown branch. Operation limited to playing in the yard, but rearranging the trains has operational interest. As the railway was the only way of getting supplies there were also other railway movements to support this. The associated railway village should also be modeled (indeed the whole area is incredibly small in real life). It would be up to the modeler how much of the incline to model. Space required would be 8' minimum (I've done the sketches but not worked it out full size) and could expand to as much as the modeler wants. Being on a convex mountain side its a bit harder to extend it.

3) Summit. Playing trains the main aim. The summit tunnel provides an effective scenic block at one end. the layout can be extended as far back towards Upper Hutt as the modeler desires, taking in the Pakuratahi gorge and also a model of Kaitoke. Space required would be at least 8' for summit, and as much more as you wanted/had space for. at least it could be a concave L shaped layout which is easier to fit in a room.

The final option is to somehow combine the lot. I can sort of see how this could work in my head (where all sorts of funny things are possible), but its a large area required to carry it off. The arrangement of the railway on the hillsides also restricts just how things fit in a room, which may or may not be ideal.

(I must start creating some more layout ideas. There's plenty of locos now available so we can move from hand building rolling stock to actually getting this running. Dare I even mention operations?)

Friday, March 22, 2013

Shapeways ZM and CE first look

DB writes:

A quick look at NZ120.org recently reveals that the scale - probably for the first time ever - has moved off the endangered species list and is entering its third and greatest age ...and going mainstream to boot.

Firstly, Russell at Trackside continues to churn out his range of kits, and as soon as he produces those lovely RTR items they seem to get snapped up. The availability of RTR (or close to RTR (btw, anyone remember Ready to Roll? Cringe.) items is a must for, and an indicator of, the scale's long term success, as not everyone who wants to run trains in NZ120 has the confidence, patience or time to make kits up from nothing or to scratchbuild things.

Secondly, there seem to be a lot of 'new' names on the forum, and not just armchair lurkers either, as the photos and videos of some really nice models and layouts show.

And lastly, over the past year a plethora of 3D printed NZ120 items have appeared as Shapeways models thanks to the efforts of some talented CAD designers. I've always wanted some CEs and more bogie box wagons, so being inherently lazy I recently ordered Peterlanc's ZM bogie box wagon and a few CE coalies from listers_nz to give the Shapeways channel a try...

Piggyback Train (2013, Darryl K Bond, resin, brass, wire and paper) as installed in the Metropolitan Museum of Art 
Initial impressions are that these shells are impressive. As the Dandruff Head intimated earlier, it's a little off-putting looking at models that are so straight and square next to my handcrafted items or even my assembled kits which tend to be less of both. In particular, the precision of the door and roof detail on this is really eye-catching compared to my earlier efforts in dealing with with the complex designs of the ZA/ZM/ZP/KS/etc box wagons.

After some discussion amongst the peanut gallery here behind the scenes at Motorised Dandruff Inc, I ordered these in white/strong/flexible material - primarily because its the cheapest. While it maintains a great level of detail it has a rough to-the-touch finish like sanded tile grouting, and while a coat or two of paint might cover that up, i'll probably run some sandpaper over the large surfaces to smooth things out.

Positively, with one exception there are effectively no signs of strata on the surfaces, so these are a lot better than some Z scale containers I received a year or two back. Yet the Shapeways printers are in a far lower league than Mark Gasson's Magic Machine, both with the rough finish, but also with fairly noticeable stair-stepping on the angled CE ends. Again, nothing a little sanding or filing can't deal to but I'll put them aside for now and look at the ZM. Not sure if you can see this clearly in the terrible phone-photo pics:
No ribbing please.
Note that the angled ends of the CEs are the only place I see this strata- it's not visible anywhere else.

Having spent a lifetime looking at ZAs and not being terribly familiar with ZMs, I was initially worried that the roof pitch seemed a little shallow and that it was supposed to have four underframe braces and that I'd been swindled out of two. After finding a few ZM pics, the model of the more modern wagon is correct and I can stop worrying about this and concentrate on global warming, the future of endangered species and my receding hairline instead.

So, as predicted on this blog a few years ago, it's good to see CAD and 3D printing coming of age and revolutionising NZ120, and indeed all modeling. While building up a train of these models is still a fairly pricey and time-consuming exercise, the costs will fall in the next few years as more 3D printing services spring up locally. And of course the quality is improving all the time.

Nice work dudes!