Saturday, December 28, 2024

Elevation, and more wagon rejuvenation

DB continues to rehabilitate dozen-year old wagons:

With the dramas of Christmas now behind us, it was time to pull out some more damaged wagons. Most of these have moved country a few times and despite being fairly well packed, a few bits have fallen off, quite a few couplers have been damaged, the odd bogie is broken, and even a dozen years ago there were a few cripples amongst the herd.

A bit of gluing and cannibalisation had four of the 40-footers back in action, as well as the four HLC coal carrying wagons. One of these has been a chronically bent UK for a dozen or more years. It was replaced with a straight UK borrowed from under a 40 foot container which I have other plans for.

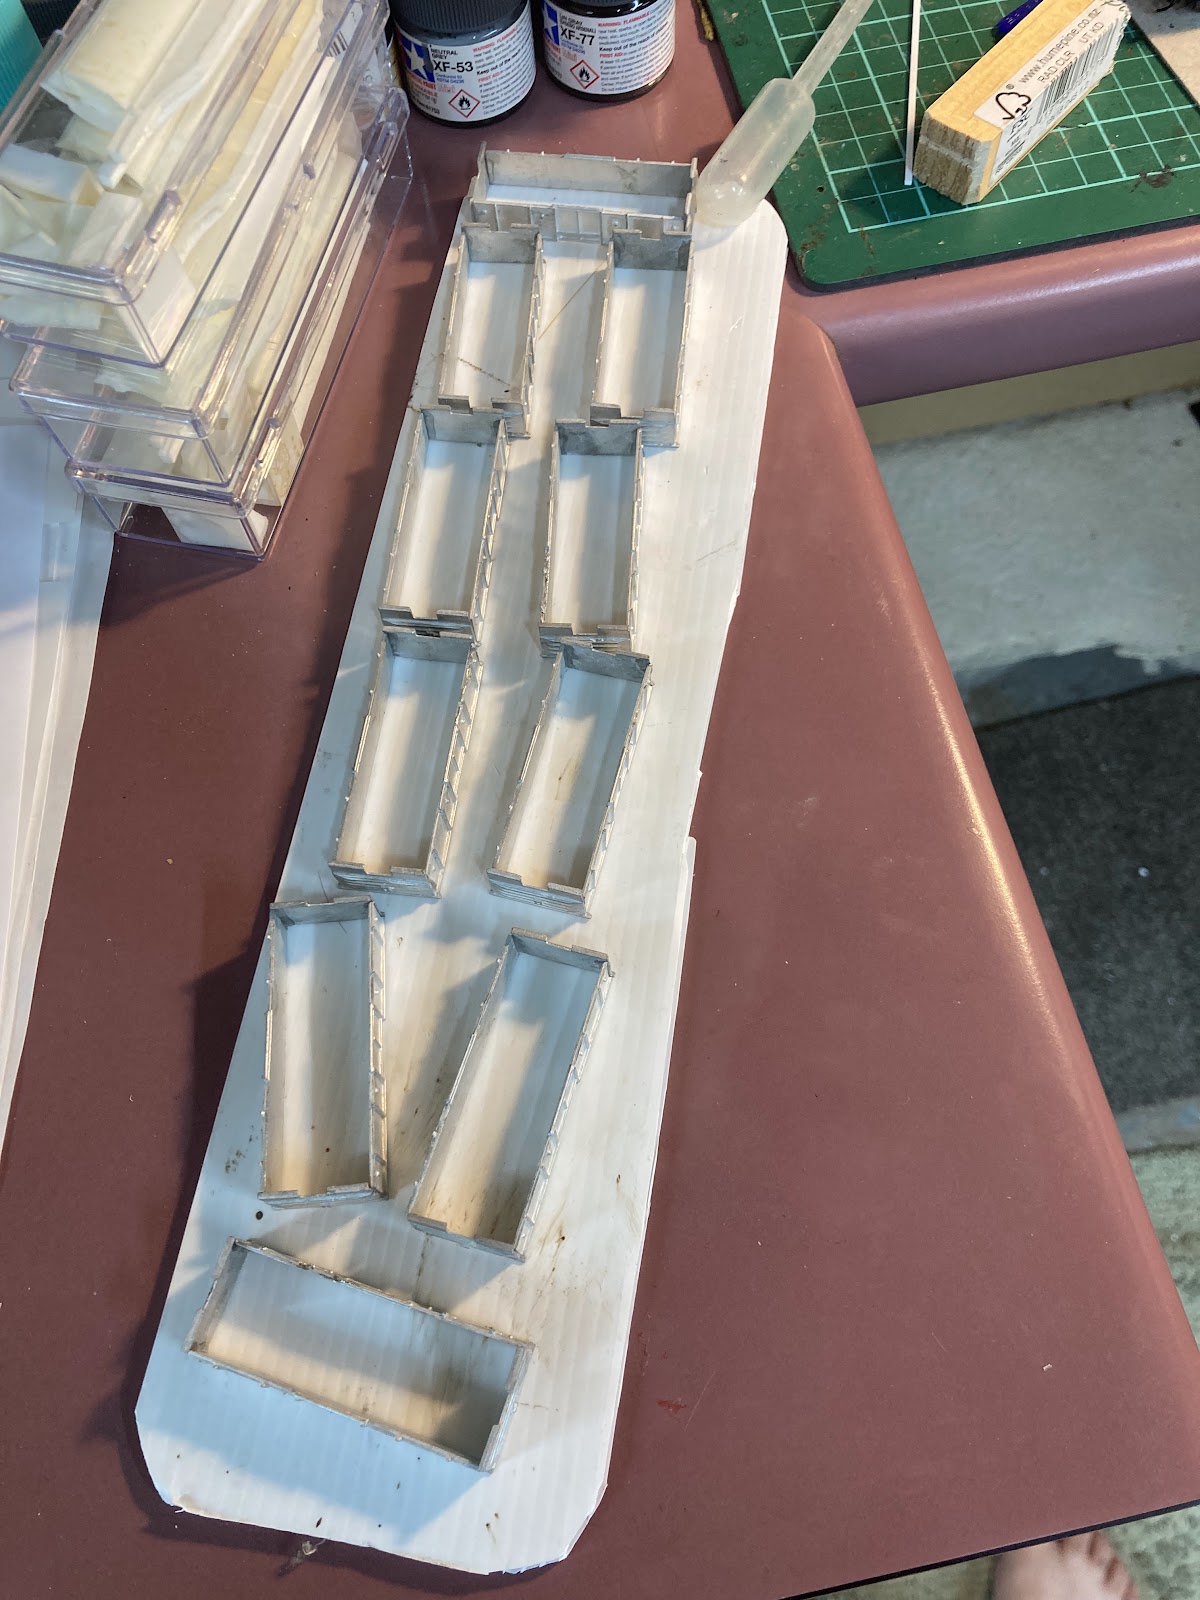
The HLC set is below (on three PKs and one UK), with the bent and disgraced UK (now sans containers, couplers and bogies) lying on its back:

I could probably do another one or two additional wagons with HLCs as I have a few spare bits. A few of the worst wagons (including that PK with four green 10-footers, and some of the other sticky container castings) are being binned. 

Some "1990s-era" wagons are in the track behind, including the roadrailer, which is still on some ancient Bachmann(?) bogies with old school rapido couplers. The roadrailer, the IB with 3x20-footers, and the Spaceracer were built in the Otaki-to-Cass days. 


A few of these locos were converted for my West Coast fetish of a decade or so ago. Wish I'd left the zinc etched blue DXC in Fruit salad now. Maybe I'll strip the paint off and repaint it one day.
I've also been thinking about the Fremo layout height. I absolutely love the 1200mm above the floor height personally, but it might just be too tall (with a backdrop) for most people to reach over comfortably at exhibitions. Maybe for me too. 1200mm might be fun for playing trains, but it isn't very exhibition-friendly when punters are forced to observe from a distance, and as I'd like to join up with the Trackgang layout one day, with its rail height at a more exhibition-standard 1000mm, that would require a massive gradient to bridge 20cm in height... then consider the heavy resin and whitemetal wagons.  Perhaps the incumbent should set the standards... 

Maybe I'll whack 10cm off the legs and see if that is a reasonable compromise. Even down at 1000mm (a bit low for my liking personally), I could always sit it on simple riser feet (or even bricks) at home for my own use.   

Friday, December 27, 2024

Studholme 12 - pointed comments

DB pointedly comments:

Studholme got moved from the garage into the basement yesterday, and this was quite easy, even with the legs extended, because each module is really light.

One of the last remaining tasks to be done on the 'northern end' before the fun can start, is sorting out the three 'mainline' turnouts. As discussed in a previous episode, the odds and sods points in the yard are as-is Peco points, sometimes operated with manual-remote pushrods, some just with your fingers.

But in an attempt to make the mainline ones more reliable, I have DCC-friendlied them. This is a bit of a misnomer, as they will still make DCC freak out if you travel too far off a siding into a set that aren't set for you, but it prevents metal wheels shorting out between the main outside rails, the closure rails, switch blades and frogs that might be at different polarities.  It also ensures there is a really positive feed of power into the frog, whereas with the standard Peco setup, this depends on the point blades being clean and making good contact with the outer rails. Sometimes that cleanliness can be upset by ballast and glue, and dust and general gunge. Whatever that is.

This process can be done several ways, but I :

1. Cut the inner rails to isolate the frog from the points blades.

2. Linked the 'points' ends of these to the adjacent main outer rails (so the points blades will always have the same polarity as the outers next to them)

3. Feed the frog (and the frog-end of the inner rails) with the appropriate polarity depending on whether the turnout is set for 'normal' straight-on running or 'reverse' for the curved track.

Cutting the rails was done using a jewellers saw (incredible things.... I got mine from the same place King Druff did many years earlier). Wiring was done with what looks like a blowtorch. This was actually done almost a year ago, and I've since procured a less-agricultural soldering iron, one that actually has a pointy tip! Below, plastic has been removed with a razor saw, with the joins about to be welded in:


The frog power feed comes from a SPDT switch - I bought a dozen of them from the local Jaycar and drilled them out to accept some piano wire. This way, when you move the switch, it puts the right polarity into the frog, and it also physically moves the point blades via the piano wire.
The piano wire for the first turnout was formed in a clever manner to sit alongside the ballast and under the turnout in a slot- I'm not sure if this was a good idea or not - the others are routed under the 'baseboards' and simply have a vertical bend that sticks up through the hole in the Peco throwbar.

Slots for the piano wire in place, and also for the power feed to the frog before sticking down the turnout:


You do need to enclose the piano wire into something (plastic tubing is ideal) that is attached to the layout or the wire will flex when pushed and might not move the points. And here a bit of foamboard  baseboard stuck on top:
To fill in gaps where sleepers have been cut off to take rail joiners, the sleeper offcuts were cut into 'ends' and middles' ...

and badly glued in the middle and outside the rails to tidy things up, otherwise these missing sleepers can look a bit naff.

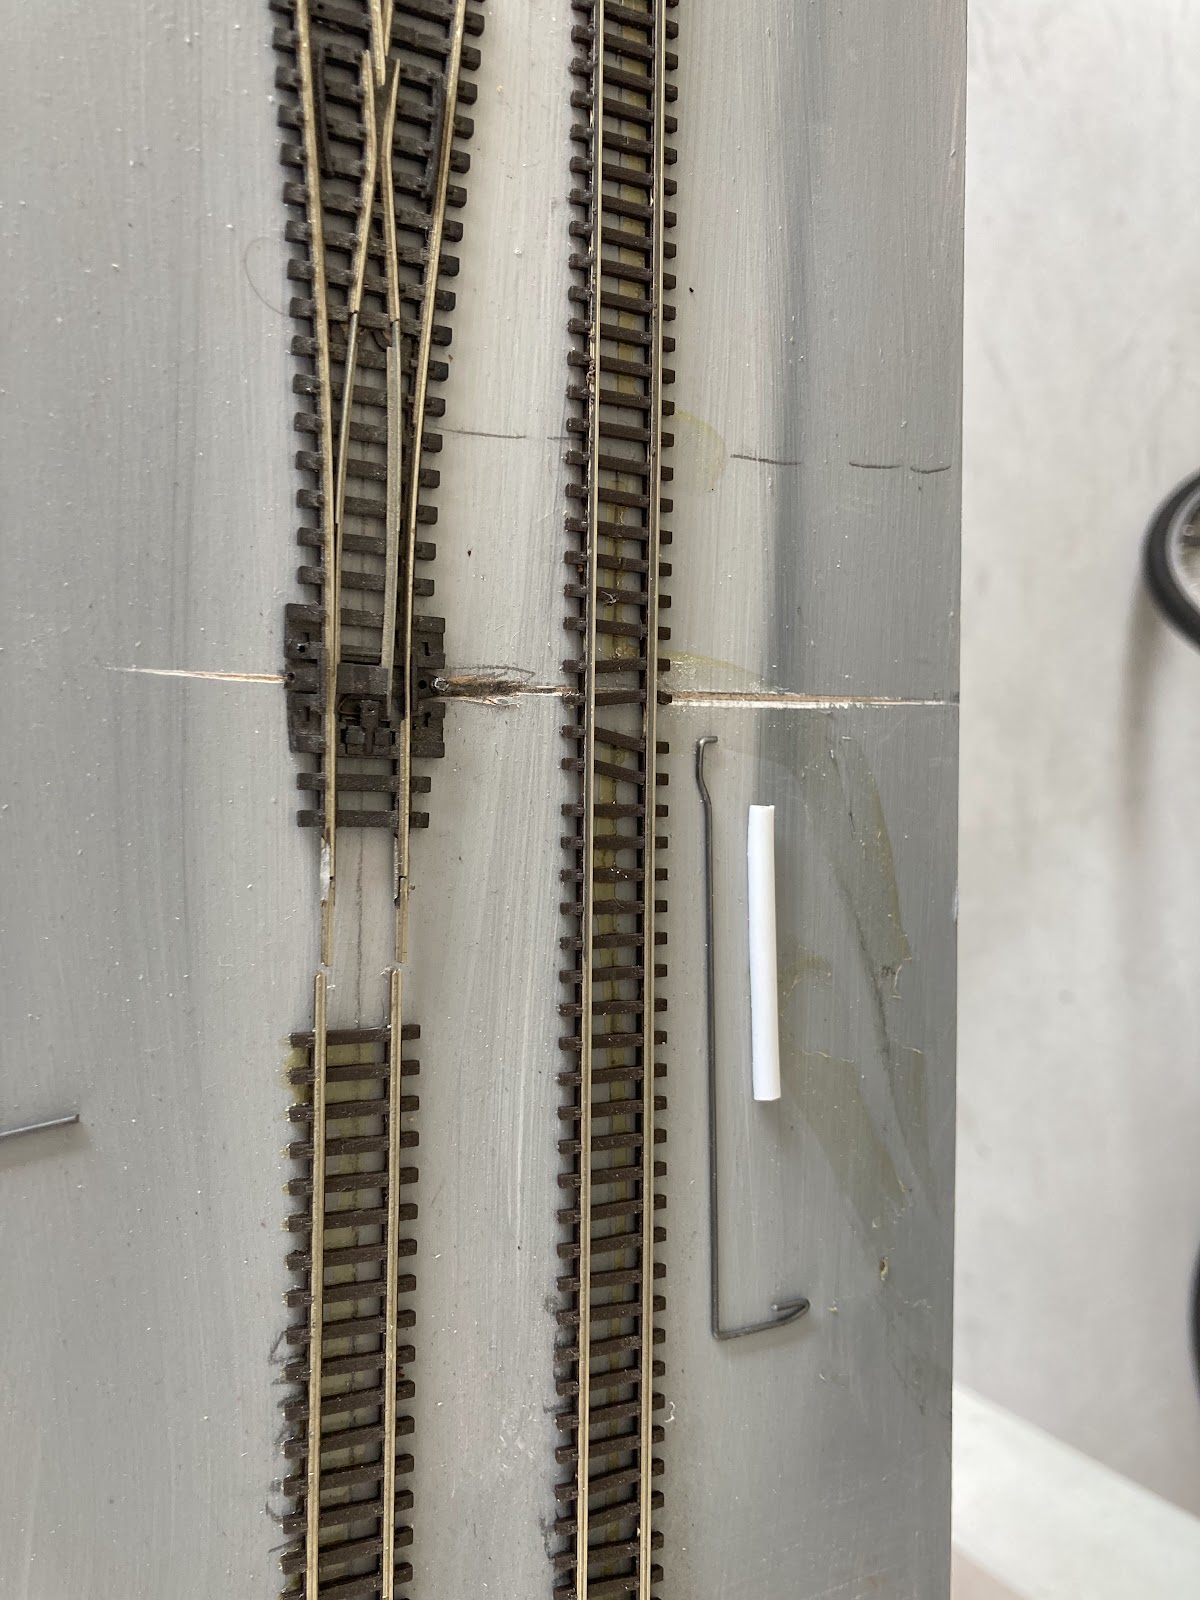
So that was the first mainline turnout done, for the next two, the pushrods were simply routed under the layout - below are two switches with their bits of piano wire which are disappearing into a plastic tube:


Ignore all the setting glue there...  And below, the piano wire emerges straight up at the points end, here before the excess wire was trimmed off the top:

In between the switches and turnouts, the wire is held in plastic tube. This has a slightly unusual routing arrangement:


As I had fixed the Peco turnouts in place (because the track centrelines had to be located 'right there'), and also fixed the SPDT switches in place (because they had to be attached to the solid wooden edges of the modules), the actuating wire between them has to be just the right length to operate the points properly. 

Bending the stiff wire perfectly is quite hard to do after the fact, so my wires were both slightly too long for the switch to operate the points in both positions. The solution was to 'make the wire shorter' by having it travel further, hence the little bits of glued plastic forcing the tubes down and taking up some of the slack. These little spacers of of white plastic were done with trial and error (mainly error) underneath the baseboards until the points operated nicely in both normal and reverse positions up top.

Monday, December 16, 2024

The 3-6 ZA Wagon


 DB says:

As soon as Mr Holden's 3-foot-6 Emporium listed the ZA wagon a year ago, I snapped up a pair, but they have sat in my pile of yet-to-be-started projects on the bench since.

These are perhaps the best 3D prints I have received. 

I'm usually a fettler and adjuster when it comes to procured items, but for this I basically applied some paint and stuck some bogies under it. 


Two sections of the below-the-belt trusses were a bit wobbly, so they got replaced. There was also some bowing of the sides in places, so on this, I've tried simply gluing a plate across the bottom to see if that holds things together, clamped while setting. I also buzzed off the underends to give space for the couplers attached to the Microtrains bogies.

Nicely proportioned, this, and some great detail in the roof and side ribs. 


I added the little white door handles (six per side) to add a little spice, and the yellow plate for the numbers. Note the quite accurate (to my eye) variations in the roof and door ribs, door detail, and detail below the bottom door rails too. There is a little strata visible under the scanning electron microscope, but its not noticeable from normal viewing distances.


Few dramas here. It will probably need a little weight, and a some weathering will come.

If you were ever wanting to get a 3d print, this should be it, firstly the detail is great, secondly these wagons were all over the place from the mid 70s until the early 2000s, and lastly, these are almost impossible to make convincingly yourself!

Updated with some weathering and numbers:


And a further update from the scary closeups department after some little white bits were added on the on the upper door chain tubes and the big V shaped door alignment stripes (done with a ruler and a Derwent white pastel pencil). Must get a yellow one of those. Plus another layer of Dullcote for good measure.


Sunday, December 15, 2024

Little Coal Wagons - LCs 2

 DB continues from last time:


After painting the 10 new LCs brown, all manner of weathering was applied with various colours and shades of washes.  The intent being to make the 10 wagons look 'uniform but all different'. Some a little redder, a few a little yellower, a few a little greyer, a few a little blacker and so on. A few patches of fresh repair paint here and there, a few blobs of rust, and so on. Where the effects were a bit strong, I went back and mellowed it a little. I may do more of that, and will dullcote the whole lot to take any remaining sheen off.

Something I forgot to mention yesterday is that these Trackgang LC side and end castings are just superb. Fine, crisp detail without any casting flaws and no noticeable flash. Whoever made these masters deserves some quiet applause. Next time I'll get Russell to assemble them for me  :)

As a finishing touch, black patches for 'Lyttelton Coal Traffic' stencilling were added above the yellow number patches on the new LC wagons, most of my other 'nice' LCs (a few can remain in a general goods train or join the coal train if needed) and all my 'less-nice' old scungy castings. Those ugly old fellas are a bit sub-par, but smuggling a few of them into a long train to make up numbers might not be noticed. And they're a bit of NZ120 history! 

Annoyingly, I went through a few photo books after painting the black squares, and found that those  'Lyttelton Coal Traffic' patches are probably a bit 'late 80s' for my liking, and not all the wagons on the trains had them anyway! D'oh.  So I painted over the patches on two of the new wagons and some of the old ones with body colour brown. 

As I don't have the ability to print white on my Alps printer at the moment, I made up a simple spreadsheet like so and printed it on white decal paper with a laser printer: 


This came out better than expected, and once I had my production line process sorted, it was quite therapeutic to add these decals to about 20 wagons. If there was any white showing at the cut edges of the decals it was touched up with black paint later on.

Then a set of wagon numbers was made up for the new wagons (and a ton of my old wagons) and printed on clear decal sheet. Most of these are actually real TMS numbers, but some were made up - its not as if I can read them unaided anyway!


To clarify, I can read, I just can't see.

And as an aside, here is a comparison of various sample LC models I have, starting with three embarassing survivors of the old bog casting factory from about 1992. For some reason I've hung onto about 15 of these well-travelled models. The masters were made with plastic sides and stripwood for the bodyside ribs, as this was before Plastruct rods were freely available. The four (very subtle, barely visible) 'bumps' on the sides (for internal rope lashing on the prototypes) were blobs of PVA! I made two masters as the first RTV mould broke up after a while, and the second one had integral little rectangular knobs underneath to hold the Peco couplers down. Note the bottom model in the pic is on a stretched 10-foot Peco chassis, the middle one on a Fleishman chassis with unusual metal wheels, and the top one on the usual 15-foot Peco. The Flashfix bondo bog stuff was often hard to get into the nooks and crannies of the rubber moulds and bits have broken off in the subsequent 30 years. Rather than being a 'proper' two piece mould, I remember forcing triangular pieces of rubber down into the top of the poured Flashfix to 'remove' material from inside the walls where I wanted the coal to be. Fortunately, the bog was easy to carve as it went off, so one could further thin the walls and open up that space for the coal. As usual, the two foot rule (perhaps even extended to "nobody should look at these from less than a four foot radius), will be vigorously enforced...

Next up below are two similar but different models, and I'm not sure where they came from. Note that the lower one doesn't have the lashing bumps, and its a very crisp casting. They might have been purchased from Rod Murgatroyd, or Rhys, or was it Cross Creek that made a few tops? The one that I've added a ridgepole to is modelled as an LB, with spoked wheels stolen from a 10-foot Peco chassis. Technically its the only one that can legally have the round Peco axlebox, although some LCs received roller bearings in their later years.  The door detail is nicely done on this, but the oversized lumps on the sides are a bit hard to decal and paint around. Maybe I even made these myself. I must go back through the blog as a memory stirrer.

And then three-foot-six 3D prints, some of the details being more chunky in nature, but being one piece, they certainly go together easily! The top one has a strata line, and the lower one I've (incorrectly!) modified the upper doors. I must check these, but I think I removed some underframe/sill material to have the tops sit lower on the Peco chassis. 

And lastly six of the ten "new" Trackgang bodies on Peco chassis that this series of postings is about. Nice fine crisp detail. 


Next we will give them a shot of Dulcote, add a few little details and, plop some coal in.

Saturday, December 14, 2024

Little coal wagons - LCs

 DB says:

Back in the Otaki to Cass era, Rhys and I had a really cool four wheeled coal train of about 35 LCs. These were all cast jobs, with mine being a little rough to say the least, being my first foray into casting with automotive bog and homemade masters and RTV moulds.  I still have about 15 of these somewhat embarrassing specimens that are almost 35 years old now. Of course, back then, the CB hoppers were only a few years old, so the long trains of little four wheelers were still fresh in the mind and pretty groovy. And they still are.

Some months ago, I noticed that Russell Trackgang had some LC tops available, so I bought 10 for a very reasonable price. These have sat in my pile of unstarted projects for many months, but in early October we had a big rainstorm that necessitated a round-the-clock flood watch in the basement,  so I decided to knock these together.  While I'd always planned to just have a few highsiders to put into an 80s goods train, the idea of a west coast coal train raised its head. 

With my poor history of assembling whitemetal models, I decided to be clever this time by sticking a side and an end together with 'superglue gel' around a 90 degree wooden end, then I'd simply link these pairs up. Pretty soon I had all twenty corners assembled with minimal fuss. Unfortunately only about two were actually at 90 degrees, so when I stuck them together, 90% of the them were wonky. Many were broken apart and reset, many ended up as four sides on the floor or stuck to fingers. I eventually got them together.

Then I found upon returning to the project that most of these had badly meeting corners, or were rhomboid in shape, or didn't have parallel walls, or did not sit flat, so I was only able to put a floor and chassis into one of the 10!

The others got broken apart, cleaned of glue, and a new strategy attempted, whereby I cut a set of plastic floors to size, then glued a side to this it at 90 degrees, then an end (usually finding my side wasn't at 90 degrees when finding the end would go on crooked) but I eventually managed to encircle the floors with sides and ends. This took about two months of periodic effort, with pauses to replenish my swear words reservoir and unstick fingers, walls, and regain mental composure after 'completed' tops would collapse in a pile of superglue while tweaking them.

Eventually all 10 were assembled and reinforced with contact glue (woohoo!) , and Peco underframes were prepared. You'll note that the floors are relatively high up - after looking at a few prototype pics and a plan, I think its a flaw of most of my previous models that the wagon tops don't sit low enough on the chassis.

One wagon was prepared to go next to the locos by having a Microtrains coupler:


Time for some primer:


And some paint. After a visit to the local bike shop to see what they had in stock I settled on the reddish-brown Tamiya XF-9 Hull Red as the base colour. 


Tuesday, December 10, 2024

Studholme 11 - more trackwork

 DB says:

'The schedule' allowed a few hours back on the Studholme modules today. 

It has now been more than a year since I started this, further cementing the blog's status as holder of the Guinness record for longest-average-elapsed-time module builds (thanks also to Paekakariki and Waihao Forks). Clearly long gone are those youthful days of blitzkrieging up a module in a week.

Its been a warm 10 days down here on The Mainland, and a kink revealed itself upon my arrival. Half a mm of rail was taken out of that track and the thing reconnected. All the other tracks seem fine, as a little space was allowed for this in the rail joints.

Some manual point controls have been added to the points on the Waimate Branch (backdrop) side of the layout. 

The three 'mainline' points at either end of the module set will be the most used, so are being made DCC friendly (whatever that means) and each is controlled by a slide switch discretely mounted at the side of the layout, via piano wire.

The four other points on the branch side are 'as-is' Peco points, controlled by more of this chunky piano wire and covered with some oversized tubing in a most agricultural fashion. speaking of agricultural, I see the code 55 Waimate Junction Y here still has some code 80 tails soldered onto it from its last use! They remain in place as the only code 80 on the modules!!
The three points on the other side (east side with access to the goods shed and fruit siding) are as-is with no remote control at this stage. I doubt they'll be used much, but if they are, I suppose I could work them with some actuating wire under the module.

So track has today been fixed down right up to the three south end mainline points, which I still need to make DCC-friendly. The coal/seed siding was also spaced further out as it looked a little close to the others. Darryl P suggested extending the coal/seed siding to serve stockyards there, which might be feasible. I certainly want to have the Studholme Hotel modelled as a flat, and the stockyards should/could be to the south of this, and a good way of fitting something small into the thin gap between the branch's curved point and the backdrop. We shall see.

The 2010s-era 17-wagon coal train was laid out on the loop to check sizing. As predicted, the loop is about 10cm short, so I'll have to drop a wagon if I want the train completely ensconced, although a train this length would be fine in reality, as it's in and clear clear of the mainline for crossings, and an oncoming shorter train can safely run into the siding (closer to the camera in the pic above), although some shuffling of the coalie for-and-aft might be required to let the shorter train out. In hindsight I should have positioned the mainline points out closer to the ends of the module set, but its a bit hard to move them now.

Friday, November 15, 2024

Studholme 10 - Cutting the cords.

DB follows on after a pause - this post has been in draft form, occasionally appended to, for the past six weeks. 

The Studholme module build has been a bit drawn out and higglety pigglety with all manner of things occurring out of the ideal sequence. Here is an attempt to get things back into a more sensible order of operations.  

Its always a good idea to paint the trackbed/scenery so if any ballast falls off there won't be white primer showing through from underneath, so this was done, as was filling in the remaining holes in the baseboard framing with foamboard. 


After these pictures, the track centrelines, obliterated by that recent application of grey paint, were redrawn.  

So finally things are at the state they should have been before any track was laid many months ago! Now feels like a good time to put down more track and start soldering it down across the PCB joins. 

As the old bomb disposal line goes: "Cut the green wire...." Snip. "But first, cut the red wire." A clever tip I picked up from somewhere was to loosen the module joining nuts a little, then place a very thin sliver of cardboard or plastic between the modules and loosely tighten everything up before the track is soldered down and cut. Then after cutting, remove the card and tighten things up to remove the Dremel-cutting-wheel-sized gap between the rail ends left from making the track cut. 

Its also quite hard to cut the track vertical because the Dremel's fat motor body is a much larger diameter than the cutting wheel. You are often left with a V shaped cut. 

Fortunately, the second-hand Dremel that I have (its a Fuller one actually) came with one of those flexi shaft extenders which has a thin endpiece you hold onto, so this makes it a little easier. 


Other approaches: 

I suppose a jeweller's saw could be used if you had the track up on a decent embankment or a really thin wooden module end.

You could also simply butt cut sections of track together and stick them down, but I figured with my module mounting pins providing a reliable location during module mating (ooo, err), tracks that are soldered across the join before cutting should all line up perfectly every time. 


As an aside, a few subtle changes and liberties have been taken with the Studholme track plan for 'model operational' reasons.

The real place had, to the east side (to the 'right' of the picture below), a main, loop, goods loop/shed road, and a loop around that goods shed that I remember being used for fresh fruit. The Froot Loop as American cereal makers might say.

On the model, I've decided to move the goods shed 'east' one track, so that gives me a main, loop, another loop, and then the goods shed. That means I'll be able to practically have four decent sized trains crossing here (including the west 'island loop')without having to run through the goods shed (which was previously, per prototype, on the long eastern goods loop) or loop around the fruit track.  I've left one stub siding in to represent that fruit track, so a Z could be parked there. I doubt that this or the goods shed little loop would ever be used much in operations, but they do have reasonable large radius points for looks.


I made some subtle changes to my plans for the west (left) side too, with a siding that will have the wagon turntable into a seed store, and the coal merchant. This leaves a runaround loop beside the island platform for Waimate branch operations. I've also included electrical breaks so the 'Waimate branch' can be run using the DCC controllers being used for the rest of the layout, or by a separate (perhaps DC) controller. The track on the west side has two switchable and isolatable 'blocks' ... so... 
  • the island loop can be used by the main DCC feed for mainline crossings, while a branchline train comes into the runaround loop. 
  • or the whole island loop (right down to the far end) can be used for a Waimate branch train to come in, run around and shunt (including accessing the near end of the island loop)
  • or a mainline DCC goods could drop off wagons into the far tail of the island line for the Branch loco to pick up.
  • or the whole thing could be run by the DCC controller so that a mainline train could shunt the coal/seed siding.
I did consider having another point off the waimate branch to serve the stock yards, but decided against putting another point there. There's not much room, but perhaps a few fake rails might be laid in the grass there and a sheep wagon plopped on them.

Seen from the other (north) end:

So there we have it. Some progress at last. 

Next, some more work on the points (three mainline points still need to be attached at the south end, plus the Waimate branch Y and curved point), some wiring, and after that (finally) the fun can start.