Thursday, February 09, 2012

Lets go shopping....

(With apologies to Steve Parr...)

Armless Fet writes:

So, more non-modelling speak from the armless one. Things are definitely getting better in the rehab stakes, but I'm having enough trouble holding pens at the moment to even think of tools yet, which is a bit aggravating. Still, I'm well known and dis-respected as an Armchair Modeller, so I shall revert back to what I know best....

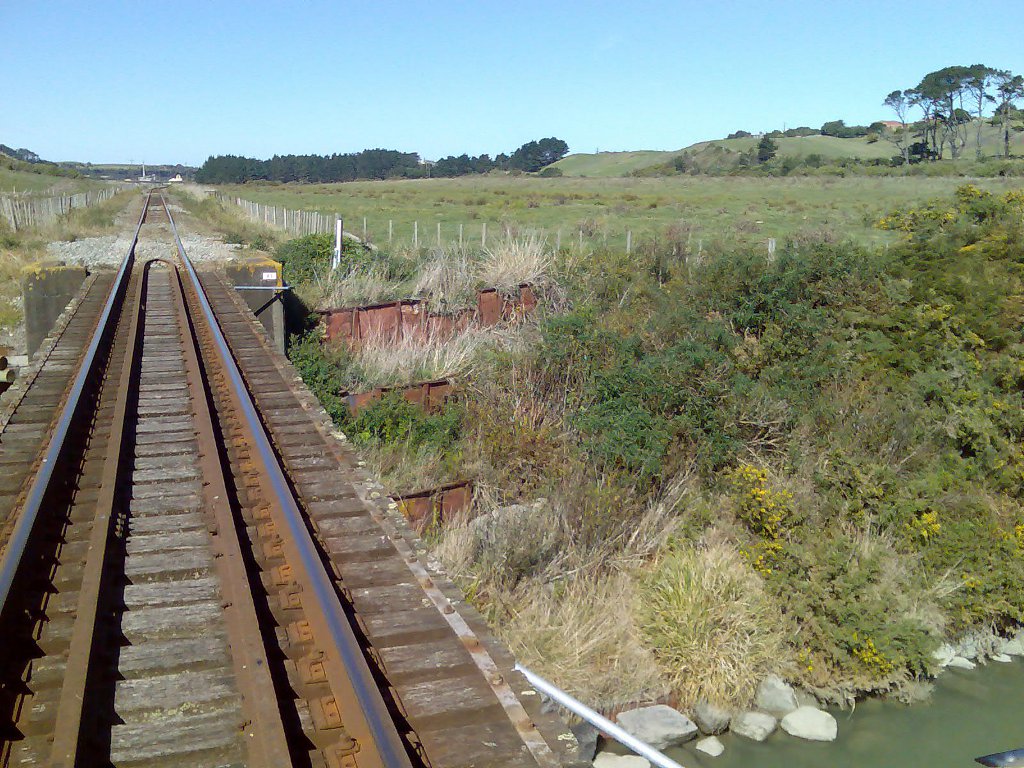
I dont know if I've mentioned it here before, but another favourite scene on the line to Whareroa is Bridge 41 to the north of Patea. Nothing overly special, but neat still the same.


I was thinking that it would be easy to model using some cheap proprietry kit from Atlas or someone else, but everything I looked at didnt quite give the same effect, mainly due to the construction of the girders.


(About now someone in the peanut gallery will pipe up with "Oh, its a Pratt-Mclaren Through overhead reversal truss bridge with titanium linking pins"....well done to those in the know, I honestly have no idea)

So disatisfied, the project was shunted into the dark recesses of my mind while I filled in my days with learning to be left handed...

This evening I was looking through some of Joe Fugates "Model Railroad Hobbyist" PDF's....I seem to keep downloading them, although I'm not sure why...the miss to hit ratio at the moment is horrendously unbalanced. Anyway, an article caught my eye featuring a Central Valley Model Works kit of a through truss bridge in HO scale. Now this looked just the ticket! I wonder if they do it in N? ....They DO!


Sure, it is slightly short, but at 30 odd US Smackers its not bad at all. I did wonder if our 1:120 trains would be too big for it, but then decided that there is little difference between Yank 1:160 stock and our scale when placed side by side, so all should be well.


And as an added bonus, some of those highly questionable Lc castings that have been hoarded since the 90's might finally get a use as well...


Now, back to physio and those strength exercises....

Tuesday, February 07, 2012

Points scoring

Today, its time to look at the convention competitions.

The most important question is 'how does the scoring work'?

This get broken down into factors which are;

1) Skill. basically, how well did you put everything together. there are 2 subsections; scratchbuilt, in which 50% of the model is hand forged from raw metal which you have smelted yourself, and kit built, where you try to put together a model which someone else has half assedly designed. I'll make the note here about laser cut or RP models. If you have done all the work yourself then you should be able to (rightly) argue that it is scratchbuilt, and if someone else has dont the monkey work, then its a kit. The convention committee may disagree, but give me a yell and I would be happy to argue on the whole CAD scratchbuilding thing, as I think it will be quite entertaining to see just what the answers are. Oh, and this is worth 20 points.

2) Complexity. How hard/mad your build is (I think). An odd one as surely the skill is to minimise the complexity? 20 points.

3) Conformity (scratchbuilt) or fidelity/added detail (kit built). A pass on this one, as surely if it looks like the real thing its good enough? 20 points

4)Finish. doss it look like the real thing? 20 points.

5) For locos and self propelled 'stuff', there's 20 points for 'runnability', however that is determined.

So, points tally up to 80 or 100 depending on if your model can move on the application of ergs.

The colour of the medal/award you gtet is then based on the marks. If its >90% you get a gold with merit. 80 to 90% you get a gold, 75 to 80% a silver (a narrow target to hit?) and 50 to 75% a bronze. From my reading of the 2010 results you seem to get a bronze for turning up, so maybe the silver slot is a bit thin?

So, that's how the scoring appears to work (from reading the rules, which I'm reasonably good at given my background in wargaming). Next time I'll look at the categories that you can enter your models in.

Monday, February 06, 2012

Pottering

Finally spent some time out in the Man-sion yesterday. The main task was to check the track work (again) to see that everything was as good as it could get. 1431 did the honours running through all the points to see where the problems were. One in particular presented grave problems. One of the bogies lifted itself vertically almost to the point of derailing before crashing back onto the track. Not overly suitable. Everything appeared to be in gauge and as a last resort I rolled the loco over and checked the wheel gauge. all 3 were too narrow. A quick expand with the fingernails and everything was fine again (my fingernails are an important part of the tool kit you know. I think I could probably use them to set a cars points)

So, all the track now works tolerably well. Its going to severely limit guests though as its vital that the wheels are in gauge, and anything that is not will be found out.

I also did a wee bit of testing to check that the Cb and the railtruck would go round 6' radius curves (the Cb had previously, but the railtruck was an unknown quantity). The answer was yes, but the railtruck then refused to climb anything but the most gentle of grades. Bang goes my plans for a loop on the bush tram layout, or even a climb up a creek valley.

On another track, who is planning to go to the convention, and what are you all planning to bring along? I still have yet to hear if they want the layout, or any track making seminars (and I'd even do one on blogging if there was any interest). I daresay that there will be a special interest group meeting, but buggered if I know what we could discuss.

Saturday, February 04, 2012

Saturday morning

Well, its been a week since I blogged anything. There have been suggestions that I have been busy modeling and not wasting time on the Wibbly Wobbly Wooo.

Instead, I've been reading military histories, which I have not done in a long time. Oh, and trying to think about ways to solve problems at work (chemistry problems, not 'why am I working here' problems). I painted 4 N scale figures to see how they came out (a British 19th century layout lurks somewhere at the back of my mind) and had another look at my 9V jump controllers (which still don't seem to make sense, but I'll see if someone else can solve that).

So, in short nothing useful.

I did some more looking into 4'6"wheels (prompted by Cabbage). It was pointed out that the 3mm society does 11mm 12 spoked wheels (well, it was listed that it existed) but there is no list on their website of what they actually sell. I could ascertain that the wheel standards fit the NMRA ones, but that was it. There is also a shop listed to sell 3mm stuff. Several e-mails later the shops says 'I don't sell them' which was bloody odd considering that they were listed them in the first place. A question on RMweb then lead to a reply 'why don't you join the 3mm society and buy them. Oh and you could model in 3mm scale and on 10.5mm track'. Grrrrr....
So, I could join the society (25 quid) on the off chance they will be able to sell me what I want (which I'm still not sure about anyway) when I don't want anything else from them (well I might, but they don't have a list online so how can I tell?). Its all a bit frustrating really.

Maybe if I win Lotto....

Wednesday, February 01, 2012

Week off

Some of you may have wondered whats going on here at Schloss dandruff.

The answer is nothing, I'm just having a week of from blogging. Normal transmission may well be resumed next week.

Saturday, January 28, 2012

Book review; 1950's steam in colour

I was lucky enough to get hold of a copy of this book at much less than cost price off Trademe a couple of weeks ago. Now Derek Cross needs no introduction (fortunately) as a photographer of a railway system long since gone, so I was very interested to see just what had shaken out of his collection.
The answer is, I'm not quite sure. Given that colour photography was in ifs infancy in the 1950's and you couldn't just change film etc, the photos themselves show just how good he was as a photographer by getting the best out of a very difficult medium. I think that the down side might be in the actual selection of pictures. Some are very nice and useful, but others are just odd (A picture of the band playing on the station platform at Glenhope during the 'last' train on the Nelson section? The only use would be to reveal how truly poor men's fashion and haircuts were in those long gone days. And I'm sure that its Danial Craig smoking a cigarette wearing a trench coat on the platform beside them). There is also two of a branch line train on the causeway at Riverton. The same train at virtually the same shot, and both 3/4 views. Was there nothing else left in the box?

Overall I'll have to give this a 'Not quite there' quite honestly. There are not quite enough useful shots to give a man modeling ideas. If you can pick it up cheap, all well and good but there are other Steam era books I would buy before this one.

Thursday, January 26, 2012

BR4 - DIY Cardboard Recycling

DB says with greenliness:

The Broken River blob* continues its pathetic treck forward.

On Saturday I undercoated the area of the backdrop that was expected to be visible above the mountains and then followed that up with some 'Utah Sky'. Alas there were no 'Avoca Sky' test pots left in stock at the local hardware store. Close enough for a base I feel.

The next step was to put in some landforms so it will look like we're making some progress here. My intention was to use some of the various bits of NZ wire netting that have been under various layouts since the Casseolithic period becasue I like the way you can cut shape and fiddle with the stuff in real time to get the terrain you want. Unfortunately while this has always worked fine in the past for larger hills, on these small narrow cliffsides it was just making me grumpy, so I thought I'd give that cardboard lattice trick a try. Strangely enough, I don't think I've ever done this before.

A quick raid on the recycling bin uncovered some corrugated cardboad boxes and some lighter manila folders that might do the trick. These were cut up into strips approx 2cm wide.

The electric glue gun (what a marvellous invention) was then fired up and I quickly started sticking vertical mountain bones on, with the odd horizontal bit weaved in for good measure near the cliff top although I'm not sure they really added much value.

After some strips of the thin card were placed on the tracks to protect them from drippage, the hardshell went on. This job used to be pretty messy before before that Woodland Scenics plaster cloth of unknown flamability entered the market.

Suddenly things are starting to look partially half-arsed. I would have liked the cliffside to be taller, so I might nudge the track closer to the edge at the left side of the centre tunnel to allow that.
*bloody layout operational block