


Something I came across in my hunts is something from American Lance Mindheim. While he has some decidedly odd views on some things, there is no doubt that he knows what he is talking about when it comes to model making and building layouts. This passage from his blog made a lot of sense, and is something that most of us can aim for.
'Here's where I'm going with all of this. For many of us, consideration should be given to layouts with shorter life spans, say three to five years. By keeping the layout size and complexity manageable, we can get it up and running quickly, flog every ounce of fun out of it, and then move on to a new and exciting theme. Such an approach will keep us energized and excited. Shorter term layouts will be put together with a more consistent look because they represent a narrower band of our skills progression. Turnouts, trees, bench work, and electronics can generally be salvaged keeping the cost down. To be clear, I'm not talking about getting two months into a layout and then constantly changing your mind and never getting anything up and going. I'm talking about driving a manageable model railroad purposely towards completion in a medium time span, and then re-stoking the fires with a new project.'
This is something that does make sense to me. there are nights when I look at the monstrosity and wonder ' just WTF were you thinking'. It does tend to go but I still wonder what I could be achieveing in the way of smaller layouts. The flip side is that there are some things that I woudl never have attempted on a smaller layout.
Tuesday, July 12, 2011


Monday, July 11, 2011
Even leggier
This weekend I toddled off to buy the various wood for another trestle and beam setup. Not boring you with the details this time around, so lest just say that everything went swimmingly. I also took the opportunity to shorten the legs by 10cm to get the rail height down to 120cm from the floor. The photo shows the result.
 This is a far more comfortable height for my back. It is also surprisingly stable. I now just have to sort out where the bits that formerly lived under the layout will move too. The big problem will be the 2nd desk i have out in the Man-sion.
So, this is how its all held together.

The beams between the trestle drop into place on the inner side of the hinges. The modules then sit on top. The whole thing can be put together in less than 5 minutes.
 This is a far more comfortable height for my back. It is also surprisingly stable. I now just have to sort out where the bits that formerly lived under the layout will move too. The big problem will be the 2nd desk i have out in the Man-sion.
So, this is how its all held together.
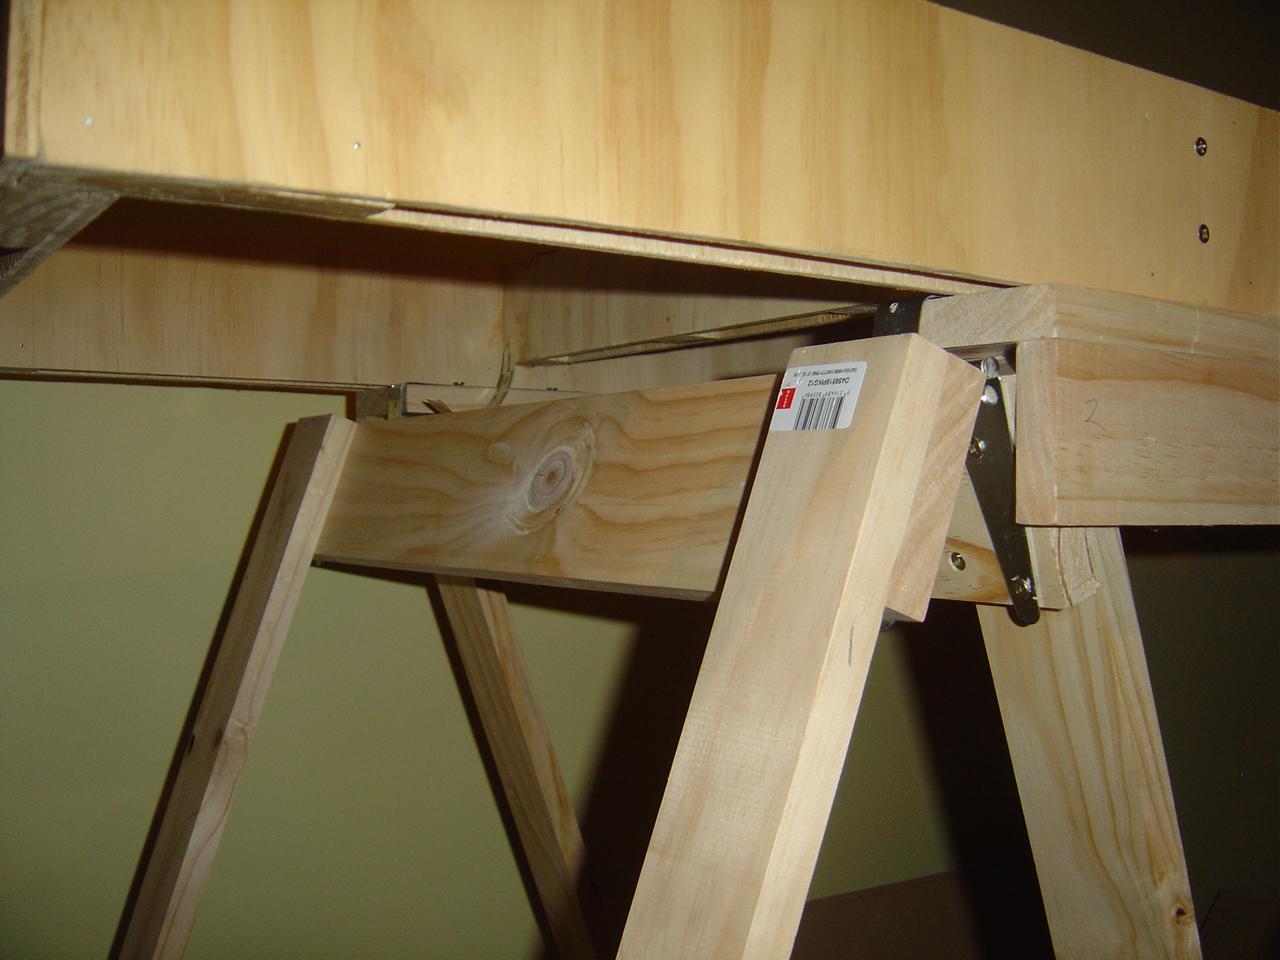
The beams between the trestle drop into place on the inner side of the hinges. The modules then sit on top. The whole thing can be put together in less than 5 minutes.
Sunday, July 10, 2011
Station time
Its been quite a while since we had a station track plan.
Today's offering is Ngapara, which has been covered before but not in plan form. This branchline featured in the September 2008 Railfan, so there are plenty of pictures around as well. the odd thing about this station is that it is split into 2 distinct pieces. At the eastern end (closest to Oamaru) we have the station.
 Note that the top loop was removed in the 1920's to leave just one, and there was a wagon turntable on the siding behind the station leading to the flour mill, which appears just under the wrinkle in the scan.
On the other side of the main road was the engine shed, turntable and livestock loading. Not included on these plans are the 2 railway houses below the loco depot that can be seen if you have a look on google earth.
I think that this station could be done quite nicely on a 6' by 9" board, or possibly expanding to 1' wide to do some extra scenicing
Today's offering is Ngapara, which has been covered before but not in plan form. This branchline featured in the September 2008 Railfan, so there are plenty of pictures around as well. the odd thing about this station is that it is split into 2 distinct pieces. At the eastern end (closest to Oamaru) we have the station.
 Note that the top loop was removed in the 1920's to leave just one, and there was a wagon turntable on the siding behind the station leading to the flour mill, which appears just under the wrinkle in the scan.
On the other side of the main road was the engine shed, turntable and livestock loading. Not included on these plans are the 2 railway houses below the loco depot that can be seen if you have a look on google earth.
I think that this station could be done quite nicely on a 6' by 9" board, or possibly expanding to 1' wide to do some extra scenicing
Saturday, July 09, 2011
Saturday morning
Just continuing the run of original titles.
In my brains Friday afternoons wanderings I've been thinking about layout sizes. More exactly the question is; 'What does everyone think that a good small layout size is?"
In my thinking, and in the process of working on a large layout my current thinking for a reasonable size layout would be about 4' by 1' for a 'first' layout (that would be 4' by 24' in S scale, or a 1/4 acre section in 9mm). I'm thinking in terms of a simple yard for shunting or just running some locos. I've been think about some simple plans but would like to see what everyone else's thoughts are/
As a short note, I ordered 2 cheapy DCC decoders from Southern Digital last weekend, and while the lady of the house has now spotted the bill, its only NZ$40 which is ridiculously cheap (just as a note they are the Digitrax DN-135 which is a base 2 function decoder). I don't think I could buy 1 decoder in this country for that price. Its just going to be a huge challenge to fit a decoder into a the Kato Mikado chassis under the Ed's.
In my brains Friday afternoons wanderings I've been thinking about layout sizes. More exactly the question is; 'What does everyone think that a good small layout size is?"
In my thinking, and in the process of working on a large layout my current thinking for a reasonable size layout would be about 4' by 1' for a 'first' layout (that would be 4' by 24' in S scale, or a 1/4 acre section in 9mm). I'm thinking in terms of a simple yard for shunting or just running some locos. I've been think about some simple plans but would like to see what everyone else's thoughts are/
As a short note, I ordered 2 cheapy DCC decoders from Southern Digital last weekend, and while the lady of the house has now spotted the bill, its only NZ$40 which is ridiculously cheap (just as a note they are the Digitrax DN-135 which is a base 2 function decoder). I don't think I could buy 1 decoder in this country for that price. Its just going to be a huge challenge to fit a decoder into a the Kato Mikado chassis under the Ed's.
Friday, July 08, 2011
Friday night
Well its the end of the week again. As with any Friday at work, I've been doing a bit of absent minded thinking while writing my weekly summary and planning next weeks experiments (its always good when the boss turns up at my office door and I can give him my next weeks plan).
This weekend promises to be an interesting one as the lady of the house is working both days. Thus the scene is ripe for a prolonged session in the Man-sion. so I thought i would do some thinking about some of the projects that I could be doing.
-Another set of legs to support the 3rd module.
-Have another look at the Ew mech to see whats next.
-more track work.
OK so the last 2 would involve saw blades which I don't have. That sort of makes it easy then
This weekend promises to be an interesting one as the lady of the house is working both days. Thus the scene is ripe for a prolonged session in the Man-sion. so I thought i would do some thinking about some of the projects that I could be doing.
-Another set of legs to support the 3rd module.
-Have another look at the Ew mech to see whats next.
-more track work.
OK so the last 2 would involve saw blades which I don't have. That sort of makes it easy then
Wednesday, July 06, 2011
Answers to Questions
Sorry its taken a while.
last post Nick asked if it would be possible to make a Heisler on this mech.
Unfortunately the answer is no, having consulted various Railfans. The main problem is the way the model is built frame wise. For that matter I think a Price Cb is about the only thing you could make with it. I have acquired the journal with the collection of Price bush loco plans (possibly the tattiest Journal in existence) and about the only other loco that could possibly be made would be the Ar.
The main problems are that the leading bogie has 2 pickup tags that stick up, and that the chassis is built around the 2 side bars with the motor dropping in between them. The first has to be hidden in side tanks, and the second in a cab rather than a narrow bush loco boiler
I've been doing some more detail work on the Cb tonight, and also having a drive and its a loverly runner.
( I've also been cleaning the Man-sion, but that's not really of much interest to you all out there).
last post Nick asked if it would be possible to make a Heisler on this mech.
Unfortunately the answer is no, having consulted various Railfans. The main problem is the way the model is built frame wise. For that matter I think a Price Cb is about the only thing you could make with it. I have acquired the journal with the collection of Price bush loco plans (possibly the tattiest Journal in existence) and about the only other loco that could possibly be made would be the Ar.
The main problems are that the leading bogie has 2 pickup tags that stick up, and that the chassis is built around the 2 side bars with the motor dropping in between them. The first has to be hidden in side tanks, and the second in a cab rather than a narrow bush loco boiler
I've been doing some more detail work on the Cb tonight, and also having a drive and its a loverly runner.
( I've also been cleaning the Man-sion, but that's not really of much interest to you all out there).
Saturday, July 02, 2011
New legs
Today's project takes us back into the murky realms of woodwork. Now my skills or lack thereof have been well documented over the years, but its never stopped me. The layout has been in need of a better set of pins for quite a while, but it came to a head one night last week when it almost fell over while I was lifting modules off and on. It was time for something new, and I've gone for something a bit left field. Its an adaption of an Ian Rice invention called a 'Ulysses', which i think is some daft acronym for a universal layout supporter (kind of like a wooden jockstrap). Basically it has wooden beams mounted between trestles, with some metal tabs to hold it all together. its designed to set up and take down quick at exhibitions. so after a trip to Bunnings we have all the bits we need.
 'Wow, not just firewood'
Now at this point I could go on about how everything just fell together and it was all unicorns and rainbows, but real life doesn't work like that, so here instead is the true unadulterated version.
-Head out to garage to get started. go down the back to the Man-sion to get the power drills, measuring tapes etc.
-Go back to the house to get the key.
-Head out to garage to get started. go down the back to the Man-sion to get the power drills, measuring tapes etc.
-Take these to the garage.
-Go back to the house to get the car keys to unlock the car to get the wood out. the lady of the house asks just what the hell I'm doing?
-Remember that one of the drills is empty. Go back to the Man-sion to find the charger so that it is good for later.
-Finally get down to cutting some wood. Discover that other power drill is almost empty as well. Go back to the Man-sion to find the charger so that it is good for later.
-Discover I'm out of power drills.
-Discover I don't posses a posidrive screwdriver.
-Tea break time. Wonder if this is how builders do it?
after a suitable interval, head back out to the garage. The power drill is all charged.
-Put together bits of wood together and add screws. Everything seems to go ok apart from some wood splitting.
-Set the first legs up and discover that they rock (and not in the cool way). cut a small amount off the offending leg to get it to stand up.
-Repeat with second set of legs, again with the removal of excess legging.
-Make up supporting rails. Add the metal L pieces to the end that hold everything together. Mark which ends go on which legs.

-Move everything into the Man-sion. Disassemble layout and old legs. Put new legs in place.
-Wonder why support rails don't match markings.
-Rearrange legs to match markings.
-Put center module onto support rails.
-Wonder why I'm trying to mate 2 modules with the steel pins facing each other.
-reverse center module.
-Connect it all up. I think it will do.

It is quite high, about level with my armpit (wasn't that a good height?).
I might remove some of the legs to drop it down 6", but it is going to be much easier on my back. Its also much easier to get underneath to adjust things.
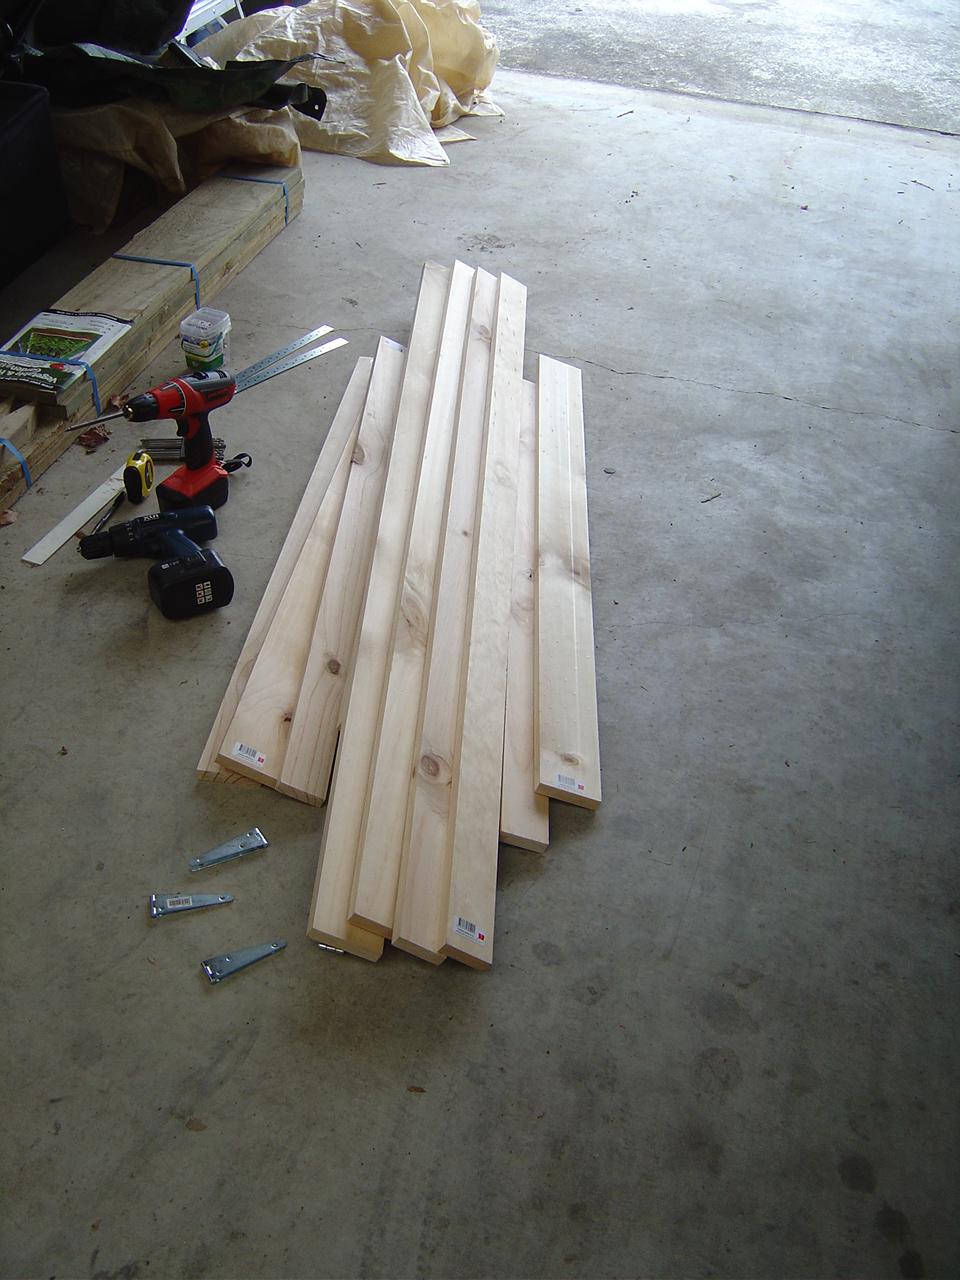 'Wow, not just firewood'
Now at this point I could go on about how everything just fell together and it was all unicorns and rainbows, but real life doesn't work like that, so here instead is the true unadulterated version.
-Head out to garage to get started. go down the back to the Man-sion to get the power drills, measuring tapes etc.
-Go back to the house to get the key.
-Head out to garage to get started. go down the back to the Man-sion to get the power drills, measuring tapes etc.
-Take these to the garage.
-Go back to the house to get the car keys to unlock the car to get the wood out. the lady of the house asks just what the hell I'm doing?
-Remember that one of the drills is empty. Go back to the Man-sion to find the charger so that it is good for later.
-Finally get down to cutting some wood. Discover that other power drill is almost empty as well. Go back to the Man-sion to find the charger so that it is good for later.
-Discover I'm out of power drills.
-Discover I don't posses a posidrive screwdriver.
-Tea break time. Wonder if this is how builders do it?
after a suitable interval, head back out to the garage. The power drill is all charged.
-Put together bits of wood together and add screws. Everything seems to go ok apart from some wood splitting.
-Set the first legs up and discover that they rock (and not in the cool way). cut a small amount off the offending leg to get it to stand up.
-Repeat with second set of legs, again with the removal of excess legging.
-Make up supporting rails. Add the metal L pieces to the end that hold everything together. Mark which ends go on which legs.

-Move everything into the Man-sion. Disassemble layout and old legs. Put new legs in place.
-Wonder why support rails don't match markings.
-Rearrange legs to match markings.
-Put center module onto support rails.
-Wonder why I'm trying to mate 2 modules with the steel pins facing each other.
-reverse center module.
-Connect it all up. I think it will do.

It is quite high, about level with my armpit (wasn't that a good height?).
I might remove some of the legs to drop it down 6", but it is going to be much easier on my back. Its also much easier to get underneath to adjust things.
Subscribe to:
Posts (Atom)