Tuesday, September 30, 2008

If you are shy..


I now have an E-mail address for you all to contact me. be warned that anything you say can (and probably will) be either taken out of context or used against you at a later date. Its just the kind of guy I am :v).
I'll be very up front now and say that I do not require a Russian bride, help in the bedroom (unless its vacuuming under the bed or finding space to fit stuff round my wife's shoes), nor am I interested in having $10 million in US dollars funneled through my bank account, Unless your name happens to be Treasury secretary Henry Paulson and you have US$700 billion that you and your buddies need a hand with moving out of your country, in which case just leave your phone number and I'll get back to you.

We all mess up

Second post tonight; whats the most embarrassing mistake you have made in your modeling career. I've already got some entries. my 2 are
-Talking about my Cass bank modules and how I found the inspiration for them in a book to someone who Kiwibonds later pointed out was Geoff Churchman, author of the book.
-While staying with my brother 'helping him with a 9mm Yb kit. prior to assembly we decided that it would be a good idea to paint it, and then bake the paint on ( with lead you can heat it to 200C after painting and the paint binds to the surface to the lead. its like modern roofing iron. however, the Von strap kits are white metal arn't they. The look in the oven after 10 minutes gave the great line 'looks a bit flat doesn't it'. No mistake there.

From another who shall remain nameless to protect the guilty;'I once superglued a Dx to my knee'(nearly fell off my chair at work :v).
Things like this require a fair slice of 'talent'

So who are you all then?

I've installed statcounter on the blog just to see how many people were checking in, since you lot give me sod all feedback apart from one or two. At the moment there's an average of 6 returning visitors and 4 new visitors a day. There's a stack from Auckland (which judging from the numbers should be a hotbed of NZ120 modeling), a sizable group from Oz, and then a smattering from all over the planet. I've been visited twice by the Googlebot. Oddest web search to turn me up; 'how to make chores more fun' all the way from Waukesha, Wisconsin (take a bow please). Apart from that I don't get much more info, other than that I can work out one or 2 of the overseas visitors.
I'll have to get a web e-mail address so the people can contact me without having to sign up to the site.

Monday, September 29, 2008

A different way of looking at things.

More from the most prolific NZ120 modeler on the planet currently (if you believe I'm incorrect, please provide photographic evidence and a blurb about what you have been doing).
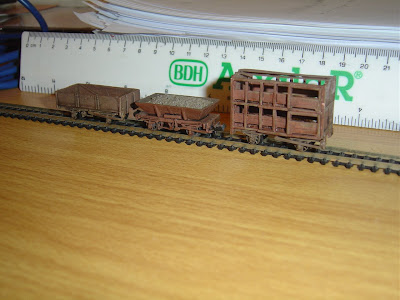
This time its an interesting take on modern wagons, and the paint schemes that they carry. These can be a bugger to paint, and its not a simple task to most of us to create a decal to match. However, with a camera and a bit of naked cunning, so very good results can be achieved.

"This week I discovered some pics taken at Westfield and printed out on a laser printer 10 years ago.

Better late than never, I cut some ¾ inch stick to size, and made the ends from corrugated (roofing) plasticard. The tops were thin plasticard. Paint for these bits was matched to the sides by trial and error. Although the sides of the containers look detailed in 3d they are obviously flat... and with the technology of the day they’re not of great resolution by today’s standards, but pass the 2 foot rule.

Problem was, when it came to make the UK, the wagon seemed about 5mm short. It looks like I scaled the printout to the correct height but not length… Still, they don’t look bad in a train and now armed with better technology I may rescan and reprint the pics. Bogies are some old MDCs with microtrains pizza cutter wheels as for once I don’t have any spare MT bogies lying around. The NC (or whatever) is plastic on brass on Peco."

Note that the photographed model in the middle looks better than the hand painted examples on either side.

I remember Karl Morris (and the walrus moustache, it must have been a 90's thing)doing something similar for GT car wagons, and sides of containers many years ago. They looked OK from a distance as well.

Tomorrow night, whats the most embarrassing thing you have done while modeling (names will be omitted to protect the guilty), and I'll reveal what statcounter tells me about my readers (and possibly the oddest web search hit you'll ever get).

Friday, September 26, 2008

Friday night pic

This from amateur fettler, fresh from a visit to the center of the south and over a bit (Timaru).
Its an unusual view of Kingston and shows how it could be used as a terminal station for a layout.


I'm not going to do a plan as its all rather self explanatory.

A Challenge

This interesting item wandered across my e-mail this morning while I was trying to look interested about black goo (the goo industry has been going well lately). Its an interesting challenge concept for the 2010 convention, and one that sparked my eye. I've tried to embed it, but failed so here it is in its entirety.

The A3 Modelling Competition.

This competition is designed as a bit of fun; it complements but does not supersede the NZAMRC competition and has a different aim. Whilst we will be happy to see the highest standards of scratch building equal weight will be placed on an out-of-the-box set up – what we are looking for here is for people to build something that they can be proud of, maybe use at their local train show and to enjoy themselves. It need not require a massive investment and should be complete in itself although it may be designed for incorporation in a larger layout at a later date. It is also an ideal opportunity to step outside your comfort zone and maybe try a new scale, period or country.

The rules are simple – to build a layout or diorama on an A3 footprint. We are looking for ingenuity here so if you can find a way of interpreting this other than as below please feel free to do so however the classic interpretation is:

A layout or diorama, excluding the support structure or any detachable parts when detached whose area (not shape note) does not exceed that of an A3 sheet of paper. If cassettes are used their area counts only when attached to the layout and only the deck of traversers or sector plates is counted in the area. There is no restriction on height, gauge, scale or period – that bit is up to you.

An A3 sheet of paper is 297 x 420mm – therefore a layout of 596 x 210mm is perfectly acceptable as is a circle of radius 199.25mm or any odd shape in between. If your layout has cassettes then these come from the total area when connected – this does mean that you may use a single cassette in multiple locations or multiple cassettes as long as they are not all connected if the total area exceeds that allowed.

Interpretation of the rules will be at the discretion of the organisers and the judge – our guest speaker – and their decision is final.

This is meant to be fun so there is no legalistic scoring system – inventiveness and atmosphere will be the deciding factor. The prizes will be awarded for best diorama, best working layout and the Speaker’s prize for ingenuity.

Inspiration:

http://www.wymann.info/ShuntingPuzzles/index.html
http://carendt.com/
Now this has got me interested in a number of ways. We are the only scale in this country with a decent sized following that could actually assemble a modular layout based on this concept, along the lines of http://www.t-trak.org/ but larger. Maybe this needs to be debated some.

Wednesday, September 24, 2008

The germ of an idea

Sifting the interweb thingy last week I came across this blog http://neag.2mm.org.uk/.
While it's not the right scale ( are any of the British scales right? Answers on the back of a postage stamp please.), I was impressed by the layout shown being assembled.


I think the child is optional


With a bit more thinking, this has developed into a fiendishly cunning plan for world domination. So cunning in fact that I'm expecting James Bond to appear at the ranch slider any time. Must get onto building that death ray out of plasticard and wood.
(Now, if it was Kiwibonds, I could distract him with a couple of bottles of Marlborough sauvignon blanc while I made my escape by bicycle as the submarine is still on back order).
I'll post some more about this idea once its more fully formed.

Tuesday, September 23, 2008

Less of the talk (Or 'stuff the plan, lets make something')

Kiwibond's rash of projects in the last couple of weeks have finally got me inspired to get started on some wagon projects. I've been guilty in the last month or so of doing too much navel gazing, thinking about how to make the (near) perfect wagon chassis etc. Sunday night I decided to stop worrying about things like that, and actually build something.
For my Paikakariki layout I need a model of the tank train that ran daily north from Wellington. I've decided to build 6 wagons. We now get the normal question. What sort, how big were they, where's the plan etc. Tossing aside such trivial concerns, the building commences. I purchased a piece of 18mm pine rod (3/4", funny how even though the countries been metric for 40 years, the old measurements just don't go away) from a local building shop. I worked out the length using a picture on the Online models website of a Uc14, which was close enough for my purposes.

From this we get a length of 176mm in S scale, which converts to 94mm, or 38' long. didn't quite sound right, so I rounded up to 40'(100mm, a nice round number). The tanks are a bit shorter, so I cut the rod to 90mm long. The ends were shaped with sandpaper using the Mk1 eyeball for prototype accuracy.


At this point I did a bit of work on the chassis, based on John Rappards Ub/Usl article and plan in the Dec 1990 issue of the local rag. The width should have been about 19mm, but I added a bit to make 20mm, as the tank is a bit over scale. I had a couple of Kato bogies off a Japanese tank car to use.


To get a correct deck height I then worked out I would need a 0.5mm deck, and 1.5mm glued below that on the outside.


The next problem is to mount the tank on the deck. The picture shows a large central cradle and 2 cradles over the bogie mounting points. After trying to sand a round hold in a 2mm piece of plastic and failing badly, I changed tack. The upper edges of the end cradles were marked, and the carefully sawn out. A piece of 2mm plasticard was cut to 2mm and then glued into the hole. This looked good untill I put the model on the track next to a Da and 50' Z15, which revealed that the whole thing was way too high.

Bugger!

The answer is to cut out the gap underneath the tank, which will lower the height by 1mm. this should be enough to fix it, but not tonight.

The last picture show the other 5 tanks on the workbench, waiting for their turn.


To finish tonight, I've got my first link from another web page. From the home of modular goodness, www.hotrak.com, comes this comment.
"Motorized Dandruff - Bills itself as “The worlds first (and so far ) only NZ 120 blog”, and covers the NZ120 scale and module scene in New Zealand."
Well, not quite so sure about the module scene. Must employ more staff to cover this area. On the blogs current budget, I'll be looking for a homeless guy who drinks meth's ( anyone out there who feels qualified can drop me a line)
Still, fame is fame I guess.

Monday, September 22, 2008

Long time coming

Most people would start a post like this with '...I've been busy at work.". Me, I just couldn't be stuffed. ( oh, and I've been busy at work.....)

While I've not been up to much, Long Island has been a hive of activity, with new and old models appearing in the last couple of weeks. First up, a steel 30' guards van.

This is plasticard on Bachmann bogies. The Nc and Mc are trackside 120 kits on peco chassis.
More recently (ie the last couple of days), this project from last century re-emerged into the light.

In Kiwibonds own words "An Atlas GP30 (the funny short ones with the 60’s humps on the cab roofs) with the metal sideframe halves dremeled out a bit will take kato SD40-2 bogies (the pre-2007 versions, with some plastic removed – available as spare parts from Kato). With one facing backwards, this is almost perfect wheelslocationwise for a DI.
Luckily, I have a half-arsed DI top that I prepared earlier. Probably 10 years earlier actually."

The second picture shows a bit more progress.

Tuesday, September 16, 2008

The other Midland line

Also tonight, some pics of Glenn Anthony's Midland line layout that he built after spending a weekend playing trains with us in Chrishchurch in 1995. Glen used converted N scale stuff, but his scenery and back scenes were something else.

A converted Minitrix loco hauls a train of converted Kato wagons across Staircase viaduct.

A pair of converted Ibertren locos roll across the big Kowai viaduct. The story is that Glen had the fantastic back scene painted by a female co-worker and paid her in tim-tams (a yummy chocolate biscuit in this country for the rest of the world)

The unacceptable face of NZ120


Found this tonight. Porirua 1994, and I could not resist posting it. Hanger on keith Archibald and Kiwibonds himself seriously playing trains. Its also a really good photo of the Otaki back scene that he painted, which is really good. Also note the DXR in the foreground with the 20-and-counting total train. Unfortunately the green dinosaur is missing..

Saturday, September 13, 2008

Layout ideas.

I've been looking at the pictures at http://www.kiwibonds.com/ taken around Dunedin in the 1980's. As this was where I got my start in NZ120 ( and my family is from around the are) I've always had a soft spot for the railways of the area. So, I've come up with an idea to model an interesting part of it that has not been done before. I've based the layout on the line between Dunedin and Port Chalmers where it runs beside (and across bits of)the Otago harbour.

It's a bit minimalist in terms of point work etc, but the main aim is to run trains (which I suppose is then a signature design feature of all my layout designs). The blanket bay section would run down one wall, and be about 3' deep, with the track across the causeway 12" back from the front of the layout. the Roseneath tunnel is very useful, as the layout can either be linear, or bent at right angles here to fit in a room. the line runs through sawyers bay, and then either runs up the hill on the SIMT, or into another tunnel to port Chalmers. If there was more space then port Chalmers could be modeled to have an area for shunting on the layout. The real beauty of this scene is that it has not really changed since the 1960's, and therefore is completely flexible in terms of rolling stock, from Ab's and Ja's ( and possibly even Wab's from the 30's) through the Dg/Di/Dj era of the 1980's to the Dx/dc combination of the modern age. I do wish I was a better artist sometimes to do these ideas justice, as I have a fully developed picture in my mind of how it should look.

Thursday, September 11, 2008

Guest spot: David Weedon

Sent in today, and I had to share this before I head off to the monthly meeting/support group. Davids work is reasonably well known on the NZ120 yahoo group, but not much outside that. his layout is a lovely looking model that I would like to visit in the flesh. David has sent in these pictures, and this description as well.

Working Coal Bins

These bins are loosely based on a plan in the Journal
I made the bins from scribed styrene sheet.
The roof is Campbell Products corrugated roofing
There are lights in the office, the upper area and beside the discharge point.

The top comes off so imitation coal can be dropped in.
The power connection is to enable the unit to easily be removed from the layout.

Here is the hopper which lifts out of the bins.
You have to make sure coal will flow down the interior corner valley angles
The motor has a worm and wheel drive from Jaycar.
The screw conveyor body is brass with the internal auger made from an old auger drill bit.
I turned the ends down to fit some brass bushes and made the auger OD match the inside of the brass tube.
It makes a lovely noise as the coal goes through.
It takes about 10 seconds to fill a wagon

Here are the bins in position on the layout with the Y class shunting some bog cast Lc wagons running on peco chassis.
There is a hole between the rails to let any overflow coal go into a plastic container under the layout.
One day I will install a miniature camera so I can easily see when a wagon is full.

I'm impressed by this. I would never have thought of building a loading working coal facility. More pictures gents please.

Wednesday, September 10, 2008

“Realistic scenery with realistic prototypes at a realistic cost”.

I can't resist to comment on the back and forward on the list in the last few days. There's large questions about how to grow the scale. Again it always comes back to cost. Since I'm going through the process at the moment, lets do the numbers.
1 pr of wheels, N scale metal UK1.60 = NZ4.20 at this evening's exchange rate. 1 pr microtrains couplers at US$2.50 = 3.70. So the fixed costs are NZ$7.90 before we add anything. lest say that the total cost of a 4 wheeled wagon chassis is $10. If you are selling them through shops, once you add the %50 you can see we get to $20, just for the chassis. Now, you can avoid selling to shops, but where do you place the benchmark for breaking even by selling X units.
Its just as well I'm going to make models for me isn't it ;v)

Tuesday, September 09, 2008

The resin years

In the 90'2 I did all of my casting in resin, even for bits that I shouldn't have. I didn't know any better (and now that I do, I'm still not sure I'd do anything differently).
Kiwibonds has come up with some pictures of some of the resin casting that I did back in the dark ages.

From left to right (I'll get it right this time), a mk3 resin Dc top, an Etchcetera Dc, and a DBR made from resin Dc bits.

Can you tell the difference from 2'?

Kiwibonds has sent some closeup pictures of the DBR, which is a nice little model, while also pointing out all the flaws in my casting and master/mould making skills.
The description reads 'Hood was cut it in half to remove a pair of engine room hood doors, new exhaust stack cover, replaced the cab with a paper one PVA’d onto clear plastic from a shirt box. Chassis was new made of styrene including the high heels for the cab and nose.'I'll point out that any flaws are down to my casting rather than anything else.


'Honestly officer, I haven't been drinking, my nose always looks like this...'


(I'd like to thank Kiwibonds at this point for giving me stuff to write about while I'm busy at work sorting out stuff to file some patents. Nothing earth shattering just giving the start up company I work for a leg up into the industry. Hopefully I'll get back to some real modeling next week after this madness has finished.)

Sunday, September 07, 2008

Oh the horror

Found by amateur fettler (having seen his house I'm not quite sure how) during a hunt for something else (possibly his children).


T-square, who needs a T-square?

This appears to be a Mk1 version of a 2' models resin Dc top. This was from memory the first crack I had at a master and mould for a locomotive top. I also seem to recall selling a few. It's a one piece casting from a 2 part mould. Note the notches in the sideframes to fit the handrails in. the windows were just painted black. The numbers on the cab were letraset, and the writing on the side was printed out on a laser printer as a strip, glued to the side and them the colours were blocked in. Not sure if it would be good enough for anyone else, but in 1992 it was state of the casting art. having said that, all the major detail is there, even a radio aerial on the cab roof.
(So, how can your modeling be worse, send those pictures in otherwise I'll have to let the resident nutters out again;v)

Saturday, September 06, 2008

Saturday morning guest spot

Courtesy of Kiwibonds we have this mornings post. As with any post the views here are not the views of the blogs owners unless they coincide with the views of the blogs owner in which case they are said views. Again thank you for your attention.

Did Trackside 120 move the scale to the next level or deflate the hopes of a new generation?

Pate Eade’s Trackside 120 kits broke new ground and elevated the scale to new heights. Suddenly we had a sprawling range of wagons available! Suddenly we were as good as Sn3½, with a broad range of quality whitemetal kits. Wagons, carriages, locos, accessories! Alas, the week I received three hundred dollars worth of trackside kits marked the the end of my NZ120 experience. The DFT was a disappointment for some detail challenges but it was the wagon chassis that killed it for me.

Today, half a dozen years later while assembling some Trackside LPAs and NCs I remember why. Nice wheels, but in bendy whitemetal holes? Squeaks! Friction! How about some bearings then (not included). I had some from the UK 2mm scale assn so put in high hats. OK, now the solebars are way two far apart and they won’t even fit on the floor. How about some cup bearings? OK, closer but still looks weird, Could try drilling deeper holes… but then, is this really worth the effort? I thought we were shelling out money for kits to make things easier…How about no bearings then, squeaking and friction be damned? Great, now without bearings, the wheel rims rub on the solebar inners which are for some reason thicker than the hornblock containing the axleholes. How about angling them? Nope, wheels pop out when a smidge of weight applied to the top. Maybe file them down for more clearance… ok, now they are all bent. Jam them in, superglue them cos I can’t solder, break them apart try again to get them straight. I couldn’t even make a flat square 4w chassis in S...

arrrgh!.

OK, it’s finally sitting flat, now apply some ends and …now the chassis is too long for the NC sides!!! I guess I was supposed to cut the solebars shorter but have long lost the instructions. As if boys read instructions anyway. Is this a kitset? God I hate those couplers. And the bogie centers! Several feet further in than they should be to clear the couplers. And you can’t move them easily outboard because the bolsters are cast in. And can I live with flexy whitemetal bogies with no bearings? Arrrgh!

resin vs trackside on peco vs trackside too long

The tops are really nice though, loads of detail in nice, thin, crisp castings. My solution: bin the chassis and put the tops on Peco 4 wheeler or microtrains bogies. I can mod a peco in less than a minute, and its bulletproof. For the NC, that means basically after spending all that money, I’m keeping the two wee ends and doing the rest in plastic.

mod a peco

I’m no Robin Knight, but I’m hardly the lowest common denominator either. I wonder how many others thought “great! finally a quick and easy way for a non-scratchbuilder to get into the scale properly” …only to end up disillusioned.

I hope the next kit makers will learn from my experiences. NZ120 may attract fine modelers, but it will never be the scale of choice for finescalers. To make the scale more accessible, you have to make it easy. Decent tops on modded Pecos or Microtrains are fine thanks.

Friday, September 05, 2008

Friday night shot


Ive just been over at www.kiwibonds.com, and maybe it's the beer, but I've picked out a shot I really like.
Back from the 80's (big hair, velvet boots, shoulder pads, and then there was women's clothes)here's another shot from the Ken Devlin collection. There's just something about this age, and this photo is a good example. A rebuilt and unrebuilt Dg head a train of scarp metal ( how apt) north from Sawyers bay. A pink Dj heads the Port Chalmers shunt back towards Dunedin. Even the 30' steel vans as well. All the trains in this picture are from a bygone age. From a modelers point of view the 80's are just as valid as the 60's as a modeling period, as there was a major changeover again from the first generation diesel loco's to the more modern Dc's, Df's (now also gone) and Dx's. I remember carrying a paint chip from a rebuilt Dg (2111 I think from memory) for years.
for more pictures if you have not already looked http://www.kiwibonds.com/KenDevlin/KenDevlin.html
(thanks to Darryl for making these available. They are true modeling gold)

Friday Night Live

Marooned on the workbench, my first steam loco in a long while. I put the coal bunker together for my Ja, and while its the correct size, it doesn't seem to work with the boiler, which is also the correct size.

It seems that I've run into one of those times where I need to toss out the plan and just build something that looks right. I've still got problems in that I cannot work out how to build the front end with the compressor covers.
The main problem i have with a project like this is that sometimes I can't move forward until I have thought out the problem I'm trying to solve. I think I'll just have to force myself to have a go at building something, and worry about getting it right later.

Thursday, September 04, 2008

Its about time...

...Someone sent me in a picture of their modeling. And the first prize goes to ECMT for this.
'My version of an F plough van ( or how to butcher an innocent resin kit ). No, don't be fooled by the deceptive appearances - this ISN'T an RP model. The basis is a Cross Creek 30 ft F van. These don't come with a roof, couplers, or bogies. I added bits of styrene for the plough, a piece of rimu half round moulding for the roof, bits of wire from a wire brush for handrails. I would have used the brush wire for the verandah railings, but it's a sod to solder, so I used brass wire instead. Not as fine but ok. The other bits added were from one of Pat Eade's F kits - bogies, roof ventilators, steps and couplers. The only thing left to do - get a decal set made for the doors. What would I do differently ? Don't try and be clever and make the handrails stand out from the model. I tried that on the main doors, didn't like it and just CA'ed the others directly on. I have 2 done, 2 more to do to create a short work train of 1 F, 2 Yc's, and 1 Nc.'

Oh, and sorry theres no prize. :v)

Wednesday, September 03, 2008

Heresy I say!

The morning E-mail session has been interesting today. The back and forward has centered around the recent discussions (again) on the NZ120 list, and around the whole RP thing. Basically I think it boils down to a series of factions.
-The experienced/old hands, who have a good/excellent grasp of what it takes to make and sell kits (not necessarily in NZ120).
-The up and comers (and I'll lump idealists in here as well), who seem to quite happily propose grad schemes abut how the future should look, and the cost gets fudged a bit to make it all seen better.
-The rest, who would just like to see someone making models for sale again.

It appears another faction may have congealed this morning. A level of dismay about the estimated cost of the whole RPing process (and the fact that despite the months of discussions, we still have yet to see anything) has lead to some interesting questions being asked, and a possible step back to the good old days.
The smart money at the moment is that a RPed 4 wheeled wagon with couplers etc will set the average Joe back about NZ$20-25. Now this is fine for those of us that want a small shunting layout made popular by the English who seem to be quite happy living in shoe boxes, but if one wants to model a set of 20-25 La's (like the 'stone train' from Otago in the 1980's) it will set you back NZ$400-600. That's a fair chunk of change even for the jet set train photographers from Long Island. Now this contrasts with the good old days where dinosaurs roamed Otaki and wagons were mass produced in basements all over Dunedin and Wellington. I'm informed that peco wagon chassis are NZ$5-7 each (I'd love to know where). For a long rake of wagons that's going to run as a set, the bulky rapido couplers can be glued and modified, and all that's needed are some decent couplers at each end of the set. Now the PECO underframe is not perfect for NZR, but by golly its close enough from 2'. To finish up a cheap top that might not have all the rivets but does look the part, and add in some rudimentary brake gear and you get something like this, for maybe 1/2 the price.
All With cheap resin cast tops by yours truely.


From a mould by the late John Rappard

Not that its not going to be good enough for some, but the rest of us....
(And that was really what the scale was about in the 80's trains dwarfed by the scenery, not as teh main focus of the whole thing. If you are keen on that, then go check out 9mm)
Here's your big chance to actually leave some comments about what the unwashed masses think (well and the washed ones too I suppose). also don't forget I'm still waiting for anyone to send in photo's of their NZ120 models.

I'm carefully locking the doors tonight, as I'm now awaiting a visit from the fine scale inquisition. Slow torture by being forced to make scale sized rivets at the correct scale on a large sheet of brass. Thumbs slowly crushed by micrometers. Maybe even dipped into a vat of low melt solder. hell may well be like that. I just hope that they serve beer.

Monday, September 01, 2008

Another bit of history

Found in a second hand book shop that was closing down. One of only 2 books written in New Zealand about model railway modeling, Steam in Miniature for the princely sum of $6(I did not believe what the prices are like on amazon). The book is about Frank Roberts, the first modeler of new Zealand railways. some of his work with primitive tools is just incredible. For his first loco, a 2 1/2' gauge model of Wa 288, he made a hacksaw from an old table knife by filing the points into the edge. makes a dremel seem almost cheating. One wonders what the old timers would have done with the modern implements that we take for granted. He built a collection of 20 loco's over the course of 20 years. Most are currently on display in Te Papa
(Oh, and the other book is 'little trains of thought' by Merv Smith. I have not counted plan books in this total)